When you click on links to various merchants on this site and make a purchase, this can result in this site earning a commission. Affiliate programs and affiliations include, but are not limited to, the eBay Partner Network.
Reviving an old thread, but looking to test a spare instrument cluster. Can anyone give any DIY to remove the cluster, please? There could be a possibility of swapping the LED's on this spare cluster as a test. If not a simple DIY to swap, can anyone specify how to bench test this cluster? I want to get the odo reading off of it? Any help is appreciated. There are 22 pins on the connector. I'm sure it's a combination of powering and grounding some pins. Thanks in advance.
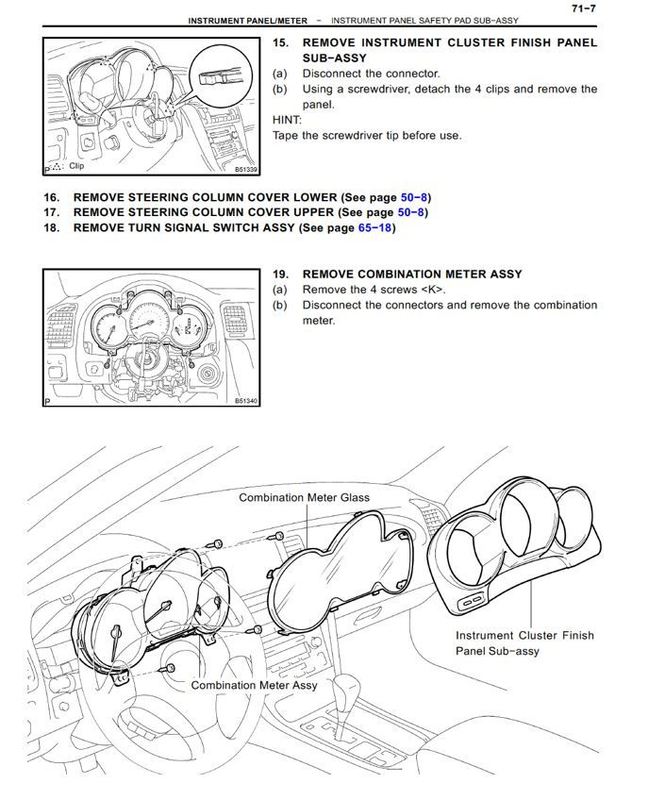
Mandy, thanks for the info! Could you supply the first few pages of this service manual. I guess I will need to remove the steering wheel to do so, and I want to make sure I don't destroy anything. Thanks.
No you do not need to. Just get it away from the front, drop it and pull it in. That's what I did.
I removed the Cluster Unit and taped the bulb that stayed on because of the LED tail. And just put them back.
Can anyone link the thread with the cluster taken apart so I can see where to tape? I have my cluster out at this very moment and don't know how to seperate the board from the housing and don't want to wreck the gauges by pulling out the back plate, if not necessary. Any help ASAP is greatly appreciated.
You should be able to gingerly bend out the front flexible black plastic facing just enough to see the led diodes underneath the facing and put some black tape over the led in question. You will have to reconnect the cluster momentarily to locate the specific led to tape over. The first few pages of the owner's manual has a cluster graphic that shows each light and its meaning. You may be able to use that as a guide for positioning. Pick the light, tape it and then reconnect cluster and place it back in position (no screws). Turn car on to test to verify if you taped correct light.
Just an update, Been really busy with travelling and studying but here's the pictures I promised I would post. There is no need to remove the screws from the back side (as I did preemptively). All that is needed is to remove the plastic tab clips that hold the front clear shield in place. Then use a toothpick, as I did, to pry up the black plastic and place your black tape over the LED. I packed a small piece of black foam under the tape, just for double measure. Additionally, I found a thread that has the information I was looking for at this very moment. Post 52 and 53. https://www.clublexus.com/forums/sc4...upgrade-4.html
Man, the pictures, blast from the past! I bought the SC late DEC 2010. 6 years going to 7 now. I still do not get tired of looking at it and cleaning it, let alone driving it.
Running out of small mods though. The last one was the DRL's, shutting down the fugly orange DRLs and using thin strips LED's as DRL's.
 11-10-13, 05:39 AM