
How do you tighten the seat nets?
 05-14-09, 02:08 AM
#46
Pit Crew
iTrader: (6)

Join Date: Dec 2008
Location: SoCal
Posts: 191
Likes: 0
Received 0 Likes
on
0 Posts
i just took a knife popped off one of the sides on the top (left or right dosent matter) and the string just has a knott holding it. i cut the string to how ever short and made a new knot. stuck it back behind the frame and pushed it back into the seat.
 05-14-09, 03:37 AM
#47
Lexus Test Driver
Just take up the slack, and then tie a small loop knot. I did it on both of my nets, and they look great.
You could also buy one of those little spring loaded things that they use on sleeping bag covers to keep the string tight. It basically has a button on one side, and then you slip the string through it. When you release the button, it clamps down on the string, and doesn't allow it to move until you push the button again. I bet you could buy these things for less than a buck from any camping store.
You could also buy one of those little spring loaded things that they use on sleeping bag covers to keep the string tight. It basically has a button on one side, and then you slip the string through it. When you release the button, it clamps down on the string, and doesn't allow it to move until you push the button again. I bet you could buy these things for less than a buck from any camping store.
 05-14-09, 06:16 AM
#48
Lexus Test Driver
I think a more permanent fix would be to replace the elastic string at the top of the net, you dont have to use something elastic to replace it either if you just want it there for looks. I think i will do this even though my nets hardly sag, but replace the string at the top.
07-07-12, 01:32 AM
#49
...Or you can just pull the top string taught, and add a color-matching toggle, from a tan hoodie/jacket.
If it's discrete in size, it'll look tasteful, like it was stock.
Much less work if you just don't have the time; (although this is well done, I like it).
If it's discrete in size, it'll look tasteful, like it was stock.
Much less work if you just don't have the time; (although this is well done, I like it).
 03-03-13, 05:33 PM
#51
Driver School Candidate

Join Date: Aug 2012
Location: NC
Posts: 2
Likes: 0
Received 0 Likes
on
0 Posts
Followed Ryan's great instructions, got seat back off (93 sc300) only to find that the trim piece holding the netting has plastic posts extending through seat back held by thin slide on metal locking washers and not screws so could not be removed for net tightening. Looked like if I remove the washers I will damage posts. Not sure what year they converted to screws. Anyone found this and have a suggestion?
 05-08-15, 06:22 AM
#53
Driver School Candidate

Join Date: Dec 2009
Location: mi
Posts: 35
Likes: 0
Received 0 Likes
on
0 Posts
I made this repair yesterday in my 95 sc and wanted to add my experence...
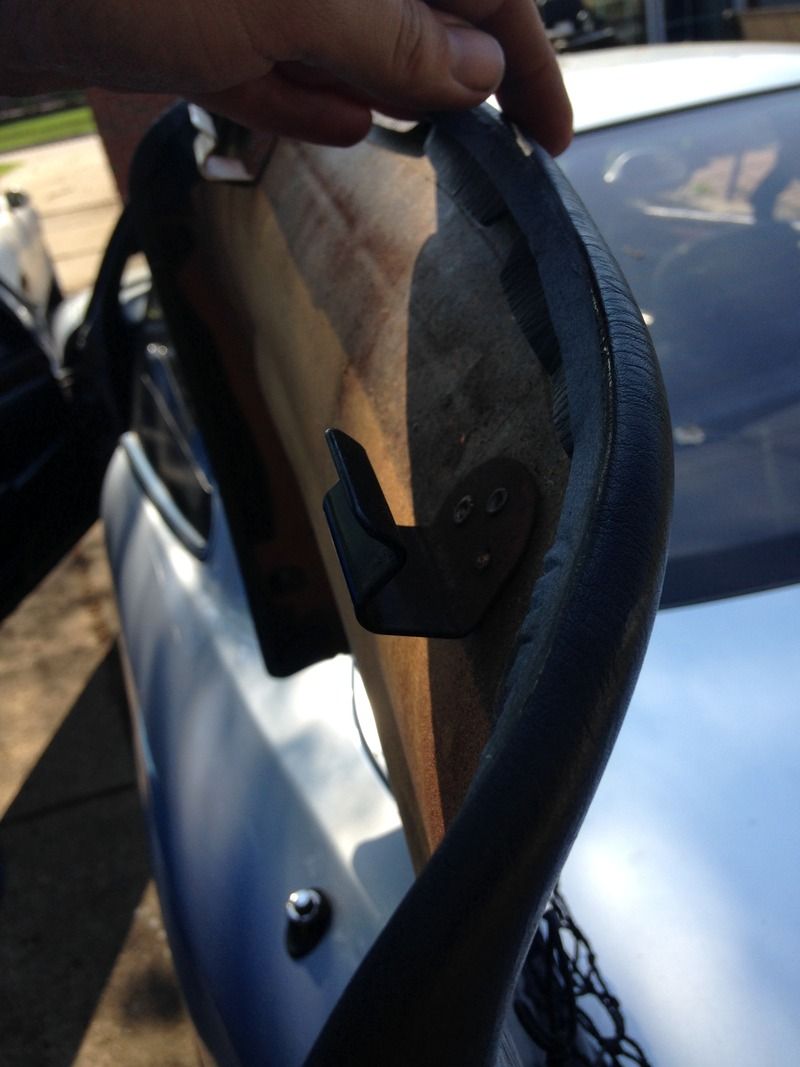
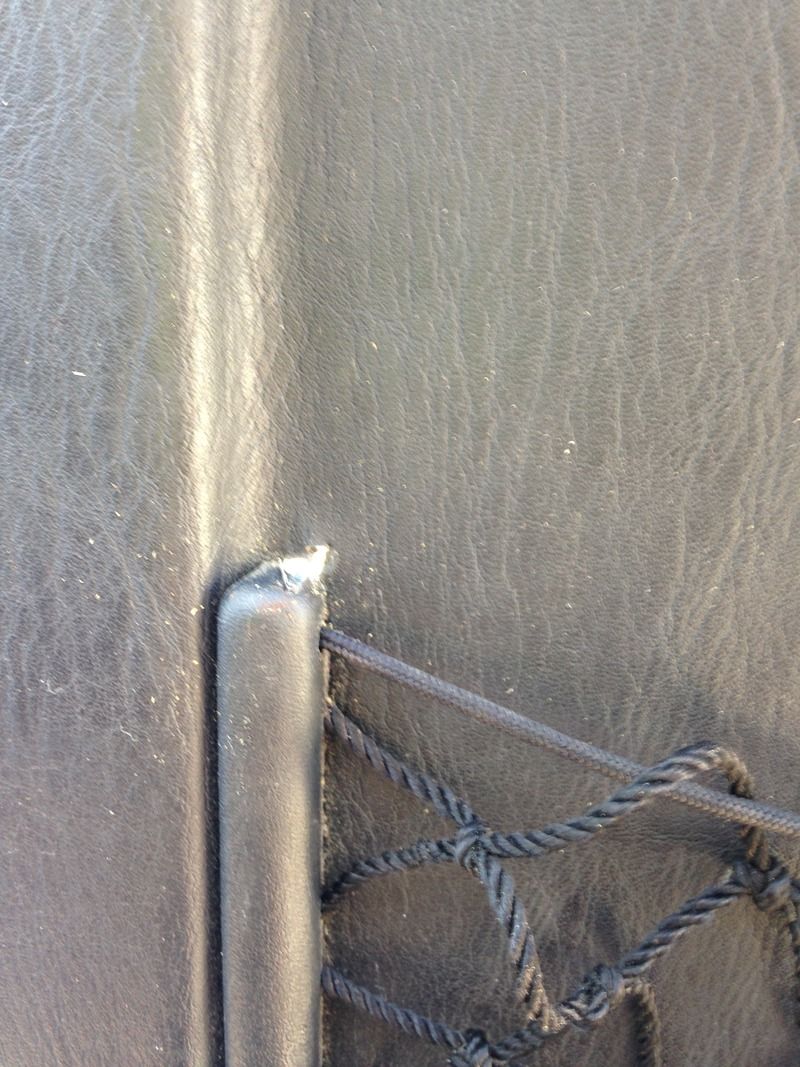
The side clips discriptions were a little vague so here is a picture of them
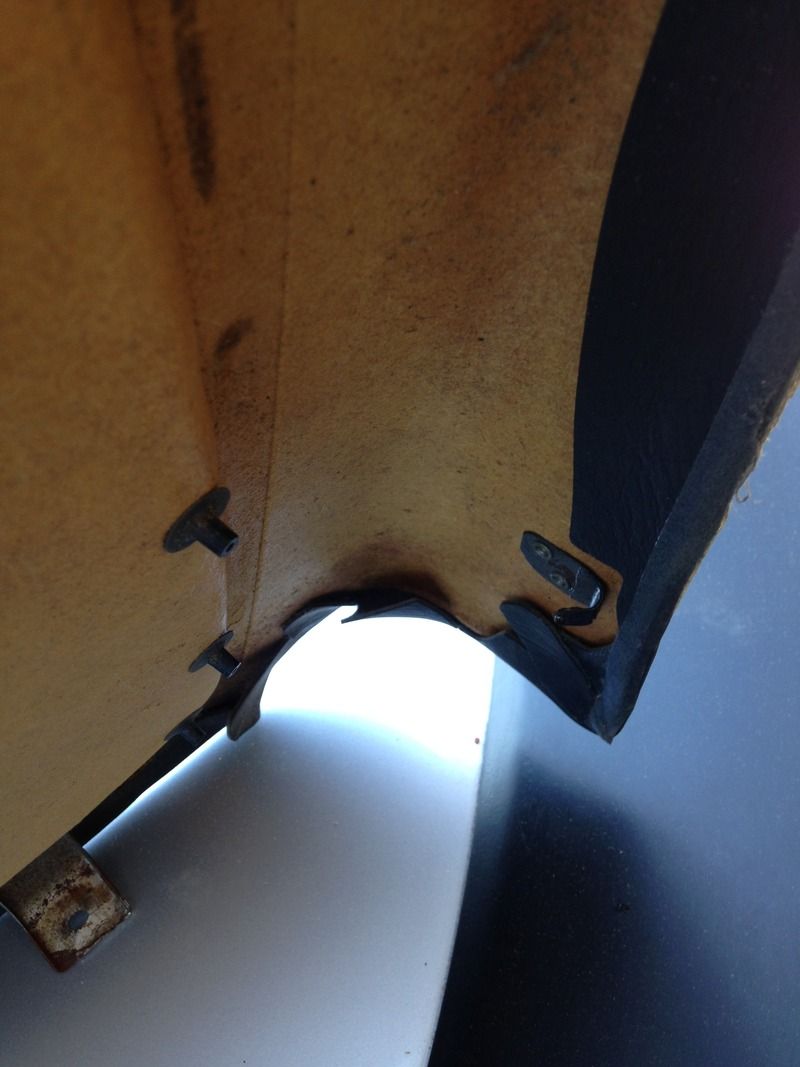
To diss lodge them after you remove the two screws you need to push in on the seat back and pull the sides where the back wraps around the seat either towards the center console or door (depending on the side you are working on).
The next issue I had was the clips holding the top of the panel to the seat
After 20 years of being in place they didn't want to let go, but with some wiggling side to side while pulling down on the panel they finaly let loose.
The last obstical I had was my seat has the retainer clips not screws...
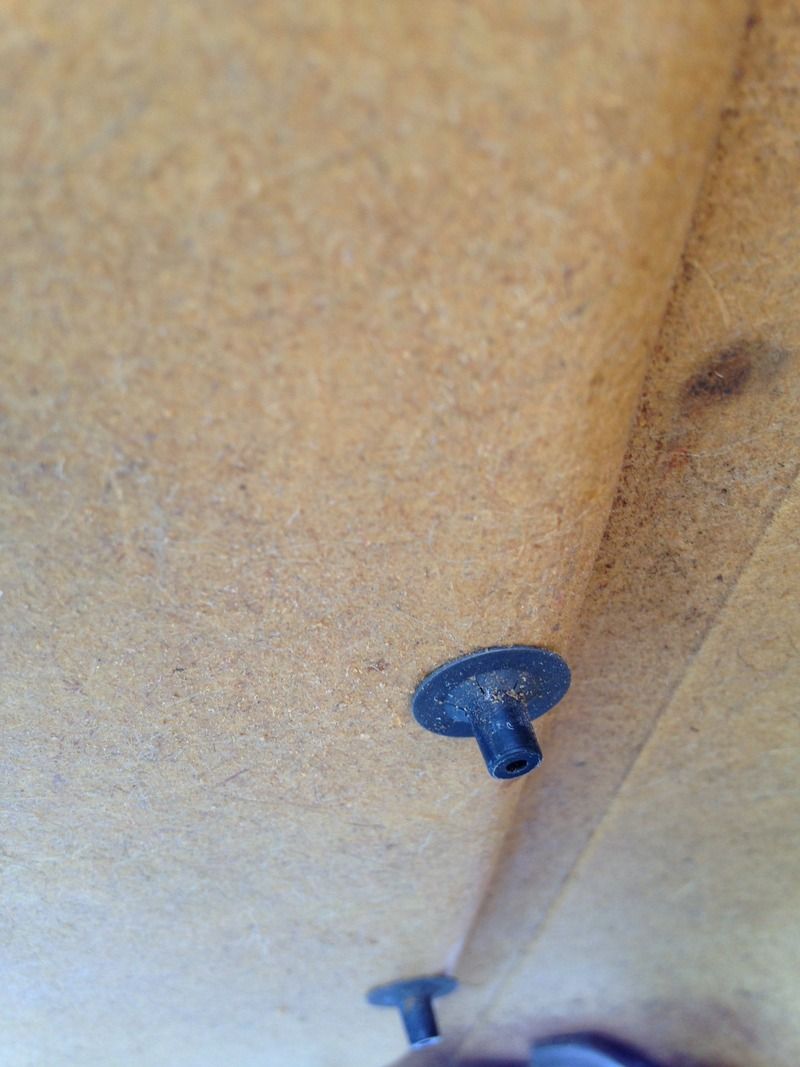
Here is where I got a bit clever...
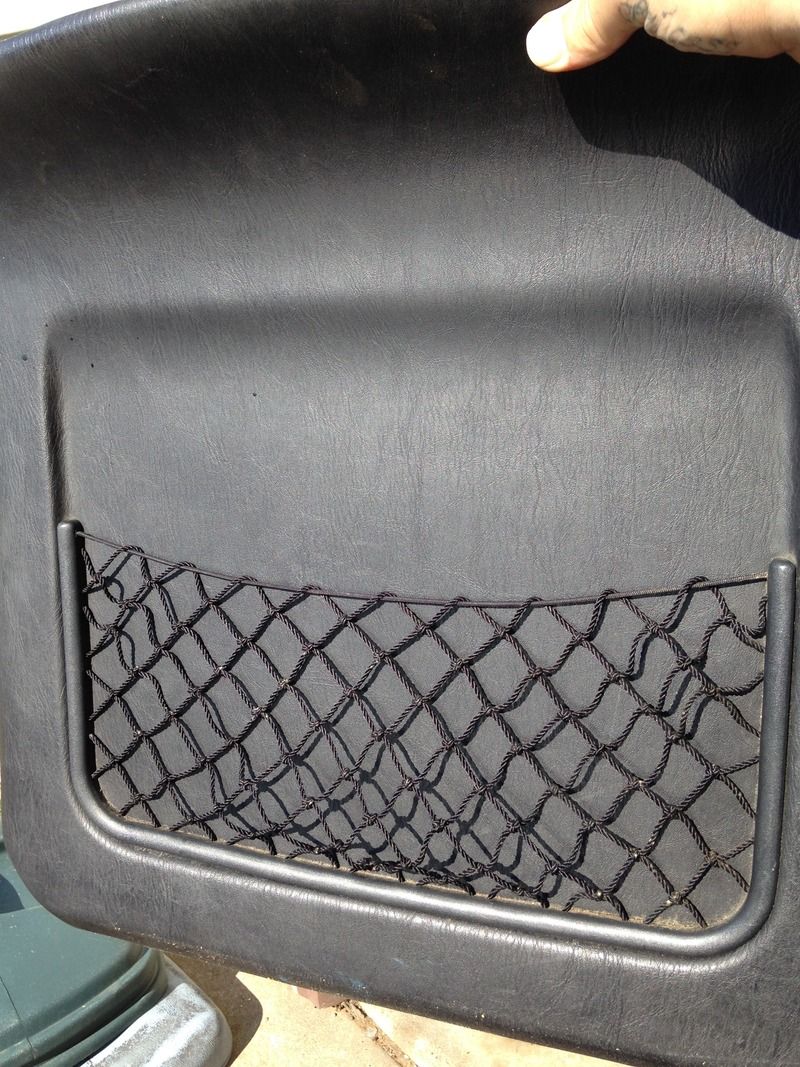
Instead of going through the time and hassle of taking the clips off and potentially breaking the studs I used a drill that was about half the width of the plastic and drill through the seat back In a few locations then fished the string out using a small screwdriver
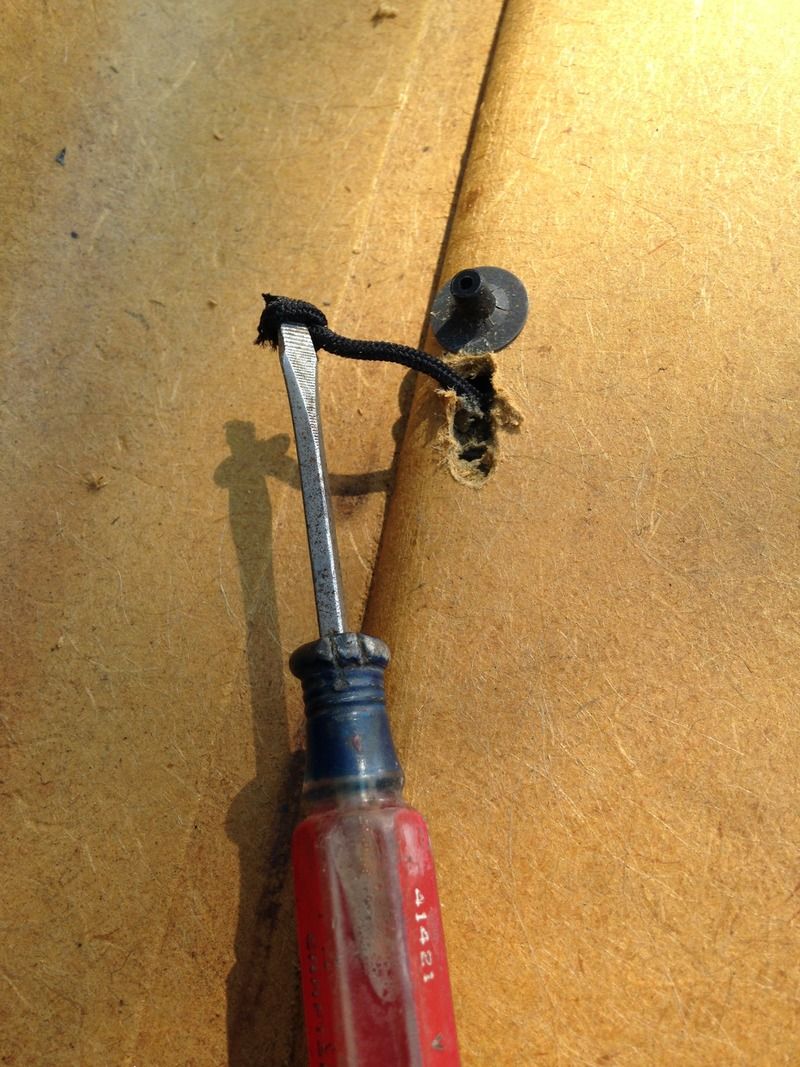
I have to admit my first go at it was a bit off the mark
The other side I only drilled two holes just above the top stud and that was plenty to dig the knot out
Results are amazing for 30min worth of work
The side clips discriptions were a little vague so here is a picture of them

To diss lodge them after you remove the two screws you need to push in on the seat back and pull the sides where the back wraps around the seat either towards the center console or door (depending on the side you are working on).
The next issue I had was the clips holding the top of the panel to the seat

After 20 years of being in place they didn't want to let go, but with some wiggling side to side while pulling down on the panel they finaly let loose.
The last obstical I had was my seat has the retainer clips not screws...

Here is where I got a bit clever...
Instead of going through the time and hassle of taking the clips off and potentially breaking the studs I used a drill that was about half the width of the plastic and drill through the seat back In a few locations then fished the string out using a small screwdriver

I have to admit my first go at it was a bit off the mark

The other side I only drilled two holes just above the top stud and that was plenty to dig the knot out
Results are amazing for 30min worth of work
 05-08-15, 07:38 AM
#54
Impressively ambitious, but my solution required less than 30 seconds worth of work.  I used lace locks to pull up the slack on each net, making it easy to tighten or loosen it as needed. For example, I later decided the pass. net would be the perfect storage for a fold-out sunshade, but that requires more slack in the net. A fraction of a second later, done!
I used lace locks to pull up the slack on each net, making it easy to tighten or loosen it as needed. For example, I later decided the pass. net would be the perfect storage for a fold-out sunshade, but that requires more slack in the net. A fraction of a second later, done!
05-08-15, 07:50 AM
#55

https://www.clublexus.com/forums/sc-...e-of-cake.html
Here is my DIY thread on this. Also, no SC's came with "screws" holding those on, just pressure tabs.
Here is my DIY thread on this. Also, no SC's came with "screws" holding those on, just pressure tabs.
05-08-15, 08:19 AM
#56
Driver School Candidate
iTrader: (1)

Join Date: Jan 2015
Location: NC
Posts: 29
Likes: 0
Received 0 Likes
on
0 Posts
This repair takes all of ten minutes from beginning to Wow! That looks Good!
Several replies tell you how to remove the back of the seat and how the mesh frame is connected. I used a small putty knife to gently pry the slip washers off the plastic posts at the back. Slowly working each post levering the washer in different places till I could lift it off. The rest was easy. Did I say it took just ten minutes?
Several replies tell you how to remove the back of the seat and how the mesh frame is connected. I used a small putty knife to gently pry the slip washers off the plastic posts at the back. Slowly working each post levering the washer in different places till I could lift it off. The rest was easy. Did I say it took just ten minutes?
05-09-15, 05:16 AM
#57
Driver School Candidate
Join Date: Dec 2009
Location: mi
Posts: 35
Likes: 0
Received 0 Likes
on
0 Posts
Clearly wasn't out to set any speed records and there are plenty of solutions to the issue. This was the thread linked to on the DIY mega thread so that is why I chose to update it with some of the details I felt were vague. I like the drill method becaus you don't run the risk of breaking the plastic posts (I never have luck with those stupid retainers) yes instead you run the risk of "missing".
After doing this repair I started thinking it over and dont like the fact that there is no "give" to the strings. Next time I'm in the local junkyard I'll scavenge one of those cargo nets you find in the trunks of some cars and canabolize the bunji string from it.
After doing this repair I started thinking it over and dont like the fact that there is no "give" to the strings. Next time I'm in the local junkyard I'll scavenge one of those cargo nets you find in the trunks of some cars and canabolize the bunji string from it.

Thread
Thread Starter
Forum
Replies
Last Post