
Another Limited Slip Diff Installed...
 11-25-06, 12:10 PM
#1
Rookie
Thread Starter
iTrader: (2)

Join Date: Mar 2006
Location: CT
Posts: 69
Likes: 0
Received 0 Likes
on
0 Posts
I took the less expensive (< $350, including 6-pack Bud Lite), but more difficult route. That is, I swapped the Supra differential guts for the Lexus diff guts. I didn't want to spend an excessive amount for an entire Supra diff housing assembly (> $900), so I did some research and found a posting by 'bmanson' that led me to believe that the guts of the diff's were interchangeable. I compared a few internal Toyota and Lexus part numbers and found them the same (Side Gear Shaft and Bearings), so I acquired a used Supra diff carrier, minus the ring gear, and completed the swap. The side benefit to changing out only the carrier is that the stock Lexus differential gearing is retained.
I have to say that the carrier change-out was the most challenging. Luckily I had access to an arbor press for installing new bearings and seals. I didn't have a big enough bench vise to securely hold the carrier when trying to remove or install the ring gear, so I visited a local garage and begged for help. They used their impact gun and had it apart in three minutes. Plan ahead and order ten new ring gear bolts because they're not reusable (they're torqued to 47 ft*lbs, then another 60 to 90 degrees) which leads me to believe they're yielded in the torquing process. Again, I visited the garage for them to torque the bolts the additional 90 degrees. This is what cost me a 6-pack of Bud Lite.
I had been sweating the carrier installation process and dialing-in the contact pattern. I reasoned that the pinion gear shim wouldn't need to change because the distance between the pinion gear and the axle centerline hadn't changed (remember I reused the same diff housing). At most I would have had to adjust the Differential Carrier Retainer shims. I must be living life right because the gear contact pattern looked fine using my standard shims.
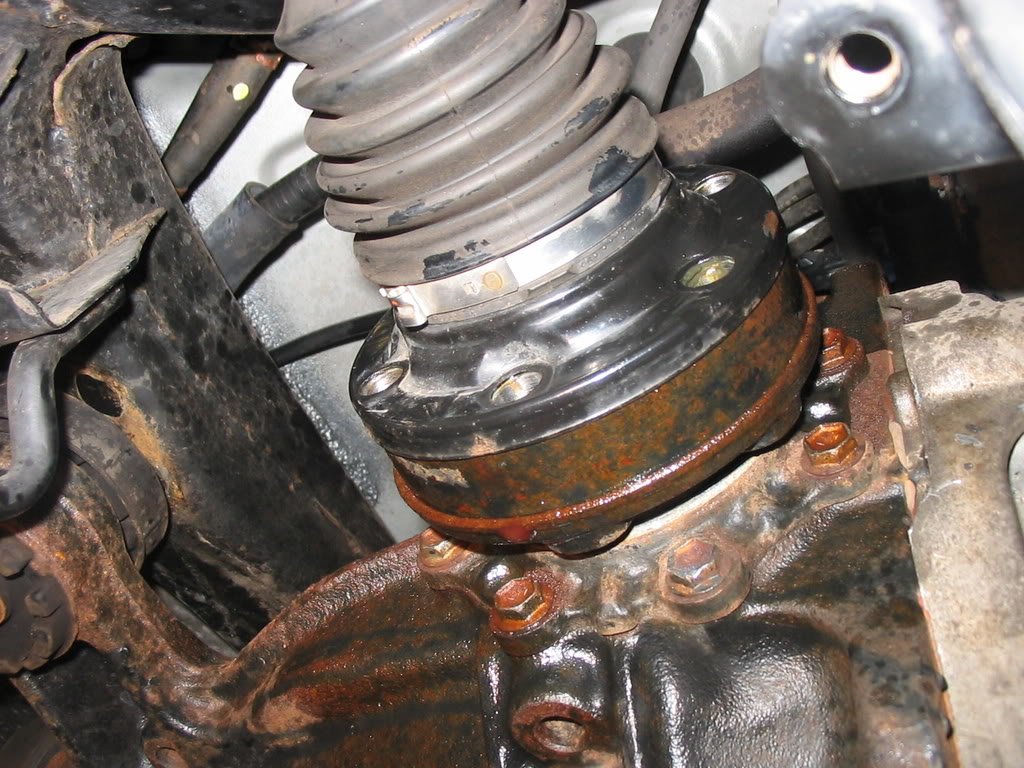
I think the biggest challenge of the process was trying to get the axle joints at the differential to separate. There was some corrosion at this joint and it made the job difficult. Anyone attempting to drop his or her diff is advised to feed the inboard axle joint some good quality penetrating oil a few days prior to disassembly. I didn't even have to remove the exhaust system, just let the rear end off the six rubber hangars.
Yesterday I was horsing around with the Lexus after it had rained to see how the traction control (TC) would behave with the LSD. It seems that the TC doesn't kick-in until there's a slight bit of sideways rotation of the rear end. I'll have to play around again to fully figure-out how it's going to work. Overall, I think this was a very worthwhile project. It's nice to finally have a V8 that will leave twin stripes down the street.
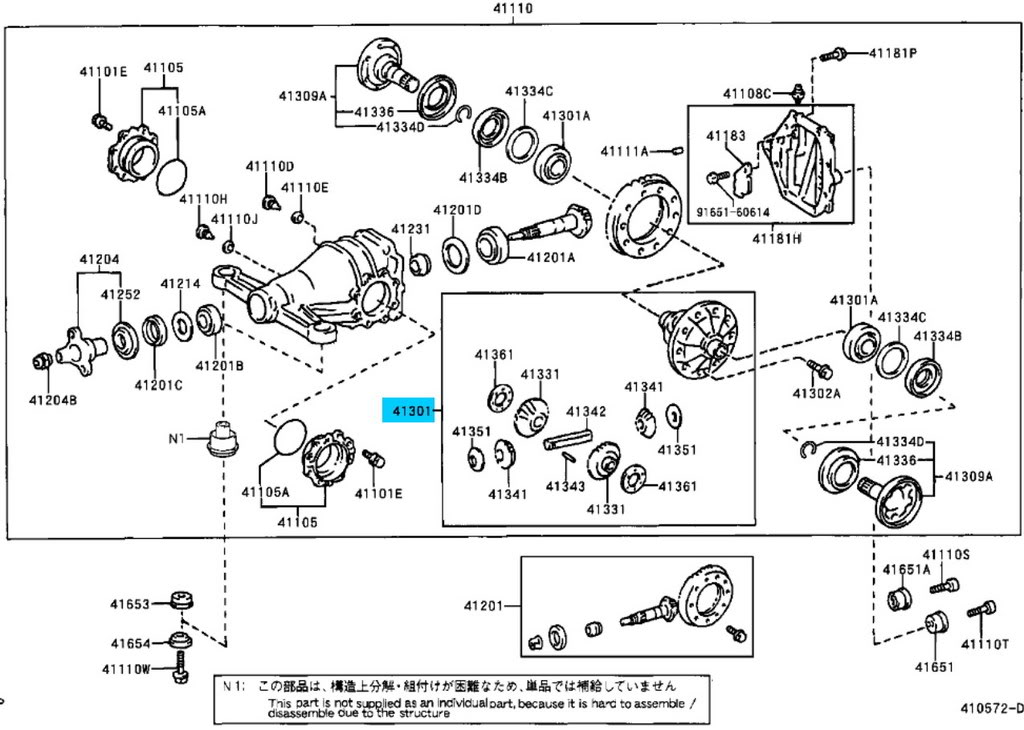
Here�s the list of the new parts I purchased to complete the project:
REF NO, P/N, DESC, PRICE
41105A, 90301-96003, O RING, $4.00 EACH
41336, 41336-24020, DUST COVER, $7.00 EACH
41334D, 90521-34003, SNAP RING, $2.00 EACH
41334B, 90311-47008, SEAL, $15.00 EACH
41301A, 90366-50033, BEARING, $40.00 EACH
41302A, 90105-12219, BOLT, $?
Here are the approximate steps to complete the project (use common sense and good mechanical judgment):
1) Block front wheels, elevate rear of car and support under lower suspension arms using jack stands positioned as far outboard as possible. Having the wheels free to rotate will make the job easier.
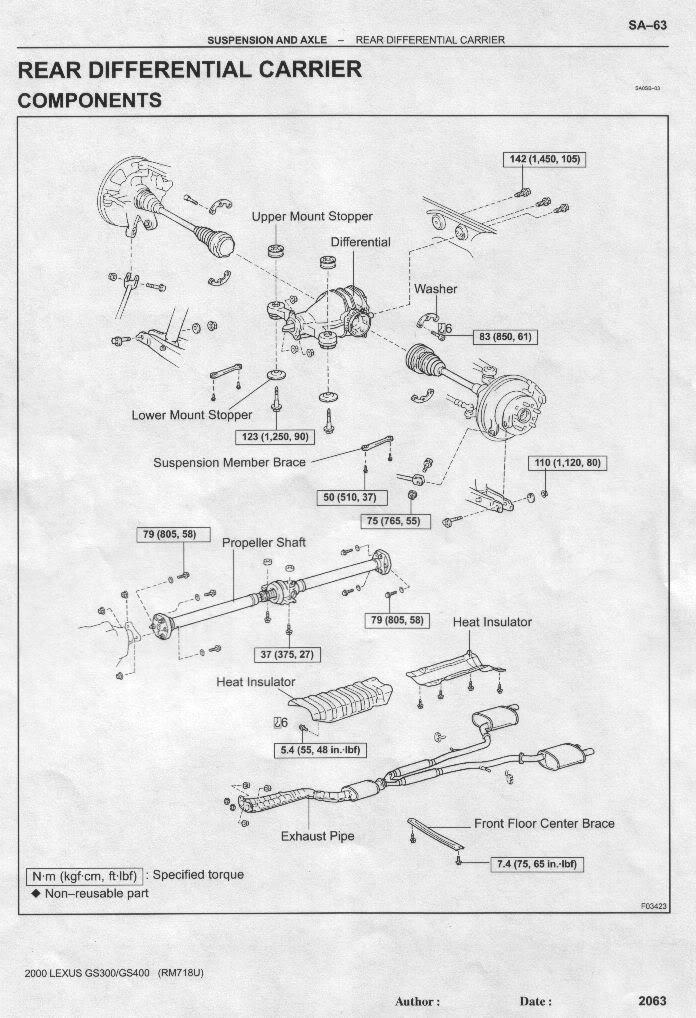
2) Lower the exhaust system. Remove Front Floor Center Brace and remove six rubber hangars allowing exhaust system to swing down and provide clearance. Support the exhaust system to prevent damage from excessive deflection. Remove Heat Insulator from under rear of Propeller Shaft.
3) Remove axles from Differential. Remove six bolts from each side. You may find it necessary/easier to remove the two Suspension Member Braces.
4) Disconnect Differential from Propeller Shaft by removing three bolts.
5) Remove Differential from chassis by removing five bolts. Warning: the Differential is HEAVY, so use a floor jack to support it. You may also find it helpful to remove the two rear Sway Bar brackets so that the Sway Bar will rotate down out of the way.
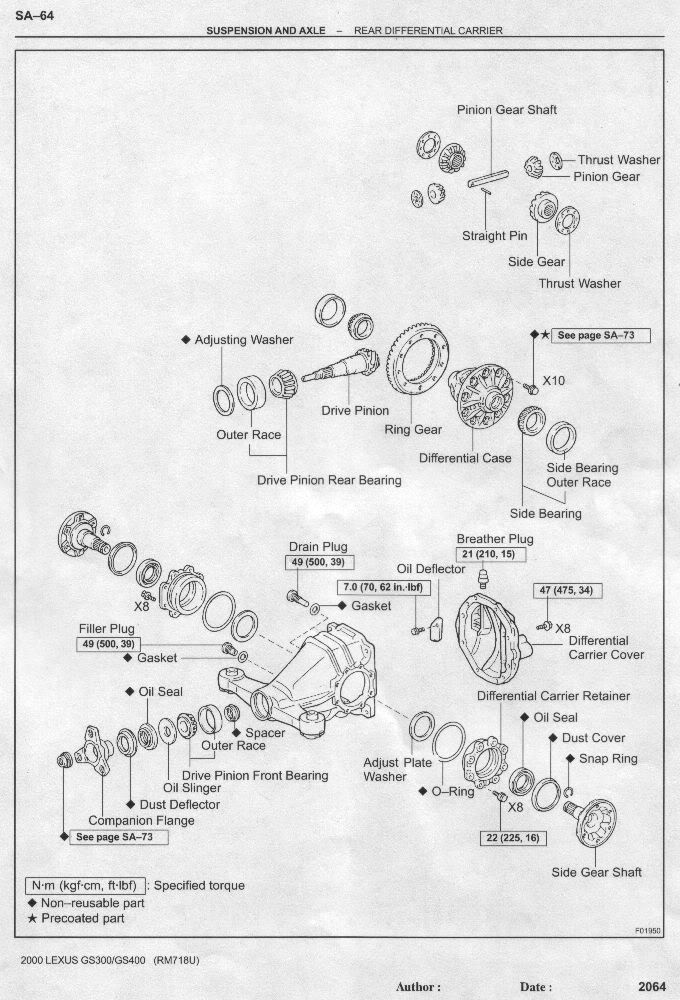
6) Remove the Cover.

7) Remove both Side Gear Shafts by evenly prying them out.
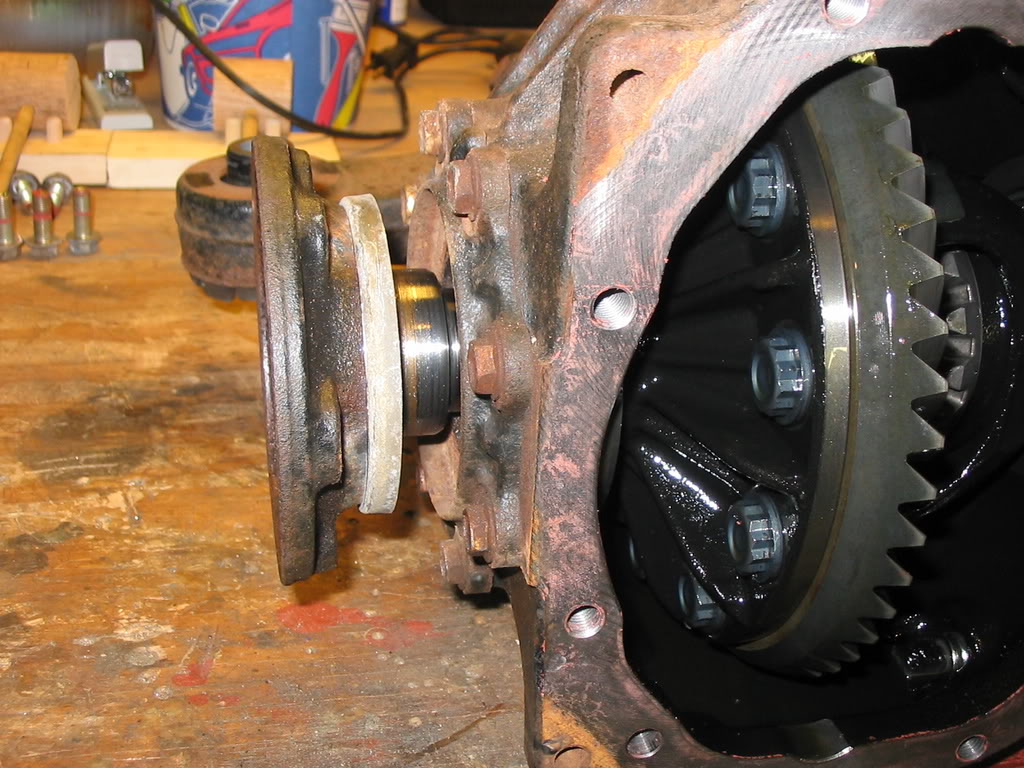
8) Remove both Diff Carrier Retainers by removing sixteen bolts and using a two-jaw gear puller.
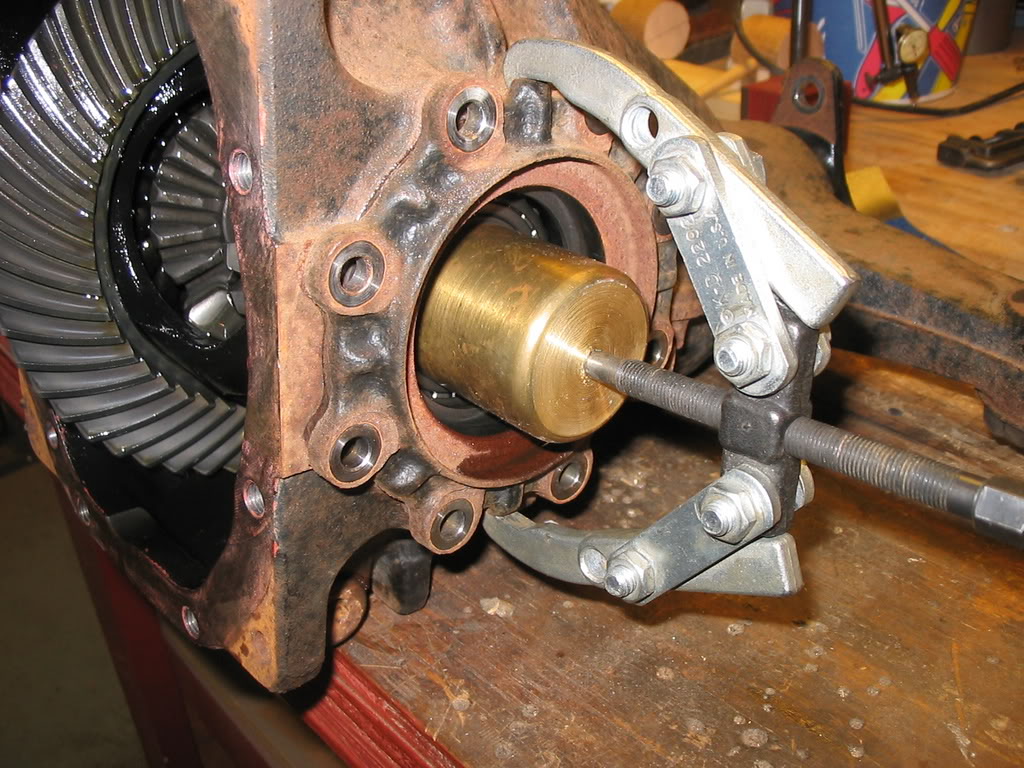
9) Remove Diff Case (the guts) from Diff Carrier (the housing). You�ll need to use the two-jaw gear puller to remove the bearings if you�re going to replace them. You�ll need an arbor press to remove the Bearing Outer Race from the Diff Carrier Retainer.
10) Remove Ring Gear by carefully hammering it off. Use a small hammer and give the Ring Gear a whack, rotate the Ring Gear about an eighth of a turn and repeat. If you get a good rhythm going, you should have it done in a few minutes.
11) Install Ring Gear on new Diff Case. Heat Ring Gear in boiling water, remove from water, dry completely, quickly install on new Diff Case. Use a few bolts to ensure proper alignment and seating. Do not torque Ring Gear Bolts until the Ring Gear has cooled sufficiently. What does �sufficiently� mean? I don�t know; that�s exactly what the manual says. Apply thread lock compound to ten new Bolts and torque to 47 ft*lbs. Now tighten each Bolt further by 60-90 degrees, in diagonally opposite pairs.
12) Reinstall the Diff Case and Diff Carrier Retainers and check the tooth contact pattern using Prussian Blue (see local NAPA). Adjust shims if necessary.
13) Use gear lube to lubricate the O-Rings on the Diff Carrier Retainers before pressing into Diff Carrier. Apply MP grease to the Oil Seal lip prior to assembly. Use Sealant on the Cover.
Brian
I have to say that the carrier change-out was the most challenging. Luckily I had access to an arbor press for installing new bearings and seals. I didn't have a big enough bench vise to securely hold the carrier when trying to remove or install the ring gear, so I visited a local garage and begged for help. They used their impact gun and had it apart in three minutes. Plan ahead and order ten new ring gear bolts because they're not reusable (they're torqued to 47 ft*lbs, then another 60 to 90 degrees) which leads me to believe they're yielded in the torquing process. Again, I visited the garage for them to torque the bolts the additional 90 degrees. This is what cost me a 6-pack of Bud Lite.
I had been sweating the carrier installation process and dialing-in the contact pattern. I reasoned that the pinion gear shim wouldn't need to change because the distance between the pinion gear and the axle centerline hadn't changed (remember I reused the same diff housing). At most I would have had to adjust the Differential Carrier Retainer shims. I must be living life right because the gear contact pattern looked fine using my standard shims.
I think the biggest challenge of the process was trying to get the axle joints at the differential to separate. There was some corrosion at this joint and it made the job difficult. Anyone attempting to drop his or her diff is advised to feed the inboard axle joint some good quality penetrating oil a few days prior to disassembly. I didn't even have to remove the exhaust system, just let the rear end off the six rubber hangars.
Yesterday I was horsing around with the Lexus after it had rained to see how the traction control (TC) would behave with the LSD. It seems that the TC doesn't kick-in until there's a slight bit of sideways rotation of the rear end. I'll have to play around again to fully figure-out how it's going to work. Overall, I think this was a very worthwhile project. It's nice to finally have a V8 that will leave twin stripes down the street.
Here�s the list of the new parts I purchased to complete the project:
REF NO, P/N, DESC, PRICE
41105A, 90301-96003, O RING, $4.00 EACH
41336, 41336-24020, DUST COVER, $7.00 EACH
41334D, 90521-34003, SNAP RING, $2.00 EACH
41334B, 90311-47008, SEAL, $15.00 EACH
41301A, 90366-50033, BEARING, $40.00 EACH
41302A, 90105-12219, BOLT, $?
Here are the approximate steps to complete the project (use common sense and good mechanical judgment):
1) Block front wheels, elevate rear of car and support under lower suspension arms using jack stands positioned as far outboard as possible. Having the wheels free to rotate will make the job easier.
2) Lower the exhaust system. Remove Front Floor Center Brace and remove six rubber hangars allowing exhaust system to swing down and provide clearance. Support the exhaust system to prevent damage from excessive deflection. Remove Heat Insulator from under rear of Propeller Shaft.
3) Remove axles from Differential. Remove six bolts from each side. You may find it necessary/easier to remove the two Suspension Member Braces.
4) Disconnect Differential from Propeller Shaft by removing three bolts.
5) Remove Differential from chassis by removing five bolts. Warning: the Differential is HEAVY, so use a floor jack to support it. You may also find it helpful to remove the two rear Sway Bar brackets so that the Sway Bar will rotate down out of the way.
6) Remove the Cover.
7) Remove both Side Gear Shafts by evenly prying them out.
8) Remove both Diff Carrier Retainers by removing sixteen bolts and using a two-jaw gear puller.
9) Remove Diff Case (the guts) from Diff Carrier (the housing). You�ll need to use the two-jaw gear puller to remove the bearings if you�re going to replace them. You�ll need an arbor press to remove the Bearing Outer Race from the Diff Carrier Retainer.
10) Remove Ring Gear by carefully hammering it off. Use a small hammer and give the Ring Gear a whack, rotate the Ring Gear about an eighth of a turn and repeat. If you get a good rhythm going, you should have it done in a few minutes.
11) Install Ring Gear on new Diff Case. Heat Ring Gear in boiling water, remove from water, dry completely, quickly install on new Diff Case. Use a few bolts to ensure proper alignment and seating. Do not torque Ring Gear Bolts until the Ring Gear has cooled sufficiently. What does �sufficiently� mean? I don�t know; that�s exactly what the manual says. Apply thread lock compound to ten new Bolts and torque to 47 ft*lbs. Now tighten each Bolt further by 60-90 degrees, in diagonally opposite pairs.
12) Reinstall the Diff Case and Diff Carrier Retainers and check the tooth contact pattern using Prussian Blue (see local NAPA). Adjust shims if necessary.
13) Use gear lube to lubricate the O-Rings on the Diff Carrier Retainers before pressing into Diff Carrier. Apply MP grease to the Oil Seal lip prior to assembly. Use Sealant on the Cover.
Brian
Last edited by bpc23; 11-25-06 at 07:15 PM. Reason: Added more details!


")
 11-26-06, 06:36 PM
#6

So what used parts did you need to pick up? Just a used Supra diff carrier, minus the ring gear? Exactly how do I describe that when posting "Wanted" ads? This is exactly what I have been looking for. Is this a common thing that Supra guys may want to get rid of and is there anything I should look out for? Thanks.
11-26-06, 08:19 PM
#7

You're a brave man for tackling that job! 
Someone must have been 'watching over you' to get those ring gears meshing so well. Either that or you're more talented than you know! lol.
Good job! Now you can go burn up tires twice as fast if ya want! w00t!
Someone must have been 'watching over you' to get those ring gears meshing so well. Either that or you're more talented than you know! lol.
Good job! Now you can go burn up tires twice as fast if ya want! w00t!
Trending Topics
11-27-06, 03:33 AM
#8
Rookie
Thread Starter
iTrader: (2)
Join Date: Mar 2006
Location: CT
Posts: 69
Likes: 0
Received 0 Likes
on
0 Posts
Yeah, half way through this project I had to ask myself if I was crazy. It was definitely a big task, but quite manageable with my father's assistance. He's the one with the arbor press and machining skills for turning some bits to use with the gear puller and the arbor press.
BoostAddct: I just purchased the used limited slip unit from titanmotorsports.com and the other stock parts from Carson Toyota. There's some confusion about what the limited slip unit is called. The Lexus Shop Manual calls it the Differential Case, but to me that sounds like the Diff Housing. I think most people call it the Diff Carrier, but that's what the Lexus Shop Manual calls the Diff Housing. Confusing, right? Just ask for the limited slip unit. Google found a hit at suprastore.com for this part. Go check it out.
Brian
06-08-07, 02:31 PM
#9
Lead Lap
iTrader: (4)
Join Date: Apr 2007
Location: CA
Posts: 537
Likes: 0
Received 0 Likes
on
0 Posts
Do you have what the recommend backlash settings are for gears. Also to adjust the backlash, can you buy these shims at the dealer, is there a preload they recommend for the bearings?I would say you got lucky too getting those gears back right, I have seen other people get it wrong and it won't take long to eat the gears up.
06-09-07, 08:06 AM
#10
Rookie
Thread Starter
iTrader: (2)
Join Date: Mar 2006
Location: CT
Posts: 69
Likes: 0
Received 0 Likes
on
0 Posts
The shop manual, section SA-77, shows the ring gear backlash specification at (0.0013" - 0.0051"). If not within this specification, adjust using shims behind the carrier bearings. A chart showing shim thicknesses is in the manual.
Next, inspect the contact pattern on the ring gear, and if necessary, replace the adjusting washer installed on the front of the drive pinion rear bearing. A chart showing washer thicknesses is in the manual.
The shims are probably an item that dealers don't keep in stock, however, they can probably get 'em within a day or two.
There is no preload on the bearings, meaning there is no nut to torque. There's just the adjusting shims that keep the entire stack properly spaced.
06-09-07, 08:59 AM
#11
Rookie
Thread Starter
iTrader: (2)
Join Date: Mar 2006
Location: CT
Posts: 69
Likes: 0
Received 0 Likes
on
0 Posts
After having lived with the swap for 6 months, I'm still happy with the results. I've found that the LSD provides more traction. With more traction, the Vehicle Skid Control (VSC) doesn't intervene as quickly, however, VSC does still intervene when necessary and functions properly.
With VSC switched off, the GS400 will spin both rear wheels. This provides huge amounts of entertainment around corners, especially wet corners. Everyone is probably used to their stock GS400's with an open differential, which is essentially like having training wheels in that when too much throttle is applied, only one rear wheel will spin leaving the other rear wheel to provide traction and keep the car from spinning-out. With a LSD (and VSC off), when too much throttle is applied in a corner, both rear wheels will spin resulting in no traction at the rear end of the car, which will make the car oversteer, or spin-out if the driver isn't experienced enough at correcting this situation.
I enjoy switching off VSC and provoking some graceful oversteer around wet, slow speed corners. I don't advocate trying this in public. Intentionally losing traction may cause an accident resulting in property damage or death.
Brian

