
10" Subwoofer install in stock location (PICS)
 04-09-14, 10:50 PM
#61
Lexus Champion

 04-10-14, 09:34 AM
#62

I have an aftermarket double din unit and all the speakers are wired to the headunit by running own wiring and bypassing the factory main amp. This is what everyone does so you should follow so far.
Then, instead of wiring up line outs to my aftermarket amp, and then to the SUB, I decided to try out what was mentioned above, and on the rear deck where the stock sub amp is for the premium sounds system, I used the wiring guide to splice the rear right speaker signal from the headunit to also go to the stock sub amp. Then I connected the remote on wire from the headunit to the stock sub amp remote wire, and reconnected the stock wiring from the amp to the speaker (I had previously removed it for my aftermarket amp but it will be there stock).
This got the amp to turn on and off with the headunit, and believe it or not the sub was hitting quite hard and with nice quality and did not affect the rear right speaker volume level at all because the sub amp is just picking up the signal without putting much resistance on it like a speaker would. All the amplification does not affect the original signal and that is what I had assumed from the quality circuits they use in these applications.
Turns out the stock sub amp also has a low pass filter built in because its not playing any of the vocals at all through the sub. I know they say generally not to feed a line level input into a sub amp but I had a feeling the stock headunit sends an already somewhat amplified signal to the stock amp, and after wiring it up and testing it at very loud volumes for long periods of times, there has been no distortion or cutting out of any kind, it just plain and simply works.
Works so well I actually removed the aftermarket amp in the trunk, and am just using the factory sub amp to power my kicker and it hits just as good as with the amp giving it several hundred watts ( I had a 1200watt amplifier but it was turned way way down).
So yeah worth a try, might save you alot of wiring and cost and space and get good sound still. I mean the bass is just much better than stock and all you have to do is replace the headunit and the subwoofer, you can reuse the stock sub amp if you like by wiring it above.
Last edited by Ali SC3; 04-10-14 at 09:37 AM.
The following users liked this post:
iTowils (01-11-20)
05-23-14, 10:39 PM
#63
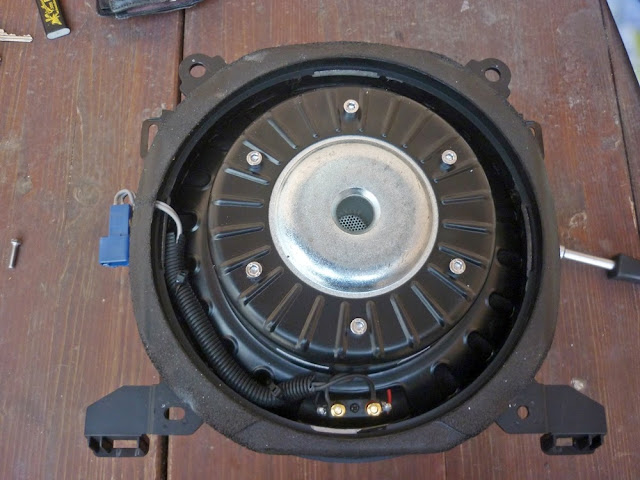
I picked up a blown OEM sub so I could chop up its mounting bracket without destroying my working one. I have all the pieces disassembled, but I haven't cut the metal spider out yet. Question: what have people done with the exactly 10" diameter, when most aftermarket 10" subs are more like 10.5" outer diameter?
It seems like the best approach is to grind down the slight raised outer lip on the gold colored metal ring (the part the spider is attached to), making for a surface that the sub can extend beyond 1/8" to 1/4" all around. Then the only measurement concerns would be: a) the cone's diameter (needs to fit in the 9-1/16" space for the spider), and b) the extra 1/4" to 1/2" of overall diameter fitting into the parcel shelf and cover.
I thought about using just the silver/gray ring (the one with the mounts for the shelf), since it's a flat surface and wouldn't require any modification. It doesn't have much structural support by itself, though. FWIW, all the pieces -- top plastic ring, gold spider, silver bracket, and bottom plastic ring -- separate out on my Pioneer sub. Only the bottom two layers are screwed together. The rest are just bonded by adhesives. So, you can take them all apart and not risk damaging the plastic pieces when doing the spider cuts.
05-24-14, 04:16 AM
#64
I picked up a blown OEM sub so I could chop up its mounting bracket without destroying my working one. I have all the pieces disassembled, but I haven't cut the metal spider out yet. Question: what have people done with the exactly 10" diameter, when most aftermarket 10" subs are more like 10.5" outer diameter?
It seems like the best approach is to grind down the slight raised outer lip on the gold colored metal ring (the part the spider is attached to), making for a surface that the sub can extend beyond 1/8" to 1/4" all around. Then the only measurement concerns would be: a) the cone's diameter (needs to fit in the 9-1/16" space for the spider), and b) the extra 1/4" to 1/2" of overall diameter fitting into the parcel shelf and cover.
I thought about using just the silver/gray ring (the one with the mounts for the shelf), since it's a flat surface and wouldn't require any modification. It doesn't have much structural support by itself, though. FWIW, all the pieces -- top plastic ring, gold spider, silver bracket, and bottom plastic ring -- separate out on my Pioneer sub. Only the bottom two layers are screwed together. The rest are just bonded by adhesives. So, you can take them all apart and not risk damaging the plastic pieces when doing the spider cuts.
It seems like the best approach is to grind down the slight raised outer lip on the gold colored metal ring (the part the spider is attached to), making for a surface that the sub can extend beyond 1/8" to 1/4" all around. Then the only measurement concerns would be: a) the cone's diameter (needs to fit in the 9-1/16" space for the spider), and b) the extra 1/4" to 1/2" of overall diameter fitting into the parcel shelf and cover.
I thought about using just the silver/gray ring (the one with the mounts for the shelf), since it's a flat surface and wouldn't require any modification. It doesn't have much structural support by itself, though. FWIW, all the pieces -- top plastic ring, gold spider, silver bracket, and bottom plastic ring -- separate out on my Pioneer sub. Only the bottom two layers are screwed together. The rest are just bonded by adhesives. So, you can take them all apart and not risk damaging the plastic pieces when doing the spider cuts.
https://www.clublexus.com/forums/sc-...o-upgrade.html
05-24-14, 06:20 AM
#65
Thanks, that helps. So, you raised it up with the upper MDF ring to increase the available diameter? (And to gain clearance above the fuel tank.) I'm hoping to avoid that, if at all possible. But, there's not much point using the upper plastic ring once the spider's ring has been modified to go wider, since the plastic ring "snaps" into place on it and would limit a new sub's surround.
How much of that raising was necessary to fit the inner diameter of the steel ring, i.e., to get the taper of the cone to drop into place? Maybe I can get away with a thinner version of what you did.
I'm looking mostly at shallow mount subs from Rockford Fosgate, Pioneer, Boss, and MB Quart (moderately wide range of price and quality). A tip I picked up is to look beyond subs specifically rated for free-air usage and find something with a QTS of 0.50 or higher and a xmax of 4mm or higher. That opens up a lot more options, since the ~4" of available top-mount depth eliminates most subs right off the bat.
That's funny, mine was in a similar predicament, with the two rear speakers blown (amazing that OEM paper crud lasts a week, let alone several decades) and the wiring broken to the driver's door speaker. Do people drive around with blown speakers or just decide to sell at that point??
How much of that raising was necessary to fit the inner diameter of the steel ring, i.e., to get the taper of the cone to drop into place? Maybe I can get away with a thinner version of what you did.
I'm looking mostly at shallow mount subs from Rockford Fosgate, Pioneer, Boss, and MB Quart (moderately wide range of price and quality). A tip I picked up is to look beyond subs specifically rated for free-air usage and find something with a QTS of 0.50 or higher and a xmax of 4mm or higher. That opens up a lot more options, since the ~4" of available top-mount depth eliminates most subs right off the bat.
The old man who had the car before me kept having head unit problems and replaced the Nakamichi with a kenwood single din and 4 channel amp that powered everything, but it was too much power and all the stock speakers were blown.
05-24-14, 06:59 AM
#66
Taking a few more measurements, I think it's doable this way:
1) Keep the lower plastic ring and the silver metal ring. Discard the gold (spider) metal ring and upper plastic ring.
2) Cut a piece of 1/4" or 1/2" MDF (keep it as thin as possible; the combination of that and the plastic/metal rings should be plenty rigid) or plastic, extending it ~1/4" beyond the OEM lip all around. It'll need little notches on the bottom for the screw heads to extend up into, as they'll attach the metal ring to the plastic ring below. Although, it should be possible to put longer screws in and attach all three layers at those points.
2b) I don't have the tools to do it, but for extra durability you could use 3/4" MDF and carve out an inner ring on the bottom, allowing the extra 1/4" of height (and diameter) to drop down below the metal ring. That way, you've got lots of mounting depth for screws and the MDF isn't extending beyond the metal ring from a support standpoint. An alternative way of going about it would be to stick with a single 1/2" or thinner sheet, but cut an additional one of the same outer diameter but wider inner diameter to glue to the bottom of the main one. That would be tricky to get right, though.
Also, by discarding the top plastic ring, that might free up some height below the OEM speaker cover. Of course, an aftermarket sub is probably going to sit higher than the recessed OEM setup that basically hangs down from the plastic ring...
Doing it this way opens up nearly 9-1/4" inner diameter, which is perfect for a few of the aftermarket subs I've looked up that measurement for. It also eliminates a lot of cutting of the spider. Mine has six support legs, not the four in the OP... And even worse, it would require cutting the entire lip of the spider out, otherwise the opening is narrowed further.
Last edited by t2d2; 05-24-14 at 07:03 AM.
06-04-14, 09:22 PM
#67
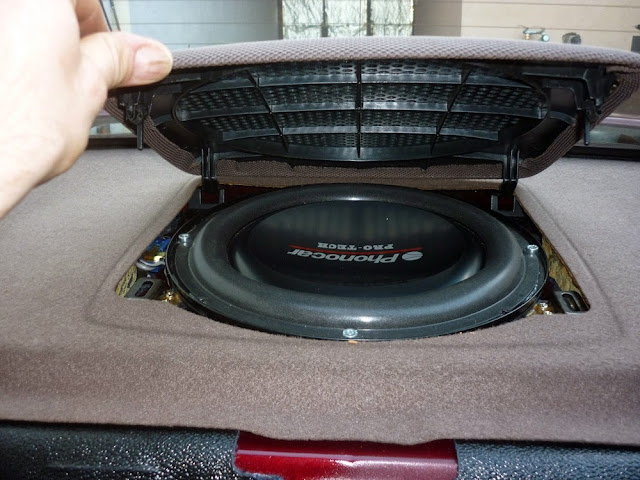
I installed an Earthquake SWS-10 sub today, per some recommendations I received elsewhere. Mounting depth is less than 3" and both inner and outer diameter are a great fit for the OEM mounting ring. I stuck with the plan I outlined in the previous post, using the lower plastic ring and silver metal ring, adding a MDF ring, and mounting the sub to it.
The SWS-10 comes oh so close to lining up with the four screw holes that hold the OEM rings together, but its diameter is a tiny bit too small for them to work. There was plenty of space above it to add a MDF ring and still clear the OEM grill, so I went ahead and added that. All in all, everything fit together quite nicely.
The only complication was the terminals on the bottom of the sub are too close to the edge to clear the parcel shelf's tapered opening. I had to cut little notches to open the hole up more for the terminals to drop in. Also, the SWS-10 has a funky setup where one terminal faces forward and the other faces back, which makes one of them pretty much impossible to get to from below. So, give yourself extra wire and pull it up top ... connect it there then drop the sub into place.
And of course, the big question... Sound quality is quite good. I can run my amp in bridged mode now and pump way more power that I could with the OEM sub, being overpowered and an impedance mismatch. It really brings the whole system to life. I just used the thin foam gasket on the bottom of the sub and didn't bother adding anything between the MDF and metal ring, so it could still be sealed up a bit better, but it hits plenty hard to make the shelf bounce.
The SWS-10 comes oh so close to lining up with the four screw holes that hold the OEM rings together, but its diameter is a tiny bit too small for them to work. There was plenty of space above it to add a MDF ring and still clear the OEM grill, so I went ahead and added that. All in all, everything fit together quite nicely.
The only complication was the terminals on the bottom of the sub are too close to the edge to clear the parcel shelf's tapered opening. I had to cut little notches to open the hole up more for the terminals to drop in. Also, the SWS-10 has a funky setup where one terminal faces forward and the other faces back, which makes one of them pretty much impossible to get to from below. So, give yourself extra wire and pull it up top ... connect it there then drop the sub into place.
And of course, the big question... Sound quality is quite good.
I can run my amp in bridged mode now and pump way more power that I could with the OEM sub, being overpowered and an impedance mismatch. It really brings the whole system to life. I just used the thin foam gasket on the bottom of the sub and didn't bother adding anything between the MDF and metal ring, so it could still be sealed up a bit better, but it hits plenty hard to make the shelf bounce.
 06-05-14, 08:02 AM
#69
Oh wait, did you mean doing the same thing as a replacement for the 8" OEM sub? Er, yeah, I suppose you could, but you would have to check inner and outer diameter measurements on it, as I've never seen one.


 06-05-14, 09:57 AM
#71
^^^ I see you wired it to the factory amp. Does that provide enough power?
It looks like you used the upper metal ring and cut the spider off it? My SWS-10 was about 1/16" too big to fit into its outer lip, but yours looks like it dropped in with 1/8" or more to spare.
It looks like you used the upper metal ring and cut the spider off it? My SWS-10 was about 1/16" too big to fit into its outer lip, but yours looks like it dropped in with 1/8" or more to spare.
04-20-15, 02:40 PM
#72
So, I've got a Pioneer 10" in the stock location using the stock bracket but I have a 12" JL from my last car I want to mount there. I'm over the huge box in the trunk idea and really like to have trunk space. Has anyone made a bracket to lift the sub about an inch to fit a 12" in the same location, obviously omitting the sub cover? I'm thinking something like this to lift it up just enough to fit the magnet in the sub hole and wire it to the pioneer amp I already have.
I'm heading to a buddies house to see if he wants to help me tackle this tonight, if so, I'll post pictures.
I'm heading to a buddies house to see if he wants to help me tackle this tonight, if so, I'll post pictures.
04-20-15, 06:14 PM
#73
Well they said its a bad idea since it's not a blow through sub and it'll sound like trash.. I think he may be right but I also think he doesn't realize I don't want to blow windows out, I just want some crisp bass without sacrificing the trunk space.. I'm at a stand still and need to do some research I guess.
04-20-15, 06:37 PM
#74
Kris, I've had this same system 5 years now , and never had an issue blowing rear window or any of that nature.
The bass sounds great, the mids and highs sound awesome and this is the only way to go from the performance stand point( keeping it light weight, without having a junk in the trunk )
I and many sc owners who have done this are pretty happy with results!!
The only way you can brake the rear window, if you're not careful installing the sub by hitting it with the wrench or a ratchet other than that you could probably use any 10" sub and have a great results!!!
, and never had an issue blowing rear window or any of that nature.The bass sounds great, the mids and highs sound awesome and this is the only way to go from the performance stand point( keeping it light weight, without having a junk in the trunk
)I and many sc owners who have done this are pretty happy with results!!
The only way you can brake the rear window, if you're not careful installing the sub by hitting it with the wrench or a ratchet
other than that you could probably use any 10" sub and have a great results!!!
04-20-15, 06:42 PM
#75
Kris, I've had this same system 5 years now , and never had an issue blowing rear window or any of that nature.
The bass sounds great, the mids and highs sound awesome and this is the only way to go from the performance stand point( keeping it light weight, without having a junk in the trunk )
I and many sc owners who have done this are pretty happy with results!!
The only way you can brake the rear window, if you're not careful installing the sub by hitting it with the wrench or a ratchet other than that you could probably use any 10" sub and have a great results!!!
, and never had an issue blowing rear window or any of that nature.The bass sounds great, the mids and highs sound awesome and this is the only way to go from the performance stand point( keeping it light weight, without having a junk in the trunk
)I and many sc owners who have done this are pretty happy with results!!
The only way you can brake the rear window, if you're not careful installing the sub by hitting it with the wrench or a ratchet
other than that you could probably use any 10" sub and have a great results!!!