
Where to find Data Air Suspension Controller?
 02-22-08, 12:18 AM
#31
Since the pictures that I posted, my cars suspension has undergone a lot of fabrication. They have been modified to take an aftermarket air management system. So now everything runs quick at the push of a button. I'll see if i get the guy that bought my controller to post up a vid.
Its madd slow because of the follow. All the lines are hard lines that are less than 1/8". All four bags run on 1 small compressor and very small vavles. You can see em under your passenger side headlight. Its about the size of a mans fist. Take all that into account...try filling 4 bags with that equipment. See how long it takes you to raise or dump the car.
Its madd slow because of the follow. All the lines are hard lines that are less than 1/8". All four bags run on 1 small compressor and very small vavles. You can see em under your passenger side headlight. Its about the size of a mans fist. Take all that into account...try filling 4 bags with that equipment. See how long it takes you to raise or dump the car.
 02-22-08, 11:30 AM
#32
Nope, Ive modified the stock OEM toyota air struts that come with my Ultimate Luxury LS430. Ive modified the stock fitting (japanese) to fit a 1/4" (american) female fitting.
My Set up
-5 gallon slim and skinny tank
-(2) Viair 380 compressors
-Auto Pilot Air Management controller
-(2) 2-way electronic valves
-(2) Craftsman water traps
-1/4" line and fittings
all this plugs into my stock OEM bags with 1/4" line. Ive removed the stock valves and compressor, but still use the oem ecu to control the dampening.
02-22-08, 11:49 AM
#33
Pole Position
iTrader: (1)
Join Date: Aug 2006
Location: DFW
Posts: 394
Likes: 0
Received 0 Likes
on
0 Posts
Nope, Ive modified the stock OEM toyota air struts that come with my Ultimate Luxury LS430. Ive modified the stock fitting (japanese) to fit a 1/4" (american) female fitting.
My Set up
-5 gallon slim and skinny tank
-(2) Viair 380 compressors
-Auto Pilot Air Management controller
-(2) 2-way electronic valves
-(2) Craftsman water traps
-1/4" line and fittings
all this plugs into my stock OEM bags with 1/4" line. Ive removed the stock valves and compressor, but still use the oem ecu to control the dampening.
My Set up
-5 gallon slim and skinny tank
-(2) Viair 380 compressors
-Auto Pilot Air Management controller
-(2) 2-way electronic valves
-(2) Craftsman water traps
-1/4" line and fittings
all this plugs into my stock OEM bags with 1/4" line. Ive removed the stock valves and compressor, but still use the oem ecu to control the dampening.
02-22-08, 12:05 PM
#34
Not everything is plug and play. It took a lot of time and experimenting to get the right sized fittings to fit on the OEM bags. I had to do a lot of cutting and welding to get those things to not leak and fit properly. Other than the stock air struts the rest of the system is very easy to install. Total it cost me around $2600 for everything. Lines, fittings, controller, valves, welding, metal sheets, tank, compressors, water traps, power wires, fuse box, remote wire, optima battery, and fuses.
02-22-08, 02:57 PM
#35
Rookie

Join Date: Apr 2005
Location: tx
Posts: 78
Likes: 0
Received 0 Likes
on
0 Posts
Not everything is plug and play. It took a lot of time and experimenting to get the right sized fittings to fit on the OEM bags. I had to do a lot of cutting and welding to get those things to not leak and fit properly. Other than the stock air struts the rest of the system is very easy to install. Total it cost me around $2600 for everything. Lines, fittings, controller, valves, welding, metal sheets, tank, compressors, water traps, power wires, fuse box, remote wire, optima battery, and fuses.
02-22-08, 03:14 PM
#36
 I'll see you this summer hopefully....cant wait to see your car
02-23-08, 03:57 PM
I'll see you this summer hopefully....cant wait to see your car
02-23-08, 03:57 PM
#38
02-25-08, 12:09 PM
#39


 I see a white color bumper and black color doors?
02-25-08, 05:01 PM
I see a white color bumper and black color doors?
02-25-08, 05:01 PM
#41
02-26-08, 08:12 PM
#42
i think i have an idea of what that kit is... should look gooooood. how about wheels? or are you going to stick with the s2h's? oh and it would be sweet if you youtubed a video of you playing with the switches 
02-27-08, 09:46 AM
#43
I sold the S2H a long time ago, I bought some 20s instead...keke. As soon as the car is done, ill take pics and video of how she sits.
03-21-08, 09:53 AM
#44
Not everything is plug and play. It took a lot of time and experimenting to get the right sized fittings to fit on the OEM bags. I had to do a lot of cutting and welding to get those things to not leak and fit properly. Other than the stock air struts the rest of the system is very easy to install. Total it cost me around $2600 for everything. Lines, fittings, controller, valves, welding, metal sheets, tank, compressors, water traps, power wires, fuse box, remote wire, optima battery, and fuses.
Is it solely for the purpose of lifting and lowering the car quickly?
05-16-08, 11:59 PM
#45

You can adjust the sensor rods in the front. Literally takes only a few minutes to do once you get the hang. Only pain in the *** is that it may cause the back to be un-balanced at times as one front corner affects the opposite side rear.
To adjust the front, turn the steering wheel completely to one side (let say you start off with turning right) You will now to be able to access the right sensor without removing your tires. I had the same question when I first started and here is an image of what the rod looks like. (should be in position #1 to lower it) The rod is double sided. Twisting it in one direction will "expand" the sensor, while the other will contract it, thereby lowering the sensor lever. However, even at the lowest, it may not suit your taste so you may have to cut about 1/4-1/2" off each side of the rod to give you a bit more lowering. Also note there is a locking nut on the top and bottom of the rod you need to loosen before twisting to adjust. Some others have fabricated their own rod. I tried but could not find a reverse treading die (the clockwise die is easily found). Once you figure out how easy it is, it will take you only seconds to access and adjust as needed.
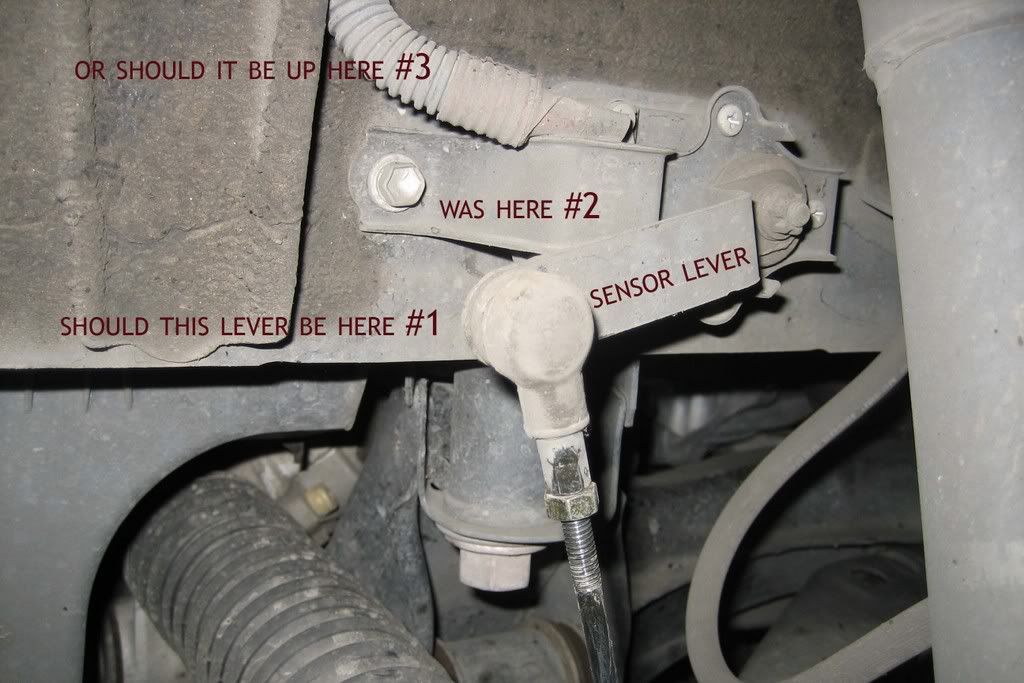
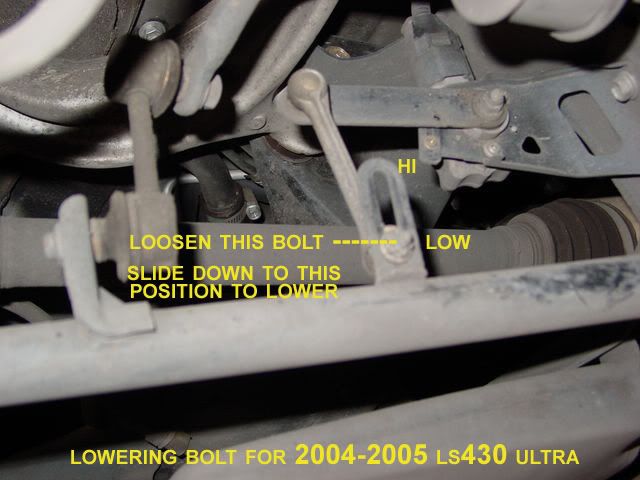
The rears are even easier. Just crawl under the back wheels and you will see an adjustment bar one each side. Loosen the 10mm bolt and slide the sensor down. Tighten and you are ready to go.
This is important. It takes time for the compressor to adjust the height. Just wait a minute or two to see the result, it is not immediate. I think the lowering is a bit faster than the lifting but still slow.
Good luck.
To adjust the front, turn the steering wheel completely to one side (let say you start off with turning right) You will now to be able to access the right sensor without removing your tires. I had the same question when I first started and here is an image of what the rod looks like. (should be in position #1 to lower it) The rod is double sided. Twisting it in one direction will "expand" the sensor, while the other will contract it, thereby lowering the sensor lever. However, even at the lowest, it may not suit your taste so you may have to cut about 1/4-1/2" off each side of the rod to give you a bit more lowering. Also note there is a locking nut on the top and bottom of the rod you need to loosen before twisting to adjust. Some others have fabricated their own rod. I tried but could not find a reverse treading die (the clockwise die is easily found). Once you figure out how easy it is, it will take you only seconds to access and adjust as needed.
The rears are even easier. Just crawl under the back wheels and you will see an adjustment bar one each side. Loosen the 10mm bolt and slide the sensor down. Tighten and you are ready to go.
This is important. It takes time for the compressor to adjust the height. Just wait a minute or two to see the result, it is not immediate. I think the lowering is a bit faster than the lifting but still slow.
Good luck.