
DIY: Fan Clutch repair
 03-24-11, 11:56 AM
#1

I have seen fan clutch threads in the forum so i decided to make this tutorial. I have 2 LS 400, 98(Black on Black) with 95K and 99 with 204K. My 98 fan clutch just gave up. Most of the time when a fan clutch fail is because of the silicone fluid drying out or getting too thick. For some reason mine only had few drops, and i didnt see any leak. If your car sound like a "Mack" truck this is for you. Is cheaper to do this if you have skills and dont wanna pay for a new one. Go to toyota dealer to order the fluid, it may take a week to get them because most dealer dont have the fluid in stock.
Tools and parts
1. 12mm wrench(you may need two)
2. 10mm socket with ratchet
4. Nail set
5. Hammer
6. Four bolts and nut
7. 2 Silicone fluid (part #08816-10001)
Steps
1. Remove the air intake inlet use the 10mm socket
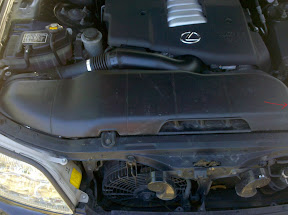

2. At this point start removing the four bolt attached to the pulley. Play with it because the pulley is rotating when you try to take the out.

3. When the fan is out remove the four bolts to take out the blade. I did not remove the plastic cove around the radiator, there enough space to slide the hands in and pull the fan out.

4. Now you will see unusual four pins(just another way to stop you from repair it)
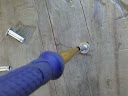
5. Use a nail set to hammer them down on the side that have a hole in the middle. And you can simply use a set of screws from the hardware store to replace these pins.

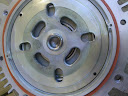
6. Open the fan apart. I put the red circles on the little hole and pin, this hole should align with the pin when you put it back. Try not to touch the gasket because it stretch out easy and make sure you dont pinch it when you put the fan together.
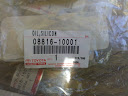
7. Fill the holes with silicon fluid, i use 1 and half bottle to fill it up to the level. I use 10,000cst but if you live in the cold weather you may want a much thiner silicon, i dont remember the part number put there is 6000cst.
Put everything back (reverse of removing) and enjoy the ride.
Tools and parts
1. 12mm wrench(you may need two)
2. 10mm socket with ratchet
4. Nail set
5. Hammer
6. Four bolts and nut
7. 2 Silicone fluid (part #08816-10001)
Steps
1. Remove the air intake inlet use the 10mm socket
2. At this point start removing the four bolt attached to the pulley. Play with it because the pulley is rotating when you try to take the out.
3. When the fan is out remove the four bolts to take out the blade. I did not remove the plastic cove around the radiator, there enough space to slide the hands in and pull the fan out.
4. Now you will see unusual four pins(just another way to stop you from repair it)
5. Use a nail set to hammer them down on the side that have a hole in the middle. And you can simply use a set of screws from the hardware store to replace these pins.
6. Open the fan apart. I put the red circles on the little hole and pin, this hole should align with the pin when you put it back. Try not to touch the gasket because it stretch out easy and make sure you dont pinch it when you put the fan together.
7. Fill the holes with silicon fluid, i use 1 and half bottle to fill it up to the level. I use 10,000cst but if you live in the cold weather you may want a much thiner silicon, i dont remember the part number put there is 6000cst.
Put everything back (reverse of removing) and enjoy the ride.

 05-17-11, 08:15 PM
#3
I will try to make them big, picasa shrink my fotos. That fan clutch came from 1998 ls 400 but my 1999 have bolt instead of pins. If you have bolt it will be easy, just unbolt it.
05-24-11, 10:13 PM
#5
Lexus Champion
iTrader: (6)

Join Date: Nov 2002
Location: Mississauga,Ontario,Canada
Posts: 3,488
Likes: 0
Received 8 Likes
on
8 Posts
If it is from torching to remove the bolts , this will not work as it has baked the old fluid solid inside.
I am sure the OEM clutch was only $100 and is the same for all 1990 - 2000 LS400's .
Also the difference in fluids is for towing and non towing not just climate.
I am sure the OEM clutch was only $100 and is the same for all 1990 - 2000 LS400's .
Also the difference in fluids is for towing and non towing not just climate.
08-31-19, 04:47 PM
#6
Racer

I have seen fan clutch threads in the forum so i decided to make this tutorial. I have 2 LS 400, 98(Black on Black) with 95K and 99 with 204K. My 98 fan clutch just gave up. Most of the time when a fan clutch fail is because of the silicone fluid drying out or getting too thick. For some reason mine only had few drops, and i didnt see any leak. If your car sound like a "Mack" truck this is for you. Is cheaper to do this if you have skills and dont wanna pay for a new one. Go to toyota dealer to order the fluid, it may take a week to get them because most dealer dont have the fluid in stock.
Tools and parts
1. 12mm wrench(you may need two)
2. 10mm socket with ratchet
4. Nail set
5. Hammer
6. Four bolts and nut
7. 2 Silicone fluid (part #08816-10001)
Steps
1. Remove the air intake inlet use the 10mm socket
2. At this point start removing the four bolt attached to the pulley. Play with it because the pulley is rotating when you try to take the out.
3. When the fan is out remove the four bolts to take out the blade. I did not remove the plastic cove around the radiator, there enough space to slide the hands in and pull the fan out.
4. Now you will see unusual four pins(just another way to stop you from repair it)
5. Use a nail set to hammer them down on the side that have a hole in the middle. And you can simply use a set of screws from the hardware store to replace these pins.
6. Open the fan apart. I put the red circles on the little hole and pin, this hole should align with the pin when you put it back. Try not to touch the gasket because it stretch out easy and make sure you dont pinch it when you put the fan together.
7. Fill the holes with silicon fluid, i use 1 and half bottle to fill it up to the level. I use 10,000cst but if you live in the cold weather you may want a much thiner silicon, i dont remember the part number put there is 6000cst.
Put everything back (reverse of removing) and enjoy the ride.

Thread
Thread Starter
Forum
Replies
Last Post
Lexicon1
Performance & Maintenance
2
03-19-07 03:03 PM