HOW TO: SC300/SC400 Double-DIN Stereo Install + Metra Mod for Double-DIN Head Units
 06-21-09, 03:14 AM
#1
UPDATED 08-12-12:
- Added install tip for more head unit clearance (for double-DIN head units) in step 7.
This how-to is to show you how to mod your SC300/SC400 Metra Double-DIN installation kit. Those who have the Metra kit may have noticed that the mounting points, which are plastic, seem very flimsy and thin. Taking some inspiration from SSmith and his modded Metra installation, I decided to do a write-up showing how I modded my kit.
IS THIS THREAD FOR YOU?
For reference, this thread is for SC300/SC400 owners who are:
1. Installing a double-DIN aftermarket head unit
2. Using the Metra double-DIN installation kit (part #95-8157B, about $22.00)
3. Want a more sturdy, solid installation
You'll need to be comfortable with using a Dremel to cut metal and plastic. The goal here is to install an aftermarket head unit into an SC300/SC400, using a combination of the Metra installation kit AND the OEM factory radio bracket. The factory bracket is stronger, made of metal; we'll be combining the two to allow for the centered double-DIN position of the Mtra kit while keeping the more sturdy, solid mounting of the OEM factory brackets.
ADDED INFO:
Had a CL member ask why the modifications are needed, here's my response:
The reason why you have to trim the OEM bracket and the Metra side pieces is because of the head unit position. The factory brackets position the head unit aligned to the top edge, whereas the Metra kit aligns the double-DIN unit centered vertically. Thus the faceplate trim of the Metra kit also fits into the dash centered vertically. If you were to align the radio mounting holes for both OEM and Metra bracket without any cutting, the Metra faceplate trim will sit about 25mm high. This will overlap the HVAC and you'll have a 25mm gap above the ashtray. By modding the brackets and using the HVAC mounting holes to align both pieces, the Metra faceplate trim sits perfectly to cover the space left by the OEM 2.5DIN head unit.
WHAT YOU WILL NEED
Required Tools
1. Phillips screwdriver (Preferably with at least a 6" length to make the job easier)
2. Dremel with heavy-duty cutting wheels
3. Sharpie marker
4. Eye protection
5. Masking tape to make wire labels
Parts Used
1. Metra Installation kit for SC300/SC400 from Ebay, part #95-8157B, about $22.00
2. OEM factory radio/HVAC control brackets
HOW LONG WILL IT TAKE?
The job will take about 1 hour if you know how to take your car apart, or maybe 2 hours if this is your first time. Let's begin!
A. REMOVE THE CENTER CONSOLE/RADIO TRIM
Let's remove the center radio trim first. My car is a 5-speed; If you need help disassembling the center console and your car is an automatic, this thread by SimonR at Soarerworld shows you how to do it. If you have a 5-speed model (like I do) then follow along.
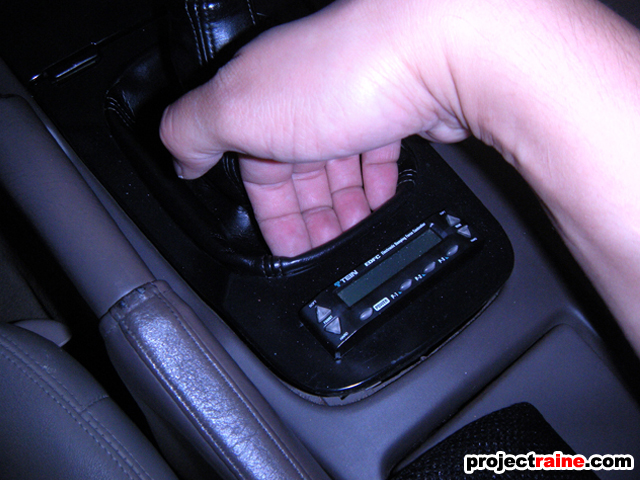
1. The gearshift boot just pops out; start by grabbing the gearshift trim near the back, and give it a short tug upward to release the clips. If you push the shift boot underneath the edge of the trim, you'll have more leverage.
2. Now pull the right side of the trim upward with the same technique.

3. And then pull the left side.
4. You can just flip the shift boot upward, you don't really need to remove the trim or the shift ****... the hole in the radio trim panel is more than big enough to pass the gearshift trim through it. Underneath, you will see 4 Phillips screws. Remove them carefully (you don't want one to drop into the center console!)

5. Next, pull the cup holder out. It's just snapped in there, give it a good tug and it will pop out.

6. You'll find two more screws to remove before the center console trim can be removed.

7. With all 6 screws removed, grab the rear of the trim and pull upward until it's loose.

8. You should be able to pop out the top edge of the trim as well, just pull enough to unclip it, but don't pull too far yet!
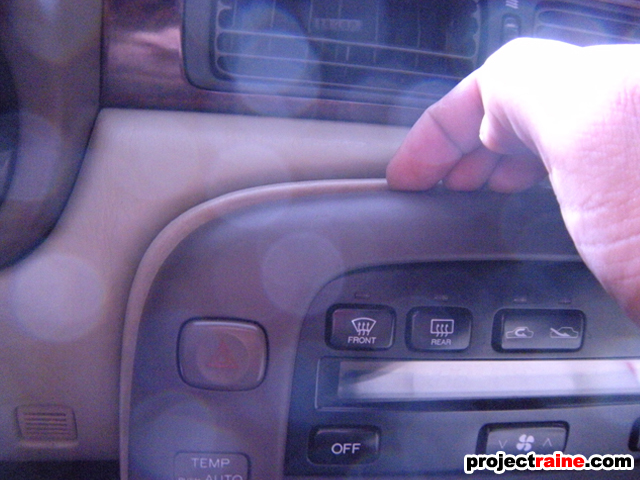
9. If you're having trouble with the top edge, start with the sides and pry the trim out with your fingers.

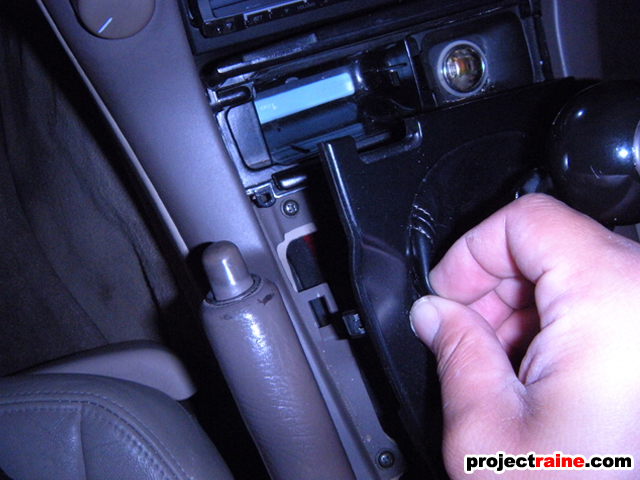
10. Here's why you don't just yank away - there's a few plugs you'll need to remove first!

11. Start with the temperature **** plug (top one, black plastic.) There's a release tab on the underside of the plug; push it, then remove the plug.

12. Next, the volume control **** plug (bottom one, white plastic.) The release tab is on the left side (nearest the steering wheel.)

13. Finally, find the blue plug connected to the cigarette lighter socket. Press the release tab to disconnect it.

14. Now you can remove the whole trim piece as a whole. Set it aside.

B. REMOVE THE RADIO CAGE
Now time to remove the radio cage.
1. There are 6 bolts securing the radio cage to the center console area. remove all 6, be carefull not to drop any bolts.

2. Pull back the radio cage, and at the top you'll find three plugs connected to the HVAC control unit. All three release tabs are at the top, so you should have no problem unplugging the three harnesses.

3. Finally, unplug the four radio plugs as well as the two antenna wires. The radio plugs have release tabs, the antenna wires just pull straight out.

4. Remove 12 screws (6 on each side) and the OEM radio and HVAC control unit will be separated from the OEM metal radio brackets.
C. MODIFY THE METRA KIT AND YOUR OEM RADIO BRACKETS
Don't forget to wear eye protection when using the Dremel.
1. Here's a side-by-side photo of a modded Metra bracket (left) and the original Metra bracket (right). See the triangular cut on the top edge? That's to clear part of the OEM factory metal radio bracket. The only other cuts made were to remove the upper and lower mounting tabs, which are so flimsy that it literally took 3 seconds to chop off. using the Dremel with a cutting wheel, make the cuts shown by the yellow lines. Cut both the left and right-side bracket the same.


2. Now here's a side-by-side photo of a modded OEM metal radio bracket (left) and the original OEM metal radio bracket.The right side has Sharpie marks; the shaded area is what is to be cut out using the Dremel. Make sure you have a lot of extra cutting wheels, I went through 2-3 wheels for each bracket. Cut both the left and right side bracket the same.


3. Test fit each piece; lay the Metra bracket on the outside of the OEM metal bracket, like shown. Use the HVAC mounting holes (shown by the yellow arrows in the photo) to align the two pieces to make sure that everything clears fine. The triangular cut at the top edge of the plastic bracket should not be hitting the metal bracket tab.

(continued next post)
- Added install tip for more head unit clearance (for double-DIN head units) in step 7.
This how-to is to show you how to mod your SC300/SC400 Metra Double-DIN installation kit. Those who have the Metra kit may have noticed that the mounting points, which are plastic, seem very flimsy and thin. Taking some inspiration from SSmith and his modded Metra installation, I decided to do a write-up showing how I modded my kit.
IS THIS THREAD FOR YOU?
For reference, this thread is for SC300/SC400 owners who are:
1. Installing a double-DIN aftermarket head unit
2. Using the Metra double-DIN installation kit (part #95-8157B, about $22.00)
3. Want a more sturdy, solid installation
You'll need to be comfortable with using a Dremel to cut metal and plastic. The goal here is to install an aftermarket head unit into an SC300/SC400, using a combination of the Metra installation kit AND the OEM factory radio bracket. The factory bracket is stronger, made of metal; we'll be combining the two to allow for the centered double-DIN position of the Mtra kit while keeping the more sturdy, solid mounting of the OEM factory brackets.
ADDED INFO:
Had a CL member ask why the modifications are needed, here's my response:
The reason why you have to trim the OEM bracket and the Metra side pieces is because of the head unit position. The factory brackets position the head unit aligned to the top edge, whereas the Metra kit aligns the double-DIN unit centered vertically. Thus the faceplate trim of the Metra kit also fits into the dash centered vertically. If you were to align the radio mounting holes for both OEM and Metra bracket without any cutting, the Metra faceplate trim will sit about 25mm high. This will overlap the HVAC and you'll have a 25mm gap above the ashtray. By modding the brackets and using the HVAC mounting holes to align both pieces, the Metra faceplate trim sits perfectly to cover the space left by the OEM 2.5DIN head unit.
WHAT YOU WILL NEED
Required Tools
1. Phillips screwdriver (Preferably with at least a 6" length to make the job easier)
2. Dremel with heavy-duty cutting wheels
3. Sharpie marker
4. Eye protection
5. Masking tape to make wire labels
Parts Used
1. Metra Installation kit for SC300/SC400 from Ebay, part #95-8157B, about $22.00
2. OEM factory radio/HVAC control brackets
HOW LONG WILL IT TAKE?
The job will take about 1 hour if you know how to take your car apart, or maybe 2 hours if this is your first time. Let's begin!
A. REMOVE THE CENTER CONSOLE/RADIO TRIM
Let's remove the center radio trim first. My car is a 5-speed; If you need help disassembling the center console and your car is an automatic, this thread by SimonR at Soarerworld shows you how to do it. If you have a 5-speed model (like I do) then follow along.
1. The gearshift boot just pops out; start by grabbing the gearshift trim near the back, and give it a short tug upward to release the clips. If you push the shift boot underneath the edge of the trim, you'll have more leverage.
2. Now pull the right side of the trim upward with the same technique.
3. And then pull the left side.
4. You can just flip the shift boot upward, you don't really need to remove the trim or the shift ****... the hole in the radio trim panel is more than big enough to pass the gearshift trim through it. Underneath, you will see 4 Phillips screws. Remove them carefully (you don't want one to drop into the center console!)
5. Next, pull the cup holder out. It's just snapped in there, give it a good tug and it will pop out.
6. You'll find two more screws to remove before the center console trim can be removed.
7. With all 6 screws removed, grab the rear of the trim and pull upward until it's loose.
8. You should be able to pop out the top edge of the trim as well, just pull enough to unclip it, but don't pull too far yet!
9. If you're having trouble with the top edge, start with the sides and pry the trim out with your fingers.
10. Here's why you don't just yank away - there's a few plugs you'll need to remove first!
11. Start with the temperature **** plug (top one, black plastic.) There's a release tab on the underside of the plug; push it, then remove the plug.
12. Next, the volume control **** plug (bottom one, white plastic.) The release tab is on the left side (nearest the steering wheel.)
13. Finally, find the blue plug connected to the cigarette lighter socket. Press the release tab to disconnect it.
14. Now you can remove the whole trim piece as a whole. Set it aside.
B. REMOVE THE RADIO CAGE
Now time to remove the radio cage.
1. There are 6 bolts securing the radio cage to the center console area. remove all 6, be carefull not to drop any bolts.
2. Pull back the radio cage, and at the top you'll find three plugs connected to the HVAC control unit. All three release tabs are at the top, so you should have no problem unplugging the three harnesses.
3. Finally, unplug the four radio plugs as well as the two antenna wires. The radio plugs have release tabs, the antenna wires just pull straight out.
4. Remove 12 screws (6 on each side) and the OEM radio and HVAC control unit will be separated from the OEM metal radio brackets.
C. MODIFY THE METRA KIT AND YOUR OEM RADIO BRACKETS
Don't forget to wear eye protection when using the Dremel.
1. Here's a side-by-side photo of a modded Metra bracket (left) and the original Metra bracket (right). See the triangular cut on the top edge? That's to clear part of the OEM factory metal radio bracket. The only other cuts made were to remove the upper and lower mounting tabs, which are so flimsy that it literally took 3 seconds to chop off. using the Dremel with a cutting wheel, make the cuts shown by the yellow lines. Cut both the left and right-side bracket the same.
2. Now here's a side-by-side photo of a modded OEM metal radio bracket (left) and the original OEM metal radio bracket.The right side has Sharpie marks; the shaded area is what is to be cut out using the Dremel. Make sure you have a lot of extra cutting wheels, I went through 2-3 wheels for each bracket. Cut both the left and right side bracket the same.
3. Test fit each piece; lay the Metra bracket on the outside of the OEM metal bracket, like shown. Use the HVAC mounting holes (shown by the yellow arrows in the photo) to align the two pieces to make sure that everything clears fine. The triangular cut at the top edge of the plastic bracket should not be hitting the metal bracket tab.
(continued next post)
Last edited by raine; 08-12-12 at 10:17 PM. Reason: Added info on why the mod is needed

The following users liked this post:
FUtom (06-03-17)
06-21-09, 03:15 AM
#2
(continued from first post)
D. REASSEMBLE THE BRACKET WITH YOUR NEW HEAD UNIT
Now to get everything back together.
1. Align the OEM metal bracket to the HVAC unit.

2. Lay the modded Metra bracket on top of the OEM metal bracket, aligning the same HVAC holes.

3. Using the OEM black screws, tighten down both bracket pieces to the HVAC unit. Do this for both sides.

4. Now install the Metra faceplate trim piece using the hardware provided with the Metra kit.

5. Make sure that the faceplate trim is level with the face of the HVAC control unit.

6. Now you can install your aftermarket double-DIN head unit below the HVAC control unit. Because we trimmed the OEM metal bracket, you should be able to use the mounting holes in the Metra bracket to secure your aftermarket head unit in place.

7. And here's how it will look when you're done. Note that you get the benefit of the Metra faceplate trim (for a clean, factory look) AND you still have the stronger mounting points of the OEM factory radio brackets.
NOTE: When you get everything together, it'll seem a little weird-looking because the plastic Metra side panels don't quite sit flat on the OEM brackets. In fact, you might actually bend the Metra side panels a little when tightening the screws that hold your aftermarket radio in place. But don't worry - once you put the center console back together, the console trim will cover up the Metra side panels AND it will align the Metra faceplate correctly with your new head unit.

Added 08-12-12
INSTALL TIP: If you have an aftermarket steering wheel installed, and you're installing a double-DIN head unit, here's a tip to get more installation space ---> go to this post.
8. Now you can wire your head unit up and reinstall it into the car; just reverse the procedure for installation!

END
D. REASSEMBLE THE BRACKET WITH YOUR NEW HEAD UNIT
Now to get everything back together.
1. Align the OEM metal bracket to the HVAC unit.
2. Lay the modded Metra bracket on top of the OEM metal bracket, aligning the same HVAC holes.
3. Using the OEM black screws, tighten down both bracket pieces to the HVAC unit. Do this for both sides.
4. Now install the Metra faceplate trim piece using the hardware provided with the Metra kit.
5. Make sure that the faceplate trim is level with the face of the HVAC control unit.
6. Now you can install your aftermarket double-DIN head unit below the HVAC control unit. Because we trimmed the OEM metal bracket, you should be able to use the mounting holes in the Metra bracket to secure your aftermarket head unit in place.
7. And here's how it will look when you're done. Note that you get the benefit of the Metra faceplate trim (for a clean, factory look) AND you still have the stronger mounting points of the OEM factory radio brackets.
NOTE: When you get everything together, it'll seem a little weird-looking because the plastic Metra side panels don't quite sit flat on the OEM brackets. In fact, you might actually bend the Metra side panels a little when tightening the screws that hold your aftermarket radio in place. But don't worry - once you put the center console back together, the console trim will cover up the Metra side panels AND it will align the Metra faceplate correctly with your new head unit.
Added 08-12-12
INSTALL TIP: If you have an aftermarket steering wheel installed, and you're installing a double-DIN head unit, here's a tip to get more installation space ---> go to this post.
8. Now you can wire your head unit up and reinstall it into the car; just reverse the procedure for installation!
END
Last edited by raine; 08-12-12 at 10:09 PM.


Trending Topics
06-25-09, 09:28 AM
#9
Wow actually no, it's not a waste of time nor effort. Do you have the Metra kit installed in your car with a 7-9 pound double-DIN head unit in it? If you do, you'd know that the top mounting tabs aren't even holes, they're slots - and the bottom mounting legs are so flimsy that you wouldn't want to even stand the whole assembly up on them without risking them snapping off. They are so fragile that once the plastic loses some moisture over time, it'll probably break off. And the Metra kit only has 4 fastening points to the center console, whereas the OEM brackets have 6, including two to the dashboard. Oh, and having 7-9 pounds with that weak of a support moves around A LOT in the dash, creaking and moaning... and I'm not cool with that.
06-25-09, 01:50 PM
#10
Once the center cover trim(one with the hazard light, and auto temp) is put back, it will hold the kit perfect in place, preventing any movement. Also the plastic isnt super thin, so it wont crack over time. And lastly the way the oem system is designed, as long as you get it in proper, all the weight will be on the 2 bottom legs/ 2 bolts, the other bolts are just for alignment purposes.
06-25-09, 03:52 PM
#11
This is why I didn't use the Metra kit I still have, I read somewhere on here that the kit doesn't hold up that well to these DoubleDin stereos. I didn't know you could use both the Metra and factory brackets together supporting the headunit. Im still waiting on the pics of the final install  . T
. T
. T
06-25-09, 03:59 PM
#12
This is why I didn't use the Metra kit I still have, I read somewhere on here that the kit doesn't hold up that well to these DoubleDin stereos. I didn't know you could use both the Metra and factory brackets together supporting the headunit. Im still waiting on the pics of the final install . T
. T
06-28-09, 11:07 AM
#13
Rookie

Join Date: Apr 2009
Location: WA
Posts: 80
Likes: 0
Received 0 Likes
on
0 Posts
I just found this thread, happens to be the day after I installed my single din retractable 7" in dash monitor. I used the single din version metra kit. The head unit is so heavy it sits katy-wompos to one side and it bends the plastic brackets. It didn't want to align even after I installed the outer trim pieces. I'm going to hack up the metal brackets and try my own single din version of what you did. Good write up man!
06-28-09, 11:56 AM
#14
I just found this thread, happens to be the day after I installed my single din retractable 7" in dash monitor. I used the single din version metra kit. The head unit is so heavy it sits katy-wompos to one side and it bends the plastic brackets. It didn't want to align even after I installed the outer trim pieces. I'm going to hack up the metal brackets and try my own single din version of what you did. Good write up man!
Speaking of, I need to take some "finished" photos.
06-28-09, 03:19 PM
#15
Driver

Join Date: Sep 2008
Location: NJ
Posts: 133
Likes: 0
Received 0 Likes
on
0 Posts
I just got done doing the metra mod and it works great. I was really starting to get annoyed from hearing the console piece between the dash and the radio trim move around. I knew it would be a problem when I first installed the metra kit but I didn't really notice it until I just got coilovers. Now it feels very solid. Thanks for the write up!