
Center console removal
 04-17-14, 02:21 PM
#1
Lead Lap
Thread Starter

Join Date: May 2011
Location: Los Angeles, CA
Posts: 548
Likes: 0
Received 0 Likes
on
0 Posts
Took off the 2 side panels, and silver trim already, just need the center panel/cup holder, not sure how to take it out.
Can anyone help?
Can anyone help?
 04-17-14, 02:33 PM
#4

These links should help you out, but cup holders with remote touch control part is the easiest to remove. Open the center storage box, then use your both hands and hold the cup holders as leverage then pull straight up. They are just a bunch of clips holding. The whole unit should come off straight up.
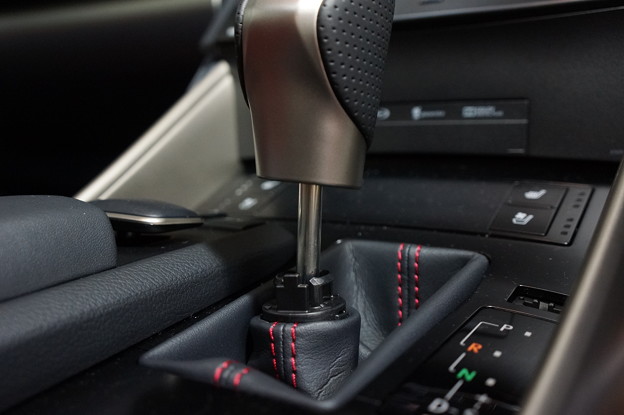
I found the most difficult part to remove was the shifter plate. It takes quite amount of force to remove it. Also, don't forget to remove one screw holding the shifter plate just under the shifter gate, it's showing in a few down the thread, but it should be on opposite of where it's showing picture (thread was referencing right hand drive car). Good luck!!
https://www.clublexus.com/forums/is-...head-unit.html
http://minkara.carview.co.jp/en/user...blog/30476687/
Last edited by dojoman; 04-17-14 at 02:38 PM.
The following users liked this post:
GR3Y5H3ART (08-09-20)
04-17-14, 02:44 PM
#5
You see the channel for cable routing from outside in the green box? It's attached to cup holders piece, if the console box is closed you cannot remove the cup holders or you may damage this part.

Last edited by dojoman; 04-17-14 at 02:49 PM.
Trending Topics
 04-17-14, 03:31 PM
#10
BTW, wear a glove or something to protect yourself or scratching the trims with your nails. The only time you should be very careful is when removing the shifter plate, it's the last piece before you gain access to screws to remove radio. Shifter plate is very tight and can pinch your fingers.
04-17-14, 04:23 PM
#13
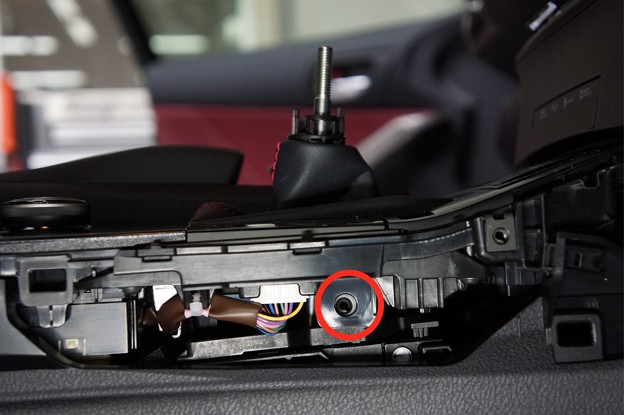
Eco/Sport **** is connected all the way to seat warmer buttons. When you remove the piece the whole thing should come off. Start from back where the console box is and lift up at an angle just like shown in picture. Use the square boxes I added as reference where you should pull up.
One warning though, when I was doing this Eco/Sport plate area wanted to lift up, see red circle, but don't separate it from shifter plate. I don't know what will happen if you happen to separate them apart.
 04-17-14, 05:22 PM
#15
I posted a thread on center console vinyl wrapping. I'll just paste the instructions here  I hope it helps
Tools you need
1. Pry tool (I don't recommend using flat head screw driver, it will damage the plastic!)
2. +head screw driver
Here is the link to do the first few steps
https://www.clublexus.com/forums/is-t...head-unit.html
Note: Put the car on neutral and use the foot brake, then turn off the car. Because the shift **** will be in the way when you are removing the front piece of center console when it is in park.
After you remove the side panels (four pieces total) in the link, remove the cup holder
First open the center storage compartment, the cup holder only requires pry tool to remove, work from the rear side to the front, reason being is that all the clips are on the side except there is one at the very front, kinda like battery cover of our TV remote.
Once you remove the cup holder and disconnect the connectors, remove the back piece of the center console (notice the whole center console is actually in two pieces, rear is the one with eco/normal/sport switch.)
Same thing, it only requires pry tool, but it is tighter than cup holder, pry the part from the very back and work your way to the front, do not pry from either left or right side to the other, once the back side is lifted, then you can slowly apply even prying force from both left and right sides. As long as you don't yank it, you shouldn't have to worry about breaking it. Remember, TAKE YOUR TIME!
Now it's time to remove the buttons and the fuel injection mode control button, the fuel injection button it self is a clip, pry that off first, because you can't pull that thing from the bottom, then unscrew four screw at the bottom, finally release all the clip holders on the side and simply pull the whole thing from the bottom.
Then move on to the front center console piece, now you should be able to see the clips from the side since you removed the side panels at the beginning, just a reminder there is a clip kinda angled on each side, so work with the direction of the clip
Finally, unscrew the screws that holds the leather parts of the shift ****.
Let me know if you have further questions
I hope it helpsTools you need
1. Pry tool (I don't recommend using flat head screw driver, it will damage the plastic!)
2. +head screw driver
Here is the link to do the first few steps
https://www.clublexus.com/forums/is-t...head-unit.html
Note: Put the car on neutral and use the foot brake, then turn off the car. Because the shift **** will be in the way when you are removing the front piece of center console when it is in park.
After you remove the side panels (four pieces total) in the link, remove the cup holder
First open the center storage compartment, the cup holder only requires pry tool to remove, work from the rear side to the front, reason being is that all the clips are on the side except there is one at the very front, kinda like battery cover of our TV remote.
Once you remove the cup holder and disconnect the connectors, remove the back piece of the center console (notice the whole center console is actually in two pieces, rear is the one with eco/normal/sport switch.)
Same thing, it only requires pry tool, but it is tighter than cup holder, pry the part from the very back and work your way to the front, do not pry from either left or right side to the other, once the back side is lifted, then you can slowly apply even prying force from both left and right sides. As long as you don't yank it, you shouldn't have to worry about breaking it. Remember, TAKE YOUR TIME!
Now it's time to remove the buttons and the fuel injection mode control button, the fuel injection button it self is a clip, pry that off first, because you can't pull that thing from the bottom, then unscrew four screw at the bottom, finally release all the clip holders on the side and simply pull the whole thing from the bottom.
Then move on to the front center console piece, now you should be able to see the clips from the side since you removed the side panels at the beginning, just a reminder there is a clip kinda angled on each side, so work with the direction of the clip
Finally, unscrew the screws that holds the leather parts of the shift ****.
Let me know if you have further questions