
Official IS-F Modification Thread

 07-09-14, 04:14 AM
#287
Thanks and I know it might be hard to believe but Lexus of Tampa Bay did the work...I had to have a few other things done so I asked them about doing this while it was there and the mechainc who works on my car said he had a great idea for the cut outs...man did he...he even said he had to file the spacers that TOMS sent to make them fit right...they just do quality work! 


 07-28-14, 03:35 PM
#291
I really want to do this to mine was it a pita to get the lenses off?
----------------------------------------------------------------------------------------------------------------------------------------------------------
courtesy of lobuxracer
----------------------------------------------------------------------------------------------------------------------------------------------------------
courtesy of lobuxracer
OK, since no one else seems to have documented this, I thought I'd do it this afternoon for S&G.

If you don't know how to get to this point of console disassembly, check the nav hack thread for guidance.

The connector is a tad buried, but you can get your hand in there, really! The release is on the front, so it isn't hard to squeeze it and get it disconnected. When you do, it will look like this:
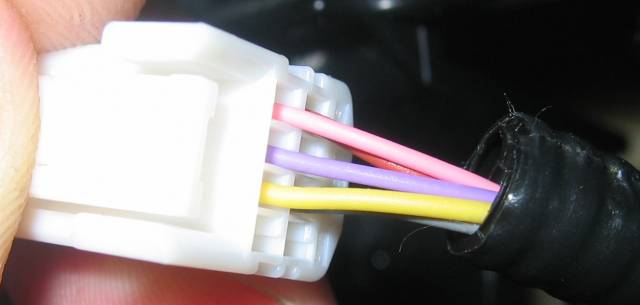
Note the position of the pink and violet wires. They are going to be reversed when we are done. I recommend removing the electrical tape from the end of the condulet and removing the rest of the tape from the wire bundle so you can easily pull the individual wires. Note how it is taped so you can duplicate this when you tape it back up if you want to retain your basic wiring reliability.

This connector has a secondary lock. I thought it was too small to have one, so I hacked up the connector a bit before I realised my stupidity, and there are some ugly marks on the connector now. Avoid my mistake and release the secondary catch by gently prying the small screwdriver slot in the middle of the secondary catch. It will only raise a little bit - about 2mm as you can see in the picture - but it makes all the difference in the world. AMHIK.

Since some have complained about the difficulty of getting pins released, I included a close up of what you are trying to accomplish. The tabs shown in the picture are easy to lift once the secondary catch is released. If you are really ****, you can do what I did and make the tool Toyco recommends for this, or you can just use a 1mm wide tip jeweler's screwdriver to lift the tab.

Here's the tool I made in action. I used a 1.4mm round stainless steel needle from a turkey lacing kit and filed it down to a 1mm x 1mm square, then filed off the point, squared it up and beveled the end as directed in the Toyco documentation. I just inserted it, levered up gently and effortlessly pulled the pins out the back of the connector.

This is the finished product. Note the pink and violet wires are reversed. Put the tape back on the wire bundle and condulet, plug the connector back into the shifter and reassemble the console. The job is finished.
I tested it, and it does indeed work like a charm to reverse the stick's shifting action. As always, I can't be responsible for any damage you might do through ham fisted problem solving (and you can see a bit of mine in the pics if you look close). The saving grace to this is the connector is available from Toyco or Tyco (the original manufacturer) if you really bugger it up.
If you don't know how to get to this point of console disassembly, check the nav hack thread for guidance.
The connector is a tad buried, but you can get your hand in there, really! The release is on the front, so it isn't hard to squeeze it and get it disconnected. When you do, it will look like this:
Note the position of the pink and violet wires. They are going to be reversed when we are done. I recommend removing the electrical tape from the end of the condulet and removing the rest of the tape from the wire bundle so you can easily pull the individual wires. Note how it is taped so you can duplicate this when you tape it back up if you want to retain your basic wiring reliability.
This connector has a secondary lock. I thought it was too small to have one, so I hacked up the connector a bit before I realised my stupidity, and there are some ugly marks on the connector now. Avoid my mistake and release the secondary catch by gently prying the small screwdriver slot in the middle of the secondary catch. It will only raise a little bit - about 2mm as you can see in the picture - but it makes all the difference in the world. AMHIK.
Since some have complained about the difficulty of getting pins released, I included a close up of what you are trying to accomplish. The tabs shown in the picture are easy to lift once the secondary catch is released. If you are really ****, you can do what I did and make the tool Toyco recommends for this, or you can just use a 1mm wide tip jeweler's screwdriver to lift the tab.
Here's the tool I made in action. I used a 1.4mm round stainless steel needle from a turkey lacing kit and filed it down to a 1mm x 1mm square, then filed off the point, squared it up and beveled the end as directed in the Toyco documentation. I just inserted it, levered up gently and effortlessly pulled the pins out the back of the connector.
This is the finished product. Note the pink and violet wires are reversed. Put the tape back on the wire bundle and condulet, plug the connector back into the shifter and reassemble the console. The job is finished.
I tested it, and it does indeed work like a charm to reverse the stick's shifting action. As always, I can't be responsible for any damage you might do through ham fisted problem solving (and you can see a bit of mine in the pics if you look close). The saving grace to this is the connector is available from Toyco or Tyco (the original manufacturer) if you really bugger it up.


 10-11-14, 03:20 AM
#299
Rookie
Join Date: May 2014
Location: Seoul city Korea
Posts: 67
Likes: 0
Received 0 Likes
on
0 Posts
Lems japan titanium intake pipe installed
I have not heard of any other intake sound except takeda open kit
I will not compare the sound between open series (whick have exotic sound over 2K rpm) and this.
Cause this is only pipe swapped ( not the overall system )
I can not dicern the unique sound characteristic of titanium it self
But definitly changed in volume over 3.6K rpm ( 15% louder and deeper )
I recommand you guys below..
If you are gonna install additional open filter like blitz, then go with this pipe
If you want to just swap oe pipe into this, you should consider more
I'm not talking there's no big difference, I'm talking about the price
Please understand my poor English
Oh I forgot to mention...
I use oe filter, so when I change into another drop in filter like blitz, it will definitly sounds better
Last edited by bdkim88; 10-11-14 at 03:35 AM.
10-11-14, 11:08 AM
#300
I have some goodies waiting to be installed. FedEx just delivered my OS Giken LSD that came from Japan last week. Unfortunately I have to wait another 1-2 weeks to get everything installed, but I've waited this long so another few weeks won't kill me. About to go on it...
- BC Racing BR coilovers with Swift springs 16k/12k
- OS Giken LSD
- Figs bushings
...can't wait
- BC Racing BR coilovers with Swift springs 16k/12k
- OS Giken LSD
- Figs bushings
...can't wait