
DIY: How To Swap Cluster Lights (Inlcuding Needles)
 07-07-11, 06:30 PM
#16

1210 is the same thing as PLCC-2 which is what I said the gauge LEDs are as the first supply needed! The only thing on the gauge that are NOT 1210/PLCC-2 are the speedometer needle and RPM needle. Those LEDs are unknown to me and 0603 LEDs will only work in there if you mount it sideways. The lower two needles for gas and temp use (2) PLCC-2/1210 LEDs each. If none are 0603, I would like to see you try to fit 1210 LEDs in the two bigger needles.
 07-07-11, 09:22 PM
#17
Just decided to do my needles to get a definite LED size for those who want to change it. No direct replacement LED I know of this one but either 0603 or 1206 will work. However, I would recommend to use 1206 since it's slightly brighter in most cases and easier to work with. So uttam24, 0603 will work and so will 1206 as I mentioned when I texted you.

07-12-11, 11:31 AM
#19
Driver School Candidate

Join Date: Jul 2011
Location: me
Posts: 1
Likes: 0
Received 0 Likes
on
0 Posts
Hi, do you have any pictures of the speedo and tach needles taken apart? You said they're illuminated by 4 SMD's, correct? Just trying to get an idea as to how they're placed within the needles. Thanks
 07-12-11, 08:26 PM
#25
Former Sponsor
iTrader: (2)

Join Date: Sep 2006
Location: California
Posts: 224
Likes: 0
Received 0 Likes
on
0 Posts
Remember the needle is very sensitive. If it won't budge, don't force it.
Before you remove the needles, move it to 60mph, 6rpm, has at 1/2 and temperature at 1/2. When you put it back together, put it a little past the spot you removed it at.
I will use the tachometer as my example. Before removing it, i turn it CLOCKWISE to 6RPM. After finishing with the needle, i put the needle in at 8RPM, and turn COUNTERCLOCKWISE to the 0. If you happen to pass 0, DO NOT keep turning counter clockwise. Turn it CLOCKWISE until you feel it stiffen up and move it a tad. Then you turn back counter clockwise and stop it at the 0. If you are confused this DIY is not for you.
07-12-11, 10:19 PM
#26
^ That is good advice, I asked you for advice on your other account and you didn't reply back so I just went ahead and pried the needles out. When I put it back, the RPMs and speed was off by like 200 and 10 MPH. Took them out a second time to change up the lights again and found out how to turn it to the proper position when it stiffens up.
To simplify, just turn the needles out of their resting position, remember where you took it off and put in on just a tad more than where you took if off. Then as you turn counterclockwise, it'll stiffen up to the place you want it to.
To simplify, just turn the needles out of their resting position, remember where you took it off and put in on just a tad more than where you took if off. Then as you turn counterclockwise, it'll stiffen up to the place you want it to.
11-28-12, 08:09 PM
#27
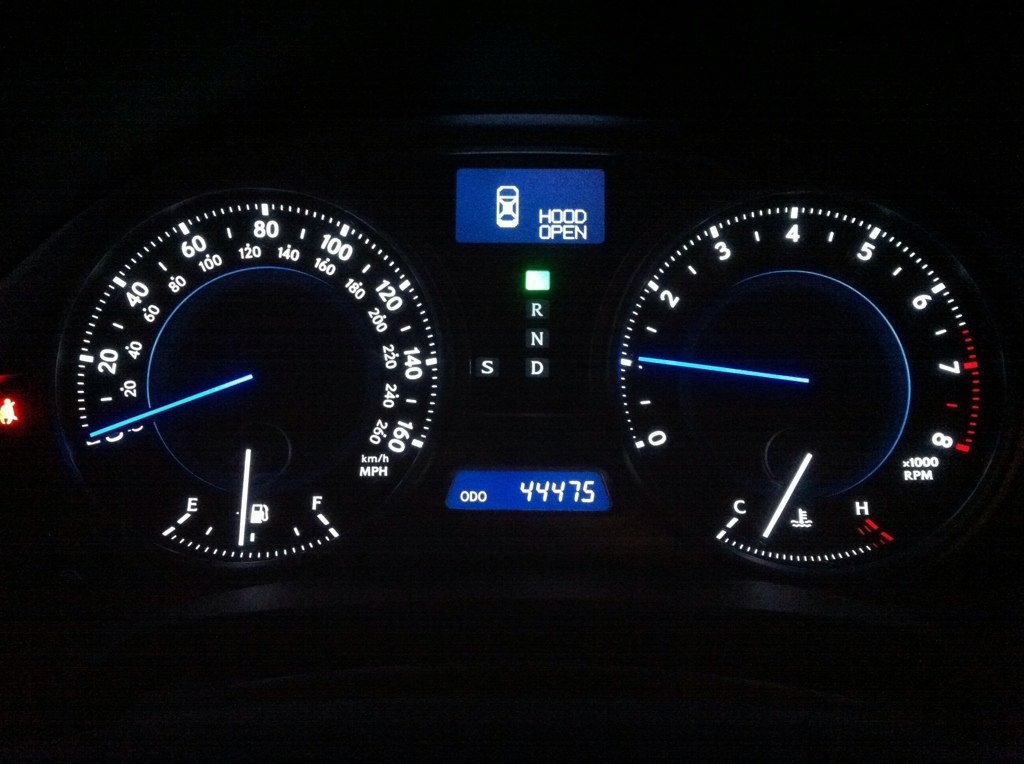
This DIY is a major pita to perform. At times I thought I might fail, but it all came out ok in the end. Went for the isf look and saved myself the hassle of changing the smaller needles. The blue is deeper than what comes through in the picture.
11-30-12, 03:09 PM
#29
I hear ya man. I was a hair width away from saying f&#* it after not being able to pull the needles out. This mod, on the scale of 1-10 difficulty, is about a 12. Half way through I started to think I may need to buy a used cluster if I ruin the one I have. It turned out cool, but caused me allot of stress for the 3 hours it took to complete the mod.

