Transfer case leak
 02-19-14, 10:28 AM
#106
Pole Position
 02-19-14, 04:18 PM
#107
Pole Position
Well, I hope I can get my point across via the photos below. There is no way to photograph the drive gear connected to the rack while the actuator is assembled. A larger gear blocks the view. I had to cut a drive gear (crudely) out of paper and stick it on a shaft to illustrate what�s going on inside the actuator.
Here�s a photo of the drive gear and how it engages with the rack.
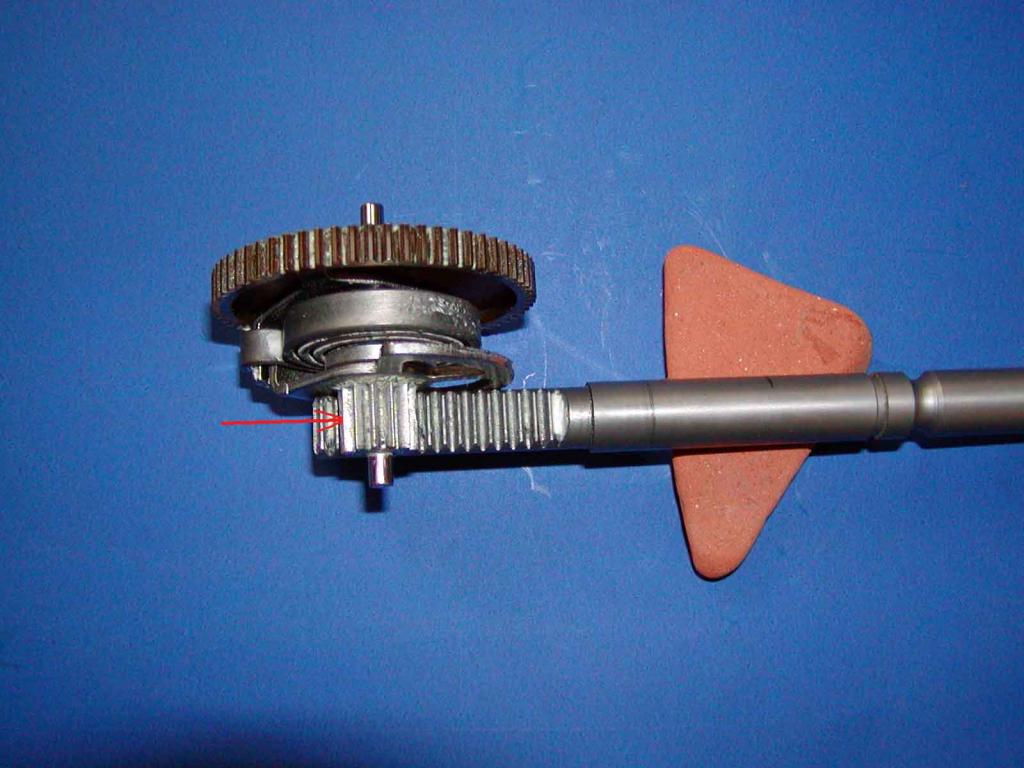
The next photo shows the rack engaged with the (paper) drive gear in the TRANSFER CASE UNLOCK position. This is the position everything would be in just prior to rotating the actuator housing counter clockwise to disengage the actuator housing from the rack.
NOTE: Nothing inside the actuator housing moves when the actuator housing is pulled away from the transfer case. The rack pulls out of the transfer case. The rack does not pull out of the actuator housing.
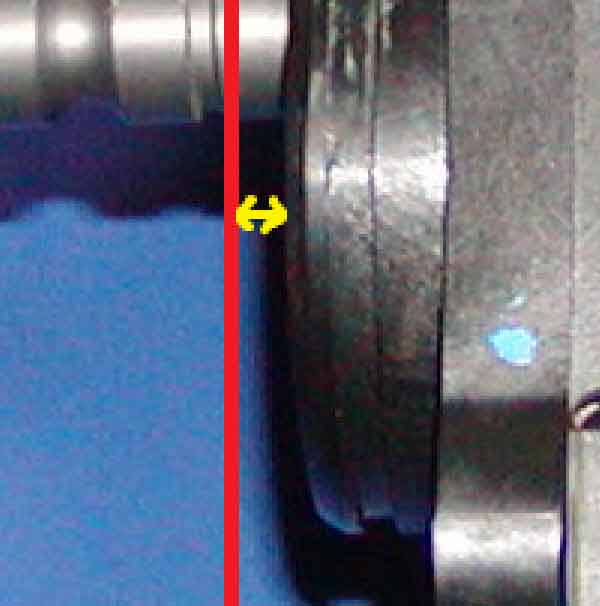
The red line shows the alignment of the rack and gear prior to twisting.
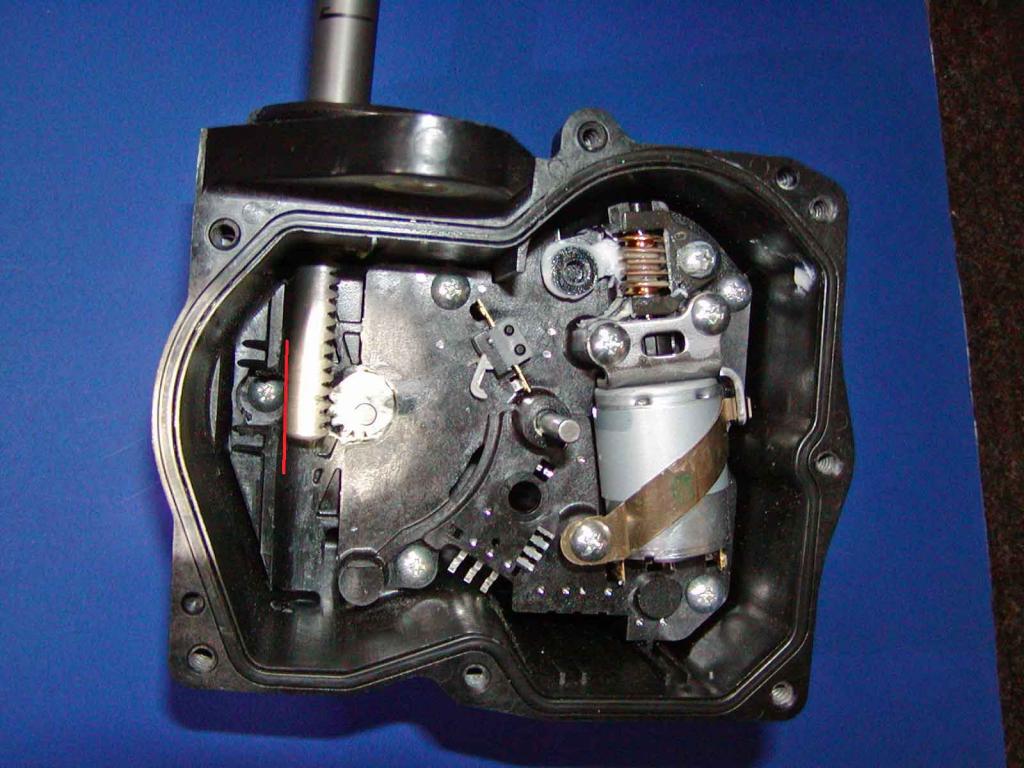
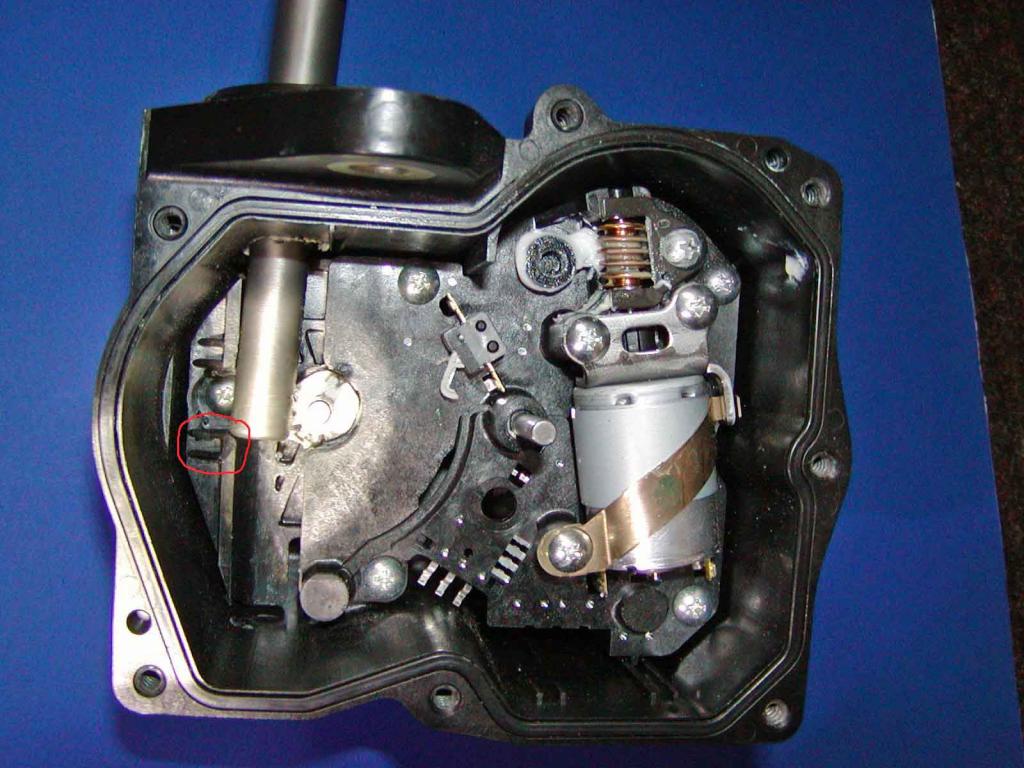
Next photo shows actuator housing turned counter clockwise to disengage the rack teeth from the drive gear. There is no clearance for the round (wider) part of the shaft. The plastic in the red circled area breaks away, allowing the rack to be pulled out of the housing.
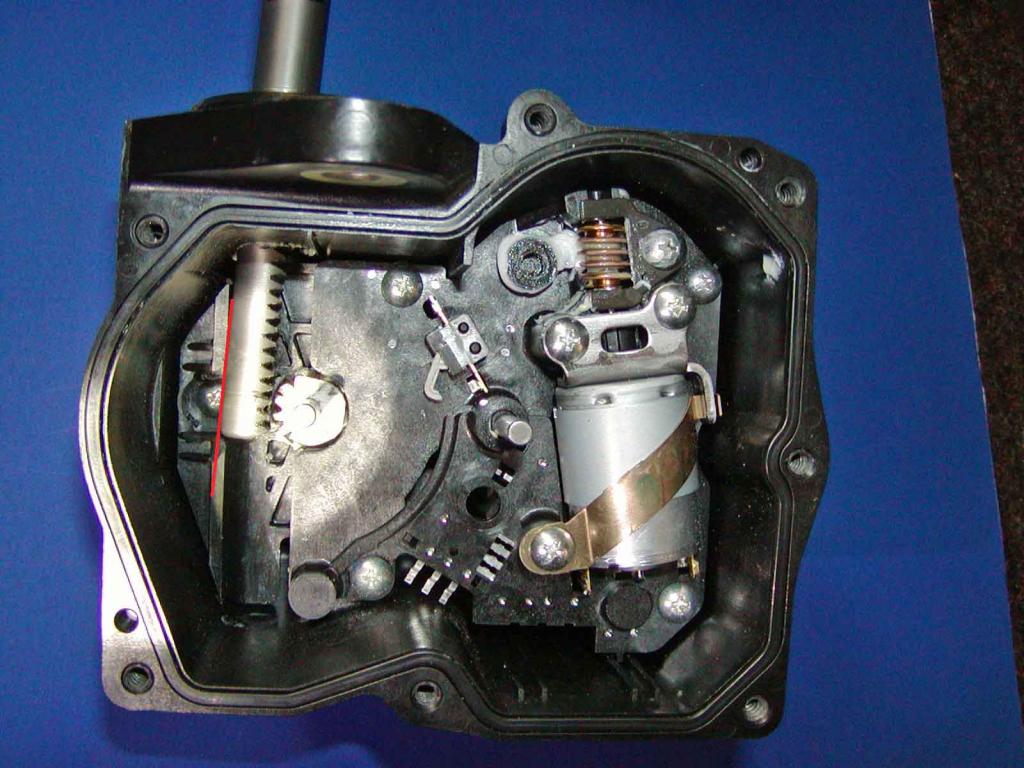
The picture below shows what happens after the o-ring is replaced and the housing is reattached to the rack. Since the plastic behind the rack has been broken away, the rack may or may not engage correctly with the drive gear. There is no way to be 100 percent sure the gear will engage.
My findings are not based on speculation. I built this test setup to verify.
More info to follow�.
Here�s a photo of the drive gear and how it engages with the rack.
The next photo shows the rack engaged with the (paper) drive gear in the TRANSFER CASE UNLOCK position. This is the position everything would be in just prior to rotating the actuator housing counter clockwise to disengage the actuator housing from the rack.
NOTE: Nothing inside the actuator housing moves when the actuator housing is pulled away from the transfer case. The rack pulls out of the transfer case. The rack does not pull out of the actuator housing.
The red line shows the alignment of the rack and gear prior to twisting.
Next photo shows actuator housing turned counter clockwise to disengage the rack teeth from the drive gear. There is no clearance for the round (wider) part of the shaft. The plastic in the red circled area breaks away, allowing the rack to be pulled out of the housing.
The picture below shows what happens after the o-ring is replaced and the housing is reattached to the rack. Since the plastic behind the rack has been broken away, the rack may or may not engage correctly with the drive gear. There is no way to be 100 percent sure the gear will engage.
My findings are not based on speculation. I built this test setup to verify.
More info to follow�.
02-19-14, 06:10 PM
#108
Lexus Champion
I like your testing setup and outcome! Great job!!
Sort of lost when you say plastic breaks away. Before it breaks does the plastic run the length of the rod like the red line?
Sort of lost when you say plastic breaks away. Before it breaks does the plastic run the length of the rod like the red line?
02-19-14, 07:38 PM
#109
Pole Position
No, it does not run the length of the rack slide area. There is a cutout adjacent to the drive gear. This is where the plastic breaks.
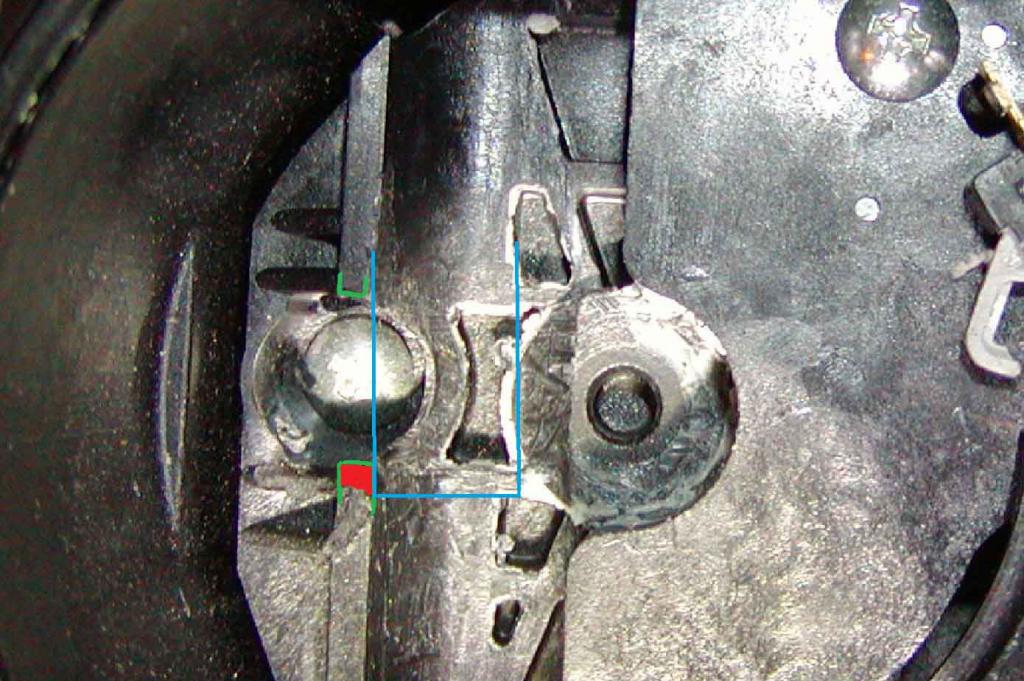
Refer to pic :
Blue represents the rack in unlocked position. Red is the area that breaks off when rack is rotated CCW. It is not much of break, but it is in just the right spot to cause problems. The rack is really "floppy" in the unlocked position once it has been rotated and then reassembled. If you look closely, you will see the area directly below the red is also chipped and compromised.
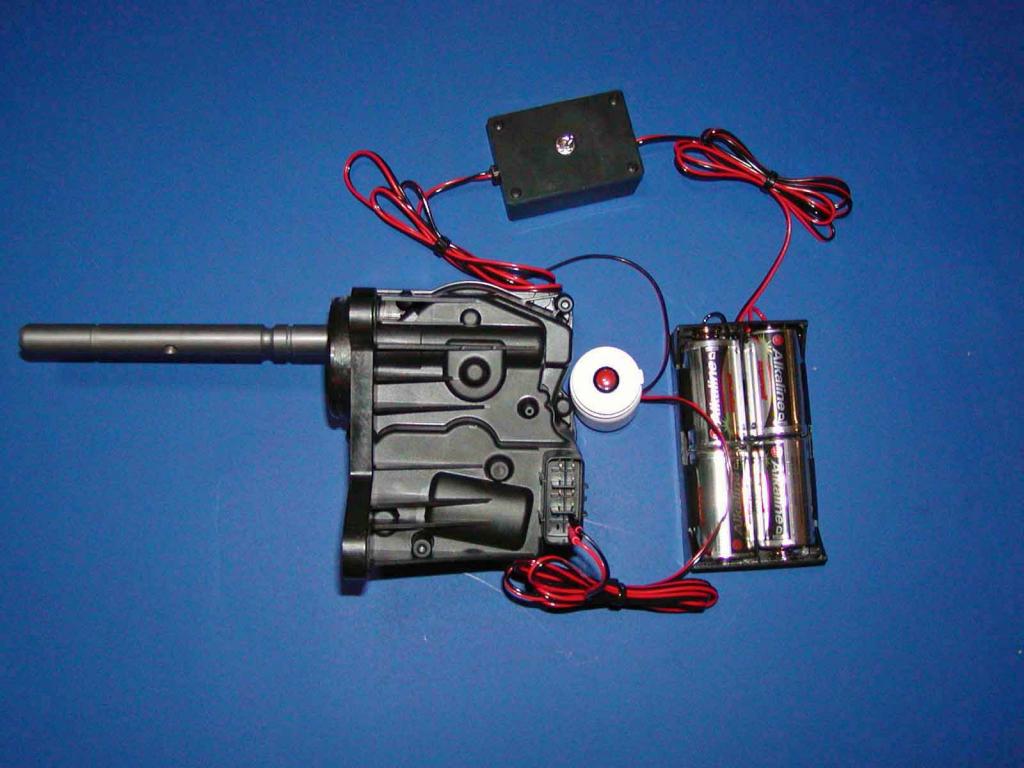
Test setup works great for running the actuator in and out. Actuator motor drive has plenty of torque even down to 3 volts!
Refer to pic :
Blue represents the rack in unlocked position. Red is the area that breaks off when rack is rotated CCW. It is not much of break, but it is in just the right spot to cause problems. The rack is really "floppy" in the unlocked position once it has been rotated and then reassembled. If you look closely, you will see the area directly below the red is also chipped and compromised.
Test setup works great for running the actuator in and out. Actuator motor drive has plenty of torque even down to 3 volts!
02-20-14, 08:34 AM
#111
Pole Position
No. I picked this broken actuator up from a Lexus dealer. Went for an estimate on the o-ring repair ($1300). Service manager had this broken actuator for "show and tell". Talked him into parting with it for some $ - no sales tax and no receipt.
I don't actually see anything wrong with this actuator. They said it did not send the proper signals to the dif lock computer. I think it is just a 'dirty' rotary timing wheel.
My GX is still on the road and still leaking oil all over the driveway.
I don't actually see anything wrong with this actuator. They said it did not send the proper signals to the dif lock computer. I think it is just a 'dirty' rotary timing wheel.
My GX is still on the road and still leaking oil all over the driveway.
02-20-14, 09:27 AM
#112
Pole Position
More pictures:
This is what you see when the cover is removed.
There is another photo on the forums that shows the interior or the actuator. It looks different from mine. Mine shows exactly what you would see when lifting off the cover.
That 'other photo' shows the interior after unscrewing the timing mechanism from inside the top cover and placing the timing mechanism on the gears.
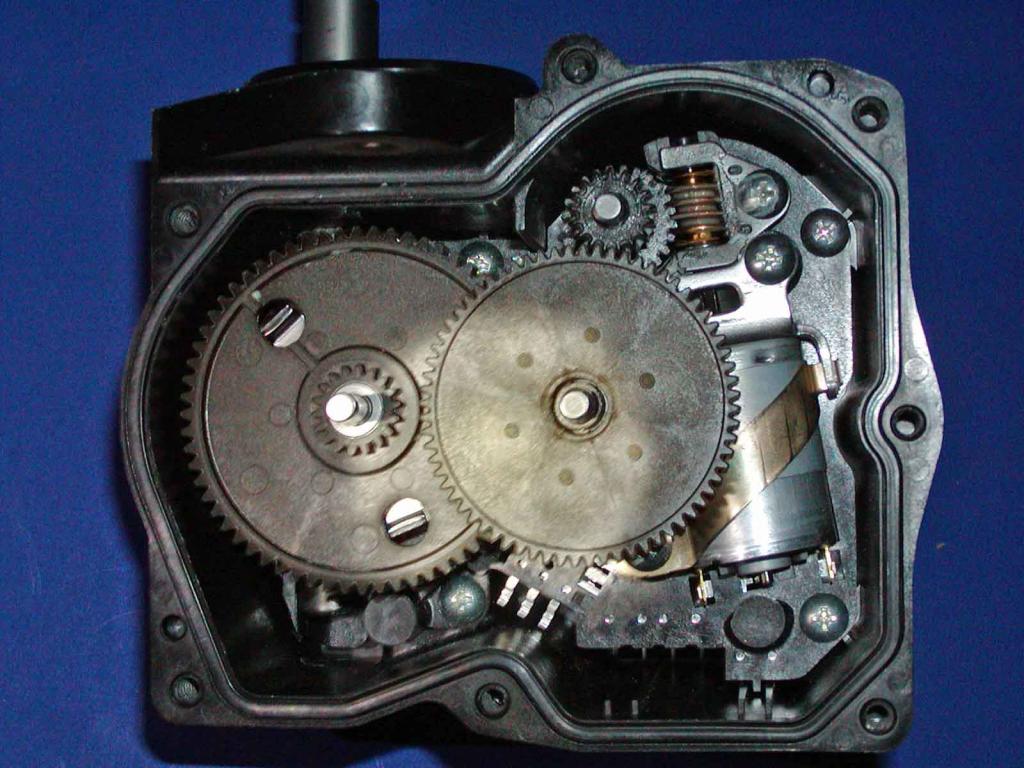
This is the view inside the cover. The timing mechanism is screwed to the cover and meshes with the drive gears when the cover is put back on. The timing mechanism could be thrown off by the slightest bump. Virtually no friction holding the wheel in place. Very dangerous to remove the cover! If any of you have done VCR repairs you will recognize that style of timing wheel !!!
Last photo shows which gears are going to fall out if you'd attempt to remove the cover while the actuator is still on the vehicle. Actually, some of these parts may stick to the cover even when removing the cover on the work bench. Ask me how I know this. LOL,

This is what you see when the cover is removed.
There is another photo on the forums that shows the interior or the actuator. It looks different from mine. Mine shows exactly what you would see when lifting off the cover.
That 'other photo' shows the interior after unscrewing the timing mechanism from inside the top cover and placing the timing mechanism on the gears.
This is the view inside the cover. The timing mechanism is screwed to the cover and meshes with the drive gears when the cover is put back on. The timing mechanism could be thrown off by the slightest bump. Virtually no friction holding the wheel in place. Very dangerous to remove the cover! If any of you have done VCR repairs you will recognize that style of timing wheel !!!
Last photo shows which gears are going to fall out if you'd attempt to remove the cover while the actuator is still on the vehicle. Actually, some of these parts may stick to the cover even when removing the cover on the work bench. Ask me how I know this. LOL,
02-20-14, 09:46 AM
#113
Lexus Test Driver
So where does this Seal go?
My X-fer case is "wet" now but not really dripping yet--Looks like the only way to do it correctly is to pay the $$$$$ and not break anything, mine will stay Wet for a while lol.
Im loving these pictures and your time explaining--Thanks!
My X-fer case is "wet" now but not really dripping yet--Looks like the only way to do it correctly is to pay the $$$$$ and not break anything, mine will stay Wet for a while lol.
Im loving these pictures and your time explaining--Thanks!
02-20-14, 09:55 AM
#114
Pole Position
More photos:
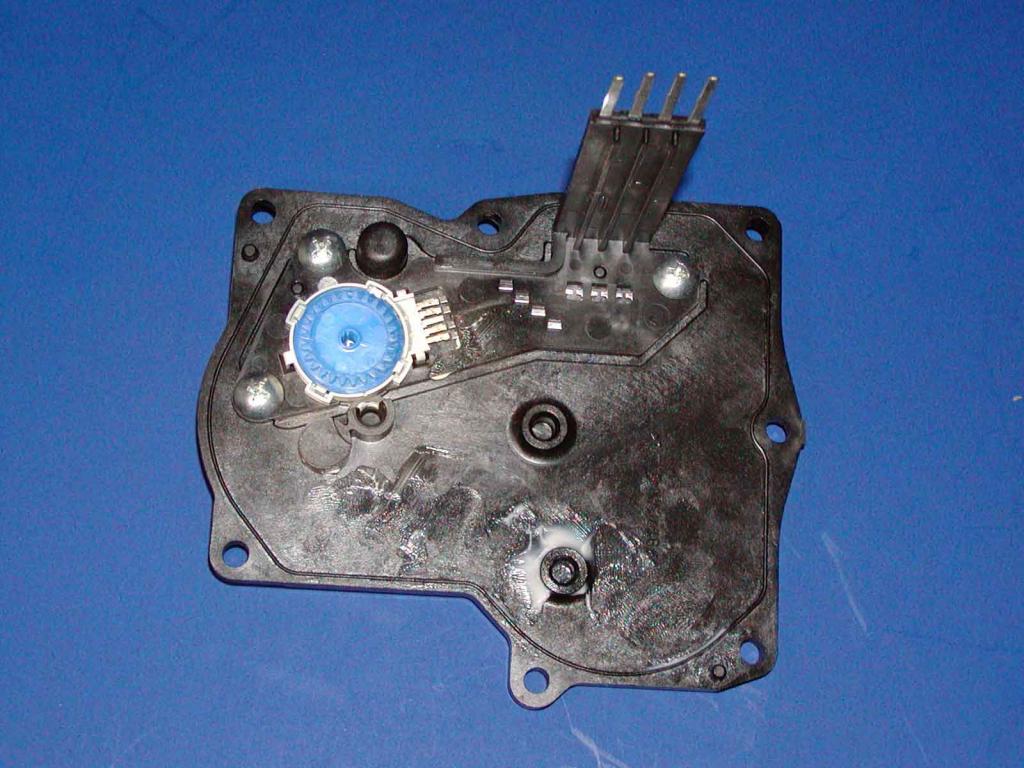
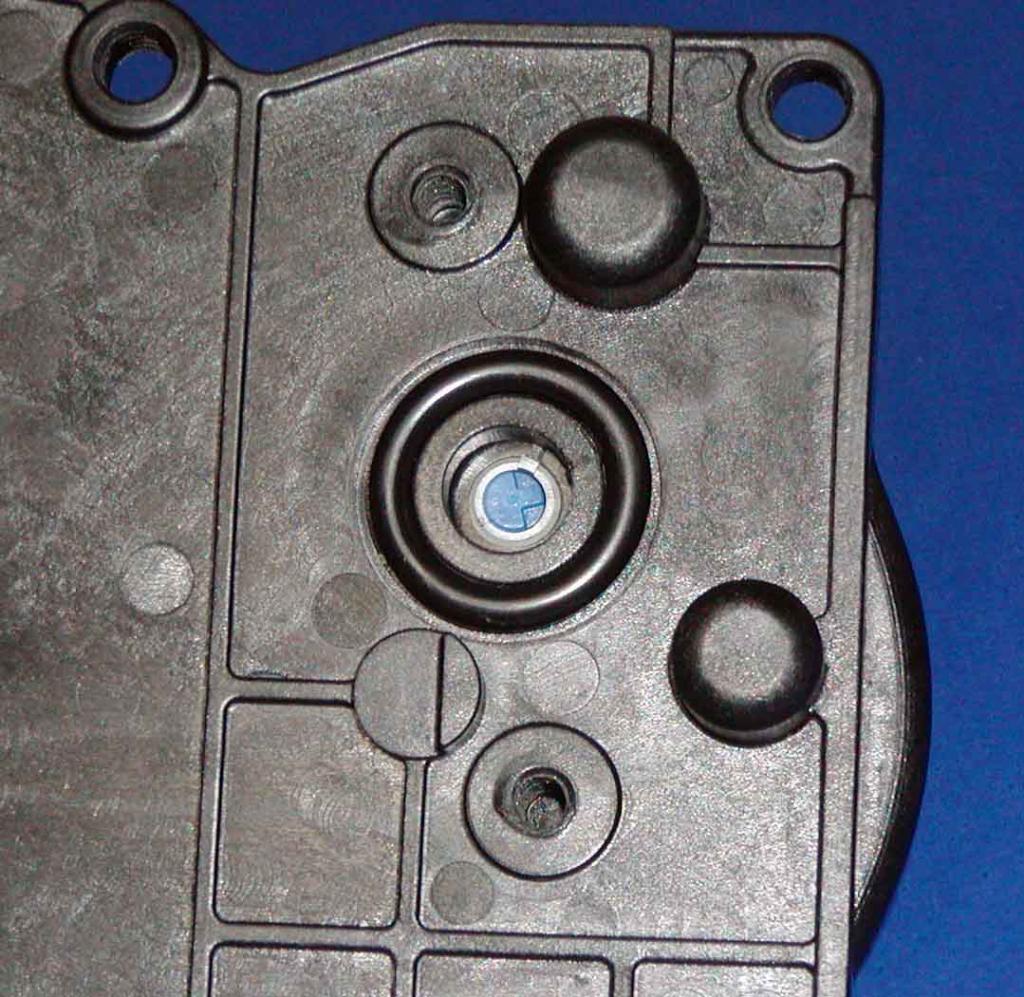
There is a metal cover on the actuator case. When the metal cover is removed, the backside of the timing wheel is visible. The blue portion rotates and the white circular portion is stationary.
EDIT:
My 2004 GX actuator does not have that metal cover over the timing index. I suspect that was added later to facilitate removing the actuator without splitting the case.
Last edited by 470reasons; 03-14-14 at 01:52 PM.
02-20-14, 10:36 AM
#115
Pole Position
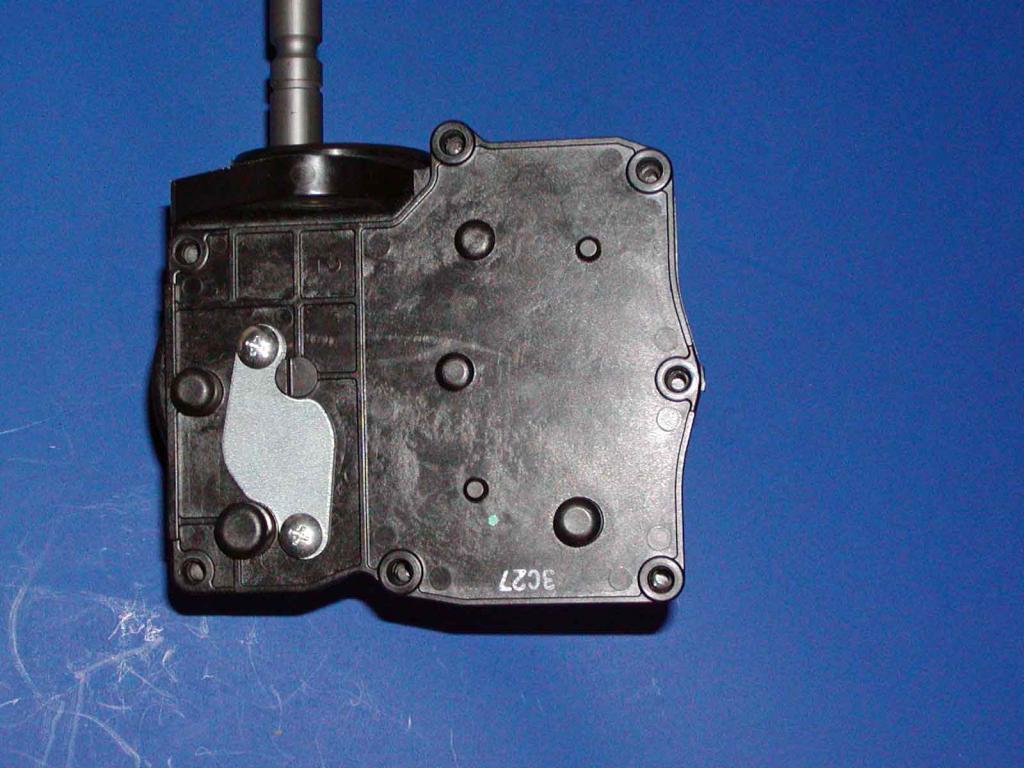
Seal locations:
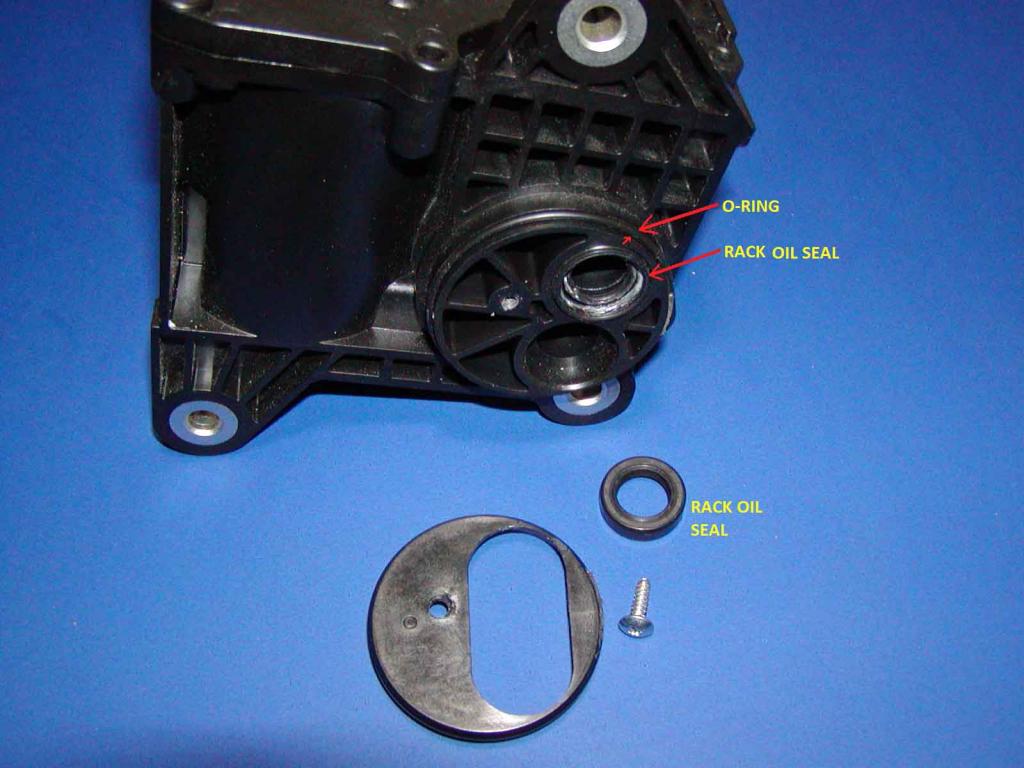
There is only 1 rack oil seal. That bottom hole is a blank. Nothing goes there.
Seal part numbers:
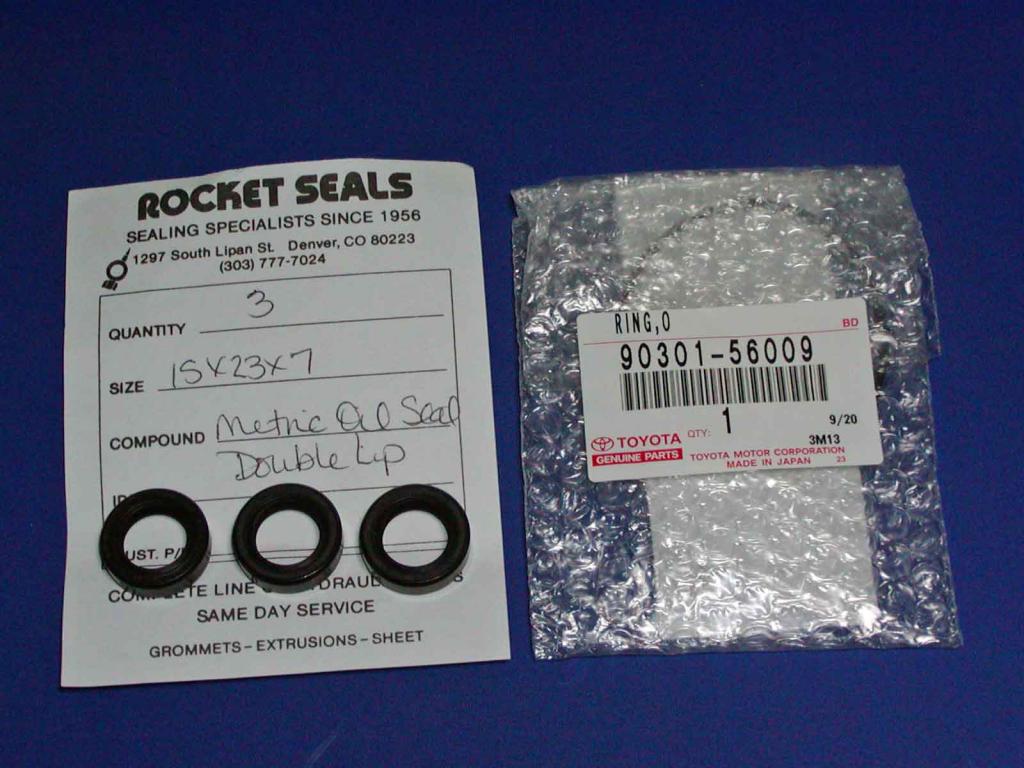
If you need the rack oil seal and call Rocket Seals (can't order on-line) they'll know exactly what you need. Sales guy said they sell a ton of these to Lexus dealers and GX owners. How do you know you need the rack seal? If oil pours out of the actuator housing when it is removed from the rack, you need the rack seal. Better to order in advance and just change the d@mn thing.
There is only 1 rack oil seal. That bottom hole is a blank. Nothing goes there.
Seal part numbers:
If you need the rack oil seal and call Rocket Seals (can't order on-line) they'll know exactly what you need. Sales guy said they sell a ton of these to Lexus dealers and GX owners. How do you know you need the rack seal? If oil pours out of the actuator housing when it is removed from the rack, you need the rack seal. Better to order in advance and just change the d@mn thing.
02-20-14, 11:20 AM
#116
Pole Position
Question???
For any of you that have pulled out your actuator:
When the 3 bolts on the actuator housing are removed and the actuator is pulled back away from the transfer case housing - Approximately how much space is there between the actuator case and the transfer case housing. Can you even see the o-ring at this point?
03-14-14, 01:39 PM
#117
Pole Position
Can't let this thread die! 35,000+ views and counting.
Well, today was the day!
Changed the actuator o-ring.
Nothing went as planned.
I had written a 4-page step-by-step procedure to follow. I rehearsed the procedure many times on the spare actuator. I�ll cut to the ending first. New o-ring is on and there is no leak! Truck drives perfectly in 4-high with diff unlocked. Not sure WHAT will happen if I shift to 4-low and the diff tries to lock.
I tried to pull back the actuator as described many times on the forums. I knew something was wrong as soon as I pulled back on the actuator. First the rack pulled out of the transfer case about 1� and that is probably the normal amount. I gingerly pulled back on the actuator to make sure it was at the end of the travel. The actuator just kept pulling off the rack! ALL THE WAY OFF THE BACK OF THE RACK!
No twisting no crunching; it could have been walked off with just my pinky fingers, no tugging involved.
The gears in the actuator were locked so the actuator was just sliding off the rack.
At this point, I figured someone had already tried to do the �pull & twist� repair and screwed it up.
However, the o-ring was flat and had not been changed - unless it was done many years ago. I have a very cool lighted magnifier and was able to inspect the inside of the actuator through the rack hole. Nothing wrong in there. No cracked plastic and the drive gear looked O.K. No evidence of oil in the actuator housing, so I didn�t change the rack oil seal.
So, WTF? I had written, tested, and had a proven repair procedure ready to go, but couldn�t use it.
I cleaned everything, installed a new o-ring and greased the rack. Put it all back together by just sliding the actuator back on the rack and bolted it up to the transfer case. Their is some tension on the actuator rack as I could feel it pressing the actuator into the case, so it�s solidly in the unlocked position. (There's a clock spring on the drive gear to help keep tension on the rack and hold it in the unlocked position) Didn't know what type oil was in the case, so I changed the oil (looked like it had JUST been changed). Used Mobil 1 synthetic 75W-90.
Now the big question is, will the drive gear engage the teeth on the rack and pull the rack to the locked position? I want to be able to use 4-low, so I need to find out. My plan is to explain my predicament to a Lexus service manager, get a quote for a new actuator install. If the quote sounds reasonable (around $2200), I�ll try to put the GX into the locked position right there at the Lexus dealer and see what happens. I�ll either be leaving the dealership in my GX or a loaner!
TIP: For cleaning the diff oil off the driveway I used �Purple Power Driveway and Concrete Cleaner� This stuff works! Scrubbed it into the concrete with a metal brush and an acid brush on a long handle. Only about $9.00 for a gallon of concentrate at Advance Auto. I may have killed my neighbor's grass...
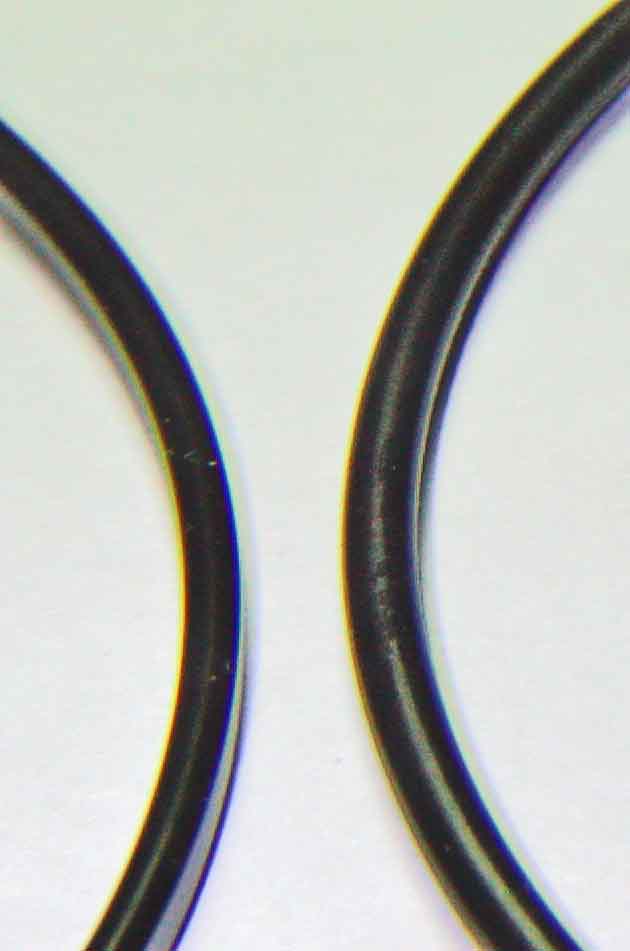
New o-ring is on the right.
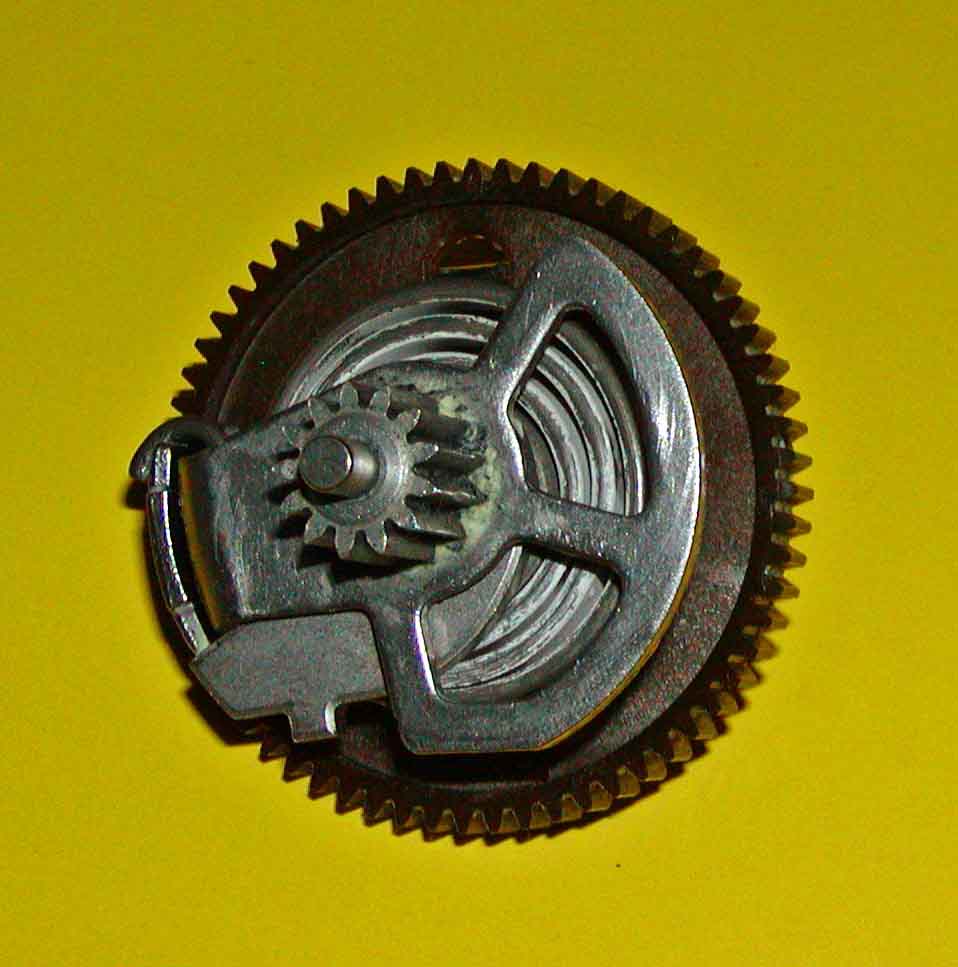
Clock Spring on Drive Gear
Well, today was the day!
Changed the actuator o-ring.
Nothing went as planned.
I had written a 4-page step-by-step procedure to follow. I rehearsed the procedure many times on the spare actuator. I�ll cut to the ending first. New o-ring is on and there is no leak! Truck drives perfectly in 4-high with diff unlocked. Not sure WHAT will happen if I shift to 4-low and the diff tries to lock.
I tried to pull back the actuator as described many times on the forums. I knew something was wrong as soon as I pulled back on the actuator. First the rack pulled out of the transfer case about 1� and that is probably the normal amount. I gingerly pulled back on the actuator to make sure it was at the end of the travel. The actuator just kept pulling off the rack! ALL THE WAY OFF THE BACK OF THE RACK!
No twisting no crunching; it could have been walked off with just my pinky fingers, no tugging involved.
The gears in the actuator were locked so the actuator was just sliding off the rack.
At this point, I figured someone had already tried to do the �pull & twist� repair and screwed it up.
However, the o-ring was flat and had not been changed - unless it was done many years ago. I have a very cool lighted magnifier and was able to inspect the inside of the actuator through the rack hole. Nothing wrong in there. No cracked plastic and the drive gear looked O.K. No evidence of oil in the actuator housing, so I didn�t change the rack oil seal.
So, WTF? I had written, tested, and had a proven repair procedure ready to go, but couldn�t use it.
I cleaned everything, installed a new o-ring and greased the rack. Put it all back together by just sliding the actuator back on the rack and bolted it up to the transfer case. Their is some tension on the actuator rack as I could feel it pressing the actuator into the case, so it�s solidly in the unlocked position. (There's a clock spring on the drive gear to help keep tension on the rack and hold it in the unlocked position) Didn't know what type oil was in the case, so I changed the oil (looked like it had JUST been changed). Used Mobil 1 synthetic 75W-90.
Now the big question is, will the drive gear engage the teeth on the rack and pull the rack to the locked position? I want to be able to use 4-low, so I need to find out. My plan is to explain my predicament to a Lexus service manager, get a quote for a new actuator install. If the quote sounds reasonable (around $2200), I�ll try to put the GX into the locked position right there at the Lexus dealer and see what happens. I�ll either be leaving the dealership in my GX or a loaner!
TIP: For cleaning the diff oil off the driveway I used �Purple Power Driveway and Concrete Cleaner� This stuff works! Scrubbed it into the concrete with a metal brush and an acid brush on a long handle. Only about $9.00 for a gallon of concentrate at Advance Auto. I may have killed my neighbor's grass...
New o-ring is on the right.
Clock Spring on Drive Gear
Last edited by 470reasons; 03-14-14 at 04:36 PM.
03-19-14, 04:28 PM
#118

Been lurking this forum for a couple years since I got my '04.
Today I brought it to my friend shop for the oring transfer case leaking for some months. I showed him this thread and he said there is no way we can pull the actuator without the shaft and not damage the actuator. Checked the online bulletin and it required remove everything including the transmission, that should take a whole day so I decided to just try it the Ez way by pull the actuator just a lil bit (will see oring right away) and clean it and apply silicon. We'll see in a couple days if it stops leaking.
Today I brought it to my friend shop for the oring transfer case leaking for some months. I showed him this thread and he said there is no way we can pull the actuator without the shaft and not damage the actuator. Checked the online bulletin and it required remove everything including the transmission, that should take a whole day so I decided to just try it the Ez way by pull the actuator just a lil bit (will see oring right away) and clean it and apply silicon. We'll see in a couple days if it stops leaking.
03-19-14, 05:00 PM
#119
Pole Position
Been lurking this forum for a couple years since I got my '04.
Today I brought it to my friend shop for the oring transfer case leaking for some months. I showed him this thread and he said there is no way we can pull the actuator without the shaft and not damage the actuator. Checked the online bulletin and it required remove everything including the transmission, that should take a whole day so I decided to just try it the Ez way by pull the actuator just a lil bit (will see oring right away) and clean it and apply silicon. We'll see in a couple days if it stops leaking.
Today I brought it to my friend shop for the oring transfer case leaking for some months. I showed him this thread and he said there is no way we can pull the actuator without the shaft and not damage the actuator. Checked the online bulletin and it required remove everything including the transmission, that should take a whole day so I decided to just try it the Ez way by pull the actuator just a lil bit (will see oring right away) and clean it and apply silicon. We'll see in a couple days if it stops leaking.
Mine just kept on coming off.
You are going to have to clean the area very well to get the RTV to work. Rubbing alchol and strips of Handi wipe might work. Permatex Black RTV should work.
I experimented with trying to cut off the old o-ring and install a new cut o-ring and then glue the new ring together. There's not much space to work and all the gear oil would have to be completely removed from the area where the gluing would be done. The right super glue works great on o-rings for the initial bond. Then put some Permatex Black RTV in the o-ring groove where the splice is and it should be good to go.
Here's an actuator o-ring that I cut and glued. Loctite sells a kit with o-ring stock and a tube of glue. I just used Loctite Super Glue (not the gell kind).
 03-19-14, 05:08 PM
#120
Pole Position
Howlycowe:
Your actuator is different from the spare actuator I was working with. I see that only the one drive gear and drive gear shaft fell out of yours when the cover was removed. (Position of that gear doesn't matter luckily.) The actuator on my GX did not have the metal access cover shown on the one in my pictures above. I guess there are several different versions of the actuator.
Your actuator is different from the spare actuator I was working with. I see that only the one drive gear and drive gear shaft fell out of yours when the cover was removed. (Position of that gear doesn't matter luckily.) The actuator on my GX did not have the metal access cover shown on the one in my pictures above. I guess there are several different versions of the actuator.