
8052JZ's NA-T Build
 12-29-15, 11:32 AM
#961

Thanks guys.
Been working on the rear seat delete and still messing around on how I want to do this. I started cutting up some foam board to get an idea of how to get this going and I think the foam bard might be a good start. Very light weight and super cheap at 14$ for a 10x4 sheet. The entire sheet is more than half the weight of the rear seats.
Made a template out of some plastic cardboard I had laying around.
Than cut out the foam bard into three pieces so it can be removed easily. Nex thing to do is shape the edges so its a snug fit.

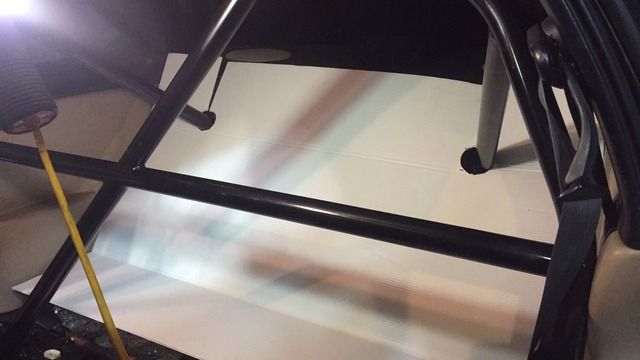
Still contemplating If i want to use the rear bottom half of the seat as a base or start from scratch. So I went ahead and took the leather liner off and shaped the seat around the passenger side bars to see what I can work with.


To be continued.......
Been working on the rear seat delete and still messing around on how I want to do this. I started cutting up some foam board to get an idea of how to get this going and I think the foam bard might be a good start. Very light weight and super cheap at 14$ for a 10x4 sheet. The entire sheet is more than half the weight of the rear seats.
Made a template out of some plastic cardboard I had laying around.

Than cut out the foam bard into three pieces so it can be removed easily. Nex thing to do is shape the edges so its a snug fit.

Still contemplating If i want to use the rear bottom half of the seat as a base or start from scratch. So I went ahead and took the leather liner off and shaped the seat around the passenger side bars to see what I can work with.


To be continued.......

 01-04-16, 10:51 AM
#965
So I've been messing with this idea all weekend long and I might be tossing the towel on this on. Its a bit complicated to work with and to make it look like an OEM fit. I may try to find an upholstery shop to get something made up or just spray on some carpet foam padding with a tan carpet that will match the interior and call it a day. Its a bit of a hassle and ALOT of work for whats it worth. We shall see.
01-12-16, 01:32 PM
#966
Driver School Candidate

Join Date: Nov 2013
Location: CA
Posts: 43
Likes: 0
Received 0 Likes
on
0 Posts
The transformation of your SC from inception (you began this thread in 2013) to now, is just great!
You went from the stock GE intake setup to the FFIM, and from the smaller turbo to the beast you are running now.. All great work!
your GE build has definitely got my thought process going since I have a spare GE sitting in my garage...
Good work bro!
You went from the stock GE intake setup to the FFIM, and from the smaller turbo to the beast you are running now.. All great work!
your GE build has definitely got my thought process going since I have a spare GE sitting in my garage...
Good work bro!
01-15-16, 09:27 AM
#967
My buddy is will be covering up the rear seat area at some point when I have the time to drive down a get the materials he needs to get the job done.
In the mean time, I've been getting ready to install one of my xmas presents..

Billet bottle warmer and bracket all in one. Loved the clean look of this so decided to get it from NitrousOutlet.

Bottle ready to go.

In the mean time, I've been getting ready to install one of my xmas presents..

Billet bottle warmer and bracket all in one. Loved the clean look of this so decided to get it from NitrousOutlet.

Bottle ready to go.
 01-27-16, 08:45 AM
#968
Got some work done! The nitrous bottle and bottle heater bracket wired and installed.
reinforced the lower deck for the trunk to mount the bottle heater bracket.

Fed some bolts through.

This is how I will be wiring it up. I think it should work. The line lock I may have armed through the bottle heater switch instead of the "Arm" switch. If I want to do a burn out, I can arm the line lock with the heater and not have the nitrous engaged while I do the burn out. Than flip it off since it takes about 15min to heat up the bottle. Hope that make sense.

And there she is. Plumed and wired in. Didn't get any pics of wiring but its just a standard relay to the pressure switch, than turned on by a Rocker switch.

 01-27-16, 12:31 PM
#972
Turned out great id say. I cleaned the factory trunk carpet as well just haven't put it back in. That fire extinguisher needs to be mounted inside on the cage somewhere so It can be assessed quickly. I've herd these work OK and not to trust them but its better than nothing I guess.
01-28-16, 11:20 AM
#973
Feed line is routed along side with the fuel lines and the solenoids mounted in the bay. I still need to wire them in.

Main line solenoid and purge valve. The purge valve is vented through the cabin filter by a hard line.

Don't mind the dirty bay as it needs a good cleaning...


Main line solenoid and purge valve. The purge valve is vented through the cabin filter by a hard line.

Don't mind the dirty bay as it needs a good cleaning...
