2jzGTE SCs - The Siblings of my Supra MKIV Toys
 02-07-16, 11:49 AM
#3496

Am building the fuel system of Black Pearl to a point where it can support +1500rwhp . Getting it ready for my stroker that will eventually be in this car. You can never be wrong in over doing your fuel system. I will rather be rich in fuel than be lean. You have two choices in closing the bottom of the tank. Fully weld or just shut close the tubes. Decided to use the latter ... hammered the tubes , folded and will spot weld the end of tube too so there is no leak whatsoever. At the same time I can always open the bottom of the tank in the future.
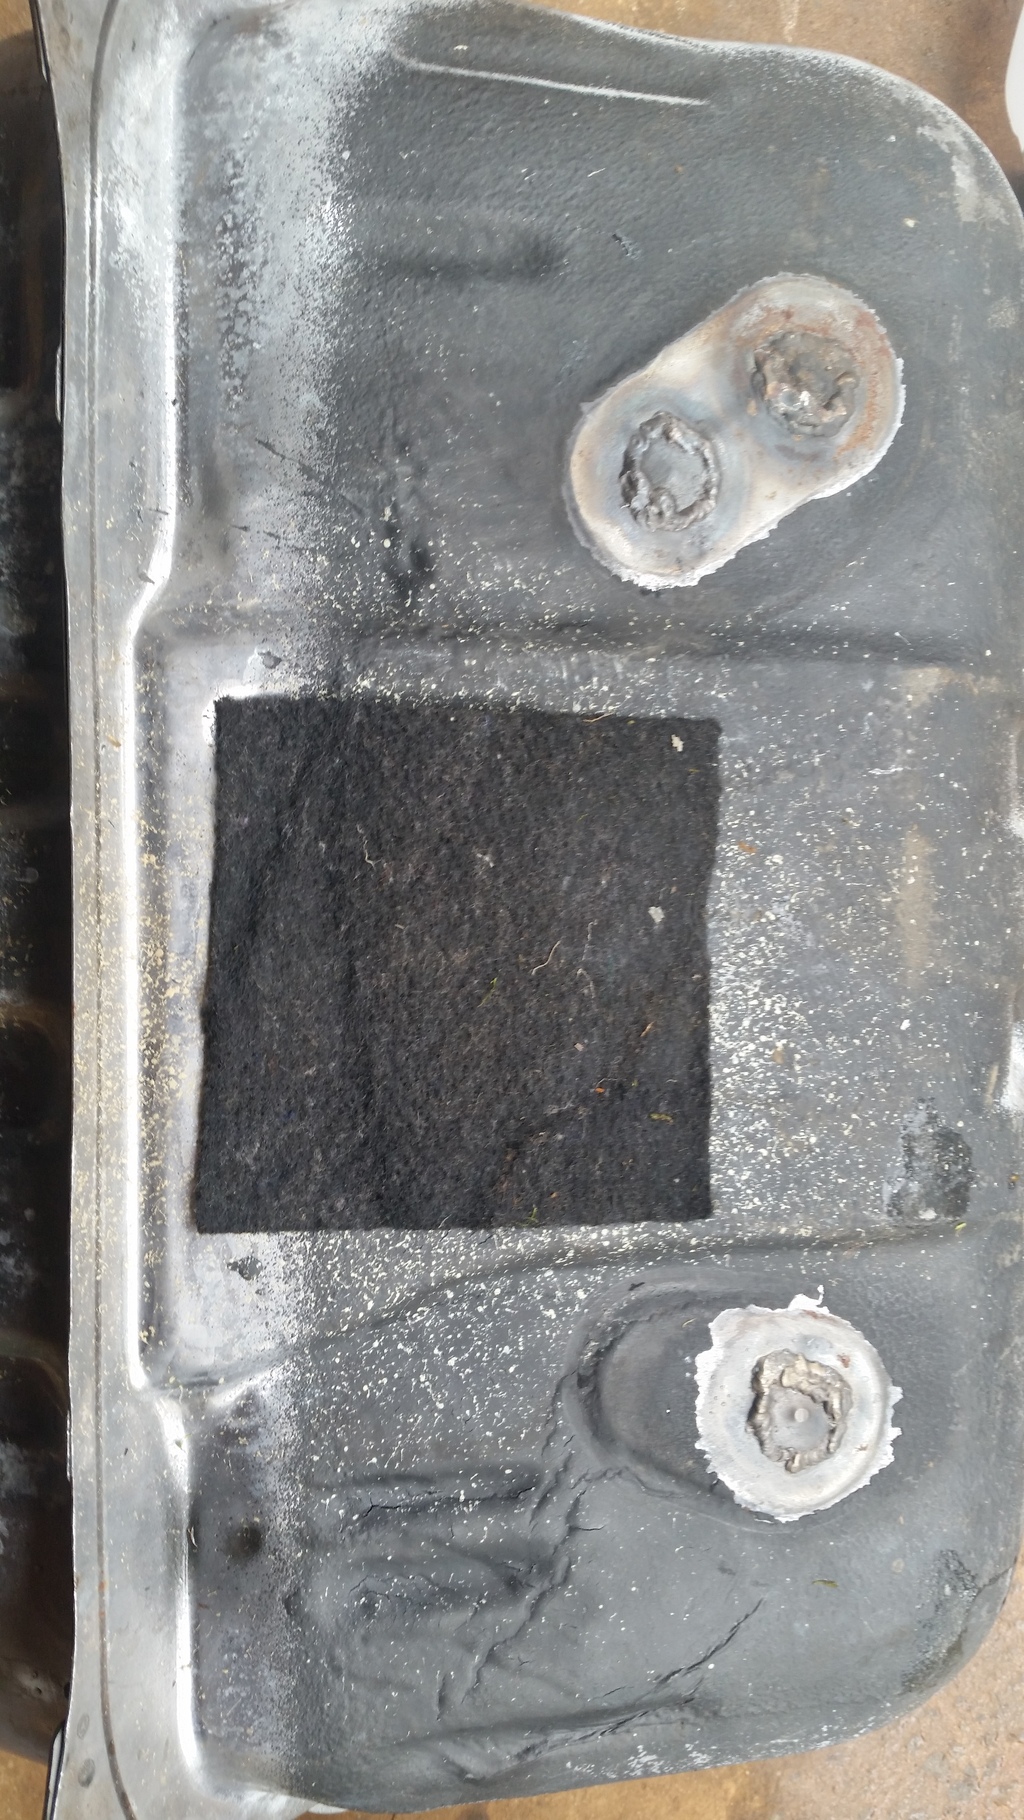
bottom totally shut by welding the holes... not using this tank
I will prefer to use this
but did work on the banjo bolts to prevent leaks... did cut and hammered the tubes
folded them
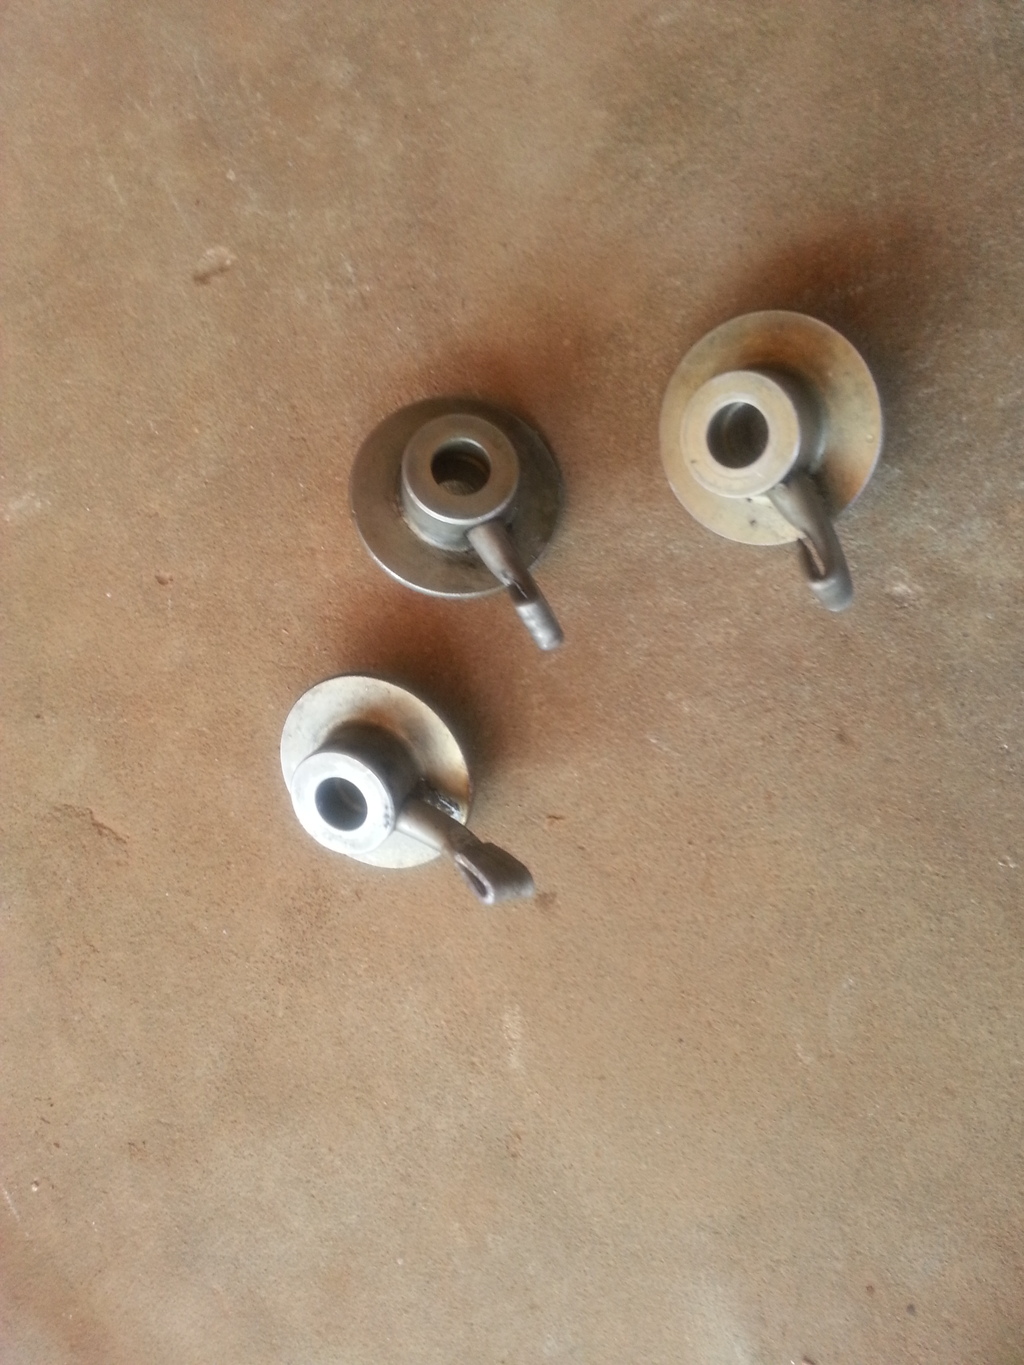

I have yet to spot weld those tube ends just to make sure there is really no leak.
.

bottom totally shut by welding the holes... not using this tank

I will prefer to use this

but did work on the banjo bolts to prevent leaks... did cut and hammered the tubes

folded them


I have yet to spot weld those tube ends just to make sure there is really no leak.
.
 02-08-16, 09:39 AM
#3497

Gerry, I did something similar but instead of folding and hammer the tube, just cut it off at the bonjo and weld it shut. This ensures no leaks whats so ever. If you have the welder just cut them off and plug up the hole. After cutting the ends off the OEM line, there is no other need for them.
02-08-16, 03:11 PM
#3498
Gerry, I did something similar but instead of folding and hammer the tube, just cut it off at the bonjo and weld it shut. This ensures no leaks whats so ever. If you have the welder just cut them off and plug up the hole. After cutting the ends off the OEM line, there is no other need for them.
 .
02-14-16, 07:53 AM
.
02-14-16, 07:53 AM
#3499
Black Pearl (1997 5speed SC300) will be my trophy SC and most likely the only SC that will eventually be left with me so I am going all out with it. Am currently building its fuel system to be able to support +1500rwhp since I have in sight a stroker setup from one of the SF sponsors.
Am installing 3 Denso TT and a Weldon 2345a pumps now so it is ready . It is I know crazy but you can never be wrong in over building your fuel system especially in high power applications. The denso and weldon pumps will be staged depending on boost .
3 pumps.... there is gates hose in between each pump to isolate EMF from each pump
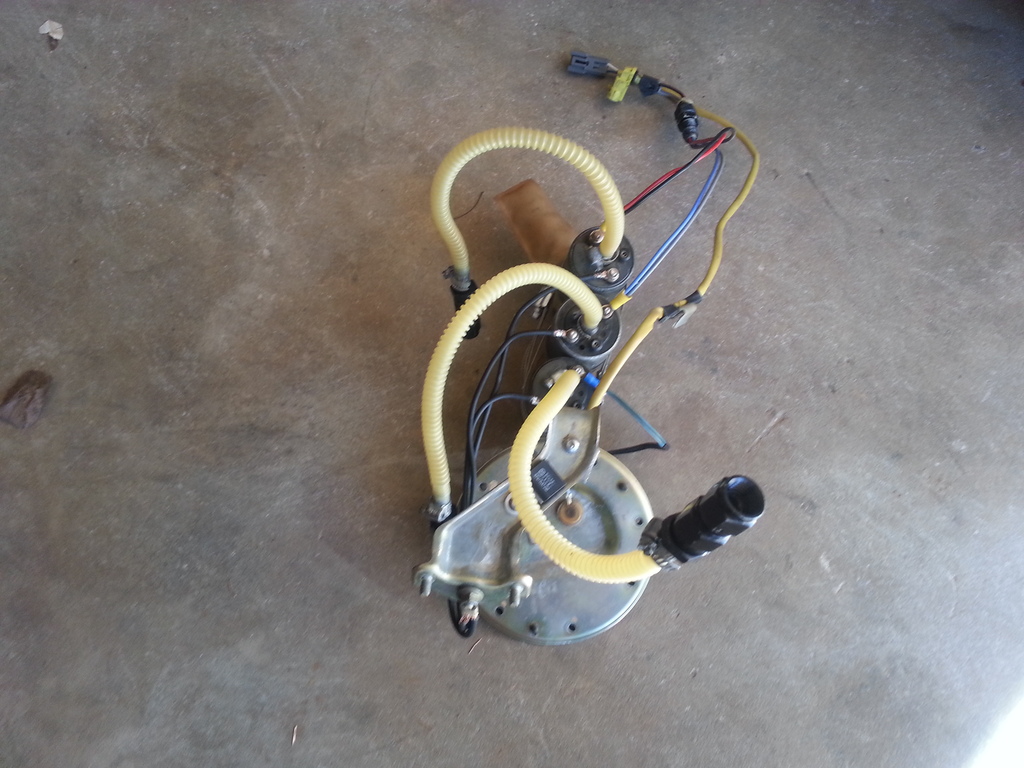
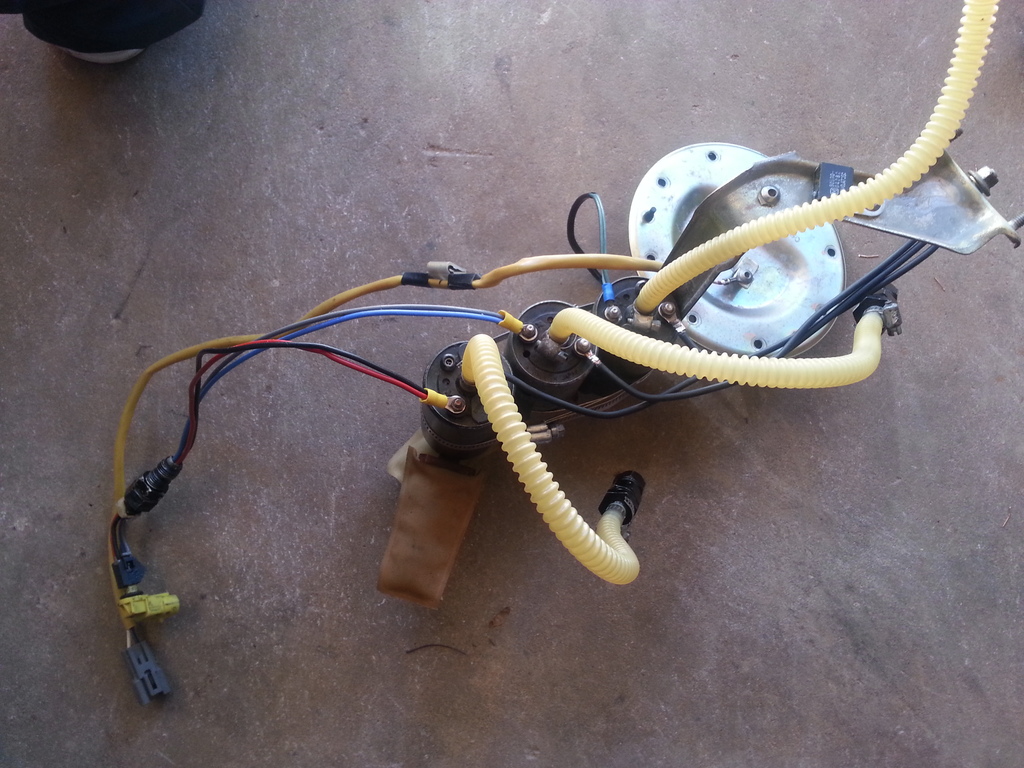
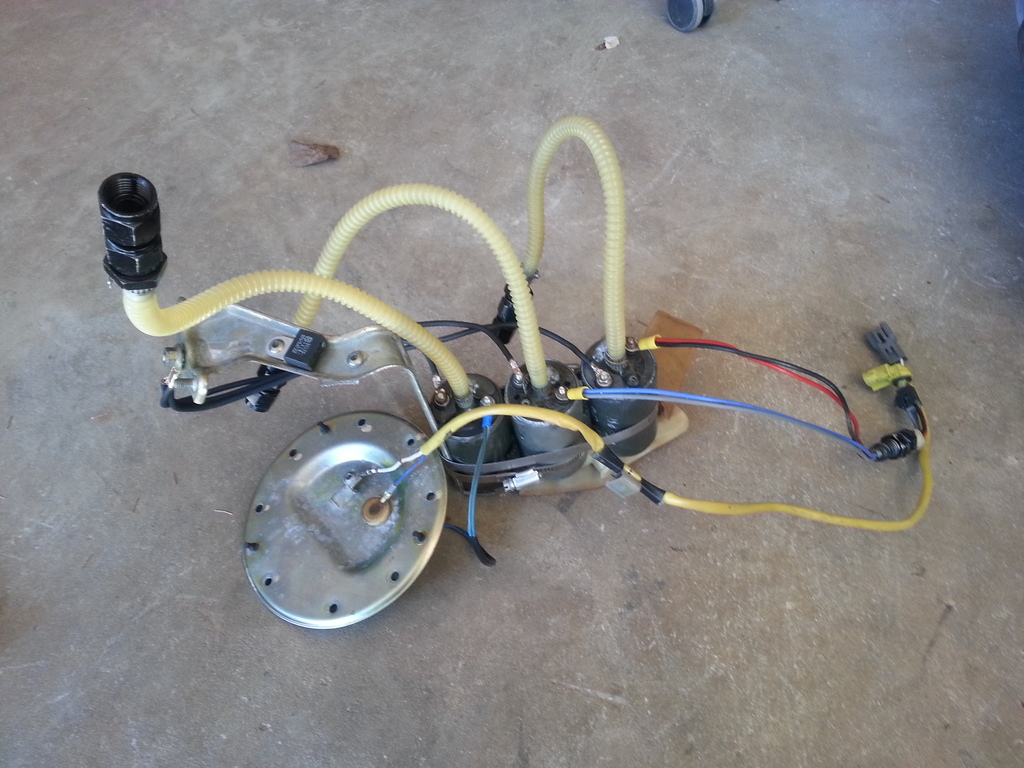
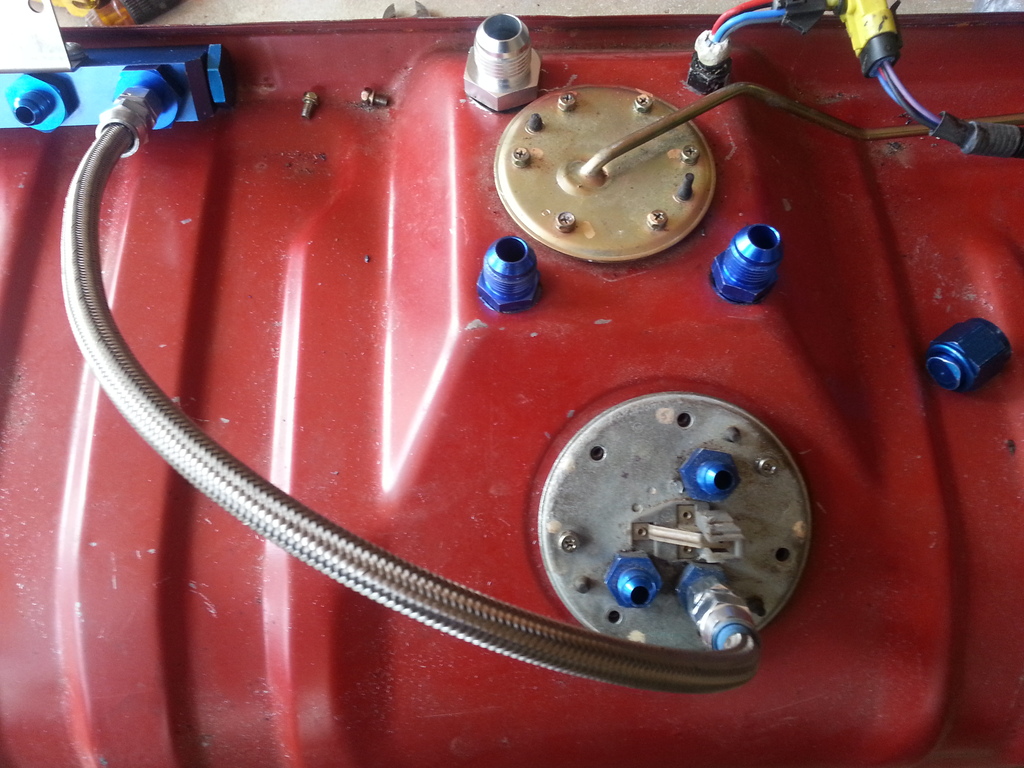
The -12an (blue fitting) will supply fuel for the Weldon 2345a that then goes to the Fuel Manifold where fuel merges with what is coming from the 3 Denso TT pumps . The -8an (black fitting) is the return line for the whole fuel system. The farther the fitting of the return line to any of the feed line ... better , so you avoid any air pockets getting into the feed. Return line can produce bubbles depending on the pressure.
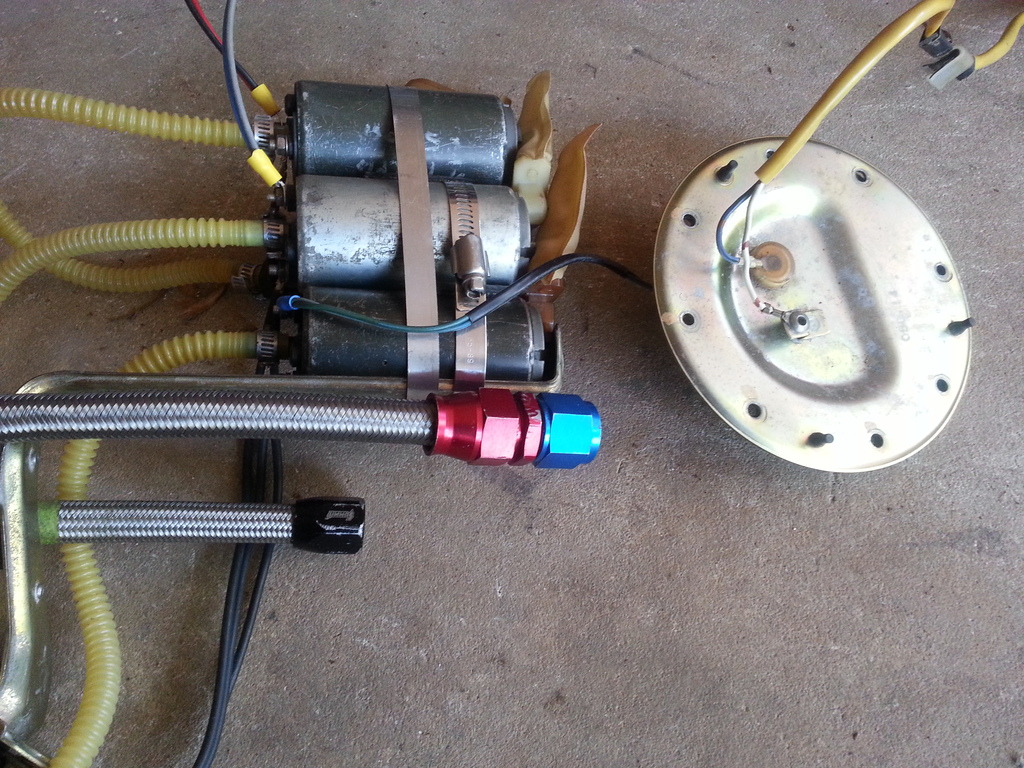
-12an bulkhead on the left supplies fuel ... -8an is the return line
these -6an supplies fuel from the 3 denso TT pumps
Am installing 3 Denso TT and a Weldon 2345a pumps now so it is ready . It is I know crazy but you can never be wrong in over building your fuel system especially in high power applications. The denso and weldon pumps will be staged depending on boost .

3 pumps.... there is gates hose in between each pump to isolate EMF from each pump


The -12an (blue fitting) will supply fuel for the Weldon 2345a that then goes to the Fuel Manifold where fuel merges with what is coming from the 3 Denso TT pumps . The -8an (black fitting) is the return line for the whole fuel system. The farther the fitting of the return line to any of the feed line ... better , so you avoid any air pockets getting into the feed. Return line can produce bubbles depending on the pressure.

-12an bulkhead on the left supplies fuel ... -8an is the return line

these -6an supplies fuel from the 3 denso TT pumps

Last edited by gerrb; 02-14-16 at 09:59 AM.
02-14-16, 12:43 PM
#3500
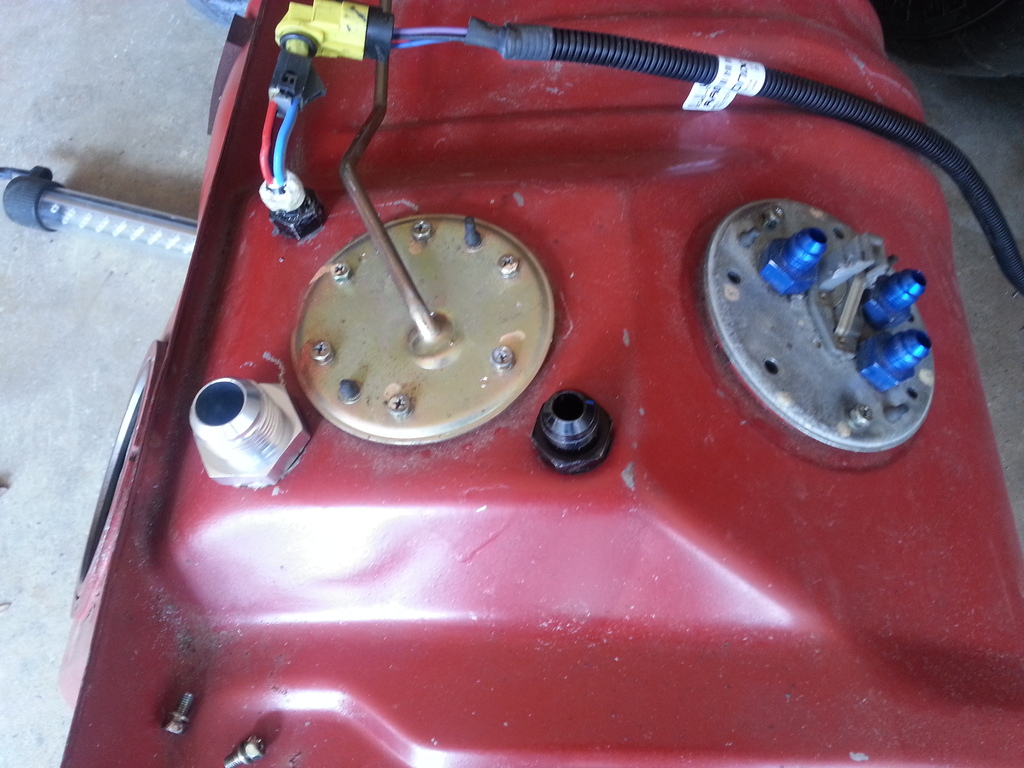
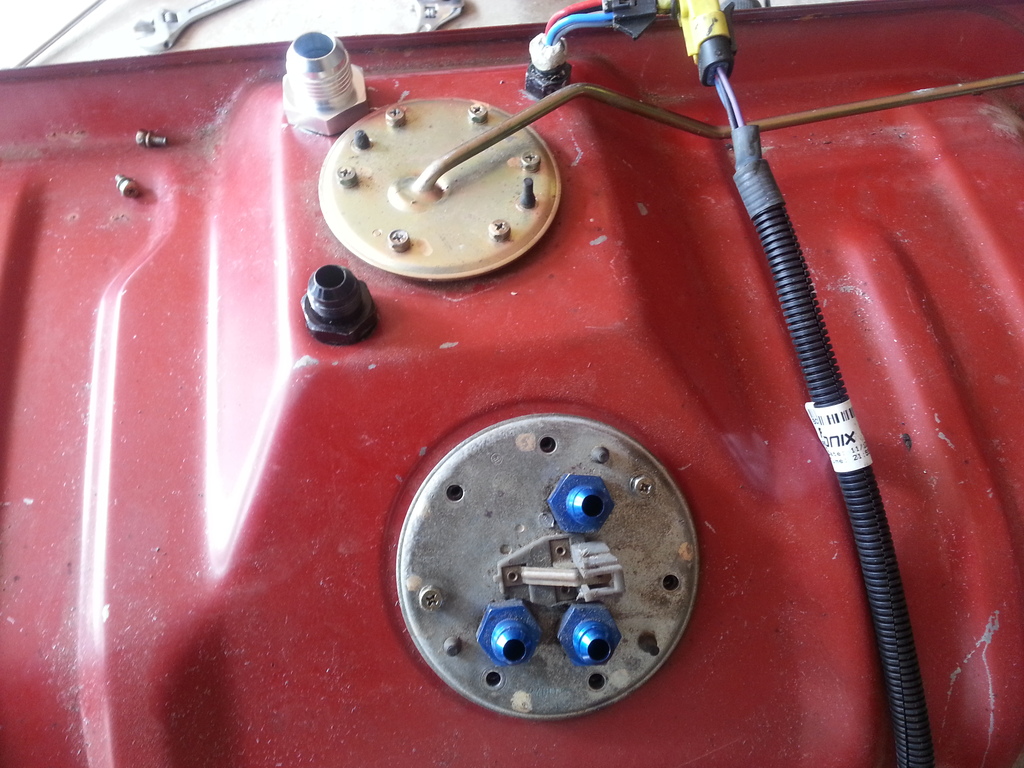
got an an answer to my email from Weldon... they telling me that the Weldon 2345a pump needs a -10an return and need at least a -10an vent on this +1500rwhp application of mine. I got away with a -8an return with my other cars that had also Weldon 2345a pumps. But me having 3 more Denso pumps definitely need a bigger return so fuel presure isn't affected on the return .
On account of that I replaced my -8an return fitting with a -10an and on its right is a -10an Aluminum Fuel Cell Safety Roll Over Vent Valve In Tank Mounted . With the amount of fuel being pumped by the Weldon and my 3 Denso TT pumps , you don't want the fuel tank being crashed due to vacuum if there is not enough venting. But at the same time you do not want fuel to be spilling through the vent if your car rolls over in an accident. I would need to replace the -12 an feed fitting to a 90 degree bulk head since the space under that base speaker is limited.
On account of that I replaced my -8an return fitting with a -10an and on its right is a -10an Aluminum Fuel Cell Safety Roll Over Vent Valve In Tank Mounted . With the amount of fuel being pumped by the Weldon and my 3 Denso TT pumps , you don't want the fuel tank being crashed due to vacuum if there is not enough venting. But at the same time you do not want fuel to be spilling through the vent if your car rolls over in an accident. I would need to replace the -12 an feed fitting to a 90 degree bulk head since the space under that base speaker is limited.

Last edited by gerrb; 02-14-16 at 12:50 PM.
02-15-16, 04:54 AM
#3501

Holy $h!t that's an over built fuel system. My hats off to you what's next 0 gauge battery wire and upgraded alternator to handle the amps. What I want to know is when are you going to invest in a go pro and start a YouTube channel. Gerrbs side by side back to back bat$h!t builds.
02-15-16, 05:26 AM
#3502
Holy $h!t that's an over built fuel system. My hats off to you what's next 0 gauge battery wire and upgraded alternator to handle the amps. What I want to know is when are you going to invest in a go pro and start a YouTube channel. Gerrbs side by side back to back bat$h!t builds.

when they are all painted ... maybe " gerrb's horses gone wild" video is what my local friends say and so many volunteering to drive one .. hahaha
Last edited by gerrb; 02-15-16 at 05:30 AM.
02-16-16, 09:58 AM
#3503
Gerrb,
I gotta hand it to ya; go big or go home. :-)
Anyway, I've tried the 3-Denso route, and you'll quickly realize they don't fit through the tank access holes mounted all together side-by-side-by-side. In fact, two hardly fit. You'll have to install the 3rd pump after installing the first two on the hanger keeping the 3rd worm gear clamp open enough to slip the pump sock through the worm gear and into the slosh bucket. So, make sure the worm gear nut is in a position you can tighten from inside the tank. Otherwise, you'll be cursing yourself pulling the whole assembly back out (from experience).
Speaking of the slosh bucket, is your plan to get all of this to fit inside the bucket? It's difficult to tell from the pictures. If so, I'd be concerned about the fuel return disturbing the fuel pick-ups for all the other pumps. That's a ton of fuel to both consume and return to the tank. I guess you could run with at least a half a tank of gas all the time to prevent from sucking air, but then you're hitting the gas station twice as often to keep the pumps fueled.
If you're plugging the banjo fittings but using them to seal the tank, don't forget to get new rubber seals. it's cheap insurance to prevent fuel leaks. I'm surprised you just didn't use the tank with the banjo holes welded shut... problem solved.
Finally, I've never had a fuel system with fittings or components inside the cabin that didn't weep fumes into the passenger area. If this is your trophy SC, the last thing you'd want is your passengers smelling gas as you accelerate the blood flow from their heads. :-P Just something to consider...
Have you considered mounting the Weldon externally and using the in-tank pumps to feed a sump tank? Then, all the fuel components are external to the chassis, and you'll still have enough gas (maybe not E85) to fuel a 1500hp motor. Plus, there's no chance of sucking air from the Weldon because the sump is always full.
Thanks,
-scott
Last edited by motorheaddown; 02-16-16 at 10:34 AM.
02-16-16, 12:42 PM
#3504
Scott , thanks for your feedbacks. You are right , there is no way , the three will go in clamped together . I have tried two and will go in. True the third will have to be clamped inside and I have done it but got to have small hands like I do so you can make use of the three openings on the fuel tank. You are right , you need to position those worm gears properly so you can tighten them . Yes the three will fit inside the slosh bucket with the third filter at 10 o-clock. I have tried them. I just clamped them outside since I was working on their wiring...so I know how long the wires will be.
The -12 fuel feed will be positioned at the back of the 3 pumps...bottom of slosh bucket. The -10 return line will have a shorter line just above the 3 denso pump so it still return fuel into the slosh tank but doesn't disturb any feed .
For the bottom banjos actually am plugging the small weep / positioning hole and weld -6an steel bulkhead on those banjo holes and just cap them. I just want to have an opportunity to bleed fuel from the bottom since I am taking out the stock lines inside the tank.
I have a Weldon 2345 at the bottom of one of my supra and I hate that loud bumbble bee sound. Inside the trunk it somehow muffles it just like the one I have on Red Mamba One. But I can look into that again . After all when that pump is used, the exhaust sound will be drowning that noise from the pump.
I have considered a sumped tank but One Weldon 2345a wouldn't be enough to power the +1500rwhp stroker motor I am eyeing on E85 that is the reason I wanted the Denso Pumps. Besides while cruising , I would only be using one Denso pump , two at most , staged based on boost so there is less pump noise. I don't want to use the Weldon uselessly on power less than 500rwhp on E85. Aside from the noise it generates , it flows so much that it heats up the fuel uselessly if you are below 500rwhp and so it will only be activated when over 800rwhp E85... just when it is needed.
I have actually made some changes on where all the 6an fittings go. I am not installing any fitting in any tank opening cover. I will look into that smell of fuel into the cabin. On my Red Mamba One where the Weldon 2345 is in the trunk. I never truly smelled anything inside the cabin .
Last edited by gerrb; 02-16-16 at 01:42 PM.
02-19-16, 07:51 AM
#3505
Decided , as Scott suggested, for the Black Pearl I will use the tank whose bottom had already been welded. Problem solved as he says , no possibility of any leak at the bottom.
Though I will prepare two fuel tanks for high HP applications, one for Black Pearl and the other for the Old Man's Tan so needed to clean up two of them. If your fuel tank had sat for a while , due to moisture , it may have some surface rusts inside. I found out that one of the cheapest way to clean out surface rusts was soak the tank with vinegar for a couple of days....poured 6 gallons of vinegar on each tank...
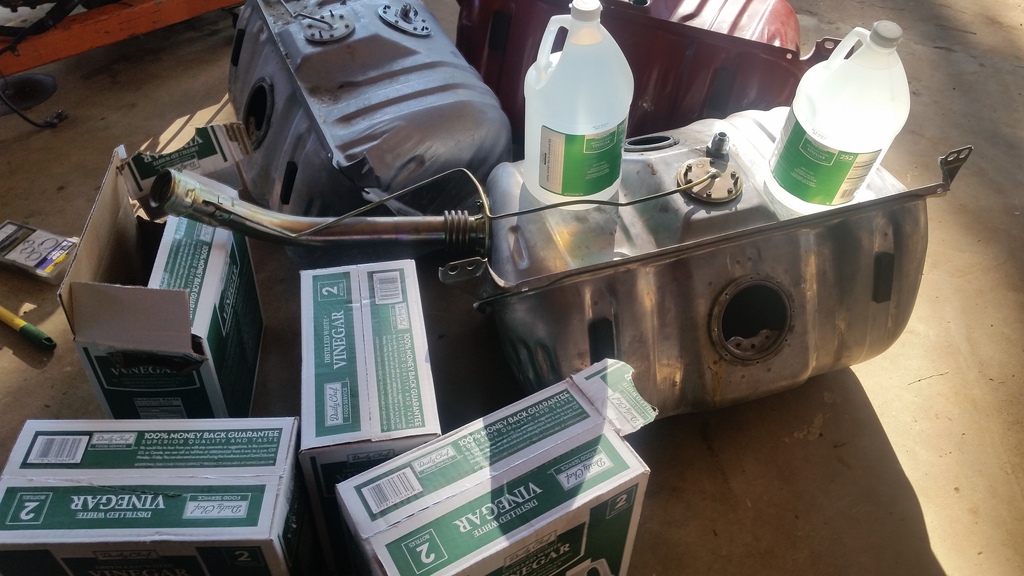
, no possibility of any leak at the bottom.Though I will prepare two fuel tanks for high HP applications, one for Black Pearl and the other for the Old Man's Tan so needed to clean up two of them. If your fuel tank had sat for a while , due to moisture , it may have some surface rusts inside. I found out that one of the cheapest way to clean out surface rusts was soak the tank with vinegar for a couple of days....poured 6 gallons of vinegar on each tank...

 02-21-16, 11:04 AM
#3506
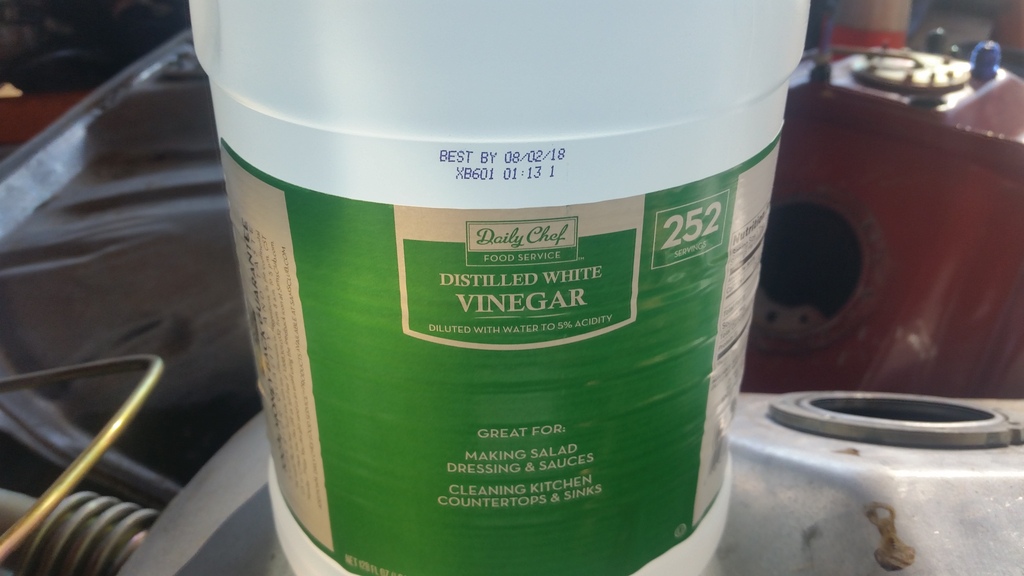
try leaving an empty fuel tank for a year and you will notice that because of moisture , it can turn rusty inside the tank just like this tank which I had sitting empty for more than a year...
but after a 3 days I have soaked it with white vinegar and a bit of brushing and washing it .. here it goes... clean. It will be the fuel tank I will use with Black Pearl . It has the welded bottom. No leaks whatsoever .
but after a 3 days I have soaked it with white vinegar and a bit of brushing and washing it .. here it goes... clean. It will be the fuel tank I will use with Black Pearl . It has the welded bottom. No leaks whatsoever .


 02-22-16, 09:37 AM
#3509
.I guess it was meant to stay with me for a while and get the power train / drive train it truly deserves being a rare original 5 speed 1997 SC300 (1 of 120) . Now with a 2jzgte VVTi / V160 6 speed to start with and slowly build it till I get the damn stroker in there
 .
02-29-16, 08:58 AM
.
02-29-16, 08:58 AM
#3510
Gerb im finally tackling this after like 3 years of parts sitting. My question is hw do you know what pin number is on the plug. Do you count left to right from the female side (where the plug actually plugs in not wire side????). then just wrap around? So if there was 2 rows of pins and 10 pins total... #1 would be top left and #6 would bottom left??
thanks again
thanks again
Here is the Table so you know where each wire from the 97 should be soldered on the 92
92 97 Notes
A1 B6 P - Gauge Cluster Light chk
A2 B7 R - Gauge Cluster Light chk
A3 B8 N - Gauge Cluster Light chk
A4 A10 D - Gauge Cluster Light chk
A5 B9 2 - Gauge Cluster Light chk
A7 C9 Seat Belt chk
A8 C16 BU1-4 Fuel chk
A10 C11 SRS chk
A11 C10 SRS chk
A12 D15 Door Open chk
A13 C8 Brake chk
A14 C13 Charging System chk
A15 C12 Charging System chk
A16 B12 L - Gauge Cluster Light chk
A17 A9 Illumination System / Tail chk
A18 C4 Overdrive ON/OFF chk
A19 C14 Oil chk
A20 C3 Cruise chk???
B1 A1 Trac OFF chk???
B3 a4 AC Control Assembly / MILF chk
B4 B13 ECT - PWR chk
B5 A5 Trac chk
B6 B4 High Beam chk
B7 B2 High Beam chk
B8 A8 Oil Level chk
B9 C5 Washer chk
B11 C6 Rear Light chk
B15 A7 ABS chk
B16 B5 LH Turn chk
B17 B1 RH Turn chk
B18 Coolant level warning switch wiring does not exist on 97 diagram / cluster ???
C1 D2 Water Temp chk
C2 D3 TC chk
C3 D4 RL chk
C4 D5 RV chk
C5 D8 RE chk
C6 D2 Clock power should be connected to C1 of 92 or D2 of 97 chk
C7 C15 Fuel / BU1-3 Diagram above is wrong..instead of C11 .. C7 is the correct pin.. after having verified actual 92 harness. chk
C8 D22 Fuel / BU1-10 chk
C9 D9 Tach / Ik1-8 chk
C10 D10 Tacho Ground Under Ashtray chk
C11 D11 10amp DOME fuse chk
C12 D12 Park - Neutral Switch chk
C13 D13 Speed chk
C14 C2 Speed chk
C15 D14 Speed Sensor Pin 2 / Tacho / Ground chk
C16 D16 Clock / SET chk
C17 D17 Clock / HOUR chk
C18 D18 Clock / MINUTE chk
C19 B10 Trip / AB chk
C20 B11 Trip / RESET chk
C21 A3 Water Temp / IK1-9 chk
C22 A2 Water Temp / IK2-24 chk
C23 D23 Left Kick Panel Ground chk
NOTE : There are other pins / wires from the 1997 plugs / pigtails that need to be wired / connected
1) Pin D1
2) Pin D6 should be joined to C13 .
3) Pin D19 should be wired to Pin 5 of the TEMP/ODO switch which is empty right now .. those pins are for the TEMP display.
4) Pin D21