


LS460 Wind Noise Fix (continued discussion)
Thread Starter
Lexus Champion
Joined: Mar 2005
Posts: 8,695
Likes: 2
From: CA
This thread is for further discussion of wind noise issues on the LS 460.
In this thread, please observe the following guidelines: Everyone is allowed to comment, both positive, negative, and neutral; please try to keep a constructive tone, and please refrain from making personal comments. If you don't like certain posts, you can choose to ignore them, but please no pointing fingers. Thank you for helping make this a helpful/useful thread.
Continued from: https://www.clublexus.com/forums/sho...d.php?t=329650
Summary: the wind noise issue has been defined in the TSIBs as "a high-pitched whistle-type wind noise" from the front side windows or the base of the outside rear view mirrors, which may occur while driving at highway speeds. The issue is distinct from normal turbulence and background noise, in that it sounds like the door or a window is not fully closed.
Prevalence: based on the reports on this board, the issue is most prevalent among owners of 2007 LS 460s. Members have debated the issue because some LS 460 owners have reported the issue, while others have not.
Fix efficacy: owners on this board have reported differing results with the implementation of wind noise fix(es), ranging from ineffective to successful.
TSIB information: http://www.lambros.net/2007LS460L/tsib/
(Noise, Vibration, and Harshness section) for Technical Service Information Bulletins (TSIBs) on the fixes employed. Specific TSIB #s:
The 2008 LS 460 and LS 460 Ls come factory-equipped with laminated (Lamisafe) front side glass.* Part of the wind noise fix for the 2007 LS 460 includes the addition of laminated (Lamisafe) glass to the front windows, replacing original tempered (Temperlite) glass. The 2007 LS 460s came with tempered glass only, while the 2007 LS 460 Ls featured laminated glass. Per 2008 specifications, all LS models have laminated glass. (*excepting some very early 2008 models).
Previous points of discussion:
Regarding the last issue, the triangular seals, this has been the topic of most recent discussion, posts copied and continued below. Please use this thread for all wind noise fix related posts.
Update: the 'jmcraney fix' for the triangular seals, named after the enterprising member who created it, has received many positive reviews, with member reports of successful implementation on multiple models. For details see the following:
Previously edited 05-01-08. Reason: Split thread, new header post
In this thread, please observe the following guidelines: Everyone is allowed to comment, both positive, negative, and neutral; please try to keep a constructive tone, and please refrain from making personal comments. If you don't like certain posts, you can choose to ignore them, but please no pointing fingers. Thank you for helping make this a helpful/useful thread.
Continued from: https://www.clublexus.com/forums/sho...d.php?t=329650
Summary: the wind noise issue has been defined in the TSIBs as "a high-pitched whistle-type wind noise" from the front side windows or the base of the outside rear view mirrors, which may occur while driving at highway speeds. The issue is distinct from normal turbulence and background noise, in that it sounds like the door or a window is not fully closed.
Prevalence: based on the reports on this board, the issue is most prevalent among owners of 2007 LS 460s. Members have debated the issue because some LS 460 owners have reported the issue, while others have not.
Fix efficacy: owners on this board have reported differing results with the implementation of wind noise fix(es), ranging from ineffective to successful.
TSIB information: http://www.lambros.net/2007LS460L/tsib/
(Noise, Vibration, and Harshness section) for Technical Service Information Bulletins (TSIBs) on the fixes employed. Specific TSIB #s:
NV003-07 -- 07 LS 460/460L: Wind Noise From Mirror Base
NV009-07 -- 07 LS 460/460L: Wind Noise From Front Side Window Area At Highway Speeds (Revised)*
NV010-07 -- 07 LS 460L: Wind Noise From Front Side Window Area at Highways Speeds (Revised)
*The wind noise fix applied in NV009-07 is available for LS 460s whose VIN# last eight digits are below 75039579 and LS 460 Ls whose VIN# last eight digits are below 75016531. Those 460/460Ls with VIN# higher than that already feature factory-implemented production fixes.
Previous points of discussion:
Photos of laminated glass installation on 2007 LS 460:
https://www.clublexus.com/forums/sho...329650&page=10
Technician's views on the wind noise fix:
https://www.clublexus.com/forums/sho...&postcount=703
Photos of check for vehicle underside body plugs: (post 630-636)
https://www.clublexus.com/forums/sho...329650&page=42
Triangular front window seal, making flush with window:
https://www.clublexus.com/forums/sho...&postcount=621
Update: the 'jmcraney fix' for the triangular seals, named after the enterprising member who created it, has received many positive reviews, with member reports of successful implementation on multiple models. For details see the following:
The jmcraney fix for triangular seals (Link to fix instructions and photos): https://www.clublexus.com/forums/ls4...noise-fix.html (It was previously also discussed below.)
Last edited by encore888; Jun 7, 2010 at 10:52 AM. Reason: add fix links, new

Driver School Candidate
Joined: Nov 2006
Posts: 27
Likes: 0
From: SC
Picked up my car today. After the second go-around with the TSIB on my 2007 LS LWB, I am happy to report that the wind noise problem is entirely gone. No cosmetic or squeak problems as a result of the repair.
They had a factory guy there again for the repair. The first time was the first one they had done at the dealership. I really think that they have gotten better dealing with the problem as time has gone on. At least in my case, after having the car for over a year, it is finally what it should have been in the first place.
They had a factory guy there again for the repair. The first time was the first one they had done at the dealership. I really think that they have gotten better dealing with the problem as time has gone on. At least in my case, after having the car for over a year, it is finally what it should have been in the first place.
Pole Position
Joined: May 2007
Posts: 294
Likes: 1
From: NJ
HH, If you have time, can you ask the dealer what they did differently the 2nd time?
My dealer did the TSIB with the factory field rep. They will not work on it again because they did everything they could on the 1st go round. Thats when they told me they are working on a second fix and they were looking at the gap in the fenders as the start to the noise working up to the windows.
I do have some mechanical back ground and have not had the time to really look into this myself. I'm guessing it's a pressure problem from in the cabin vs outside the cabin. I think the air is rushing in or out or the cabin via the weakest seal in the window seal. I'll bet the fix will be some type of venting option in the cars plenum chamber.
Driver School Candidate
Joined: Nov 2006
Posts: 27
Likes: 0
From: SC
garyr: Their response was that they basically redid the TSIB but feel that they have gotten better with implementing it. The one thing they did, that they did not do, on the first go-around was seal the airspace that was present under the black triangular piece on the front part of the side glass. There definitely was a gap on the drivers side compared to the passenger's side that could have accounted for wind noise. In any event the fix definitely is satisfactory.
Hope you can get your problem resolved soon.
Hope you can get your problem resolved soon.
CL Community Team


Joined: Apr 2008
Posts: 2,222
Likes: 310
From: TX
garyr: Their response was that they basically redid the TSIB but feel that they have gotten better with implementing it. The one thing they did, that they did not do, on the first go-around was seal the airspace that was present under the black triangular piece on the front part of the side glass. There definitely was a gap on the drivers side compared to the passenger's side that could have accounted for wind noise. In any event the fix definitely is satisfactory.
Hope you can get your problem resolved soon.
Hope you can get your problem resolved soon.
Driver School Candidate
Joined: Nov 2006
Posts: 27
Likes: 0
From: SC
I think there is some real wisdom here. I have a 2007 LS460 (swb) that I bought new in Oct 2007. I have been back to the dealership several times and complained to Lexus. The TSB that replaces the front passenger door windows has been done among other thing. I recently complained to Lexus again and took the car in for an evaluation by the factory rep. This time they said that the car was performing as it should and there was nothing else that they could do. I decided I could not tolerate the wind noise and noise from passing cars so I started considering the purchase of a new car. I took one of their new 2008 LS460s for a test ride. It was a windy day and the 2008 had some wind noise from certain angles but was much quieter overall. I don't think it is reasonable to expect a car to be completely unaffected by strong cross winds (you have to have some connection to the outside air to sustain the car occupants). Because of some things others have said, but not the quote above - I didn't read it until after I worked on my car, I decided to remove the plastic triangle shaped trim that is at the forward corner of the front passenger door windows. Under that trim I found that there are two large gaps at the corners toward the rear of the car. I closed the gaps with some sealant and stuck the trim back on with the sealant. My car is now much quieter and has much better isolation from the noise of passing traffic. I told my dealership rep about what I had done and he said he would pass it on to Lexus. I see from the quote above that some Lexus reps are aware of the problem already. I can provide more details about what I did on my car if anyone is interested.
When I had the TSIB done for a second time they also fixed the black triangular piece.
CL Community Team
Joined: Apr 2008
Posts: 2,222
Likes: 310
From: TX
Interesting enough, it wasn't the dealer that noticed the gap under the black triangular piece. An aeronautical engineer at Gulf Stream in Savannah GA who I had drive and closely look over my car found the gap. We tapped over it and the noise was greatly diminished.
When I had the TSIB done for a second time they also fixed the black triangular piece.
When I had the TSIB done for a second time they also fixed the black triangular piece.
Trending Topics
Lexus Test Driver
Joined: May 2006
Posts: 1,155
Likes: 7
From: TX
I think there is some real wisdom here. I have a 2007 LS460 (swb) that I bought new in Oct 2007. I have been back to the dealership several times and complained to Lexus. The TSB that replaces the front passenger door windows has been done among other thing. I recently complained to Lexus again and took the car in for an evaluation by the factory rep. This time they said that the car was performing as it should and there was nothing else that they could do. I decided I could not tolerate the wind noise and noise from passing cars so I started considering the purchase of a new car. I took one of their new 2008 LS460s for a test ride. It was a windy day and the 2008 had some wind noise from certain angles but was much quieter overall. I don't think it is reasonable to expect a car to be completely unaffected by strong cross winds (you have to have some connection to the outside air to sustain the car occupants). Because of some things others have said, but not the quote above - I didn't read it until after I worked on my car, I decided to remove the plastic triangle shaped trim that is at the forward corner of the front passenger door windows. Under that trim I found that there are two large gaps at the corners toward the rear of the car. I closed the gaps with some sealant and stuck the trim back on with the sealant. My car is now much quieter and has much better isolation from the noise of passing traffic. I told my dealership rep about what I had done and he said he would pass it on to Lexus. I see from the quote above that some Lexus reps are aware of the problem already. I can provide more details about what I did on my car if anyone is interested.
If so, how do you remove it ... just pull it off? What holds it on?
It might be helpful to those with noise to post some pix and details of what you did.
.
.
ClubLexus Stories
Celebrating Lexus & Toyota from Around the Globe

Top 10 Most Confusing Things Lexus Has Ever Done!
Joe Kucinski
2026 Lexus ES Review: Lexus Re-Embraces Founding Principles
Michael S. Palmer
10 Lexus Bargains That are Cheaper Than a New Toyota RAV4
Joe Kucinski
8 Weirdest Things Lexus Has Ever Built
Verdad Gallardo
10 Lexus Designs That Have Aged Like Fine Wine
Verdad Gallardo
8 Tips for Improving Your Hybrid or Plug-in Hybrid's Efficiency!
Michael S. Palmer
10 Best Lexus Models No One Remembers
Joe Kucinski
TRD Off-Road Premium: Best 2026 4Runner, Except This One Thing
Michael S. Palmer
Top 10 Lexus & Toyotas to Drive Before You Die!
Joe KucinskiCL Community Team
Joined: Apr 2008
Posts: 2,222
Likes: 310
From: TX
01 Jul 10
The information here is obsolete.
Current information is at:
https://www.clublexus.com/forums/ls4...noise-fix.html
Added 08Feb09
I have developed a better way to do this repair. The new recommendation compensates for a weakness in the old procedure and has better odds for a successful repair.
https://www.clublexus.com/forums/ls4...ussion-28.html
ADDED 18Sep08
There is a lot of helpful information in the discussion that follows in this thread. If you don't have the time or inclination to read it, here is a link to a consolidation of the information that follows.
http://www.freewebtown.com/uaels460/Jmcraney.htm
Yes, I am talking about the little plastic piece of trim that is at the forward outside corners of the windows in the front doors of the 2007 LS460.
You might want to let the pros do this for you but for you DIYers here is what you need to do.
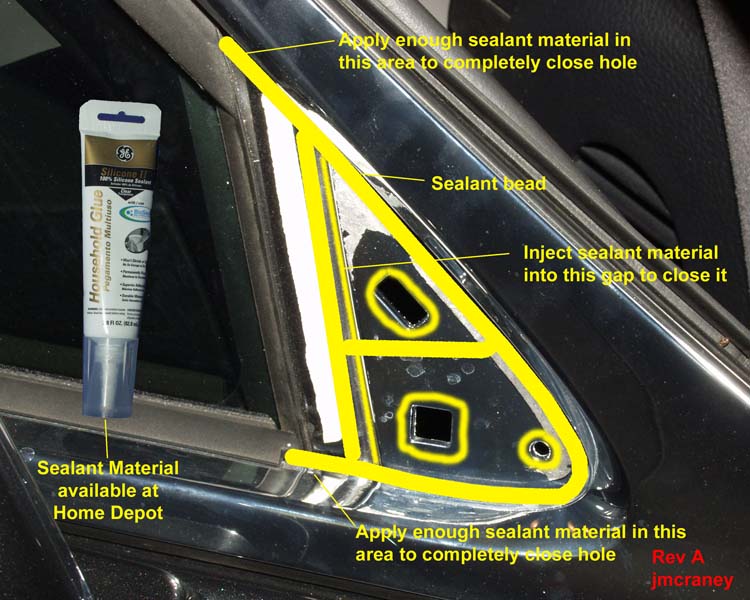
My solution is fast, and cheap but requires that the vehicle not be driven for 24 hours. Although the picture is a view of my passenger door, my problem was bilateral so I suggest that you do both sides, and just use a mental mirror image while doing the drivers side.
First, you need to take a flat tool, like a small putty knife, and pry up a corner of the trim piece. The trim piece is made of very durable plastic and it is very unlikely to break. After you get it going, just slowly peel it off. It is attached with some double-sided tape that will let go with a little pressure. If you have trouble tearing the white tape you can use a sharp device to sever it. There are three registration pins on the back of the trim piece and one of them may break off as you lift it up but that will not make any difference because you can attain satisfactory alignment without it. If you are are a real stickler about breaking the registration pins you can mitigate that by taking a wooden paint stirrer stick - sharpen one end like a wedge - and pushing it between the registration pins to dislodge the mounting tape as you lift up the trim piece. You do not need to clean up the old mounting tape residue.
There are three areas of concern.
The first area of concern is the two very large gaps that are under the rear corners of the triangle-trim. You need to use the sealant to build plugs or sort of crude gaskets to close those areas. You should leave the sealant tall enough to contact the trim piece as it is pushed on but that is not critical and will provide satisfactory results even if it is not tall enough to touch. Sealing this area will also insure that rain water will not be able to run into the lower corner under certain extreme conditions.
The second area is the .040" (1 mm) gap. You just need to inject sealant into this gap. Be sure you get enough into the ends to effectively seal them. It seems that even very small leaks under the triangle-trim cause noticeable noise in the passenger compartment.
The third area is the registration pin holes - one round hole, one square hole and one rectangular hole. The technique for this is a little different. You are going to use the trim piece as a cap for these holes. This is done by creating a sealant bead around each hole - sort of like a donut so that when the trim piece is pressed on, the registration holes are isolated to prevent air from entering or exiting through them. The sealant bead doesn't need to be very tall because the gap between the chrome and plastic piece in this area is only the width of the mounting tape. I would suggest .200" (5 mm) would be more than adequate.
The sealant cross stripe near the registration holes is for added dampening. It is not critical and I think a bead height of at last .200" (5 mm) would be about right.
The rest of the suggested sealant bead pattern is to hold the trim piece on and none of it is critical.
The recommended sealant has a very long work-time so you don't need to hurry.
After you get every thing set you just press the trim piece firmly onto the the fresh sealant and position it if necessary. If there is any sealant "squish-out" you need to let it dry for 24 hours and then trim it off. Do not try to work the wet sealant.
A sharpened wooden paint stirrer sick or plastic caulk trimmer tool is useful to clean up any squish-out as neither will scratch the plastic or chrome.
If you think that you have not attained complete isolation in this area and want to try again that is fairly easy to do if you use the sealant that I recommended.
The sealant comes in colors. I used the clear but black would be more desirable if it is available.
I believe that the recommended sealant has very good properties as far as life, temperature, moisture, adhesion and re-workability.
Don't forget to do both sides.
It needs about 24 hours to cure before you drive your car.
Good Luck!
The information here is obsolete.
Current information is at:
https://www.clublexus.com/forums/ls4...noise-fix.html
Added 08Feb09
I have developed a better way to do this repair. The new recommendation compensates for a weakness in the old procedure and has better odds for a successful repair.
https://www.clublexus.com/forums/ls4...ussion-28.html
ADDED 18Sep08
There is a lot of helpful information in the discussion that follows in this thread. If you don't have the time or inclination to read it, here is a link to a consolidation of the information that follows.
http://www.freewebtown.com/uaels460/Jmcraney.htm
Yes, I am talking about the little plastic piece of trim that is at the forward outside corners of the windows in the front doors of the 2007 LS460.
You might want to let the pros do this for you but for you DIYers here is what you need to do.
My solution is fast, and cheap but requires that the vehicle not be driven for 24 hours. Although the picture is a view of my passenger door, my problem was bilateral so I suggest that you do both sides, and just use a mental mirror image while doing the drivers side.
First, you need to take a flat tool, like a small putty knife, and pry up a corner of the trim piece. The trim piece is made of very durable plastic and it is very unlikely to break. After you get it going, just slowly peel it off. It is attached with some double-sided tape that will let go with a little pressure. If you have trouble tearing the white tape you can use a sharp device to sever it. There are three registration pins on the back of the trim piece and one of them may break off as you lift it up but that will not make any difference because you can attain satisfactory alignment without it. If you are are a real stickler about breaking the registration pins you can mitigate that by taking a wooden paint stirrer stick - sharpen one end like a wedge - and pushing it between the registration pins to dislodge the mounting tape as you lift up the trim piece. You do not need to clean up the old mounting tape residue.
There are three areas of concern.
The first area of concern is the two very large gaps that are under the rear corners of the triangle-trim. You need to use the sealant to build plugs or sort of crude gaskets to close those areas. You should leave the sealant tall enough to contact the trim piece as it is pushed on but that is not critical and will provide satisfactory results even if it is not tall enough to touch. Sealing this area will also insure that rain water will not be able to run into the lower corner under certain extreme conditions.
The second area is the .040" (1 mm) gap. You just need to inject sealant into this gap. Be sure you get enough into the ends to effectively seal them. It seems that even very small leaks under the triangle-trim cause noticeable noise in the passenger compartment.
The third area is the registration pin holes - one round hole, one square hole and one rectangular hole. The technique for this is a little different. You are going to use the trim piece as a cap for these holes. This is done by creating a sealant bead around each hole - sort of like a donut so that when the trim piece is pressed on, the registration holes are isolated to prevent air from entering or exiting through them. The sealant bead doesn't need to be very tall because the gap between the chrome and plastic piece in this area is only the width of the mounting tape. I would suggest .200" (5 mm) would be more than adequate.
The sealant cross stripe near the registration holes is for added dampening. It is not critical and I think a bead height of at last .200" (5 mm) would be about right.
The rest of the suggested sealant bead pattern is to hold the trim piece on and none of it is critical.
The recommended sealant has a very long work-time so you don't need to hurry.
After you get every thing set you just press the trim piece firmly onto the the fresh sealant and position it if necessary. If there is any sealant "squish-out" you need to let it dry for 24 hours and then trim it off. Do not try to work the wet sealant.
A sharpened wooden paint stirrer sick or plastic caulk trimmer tool is useful to clean up any squish-out as neither will scratch the plastic or chrome.
If you think that you have not attained complete isolation in this area and want to try again that is fairly easy to do if you use the sealant that I recommended.
The sealant comes in colors. I used the clear but black would be more desirable if it is available.
I believe that the recommended sealant has very good properties as far as life, temperature, moisture, adhesion and re-workability.
Don't forget to do both sides.
It needs about 24 hours to cure before you drive your car.
Good Luck!
Last edited by jmcraney; Jul 1, 2010 at 07:11 AM. Reason: Revised recommendation, added metric dimensions, 18Sep08 - added link
Lexus Test Driver
Joined: May 2006
Posts: 1,155
Likes: 7
From: TX
Jmcraney's pictures for above post are:

and
Note: the following 2 original pictures have been supplanted by the above 2 revised versions (the updated ones have "Rev A" in the lower right corner).
https://www.clublexus.com/gallery/da...17/LS460_1.jpg
https://www.clublexus.com/gallery/da...17/LS460_2.jpg
.
.
and
Note: the following 2 original pictures have been supplanted by the above 2 revised versions (the updated ones have "Rev A" in the lower right corner).
https://www.clublexus.com/gallery/da...17/LS460_1.jpg
https://www.clublexus.com/gallery/da...17/LS460_2.jpg
.
.
Last edited by encore888; May 9, 2008 at 03:19 PM. Reason: Update

Rookie
Joined: Apr 2007
Posts: 91
Likes: 1
From: CA

Thanks for the great work MIKE_TX... I hope Lexus does the due diligence and incorporates this into the TSIB asap.
Lexus Test Driver
Joined: May 2006
Posts: 1,155
Likes: 7
From: TX
Wow, those pictures certainly put some perspective on the wind noise issue and a potential root cause. I had the wind noise TSIB performed last Friday and things seem to be much better. Still some wind noise but definitely not as prominent. I'm curious whether the dealer sealed anything in the area of the pictures. Hopefully, the TSIB will be updated as I'm a little hesitant to DIY self seal my $80k car... this isn't my bathtub
Thanks for the great work MIKE_TX... I hope Lexus does the due diligence and incorporates this into the TSIB asap.
Thanks for the great work MIKE_TX... I hope Lexus does the due diligence and incorporates this into the TSIB asap.

.
.


Pole Position
Joined: Mar 2007
Posts: 2,730
Likes: 26
From: Sakon Nakhon
Great procedure! I presume we are looking at the exterior of the car just forward of the mirror, are we?
I believe you have sleuthed a fix which I suspect may even preclude the complicated replacement of the glass itself...
Lexus, are you reading this?
I believe you have sleuthed a fix which I suspect may even preclude the complicated replacement of the glass itself...
Lexus, are you reading this?
Last edited by encore888; May 9, 2008 at 03:19 PM. Reason: updated