


A very detailed 1999 Lexus ES300 Retrofit Feat. Acura TSX HID projectors
Thread Starter
Pole Position
Joined: Nov 2001
Posts: 2,384
Likes: 16
From: Chicago, IL
I'm back by popular demand (just joking). However I am back and after speaking with a few members/mods I've decided to tone down posting requests for service on my threads here and continue sharing my HID retrofit projects. After all, this is the place is all started for me and it was here where I was first inspired by this phenomenon. So I must give credit where its due and continue to add to the valuable informative community that CL has become to be.
Feel free to ask questions about the work and continue to post your thoughts and opinions. They're very welcome. However please do not ask me for service here on the retrofit threads in the lighting section. I haven't got the vendor's liscense thing finalized yet. And will not respond to those posts in the retrofit threads.
Anyhow on with the show.
For this new project I decided to do something that's never been done before. I decided to retrofit Acura TSX HID projectors into my own car which is a 99 ES300. I already have an HID setup now which is one of the best retrofits out there now. Alot of work went into that project and it has been refined even more than the last thread written. However, I felt that in the last few posts, I haven't been as detailed providing a walk through that others feel they can use to follow along if they decide to tackle HID retrofitting. So consider this one a good place for future reference
I'll start off by saying its a good idea to buy a spare set of headlamps to work on vs using your own. THis way you can continue to drive your car and take your time vs. rushing through because you need to get to work
To perform a retrofit you'll need to open and unseal your headlamps. There are several guides posted here on Clublexus. The method I use is the popular oven method. Before you place them in the oven observe the rear end to make sure there aren't any screws that hold the entire assembly together. For the ES300 there aren't any so you can proceed
1. Pre Heat up your oven to 260 degrees. (Make sure you take out that top metal rack out so you have enough room)
2. Spread aluminum foil sheets on the bottom rack (3 layers should do) and place the headlamp on there for 8 mins. (Do not go over)
3. Safely remove them (with oven mits of course) and gently pry the tabs that hold the assembly together. The key here is not to bend them all the way up. Just a few mms to clear the small things they're clipped to.
4. Observe the corners. (best one to use is the bottom left corner on the passenger lamp and the bottom right corner on the driver side) Using a butter knife or a flathead screwdriver with a wide blade, insert it all the way and gently bend it towards you. Work slowly. The key here is to bend the front plastic lense upward a lil bit so you can stick a finger in there.
5. Using both hands, gently pry the front lense from the grey rear plastic part of the headlamp housing. Now seperate the two pieces and set the clear plastic lense somewhere safe.
6. Now is a good time to observe the lenses to see if they need cleaning. If they do, wash them by bare hand using a dishwashing detergent like Pomolive or a Color Safe Bleach solution like Tide. (They work wonders on our lenses). When you finish, polish them if you desire with a plastic polish like Mother's or Meguires etc. (3.99 at Autozone or Murrays etc)
7. Now oberve the housing. It should look like this from the rear.

Your goal at this point is to remove the bulbs from there and remove those black rubber covers off. The good thing is that they easily come off so just pull them out by hand
8. Next you'll be unscrewing the bulb holder for the H7 lowbeam bulb since we won't need this anymore because this is where the TSX projector will be mounted

9. Once the assembly is unscrewed, take the H7 bulb out along with the holding pin and set them somewhere.

This is what your reflector setup should look like

10. Now we'll be removing the reflector assembly out of the housing so we can do our prep work.
Locate the 2 metal screw rods sticking out the back.

Using a 5/16 socket attachment or a philips screw driver, screw the screws counter clockwise. Start with the middle one first. You'll observe the reflector moving downward. Once its reached its lowest point stop screwing and work the other one in the same manner. Once they've both reached their furtherst points, gently pull the reflector off its housing and set it somewhere safe for now.
Look for more pics as I go along today. Along with more steps. I'll also be editing this post and adding more pics for the ealier steps but hopefully this should give everyone an idea of whats involved
Feel free to ask questions about the work and continue to post your thoughts and opinions. They're very welcome. However please do not ask me for service here on the retrofit threads in the lighting section. I haven't got the vendor's liscense thing finalized yet. And will not respond to those posts in the retrofit threads.
Anyhow on with the show.
For this new project I decided to do something that's never been done before. I decided to retrofit Acura TSX HID projectors into my own car which is a 99 ES300. I already have an HID setup now which is one of the best retrofits out there now. Alot of work went into that project and it has been refined even more than the last thread written. However, I felt that in the last few posts, I haven't been as detailed providing a walk through that others feel they can use to follow along if they decide to tackle HID retrofitting. So consider this one a good place for future reference
I'll start off by saying its a good idea to buy a spare set of headlamps to work on vs using your own. THis way you can continue to drive your car and take your time vs. rushing through because you need to get to work
To perform a retrofit you'll need to open and unseal your headlamps. There are several guides posted here on Clublexus. The method I use is the popular oven method. Before you place them in the oven observe the rear end to make sure there aren't any screws that hold the entire assembly together. For the ES300 there aren't any so you can proceed
1. Pre Heat up your oven to 260 degrees. (Make sure you take out that top metal rack out so you have enough room)
2. Spread aluminum foil sheets on the bottom rack (3 layers should do) and place the headlamp on there for 8 mins. (Do not go over)
3. Safely remove them (with oven mits of course) and gently pry the tabs that hold the assembly together. The key here is not to bend them all the way up. Just a few mms to clear the small things they're clipped to.
4. Observe the corners. (best one to use is the bottom left corner on the passenger lamp and the bottom right corner on the driver side) Using a butter knife or a flathead screwdriver with a wide blade, insert it all the way and gently bend it towards you. Work slowly. The key here is to bend the front plastic lense upward a lil bit so you can stick a finger in there.
5. Using both hands, gently pry the front lense from the grey rear plastic part of the headlamp housing. Now seperate the two pieces and set the clear plastic lense somewhere safe.
6. Now is a good time to observe the lenses to see if they need cleaning. If they do, wash them by bare hand using a dishwashing detergent like Pomolive or a Color Safe Bleach solution like Tide. (They work wonders on our lenses). When you finish, polish them if you desire with a plastic polish like Mother's or Meguires etc. (3.99 at Autozone or Murrays etc)
7. Now oberve the housing. It should look like this from the rear.
Your goal at this point is to remove the bulbs from there and remove those black rubber covers off. The good thing is that they easily come off so just pull them out by hand
8. Next you'll be unscrewing the bulb holder for the H7 lowbeam bulb since we won't need this anymore because this is where the TSX projector will be mounted
9. Once the assembly is unscrewed, take the H7 bulb out along with the holding pin and set them somewhere.
This is what your reflector setup should look like
10. Now we'll be removing the reflector assembly out of the housing so we can do our prep work.
Locate the 2 metal screw rods sticking out the back.
Using a 5/16 socket attachment or a philips screw driver, screw the screws counter clockwise. Start with the middle one first. You'll observe the reflector moving downward. Once its reached its lowest point stop screwing and work the other one in the same manner. Once they've both reached their furtherst points, gently pull the reflector off its housing and set it somewhere safe for now.
Look for more pics as I go along today. Along with more steps. I'll also be editing this post and adding more pics for the ealier steps but hopefully this should give everyone an idea of whats involved
Thread Starter
Pole Position
Joined: Nov 2001
Posts: 2,384
Likes: 16
From: Chicago, IL
Oh yeah, here's a few quick shots of the fabulous Acura TSX headlight projectors I'll be using for this retrofit. I'll have pics of the multi shroud design later on when I remove them from the 1st piece from the Acura MDX headlamps which are still in my trunk downstairs.
I'm using them along with 2 other pieces that can be bought at Home Depot and Ace Hardware. I'll have pics of those later tonight.

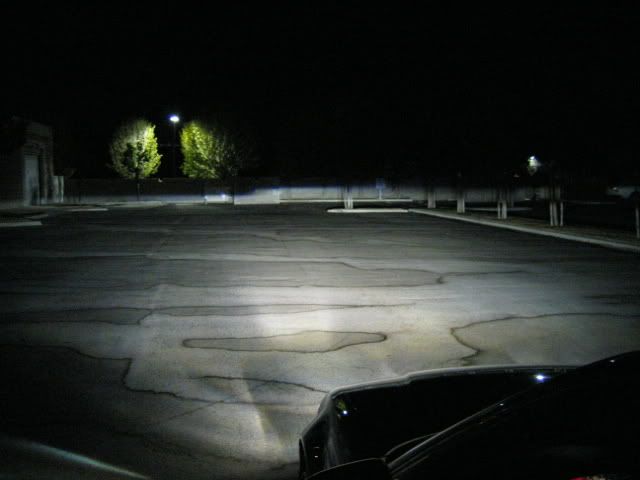
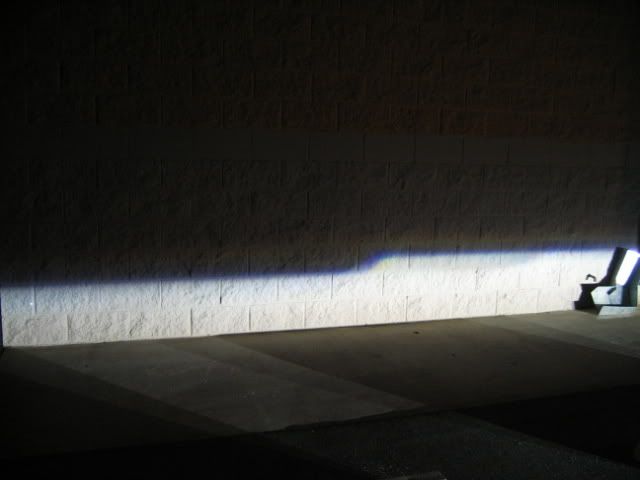
Some examples of their output from a few fellow members from HIDplanet.com


I'm using them along with 2 other pieces that can be bought at Home Depot and Ace Hardware. I'll have pics of those later tonight.
Some examples of their output from a few fellow members from HIDplanet.com
Thread Starter
Pole Position
Joined: Nov 2001
Posts: 2,384
Likes: 16
From: Chicago, IL
Hey guys. Its been a verrry busy day indeed (various business meetings and the rain (blah). But anyway, I'm back and am now working on 2 retrofits and a possible install of my semi new Kenwood KVT-910 into my ES. I'm also contemplating installing the Navi myself as well(Kenwood KNA-DV2100) when that arrives later in the week (Come on UPS) but I promise I won't leave this thread to die. I'll update with pics as I move along and look for the corresponding thread for the SC300 retrofit sometime tomorrow when I can gather my thoughts.
Trending Topics
ClubLexus Stories
Celebrating Lexus & Toyota from Around the Globe

Lexus NX 350h: A Fuel-Sipping Secret Hot Hatch???
Michael S. Palmer
5 Best & 5 Worst Lexus Daily Drivers
Joe Kucinski
Top 5 Hottest Lexus & Toyotas in 2026 (Hardest To Buy)
Brett Foote
2026 Lexus IS 350 F Sport Review: The Last of Its Kind Still Rocks
Michael S. Palmer
Top 10 Most Confusing Things Lexus Has Ever Done!
Joe Kucinski
2026 Lexus ES Review: Lexus Re-Embraces Founding Principles
Michael S. Palmer
10 Lexus Bargains That are Cheaper Than a New Toyota RAV4
Joe Kucinski
8 Weirdest Things Lexus Has Ever Built
Verdad Gallardo
10 Lexus Designs That Have Aged Like Fine Wine
Verdad Gallardo
Thread Starter
Pole Position
Joined: Nov 2001
Posts: 2,384
Likes: 16
From: Chicago, IL
Look for an update here in the next couple days. Oh and I've done this mod too hehe
http://www.hidplanet.com/forums/viewtopic.php?t=8731
In other news, I'm meeting with my supplier to swap out some projectors for an SC retrofit I'm also working on. When I get them in my hand (hopefully later today), then I'll start up that thread and document that as well then visit this one again later in the week (All in one breath hehe)
Last edited by tiguy99; Nov 8, 2005 at 10:00 AM.


Thread Starter
Pole Position
Joined: Nov 2001
Posts: 2,384
Likes: 16
From: Chicago, IL
Thanks PHML. Both of these projects are going to come out nice. After I meet with the supplier in 2 hours, I'll be scrambling around town to grab some 3m rubbing compound for the SC300 lenses that will sanded/detailed.
Originally Posted by tiguy99
Thanks PHML. Both of these projects are going to come out nice. After I meet with the supplier in 2 hours, I'll be scrambling around town to grab some 3m rubbing compound for the SC300 lenses that will sanded/detailed.
tiguy99....more pics pls


Thread Starter
Pole Position
Joined: Nov 2001
Posts: 2,384
Likes: 16
From: Chicago, IL
I've got good news. I just got back (this guy lives far as he11 plus add on rush hour traffic etc. Anyhow, we managed to snap a few shots of the new projectors he gave me and whooa Mamma! I'm gonna post up a few soon as I get them from the email he sent brb
Thread Starter
Pole Position
Joined: Nov 2001
Posts: 2,384
Likes: 16
From: Chicago, IL
ok..here's sneak peak at that one...


Just look at that beam pattern! These were taken last night from about 10 feet distance. The colors get crazy around 25-40 feet away! This my friend is why I keep preaching the Valeo Hyrbid projector setup! Just wait till I'm finished with this one! Thread will officially be up with pics in the morning now. They're almost ready
Just look at that beam pattern! These were taken last night from about 10 feet distance. The colors get crazy around 25-40 feet away! This my friend is why I keep preaching the Valeo Hyrbid projector setup! Just wait till I'm finished with this one! Thread will officially be up with pics in the morning now. They're almost ready
Lexus Test Driver
Joined: Oct 2006
Posts: 1,039
Likes: 0
From: Field of Dreams
I know this is an old old thread, but I wanted to know if there were pics of the finished setup. I would like to see what the TSX projectors look like installed in the ES300 headlamps. I am currently in the middle of my retrofit and would like to compare notes. I too have the same projectors and am using mdx shrouds around the TSX projectors. So far, it is going very well.