DIY - Daizen Caster Arm Bushing Installation - lots of pics!
 12-18-13, 11:11 AM
#226

Mike
__________________
Redefining Lexus Aftermarket Parts Since 2001
-- We are your Lexus suspension experts--
BCR - KW - PENSKE - OHLINS - HKS - GREDDY - STANCEPARTS
Links - Arms - SuperPro Poly Bushings - Solid Bearing Conversions - Motor Mounts
RB BBK's and 2P Rotors, G-Loc pads, Radium Fuel Systems
Custom Fabrication Design and Machining - Industrial 3D Printing - Laser Cutting
2018 USTCC Sportsman Class Champions - 2018 NASA ST5 National Champions
 12-18-13, 04:21 PM
#227
And just yesterday prior to your order I sold my last set(actually an exchange for a customer with a larger diameter bushing requirement on an early model because someone must have swapped arms on him. Getting more in via air freight but they seem to sell out as soon as they hit. I will get it out ASAP. Please check OD to see if its 60mm or 65mm(late model).
Mike
Mike
Its OEM 2003 arms. I pressed PSB bushings into them last year.
Just keep me posted pls, was trying to get these installed next wk during my xmas break
TYSIR.
12-19-13, 10:46 PM
#228
OK current schedule is I should have them the 14th of Jan. All pre 2000/2001 bushings will be back in stock next week.
__________________
Redefining Lexus Aftermarket Parts Since 2001
-- We are your Lexus suspension experts--
BCR - KW - PENSKE - OHLINS - HKS - GREDDY - STANCEPARTS
Links - Arms - SuperPro Poly Bushings - Solid Bearing Conversions - Motor Mounts
RB BBK's and 2P Rotors, G-Loc pads, Radium Fuel Systems
Custom Fabrication Design and Machining - Industrial 3D Printing - Laser Cutting
2018 USTCC Sportsman Class Champions - 2018 NASA ST5 National Champions
Redefining Lexus Aftermarket Parts Since 2001
-- We are your Lexus suspension experts--
BCR - KW - PENSKE - OHLINS - HKS - GREDDY - STANCEPARTS
Links - Arms - SuperPro Poly Bushings - Solid Bearing Conversions - Motor Mounts
RB BBK's and 2P Rotors, G-Loc pads, Radium Fuel Systems
Custom Fabrication Design and Machining - Industrial 3D Printing - Laser Cutting
2018 USTCC Sportsman Class Champions - 2018 NASA ST5 National Champions
01-08-14, 09:19 PM
#229
Another alternative for 2001+ owners. We have the adjustable #2 bushing that we are gong to couple with our adjustable front bushing to make a camber kit. But thought we should also offer it alone in case you were waiting for the centered version. Caster increase will assist with steer-in and overall handling. Not a bad thing in addition to the improved bushing design.
http://shopfigs.com/v1/index.php?rou...product_id=221

http://shopfigs.com/v1/index.php?rou...product_id=221
__________________
Redefining Lexus Aftermarket Parts Since 2001
-- We are your Lexus suspension experts--
BCR - KW - PENSKE - OHLINS - HKS - GREDDY - STANCEPARTS
Links - Arms - SuperPro Poly Bushings - Solid Bearing Conversions - Motor Mounts
RB BBK's and 2P Rotors, G-Loc pads, Radium Fuel Systems
Custom Fabrication Design and Machining - Industrial 3D Printing - Laser Cutting
2018 USTCC Sportsman Class Champions - 2018 NASA ST5 National Champions
Redefining Lexus Aftermarket Parts Since 2001
-- We are your Lexus suspension experts--
BCR - KW - PENSKE - OHLINS - HKS - GREDDY - STANCEPARTS
Links - Arms - SuperPro Poly Bushings - Solid Bearing Conversions - Motor Mounts
RB BBK's and 2P Rotors, G-Loc pads, Radium Fuel Systems
Custom Fabrication Design and Machining - Industrial 3D Printing - Laser Cutting
2018 USTCC Sportsman Class Champions - 2018 NASA ST5 National Champions
01-20-14, 05:35 PM
#230
Driver
Join Date: Dec 2013
Location: TN
Posts: 172
Likes: 0
Received 0 Likes
on
0 Posts
So I was able to do one of my caster bushings today. I was able to do it without a shop press and I was able to find a cure for the wiggle room in the bushings retaining rod. Also found out how to get the caster arm back in with relative ease.
01-20-14, 09:54 PM
#231
we should have more bushings tomorrow. Sorry for the long wait guys.
Mike
Mike
__________________
Redefining Lexus Aftermarket Parts Since 2001
-- We are your Lexus suspension experts--
BCR - KW - PENSKE - OHLINS - HKS - GREDDY - STANCEPARTS
Links - Arms - SuperPro Poly Bushings - Solid Bearing Conversions - Motor Mounts
RB BBK's and 2P Rotors, G-Loc pads, Radium Fuel Systems
Custom Fabrication Design and Machining - Industrial 3D Printing - Laser Cutting
2018 USTCC Sportsman Class Champions - 2018 NASA ST5 National Champions
Redefining Lexus Aftermarket Parts Since 2001
-- We are your Lexus suspension experts--
BCR - KW - PENSKE - OHLINS - HKS - GREDDY - STANCEPARTS
Links - Arms - SuperPro Poly Bushings - Solid Bearing Conversions - Motor Mounts
RB BBK's and 2P Rotors, G-Loc pads, Radium Fuel Systems
Custom Fabrication Design and Machining - Industrial 3D Printing - Laser Cutting
2018 USTCC Sportsman Class Champions - 2018 NASA ST5 National Champions
02-17-14, 07:01 PM
#232
Installed FIGS adjustable caster bushings yesterday.
Got an alignment today... the 10mm adjustable bushings caused my caster to go slightly out of spec.
Ideal Range is 7.1 to 8.1 degrees
*Driverside = 8.7 degrees
*Passengerside = 8.2 degrees
It's very minimal, I can live with that.
I'm on Eibach and bilstein, minimal drop. I'd say about an inch all around from stock.
Those with coilovers and more of an inch drop (which I'd say is about 80% + of the members) would definitely benefit more from these than I do.
Install was a breeze. (3rd time doing caster bushings now, Daizen, PSB/ADUS, and now FIGS)
Good quality, wish I had a bit more grease since I dropped the bushings once or twice trying to get the underbrace back on, thus having to wipe it off and reapply.
Will update as I drive more.
Last edited by runyun; 02-17-14 at 08:32 PM.
02-18-14, 07:20 AM
#233
thanks for the pics Runyun. Great job on the install. While its slightly outside OEM spec, the additional caster will provide sharper turn in and steering response, self centering. These are all positives in my book and hopefully you agree after further driving.
__________________
Redefining Lexus Aftermarket Parts Since 2001
-- We are your Lexus suspension experts--
BCR - KW - PENSKE - OHLINS - HKS - GREDDY - STANCEPARTS
Links - Arms - SuperPro Poly Bushings - Solid Bearing Conversions - Motor Mounts
RB BBK's and 2P Rotors, G-Loc pads, Radium Fuel Systems
Custom Fabrication Design and Machining - Industrial 3D Printing - Laser Cutting
2018 USTCC Sportsman Class Champions - 2018 NASA ST5 National Champions
Redefining Lexus Aftermarket Parts Since 2001
-- We are your Lexus suspension experts--
BCR - KW - PENSKE - OHLINS - HKS - GREDDY - STANCEPARTS
Links - Arms - SuperPro Poly Bushings - Solid Bearing Conversions - Motor Mounts
RB BBK's and 2P Rotors, G-Loc pads, Radium Fuel Systems
Custom Fabrication Design and Machining - Industrial 3D Printing - Laser Cutting
2018 USTCC Sportsman Class Champions - 2018 NASA ST5 National Champions
04-22-14, 08:41 PM
#234
Driver School Candidate

Join Date: Apr 2013
Location: Tx
Posts: 9
Likes: 0
Received 0 Likes
on
0 Posts
3/3/12 Update - After two years, the Daizens started clunking, so I took them out and replaced them with OEM type bushings. This how-to is of course still applicable, but I now have my doubts about the Daizen bushings. See post #98 for details.
I posted this on the general forum, but thought it might be useful on this one as well, hope that's OK.
This weekend I installed the Daizen caster arm bushings, and took some pictures along the way. I did the whole job in 3.5 hours, counting from getting the car up onto the jackstands to when I test drove it. This was my first time doing this, I think I could do it in half the time if I did it again.
I got the bushing kit from TM Engineering. I guess I was lucky, because I got the parts within ten days of ordering, and Todd was great in his correspondence with me.
A tricky part of this job was getting the old bushings out. I did not use either the "torch it out" or "cut it out" approaches, instead I sprung for the $99 Harbor Freight 12 ton press, and pressed them out. I would recommend this approach - it is fairly easy, plus you get to keep the press as a reward .
.
So here is the step by step DIY. As a disclaimer, I am a fairly competent DIY-er. If you are not, or are not sure of what you are doing, this job may not be for you.
If, like me, you are only doing the caster arm bushing (#2 Lower Suspension Arm, in Lexus-speak), there is no need to separate or remove ball joints, springs, etc. Some writeups suggested to do that, but there is no need.
1. Jack up the car and put it safely onto jackstands. Remove wheels/tires.
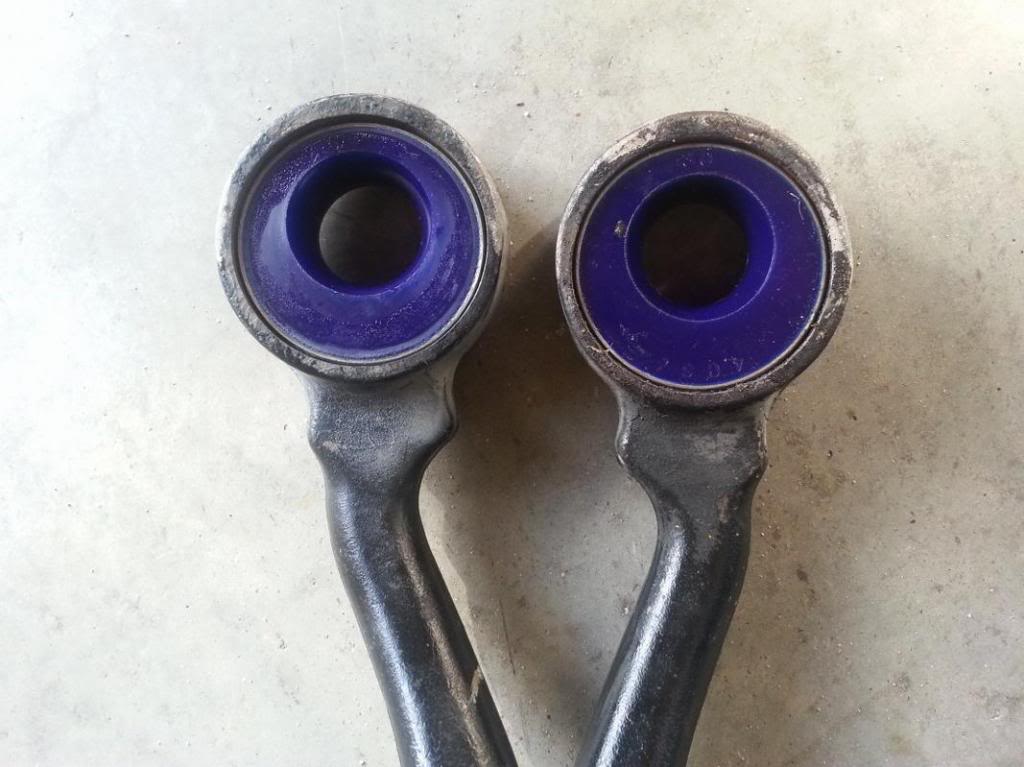
2. Remove the bolts and nuts holding the suspension member brace and the two strut bar brackets. 10 fasteners total - two bolts in the front of the brace, and then two bolts and two nuts at each strut bar bracket. Below is a photo of one strut bar bracket, and its four fasteners. (For those who noticed - yes, the arm already has new bushings installed, because I initially forgot to take this picture, and took it at the end of the job).

3. Here is a view of the bushing end of the arm, the bushing is now exposed.

4. Here is a view of the two bolts holding the caster arm to the #1 Lower Suspension Arm (the ones with "11" on the head).

5. Here I am removing the two bolts holding the caster arm to the #1 Lower Suspension Arm. I used a 25" breaker bar, and still had to give it a heck of a heave-ho before the bolts loosened.

6. Now the arm comes right out, as promised.

My bushings were pretty much shot, as you can see by the big crack that is visible when I pried on the bushing.

7. You cannot press the bushings out without lifting the lip of the bushing first. I clamped the arm in a vise, and used an air chisel to lift the lip. Here is a portion of the lip lifted.

8. Here is what you want to end up with, with the lip lifted all the way around.

9. Now I placed the arm and the bushing into my 12 ton press.

10. Here is a closeup, just after starting to press.

11. Here is the bushing after some movement. It made quite the "POP!" when it first moved.

12. Here is the bushing out of the arm.

13. You'll want to debur the arm, remove any rust, and then apply some of the Daizen supplied lube to the arm and to the bushing.
14. Now it's time to install the Daizen bushing in the arm. Line up the bushing and the arm in the press, and proceed to press.

15. At first it looked like the lip was too big to slip through the arm hole, as the bushing was flexing and bulging quite a bit. I was worried that the bushing might collapse under pressure. But it did not, and with more pressure it popped right in.

The next step was getting the arm back into the car. It ended up being the most frustrating part for me. The problem is that the Daizen bushing is much less compliant than the original bushing, so it is difficult to simultaneously line up both the bushing with its stud, and the caster arm with the #1 control arm. I initially tried installing the control arm bolts first, but then I could not slip the bushing over the stud. I even tried to raise the control arm with a jack, but no matter how high I raised it (to the point of lifting the car off the jack stand), things still would not line up. So I ended up using the approach I show here.
16. Slip the Daizen sleeve onto the stud. The larger hole goes up; it won't fit the other way.

17. Now position the caster arm in place, and slip the bushing over the Daizen sleeve.

18. Place the strut bar bracket over the stud, and loosely install the retaining nut, to keep the arm from falling off the stud.

19. Now it's time to install the bolts holding the caster arm to #1 control arm - but as you can see, the geometry is off. If you try to install the bolts like this, you'll strip the threads and will end up with a big mess on your hands.

20. To line things up, I grabbed a large adjustable wrench, placed it over the caster arm near the bushing, and rotated the arm until the bolts up front lined up.

21. Reinstall the suspension member brace, torque all the bolts and nuts. Caster arm to #1 control arm bolts: 122 ft-lbf ; Caster arm bushing stud: 112 ft-lbf; strut bar bracket and suspension member brace bolts: 43 ft-lbf. Reinstall the wheels, and go for a test drive
I have not driven the car enough to see if it cured my clunking, or how it improved the drivability (if at all), but I wanted to post this thread before I forgot all the steps. I'll report on the driving impressions later on.
BTW, on further reflection, if I did this again, I might try another approach for getting the arm back in place: first loosely install the bolts holding the caster arm to the control arm, and then use some kind of a pry bar inside the bushing sleeve to force it to rotate and line up with the stud. But I haven't tried this, so I don't know if that would work better or worse than the approach I showed here.
Hope this helped. I would welcome any corrections or clarifications that I might have left out.
I posted this on the general forum, but thought it might be useful on this one as well, hope that's OK.
This weekend I installed the Daizen caster arm bushings, and took some pictures along the way. I did the whole job in 3.5 hours, counting from getting the car up onto the jackstands to when I test drove it. This was my first time doing this, I think I could do it in half the time if I did it again.
I got the bushing kit from TM Engineering. I guess I was lucky, because I got the parts within ten days of ordering, and Todd was great in his correspondence with me.
A tricky part of this job was getting the old bushings out. I did not use either the "torch it out" or "cut it out" approaches, instead I sprung for the $99 Harbor Freight 12 ton press, and pressed them out. I would recommend this approach - it is fairly easy, plus you get to keep the press as a reward
.So here is the step by step DIY. As a disclaimer, I am a fairly competent DIY-er. If you are not, or are not sure of what you are doing, this job may not be for you.
If, like me, you are only doing the caster arm bushing (#2 Lower Suspension Arm, in Lexus-speak), there is no need to separate or remove ball joints, springs, etc. Some writeups suggested to do that, but there is no need.
1. Jack up the car and put it safely onto jackstands. Remove wheels/tires.
2. Remove the bolts and nuts holding the suspension member brace and the two strut bar brackets. 10 fasteners total - two bolts in the front of the brace, and then two bolts and two nuts at each strut bar bracket. Below is a photo of one strut bar bracket, and its four fasteners. (For those who noticed - yes, the arm already has new bushings installed, because I initially forgot to take this picture, and took it at the end of the job).
3. Here is a view of the bushing end of the arm, the bushing is now exposed.
4. Here is a view of the two bolts holding the caster arm to the #1 Lower Suspension Arm (the ones with "11" on the head).
5. Here I am removing the two bolts holding the caster arm to the #1 Lower Suspension Arm. I used a 25" breaker bar, and still had to give it a heck of a heave-ho before the bolts loosened.
6. Now the arm comes right out, as promised.
My bushings were pretty much shot, as you can see by the big crack that is visible when I pried on the bushing.
7. You cannot press the bushings out without lifting the lip of the bushing first. I clamped the arm in a vise, and used an air chisel to lift the lip. Here is a portion of the lip lifted.
8. Here is what you want to end up with, with the lip lifted all the way around.
9. Now I placed the arm and the bushing into my 12 ton press.
10. Here is a closeup, just after starting to press.
11. Here is the bushing after some movement. It made quite the "POP!" when it first moved.
12. Here is the bushing out of the arm.
13. You'll want to debur the arm, remove any rust, and then apply some of the Daizen supplied lube to the arm and to the bushing.
14. Now it's time to install the Daizen bushing in the arm. Line up the bushing and the arm in the press, and proceed to press.
15. At first it looked like the lip was too big to slip through the arm hole, as the bushing was flexing and bulging quite a bit. I was worried that the bushing might collapse under pressure. But it did not, and with more pressure it popped right in.
The next step was getting the arm back into the car. It ended up being the most frustrating part for me. The problem is that the Daizen bushing is much less compliant than the original bushing, so it is difficult to simultaneously line up both the bushing with its stud, and the caster arm with the #1 control arm. I initially tried installing the control arm bolts first, but then I could not slip the bushing over the stud. I even tried to raise the control arm with a jack, but no matter how high I raised it (to the point of lifting the car off the jack stand), things still would not line up. So I ended up using the approach I show here.
16. Slip the Daizen sleeve onto the stud. The larger hole goes up; it won't fit the other way.

17. Now position the caster arm in place, and slip the bushing over the Daizen sleeve.
18. Place the strut bar bracket over the stud, and loosely install the retaining nut, to keep the arm from falling off the stud.
19. Now it's time to install the bolts holding the caster arm to #1 control arm - but as you can see, the geometry is off. If you try to install the bolts like this, you'll strip the threads and will end up with a big mess on your hands.
20. To line things up, I grabbed a large adjustable wrench, placed it over the caster arm near the bushing, and rotated the arm until the bolts up front lined up.
21. Reinstall the suspension member brace, torque all the bolts and nuts. Caster arm to #1 control arm bolts: 122 ft-lbf ; Caster arm bushing stud: 112 ft-lbf; strut bar bracket and suspension member brace bolts: 43 ft-lbf. Reinstall the wheels, and go for a test drive
I have not driven the car enough to see if it cured my clunking, or how it improved the drivability (if at all), but I wanted to post this thread before I forgot all the steps. I'll report on the driving impressions later on.
BTW, on further reflection, if I did this again, I might try another approach for getting the arm back in place: first loosely install the bolts holding the caster arm to the control arm, and then use some kind of a pry bar inside the bushing sleeve to force it to rotate and line up with the stud. But I haven't tried this, so I don't know if that would work better or worse than the approach I showed here.
Hope this helped. I would welcome any corrections or clarifications that I might have left out.
04-23-14, 09:54 AM
#236
we also have plenty of parts in stock for both years 1998-2005. As well as out new camber kit which uses adjustable #1 and #2 bushings
__________________
Redefining Lexus Aftermarket Parts Since 2001
-- We are your Lexus suspension experts--
BCR - KW - PENSKE - OHLINS - HKS - GREDDY - STANCEPARTS
Links - Arms - SuperPro Poly Bushings - Solid Bearing Conversions - Motor Mounts
RB BBK's and 2P Rotors, G-Loc pads, Radium Fuel Systems
Custom Fabrication Design and Machining - Industrial 3D Printing - Laser Cutting
2018 USTCC Sportsman Class Champions - 2018 NASA ST5 National Champions
Redefining Lexus Aftermarket Parts Since 2001
-- We are your Lexus suspension experts--
BCR - KW - PENSKE - OHLINS - HKS - GREDDY - STANCEPARTS
Links - Arms - SuperPro Poly Bushings - Solid Bearing Conversions - Motor Mounts
RB BBK's and 2P Rotors, G-Loc pads, Radium Fuel Systems
Custom Fabrication Design and Machining - Industrial 3D Printing - Laser Cutting
2018 USTCC Sportsman Class Champions - 2018 NASA ST5 National Champions
04-30-14, 06:19 PM
#237

I was running the daizen bushings until today when I switched to the Figs (centered version). No driving impressions yet but i'm already happy just with the ease of install. The Daizen's we're just a pain in the *** but the Figs went on with minimal effort. I still put a wrench on the arm to line up the two bolts, but I surprised myself with the little force I used to do it. I'll post again after I get some seat time.
