When you click on links to various merchants on this site and make a purchase, this can result in this site earning a commission. Affiliate programs and affiliations include, but are not limited to, the eBay Partner Network.
The manufacturer says 15 minutes between coats. Typically in painting, you want the paint slightly tacky prior to the second application. This allows the second coat to better adhere to the first. The final cure time is very important to follow.
When taking off wheels, I personally use race ramps to be able to reach the front and rear jack points since I'm lowered. Put on the ebrake, chalk the wheels, and take a breaker bar to break loose the lugs. THEN begin jacking the car up just enough to have the tires an inch off the ramp. Put jack stands on the jack points and drop the car onto the stands, then take off the lug nuts and the wheel. Pretty easy.
As for the color, it depends om how much you want the calipers to be visible. Red, blue, and yellow are common on black ISx50s. Gold or bronze will look great too. There is a painted caliper thread that will give u some ideas.
I painted mine and came out really nice. I cleaned the calipers let it dry then went over with an acetone. Make sure you clean the back not necessary but I painted as much as I could.
I think a red would stand out more, than any other color, on your black IS.
Be very careful with the brush and tape off any parts you dont want painted, slight bumps and such might happen. Also get a couple cheap brushes, smaller ones, from the hardware store. This way you can wait and use a new brush instead of cleaning the old one you just painted with. I did 2 coats which turned out nice. Humidity sucks, I was stationed down south, and you may want to wait til the end of daylight then hit it again in the AM? If not then wait an hr and ou should be cool.
Thanks, good idea on getting the extra brushes. I am leaning toward painting them red. My last IS350 I did black with red logos. I will definitely be doing this in the morning in my garage. I waxed my car last weekend and it was extremely hot!! I had to stop about every half hour and cool off.
I have done a few sets now, I used to work in a body shop back in the day and I wouldn't brush them always spray them. I typically wait 15min between coats, the prep is the most important part I take them to a car wash and get at them good with soap and pressure washer. Then get home get them up on jack stands and the wheels off then I use brake kleen and wipe them with shop towels until the shop towels are clean then I wipe it with acetone then I scuff them good with purple scotch bright. Then wipe them again with acetone finally blow them down with air and go to paint.
get the foam brushes, they apply a smoother and more even coat. Clean the crap out of the calipers with brake cleaner. Probably spent 50% of the overall time cleaning.
Hi everyone, few weeks ago I decided to go ahead with this mod. I'd been thinking about doing this for a few years but never really pulled the trigger just cause I was a little unsure of the process and procuring the parts, but when the dealership wanted 1300 for new pads and resurfacing the rotors for front and back, I went ahead with it. Just gonna share my experience so some of you who are thinking about doing this can avoid some issues I ran into. Took some pics but not a lot. Btw I have a 2010 is250 awd.
These are the main threads I used for referance. I ordered two WBR remanufactured calipers for a 2010 is350, front brake pads for a 2010 is350, rear pads for 2010 is250 (I didn't upgrade the rear calipers), and stoptech drilled front rotors Canadian spec for 2010 is350. And that was my first mistake. I had read on forums that after 2010 all rotors were the same from rwd to awd which is partially true. Basically 09-13 Canadian spec rwd rotors wont fit their awd equivalent but the US specs one do. The reason being the US one allow for extra clearance of the awd hub. This is a good post to use for reference, didn't find it until after I made my mistake.
And here's a pic of the rotors, top is US spec and bottom is Canadian, both I ordered as a 2010 is350 and you can see the difference between the US and Canadian one. The US one has more clearance for the larger hub. I put the Canadian one on and due to the contact with the hub, the wheel would not move at all, you can see some of the grinding when i kinda forced it on the Canadian one. Someone else on forums had this problem too and this is why. Make sure you guys get the right parts.
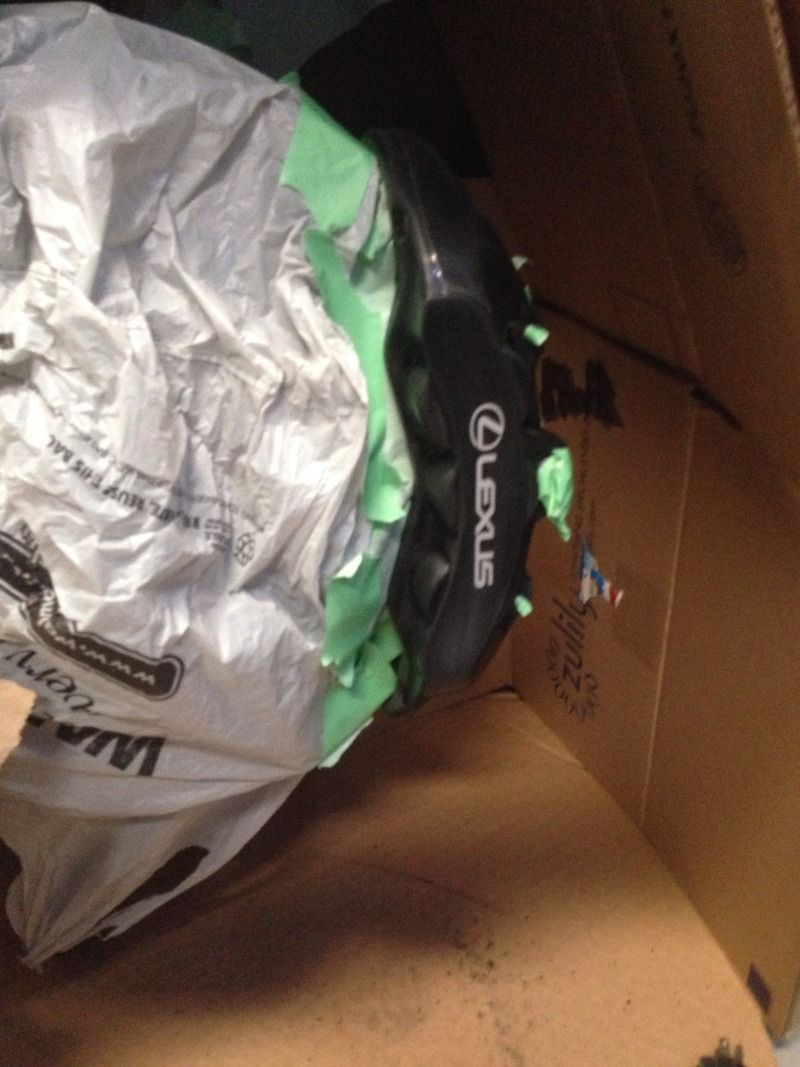
On to the calipers, when they came in, they were already painted black from partsgeek.com. so if you wanted black, you can just order them outright, decal and clear coat. Not a great pic but this is what they look like out of the box.
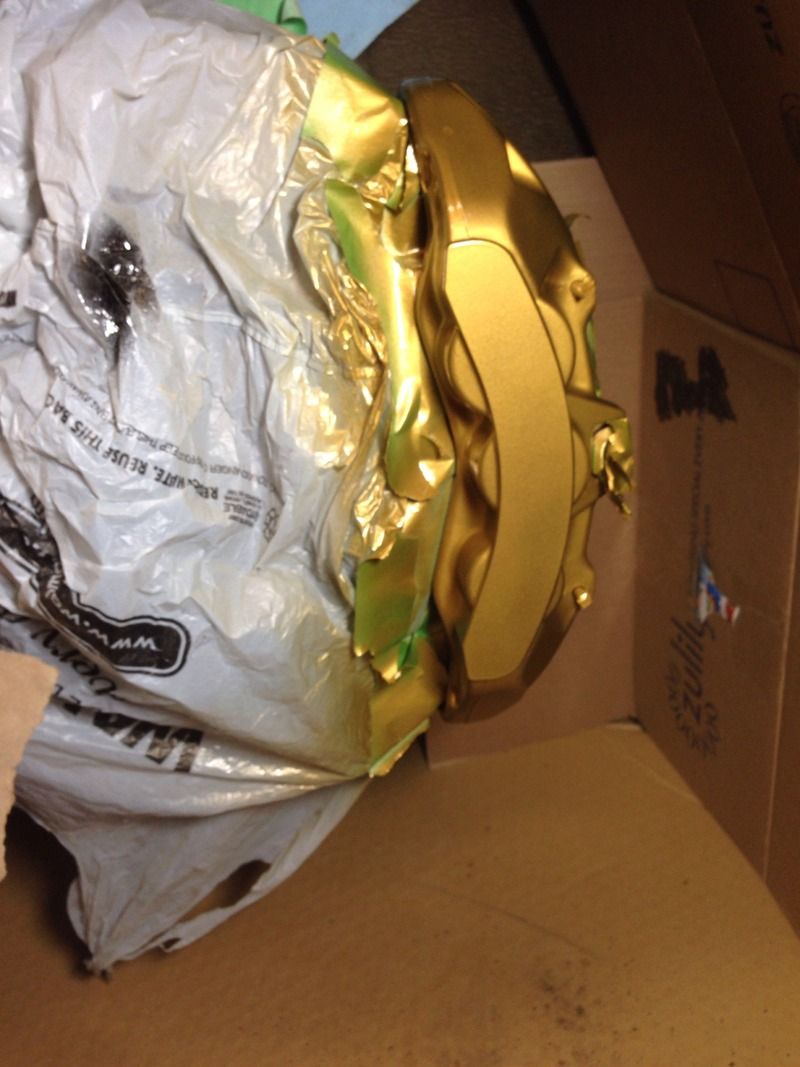
They come with anti rattle spring and a new bolt for the brake line. This next part was my own experience, I don't know if the other DIY that also order from partsgeek had any issue or not but again this was my experience. One of the bolt holes on the caliper used for connecting the caliper to the knuckle was semi stripped when I received it. I know for a fact that I didn't strip it by over tighten it. When I installed the first time, I kept turning the wrench but the bolt would get some resistance then get loose. I thought it would be ok since the force being applied to that bolt was perpendicular, in hindsight that was a dumb assumption, this was my second mistake. But basically the bolt came loose while driving allowing the caliper to get loose and made contact with the inside of my rims. I think it was a combination of the a semi stripped hole with a semi stripped bolt that allowed it to get loose. I ended up purchasing and replacing all four bolts for peace of mind. So just double check your parts, make sure they are good to go. Now on to the painting. I really liked the f sport blue and thought that the G2 blue caliper paint was a good match. Since the calipers were already black and very clean, I didn't have to clean it or do anything, I just went ahead and painted right over it. Painting wasn't too bad, just follow the instructions on the box. As I painted, I was horrified to see blue looked nothing like the blue I had imagined, it was a dull blue borderline purple. After 2 coats this is what it look liked.
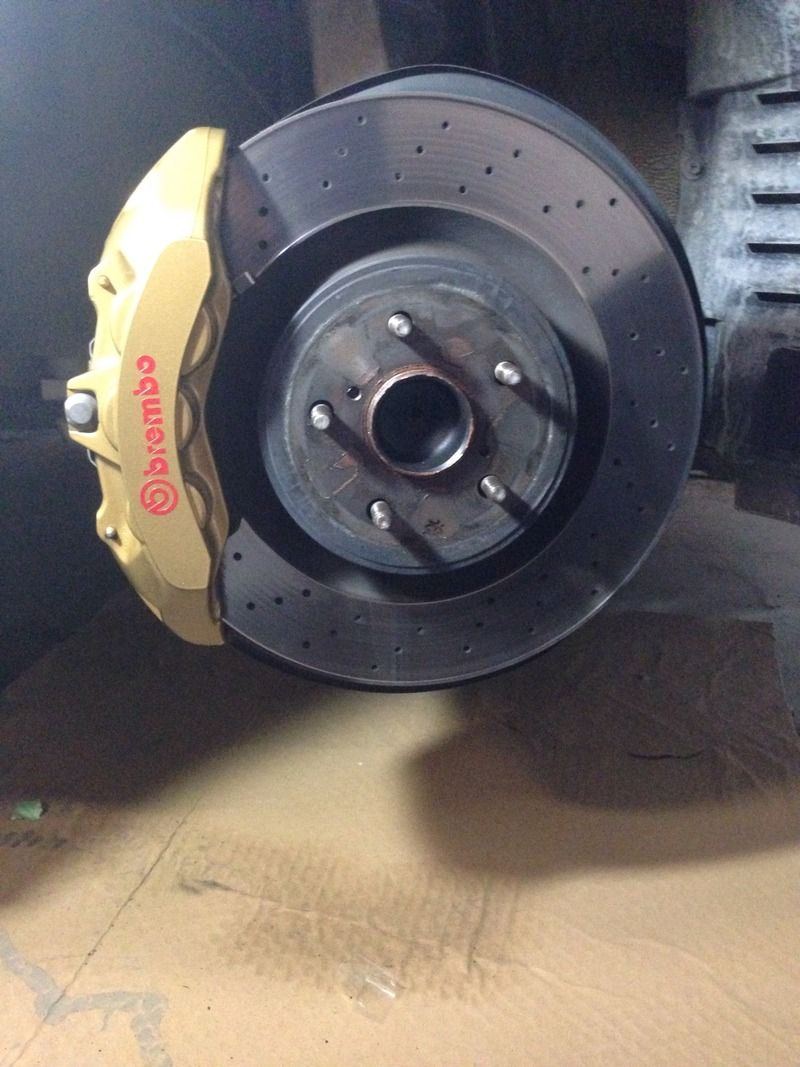
But I pressed ahead with 3-4 coats. I would recommend getting a higher quality brush instead of using the one G2 includes. Also inside the paint there were like little particles of something, i couldn't tell what it was. At first I thought it was bristles that had fallen off the paint brush but they were annoying, I had to pick them off the caliper otherwise you would have these weird lines like 2mm long. There weren't a lot, i picked off like 10-15 over 3-4 coats. After letting it dry overnight the blue got darker but it was still off until I brought it into the sunlight. The color came out awesome. I applied the lexus decal and applied the high temp clear coat. I was super happy with the results until the bolt incident ruined a portion of it. Advice on painting is take your time. Even thought my came out decent they couldve been so Installing was easy. Raise car, take tires off. Take off the old caliper by removing 2 bolts in the back holding it to knuckle(i recommend replacing these), do not disconnect the brake lines yet. Find something to hold the old caliper up to avoid stress on the brake line. You will also need to bend the dust shield at some point and I recommend doing it while the old rotors are on, that way you can just stick a flat head back there and use the leverage from the rotors to bend them. After that, you can take the rotor off, there are no bolts holding it in place, you just need a lot of force to pop them loose from the rust. I ended up taking a sledgehammer and knocking them off after soaking them in WD40 for like 30 mins. Once the rotors are off, you need to make one more modification to the dust shield, you to cut off a small section, I don't have pictures but you can find them in the other DIY I posted. Next, disconnect the brake lines from the old calipers and attach to new ones, do it quick cause there will be liquid coming out of the line and try to avoid getting any onto the new calipers. Put the new rotor and use the lug nuts to hold them in place. Next attached the new calipers to knuckle. Put in new brake pads with pins and anti rattle spring, I would apply some anti squeal grease to the backs of the pads so you don't get the annoying screeching sound every time you step on the brakes. Once you have done these steps for both sides you need to bleed the brakes. Its pretty easy with a brake bleeding kit, you can look up a youtube video but basically you add brake fluid to the reservoir, cap it. Attach a clear hose to the little valve on the caliper with the other in going into some container, open the valve, pump the brakes, which will squirt fluid out of the nozzle. Check to see if there are air bubbles in the hose, if there are, pump brake pedal again, if not close the valve and go to the other wheel. Once you have done this for both sides. Put the tires back on. Last step is to bed in the brakes which is different based on which brake pad you chose. Now for the results.
Brake performance is much better. With the old ones I would just keep sliding and I would really have to press down to stop in time. I get much better initial bite and better braking and feeling as I come to a stop. Plus it looks much better now. Also I feel obligated to say, I'm not a mechanic or expert, I'm just an enthusiast so perform all this at your own risk but definitely a worthwhile mod and hopefully you can avoid some of the stuff I ran into. Best of luck!!!
Just got my calipers painted finally after saying I would do them for so long lol. Im only posting one pic for now since its the only one I took . The car is currently in the body shop having my GFX front and rear installed
 06-12-15, 01:00 PM


 I had read on forums that after 2010 all rotors were the same from rwd to awd which is partially true. Basically 09-13 Canadian spec rwd rotors wont fit their awd equivalent but the US specs one do. The reason being the US one allow for extra clearance of the awd hub. This is a good post to use for reference, didn't find it until after I made my mistake.


 What do you think?
