DIY Daizen Steering Rack Bushing
 11-01-06, 08:49 PM
#1

Q&A:
Q: What is the Daizen Steering Rack Bushing kit?
A: The Daizen Steering Rack Bushing kit is a kit of polyurethane bushings that replaces your old OEM rubber bushing on the steering rack. Because the OEM bushings are made out of rubber, they will become weak over time and your steering rack will be prone to movement. This is unacceptable because there will be more slop than necessary (read: loose/unprecise steering)
Q: How do I know if I need to replace my bushings?:
A: You'll want a friend/buddy to help you with this. The car should not be jacked up at this point. You'll want the tires touching the ground. First, turn your ignition to the "on" position without turning the engine on. This will prevent the steering from locking up. Next, have your friend sit in the car and continuously steer the steering wheel back and forth quickly. While your friend is doing this, look under the car at the steering rack. If it's moving, your bushings are worn out.
Q: How long will the installation and how's the difficulty?
A: Although the length of time required will vary depending on the person behind the job, it should take approximately 45min-1hour. The work itself is very easy. It's just a matter of working through it smoothly without complication. If you can hold a wrench, you can do this job.
Q: Okay that sounds great. Now where can I buy it and how much?
A: Contact our vendor TM Engineering for the kit. The price is $39.95+shipping (Part No. GS-2030)
http://www.tmengineering.net/suspens...n/make/gs.html
Sewell Lexus now carries it
http://lexus-parts.com/partdetail.asp?PartID=3934&ModelID=11&SubCategoryID=85
Last edited by GSteg; 09-10-07 at 11:47 AM.
 11-01-06, 08:50 PM
#2
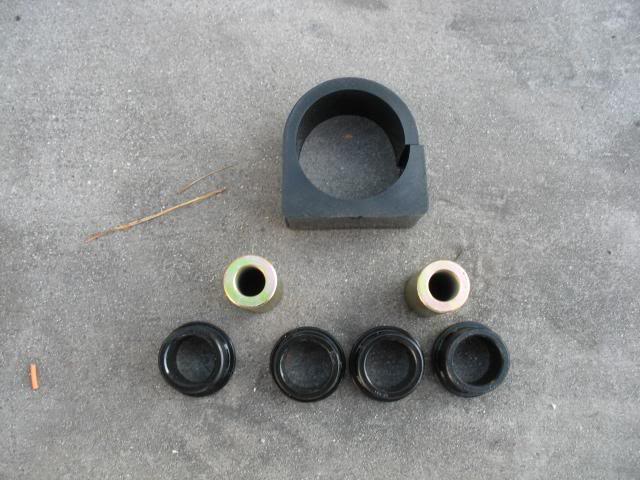
Q: Now that I've got the kit, how do I install it?
A: That's where I chime in The instruction provided by Daizen is pretty vague. All it tells you to do is remove the old bushing and install the new one. No kidding. 
Tools Needed:
-10mm wrench
-14mm socket
-17mm socket
-3/8" or 1/2" rachet (breaker bar recommended, or use a metal pipe for extension)
-3/8" or 1/2" socket extension
-Swivel head for rachet
-Torque wrench
-Mallet or hammer
-plier
-Screwdriver (standard length)
-Jackstand
Step 1:
-Make sure your car is parked with the emergency brakes engaged. Jack up the car enough to the point where you think you're able to work under the car. Put on jackstands and use wheel chokes on the rear wheels to prevent the car from rolling
Step 2:
-Remove the lower chassis brace. There should be (6) 14mm screws to remove. I have no picture, but it should be self-explanatory once you get down there.
Step 3:
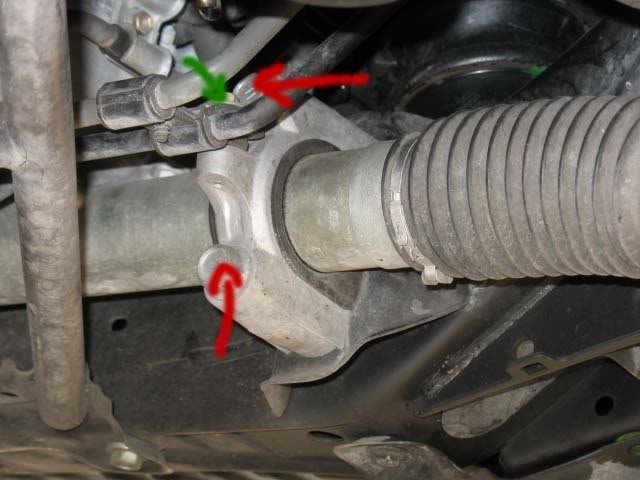
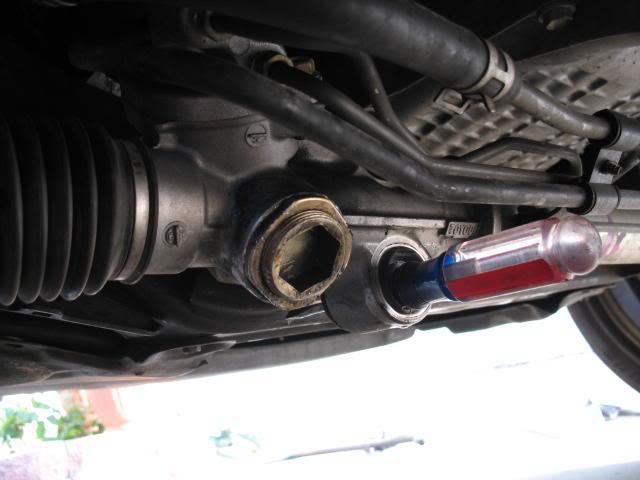
-Get under the Passenger side of the car and remove the (1) 10mm bolt with your 10mm wrench. The bolt is pointed by the green arrow in the picture. This must be removed, otherwise your 17mm socket wont fit into the 17mm bolt because of clearance issue.
-Remove the (2) 17mm bolt (indicated by the two red arrows). Then the metal bracket should be able to slide off. Remove the old rubber bushing and proceed to throw it in the trash. In my case, the bushing was so worn out that it because very very soft. It flopped around easily.
Step 4:
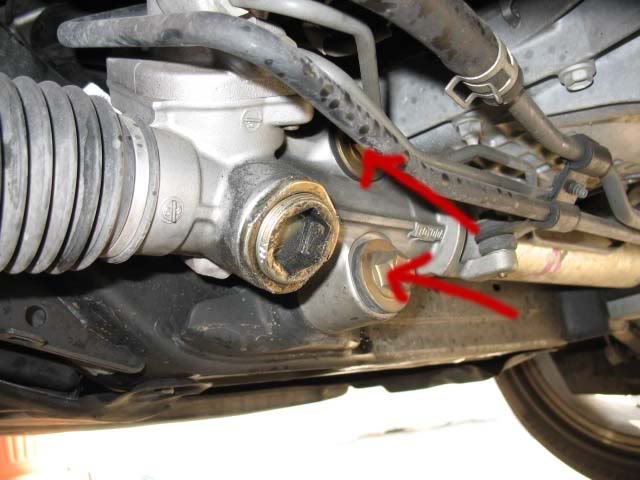
-Next, hop on over to the driver side where things are a bit more complicated, but nothing impossible. Remove the (2) 17mm bolts (indicated by the red arrows). You'll need the socket extension to reach the upper bolt. You should be able to move your steering rack around, but it wont drop so dont worry
A: That's where I chime in
The instruction provided by Daizen is pretty vague. All it tells you to do is remove the old bushing and install the new one. No kidding. Tools Needed:
-10mm wrench
-14mm socket
-17mm socket
-3/8" or 1/2" rachet (breaker bar recommended, or use a metal pipe for extension)
-3/8" or 1/2" socket extension
-Swivel head for rachet
-Torque wrench
-Mallet or hammer
-plier
-Screwdriver (standard length)
-Jackstand
Step 1:
-Make sure your car is parked with the emergency brakes engaged. Jack up the car enough to the point where you think you're able to work under the car. Put on jackstands and use wheel chokes on the rear wheels to prevent the car from rolling
Step 2:
-Remove the lower chassis brace. There should be (6) 14mm screws to remove. I have no picture, but it should be self-explanatory once you get down there.
Step 3:
-Get under the Passenger side of the car and remove the (1) 10mm bolt with your 10mm wrench. The bolt is pointed by the green arrow in the picture. This must be removed, otherwise your 17mm socket wont fit into the 17mm bolt because of clearance issue.
-Remove the (2) 17mm bolt (indicated by the two red arrows). Then the metal bracket should be able to slide off. Remove the old rubber bushing and proceed to throw it in the trash.
In my case, the bushing was so worn out that it because very very soft. It flopped around easily. Step 4:
-Next, hop on over to the driver side where things are a bit more complicated, but nothing impossible. Remove the (2) 17mm bolts (indicated by the red arrows). You'll need the socket extension to reach the upper bolt. You should be able to move your steering rack around, but it wont drop so dont worry
The following users liked this post:
Adali (09-17-21)
11-01-06, 08:52 PM
#3
Step 5:
-Now this is where the fun begins You'll need to remove the old bushings out.Daizen suggests to use a mallet to hammer it out  . I found out an easier way to get it out. Take your screwdriver and slide it through the hole. Now take your mallet and hit your screwdriver with a good amount of force. It'll eventually go through, and it's a whole lot easier than what Daizen recommends.
Step 6:
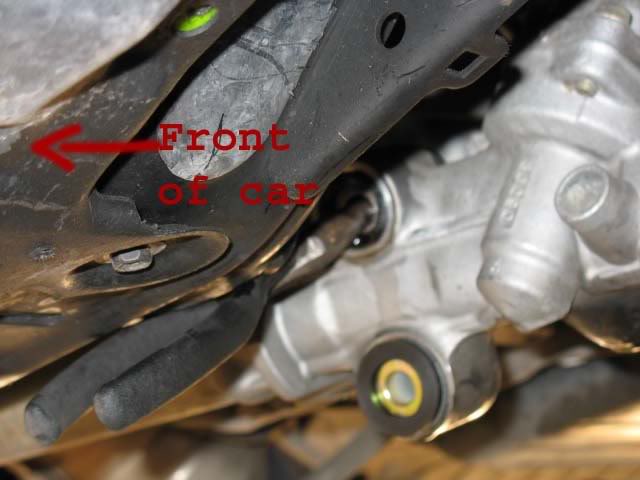
-The upper bushing is more challenging, but again, not impossible. Take your plier and put it through the upper bushing, but put it in from the front of the car. See picture:
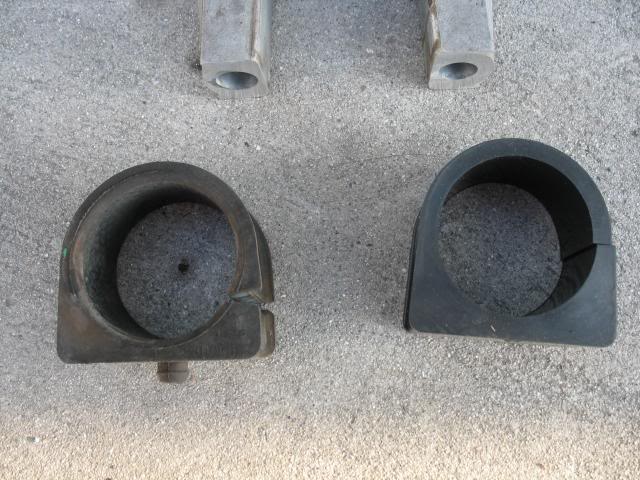
Use your mallet and hit against the plier and the bushing should pop out. Result of the old bushing?
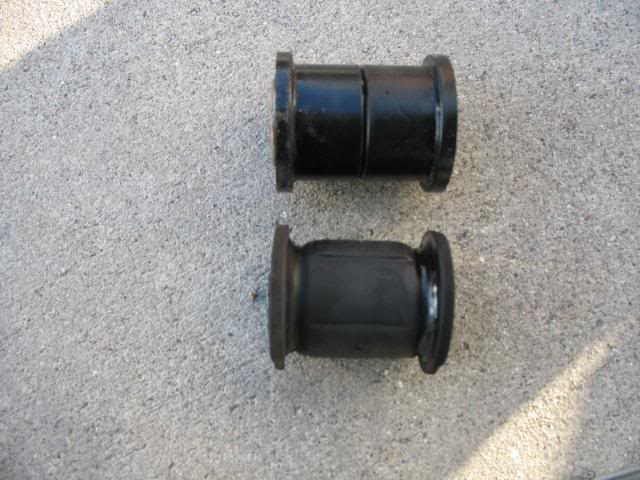
Can you guess which one is which?
Step 7:
-So now you're done removing everything. It's a breeze from here on. Put in your new Daizen bushings. It's very obvious on how to put it them in so I doubt a picture is needed.
-Next bolt on all the corresponding bolts. It's backward from here on out. All the bolts should be torqued to 48ft/lbs.
Step 8:
-Enjoy
-Now this is where the fun begins
You'll need to remove the old bushings out.Daizen suggests to use a mallet to hammer it out . I found out an easier way to get it out. Take your screwdriver and slide it through the hole. Now take your mallet and hit your screwdriver with a good amount of force. It'll eventually go through, and it's a whole lot easier than what Daizen recommends.Step 6:
-The upper bushing is more challenging, but again, not impossible. Take your plier and put it through the upper bushing, but put it in from the front of the car. See picture:
Use your mallet and hit against the plier and the bushing should pop out. Result of the old bushing?
Can you guess which one is which?
Step 7:
-So now you're done removing everything. It's a breeze from here on. Put in your new Daizen bushings. It's very obvious on how to put it them in so I doubt a picture is needed.
-Next bolt on all the corresponding bolts. It's backward from here on out. All the bolts should be torqued to 48ft/lbs.
Step 8:
-Enjoy
The following 3 users liked this post by GSteg:
11-01-06, 08:53 PM
#4
Impression:
-Before: My car would track straight, even though I steered the steering wheel back and forth (2" from center) quickly. That tells you how loose the steering was.
-After: When attempting the same test, the car would steering back and forth with precision, respectively to my steering input. I went under the car and this time, the steering rack did not move like before. No more looseness from my steering wheel. The quality of the steering did not degrade. It felt like OEM and there was no hints of added vibration. Did it help steering? YES! Did it do any negatives? NO!
This is my experience ,and to be honest, it's worth the $40. If it was $100, I'd still buy it because it fixed my loose steering, which can be very dangerous on the highway, or in an emergency situation.
I give it up. I hope this helps for those who haven't seen the underside of their car. Visuals are always a plus and time saver
*let me know if I made grammar mistakes
-Before: My car would track straight, even though I steered the steering wheel back and forth (2" from center) quickly. That tells you how loose the steering was.
-After: When attempting the same test, the car would steering back and forth with precision, respectively to my steering input. I went under the car and this time, the steering rack did not move like before. No more looseness from my steering wheel. The quality of the steering did not degrade. It felt like OEM and there was no hints of added vibration. Did it help steering? YES! Did it do any negatives? NO!
This is my experience ,and to be honest, it's worth the $40. If it was $100, I'd still buy it because it fixed my loose steering, which can be very dangerous on the highway, or in an emergency situation.
I give it
up. I hope this helps for those who haven't seen the underside of their car. Visuals are always a plus and time saver *let me know if I made grammar mistakes
The following 3 users liked this post by GSteg:
11-01-06, 09:06 PM
#6
GREAT RIGHT UP.. I did my bushings DIY, like Pavster did, fellow member on here. I do agree you rack moves when you steer back and forth. I witnessed it myself. What I did was I bought 4 washers and used them on each side of the bushing, shown on Step:4.. The washers were big enough to go inside the opening where the bushing is, and we tourqued the bolts 60lbs, so some of the bushing came outside. The rack did not move after that, but my steering is still loose. I might do this mod last. First I need to change out sway bar bushings with Daizen's and check my end links and sway bar mounts. that could be an issue too.. Since everything else is changed out already.. Just getting a bit sick of trying to fix this engineering mistake that Lexus did with the steering and suspension, making it to soft and loose..
Last edited by Panerai127; 11-01-06 at 09:07 PM. Reason: edit
The following users liked this post:
LSUGS430 (11-17-22)

Trending Topics
11-01-06, 09:11 PM
#8
GREAT RIGHT UP.. I did my bushings DIY, like Pavster did, fellow member on here. I do agree you rack moves when you steer back and forth. I witnessed it myself. What I did was I bought 4 washers and used them on each side of the bushing, shown on Step:4.. The washers were big enough to go inside the opening where the bushing is, and we tourqued the bolts 60lbs, so some of the bushing came outside. The rack did not move after that, but my steering is still loose. I might do this mod last. First I need to change out sway bar bushings with Daizen's and check my end links and sway bar mounts. that could be an issue too.. Since everything else is changed out already.. Just getting a bit sick of trying to fix this engineering mistake that Lexus did with the steering and suspension, making it to soft and loose..


The following 2 users liked this post by aloha08isf:
DJHydrogen (03-21-20),
LSUGS430 (11-17-22)

The following users liked this post:
LSUGS430 (11-17-22)
 11-02-06, 01:36 PM
#14
Damn, that was good. Ok, you convinced me. I will get them now too. I have the daizen control arm bushings to put in anyway, might as well do it all at once and hit up an allignment. Thanks.
By the way, how many miles did you have on your car, and what year was it?
By the way, how many miles did you have on your car, and what year was it?
The following users liked this post:
LSUGS430 (11-17-22)
11-02-06, 02:33 PM
#15
I have 128k miles on my car and it's a 1999. I doubt OEM bushings last too long seeing how it's under stress all the time (while steering and driving over bumps)
$40 for the bushings is a great deal to correct your steering. Honestly, I can turn my steering just a tad whee bit and the car will turn accordingly. I couldn't do that before so my steering was unpredictable in turns.
I decided to make a DIY because I knew people out there are looking for one. I couldn't find one for the GS so I took the opportunity to snap pictures
Last edited by GSteg; 11-02-06 at 02:38 PM.
The following users liked this post:
LSUGS430 (11-17-22)