Lower Control Arm DIY


 02-15-10, 09:24 PM
#49
I haven't found any rust on my car, so hopefully I'll be fine.
How can I check my ball joints before removing the arms? Once the nose is in the air, can I just peek in there and see them? I haven't played with the front suspension since the summer of '08, so I don't remember how it looks. I'd really rather not go through the trouble of getting the arms out/bushings in to find the ball joints are toast and I need new arms...
This is pretty much the same pitman arm puller I have: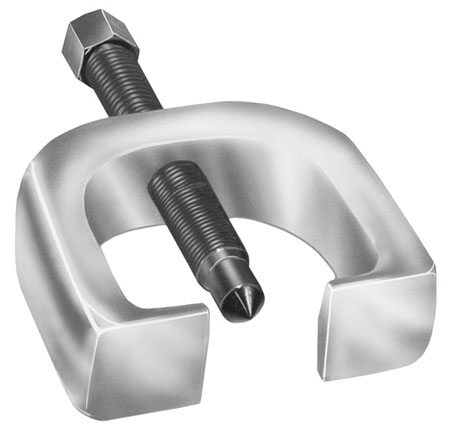
Is this the tool everyone recommends to remove the ball joint? How is it done?
I also have a pickle fork, but have read that's not the safest option when trying to retain the ball joint.
I'm searching all over the forums and want to make sure I know what I'm doing before I start.
Last edited by MongooseGA; 02-15-10 at 10:03 PM.
02-15-10, 11:54 PM
#50
Rookie
iTrader: (-1)

Join Date: Aug 2004
Location: Tennessee
Posts: 66
Likes: 0
Received 0 Likes
on
0 Posts
Ive got a question for you guys. Is it better to replace the whole arm? Or does people just do that to not have to go through the trouble of putting new bushings in? if putting new arms on is the supra ones any different? Any better? Can someone just give me the general info on this. thanks
02-16-10, 11:37 AM
#52

Ive got a question for you guys. Is it better to replace the whole arm? Or does people just do that to not have to go through the trouble of putting new bushings in? if putting new arms on is the supra ones any different? Any better? Can someone just give me the general info on this. thanks
a bushing kit will only swap out the bushings. also there's more work with pressing out the old or cutting out the old and installing new.
 02-18-10, 10:56 PM
#55
Driver School Candidate

Join Date: Feb 2010
Location: HI
Posts: 2
Likes: 0
Received 0 Likes
on
0 Posts
Been reading the forum and looks like lots of great info here. I'm looking to change out my LCA with the supra parts on my sc300. I checked out the Carson Toyota website and price currently is $263 per side. Anyone know of any cheaper sources? I'm in Hawaii as well.
03-07-10, 05:04 PM
#57
Rookie
Join Date: Nov 2009
Location: Texas
Posts: 87
Likes: 0
Received 0 Likes
on
0 Posts
okay this is by far the simplest job i have ever done.
tools you need:
Ball Joint Fork
22 MM open end wrench
19 MM open end wrench
14 MM open end wrench
metric hex set
needle nose pliers
OKay start with Remove wheel. it is preferable to have the vehicle on a lift cuz u gotta get up underneath it.
once the wheel is off, start removing nuts. the ones i have circled.
 03-07-10, 08:47 PM
#59
Rookie
Join Date: Nov 2009
Location: Texas
Posts: 87
Likes: 0
Received 0 Likes
on
0 Posts
 .
03-20-10, 01:19 PM
.
03-20-10, 01:19 PM
#60
Lexus Test Driver
iTrader: (6)

Join Date: Aug 2008
Location: ca
Posts: 1,574
Likes: 0
Received 0 Likes
on
0 Posts
once everything is in place start tightening everything down nice and tight. i started at the ball joint and then the sway arm then the shock then the two arm to frame nuts. once its all tight, put the cotter pin back in the castle nut, and give the arm a pull downwards make sure u get no clunking or shaking. then you are pretty much done. put ur wheel back on and you are rolling.


To do the job properly, you should have your wheels on and the weight of the car compressing the suspension to normal riding position BEFORE you tighten the bolts all up. If you don't do this, and you tighten your new rubber bushings in place while the suspension is in its fully drooped position, you are subjecting the rubber bushing to pretty severe twisting which WILL cause premature failure.
This either requires putting the car on a drive up rack/ramp... like an alignment machine has(best), or at least some floor ramps. Ideally, the car should be level too, so just putting them under the front wheels alone is better than the OP suggested, but still not optimal. The trouble for the DIY'er, is getting all four wheels of the car up high enough to crawl underneath and tighten those bolts up. I used four ramps and extra blocks of wood under the tires to add height. (if you choose that method, be sure you can tell what safe to crawl under and what's not!!)
Alternatively, if you are going straight to the alignment shop, ask them to loosen the CA bolts up again, let the bushings fully relax, and then retighten them with the alignment. BTW, I believe the torque is something like 166 ft.lbs. (just beyond most peoples 150 ft.lb torque wrenches lol)