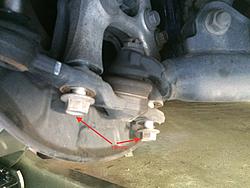
Lower Ball Joint Boot Cracked/Leaking
 07-07-17, 06:33 PM
#1
Has anyone replace these already on our cars?
If so, do you have the torque specs for the bolts and ball joint nuts?
My car now has 62k and noticed this below while doing an oil change and changing out the rotors.
I was going to buy some pickler forks, ball joint clamp and just do it in my garage for forgo the alignment....but then other part of me says just take it to the dealer and have them do it and align it and wash my hands of it...

Thoughts?
If so, do you have the torque specs for the bolts and ball joint nuts?
My car now has 62k and noticed this below while doing an oil change and changing out the rotors.
I was going to buy some pickler forks, ball joint clamp and just do it in my garage for forgo the alignment....but then other part of me says just take it to the dealer and have them do it and align it and wash my hands of it...
Thoughts?


The following users liked this post:
MisterSkiz (07-08-17)
07-08-17, 09:19 AM
#3

Has anyone replace these already on our cars?
If so, do you have the torque specs for the bolts and ball joint nuts?
My car now has 62k and noticed this below while doing an oil change and changing out the rotors.
I was going to buy some pickler forks, ball joint clamp and just do it in my garage for forgo the alignment....but then other part of me says just take it to the dealer and have them do it and align it and wash my hands of it...
Thoughts?
The following users liked this post:
MisterSkiz (07-08-17)
07-08-17, 12:56 PM
#4
Time and convenience, and dealership pricing, versus a couple hours, if that, in your garage switching them out yourself, not including an alignment. I would go ahead and do both sides even if that's the only side showing wear. From Moog to OEM, the parts are not that expensive.

 07-19-17, 07:35 PM
#7
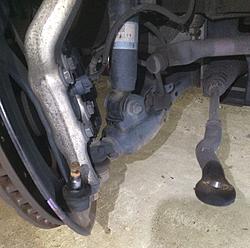
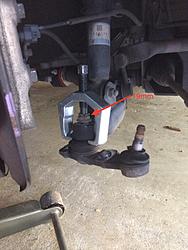
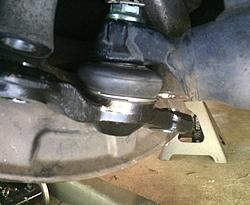
Around 56k miles my '08 started steering a little sloppy. New/wider tires and an alignment didn't help so I decided to try replacing the lower ball joint assemblies. Here's what one tie rod end looked like before the install:
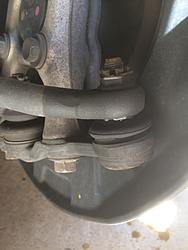
A little wet but no tears, cracks, or grease oozing out.
Here's a DIY:
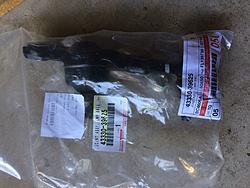
I've never done this before on any car so if you're on the fence you might want to try it yourself. It's not that bad. Here are the Lexus parts you'll need:
Left ball joint assy: (1) 43340-39505
Right ball joint assy: (1) 43330-39625
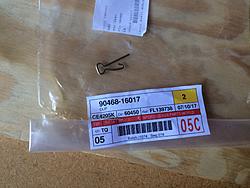
Retainer clips/cotter pins: (2) 90468-16017
17mm Castle nuts: (2) 9017112002
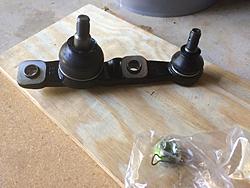
Each ball joint assembly includes this (notice it doesn't come with a new castle nut or retaining clip for the tie rod end; just one for the control arm pivot or whatever you call it):
This is what a new clip looks like:
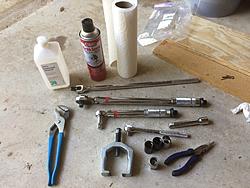
Here are the only tools I used. I needed pliers because the pitman arm that I borrowed did not allow for a socket to fit over top of it. The sockets you see are 17mm, 19mm, 21mm for the wheel lug nuts, and the wheel lock:
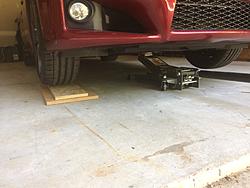
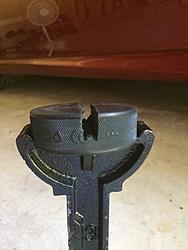
1. Jack up the front and put it on jack stands. For those of you looking for methods, I drive one of my wheels onto two boards that sit about 1.5" off the ground. Then I use a low profile jack to reach the lift point in front of the oil pan. After lowering the car onto the stands I like to lift the jack back onto the jack point with a little bit of pressure as a backup in case my jack stands fail. But for this procedure you'll need the floor jack to keep the steering knuckle elevated and out of the way. For the jack stands I cut out the top and bottom of a hockey puck. The puck ends up supporting the pinch weld itself as well as the frame that it protrudes from.

2. Turn the steering wheel so that the tie rod on the side you're working on is fully extended. You don't have to start the car. Just press the start button twice. Turn the power off when you're done so you don't drain the battery.
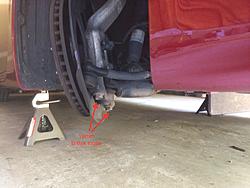
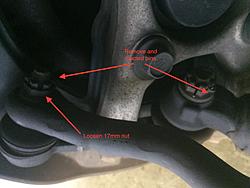
3. There are two ball joints with castle nuts on top of them. One acts as a pivot and the other allows the tie rod end to steer the entire knuckle. Remove the pins from both castle nuts and throw them away. Break loose the two 19mm bolts on the bottom of the steering knuckle. You need to do this first because when the tie rod end is removed, the knuckle will rotate freely while you're trying to get the 19mm bolts off and you won't be able to get any torque on them. Loosen the 17mm castle nut on the tie rod end.
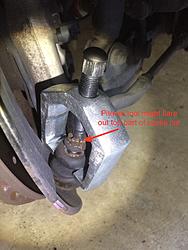
4. I would back the castle nut out and keep it screwed onto the top threads to prevent the tie rod from flying off when it pops out. Remove the tie rod with a pitman arm puller or some other tool. You can borrow one at autozone for free (with a refundable deposit) or they're about $15. The pitman tool may flare out the top of the castle nut which means you may not be able to fit the 17mm socket over it again (unless you squeeze it back into shape with pliers like I did). I would just use a new castle nut during installation. Part # 9017112002. Remove the castle nut and move the tie rod out of the way.
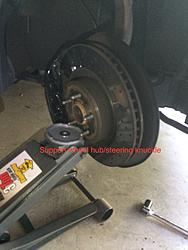
5. You can't get to the larger castle nut since part of the steering knuckle is in the way so the next step is to remove the steering knuckle from the lower ball joint assembly. Support the weight of the knuckle by resting the wheel hub bolts on a jack. Remove the two 19mm bolts completely from the bottom of the knuckle. As you do this jack up the knuckle so that it's out of the way.

6. Loosen the larger 19mm castle nut and use the pitman arm tool to remove the entire ball joint assembly.
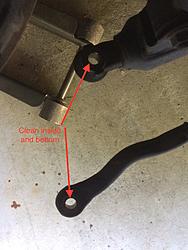
7. Clean the bottoms and insides of the pivot and tie rod end. I feel like if these have any pieces of dirt on them it would wear down the new rubber ball joints quicker.
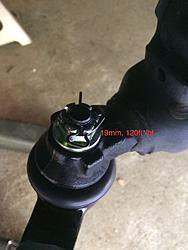
8. Install the new ball joint assembly by tightening the new 19mm castle nut to 120 ft*lbf. I can't remember, but I might have temporarily placed the tie rod end into the assembly in order to hold the assembly in place while I torqued the 19mm castle nut. When the ball joint is installed it will not make a popping sound like it did when the old one was removed. Install the new retainer pin that came with the kit. edit: the service manual says "further tighten the nut up to 60 degrees if the holes for the clip are not aligned"
9. Lower the steering knuckle onto the new ball joint assembly and tighten the two large 19mm bolts on the bottom of the knuckle to 88 ft*lbf. It will take some finagling to get the knuckle to sit on the ball joint assembly properly. If you want to use new bolts for the knuckle here's their part # 90105A0232. If the knuckle won't hold still while you're trying to torque the bolts, skip to the next step and attach the tie rod end first so that the knuckle won't be able to rotate.
10. Attach the tie rod end and torque the 17mm castle nut to 48 ft*lbf (576 in*lbf). Only my smaller torque wrench could reach in there. The ball joint assembly does not come with a new castle nut for the tie rod end. Either reuse your old one or here's the part number for a new one: 9017112002. Install a new retainer pin that also does not come with the ball joint assembly (9046816017). If you weren't able to torque down the 19mm knuckle bolts, do so now (88 ft*lbf).
11. Repeat for the other side.
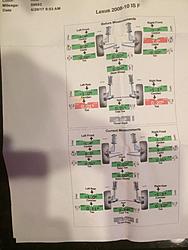
12. Get an alignment? Let the debate begin. Here's the results from an alignment at 59,692 miles with new tires and the old ball joints:
I installed the lower ball joints at 59939. Here's the alignment check I had done at 59952 on the same day:
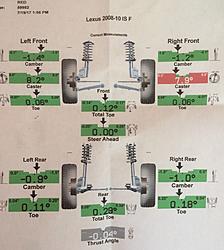
At this shop alignment checks are free so obviously they want you to be out of spec and need an alignment and pay for it. No adjustments were needed.
Conclusion: The ball joints didn't make a big difference in handling around town. However, I no longer have to make tiny steering inputs and the steering wheel returns to center again when I let go of the wheel. I can't feel the front wheels wobbling all over the place when I drive over bumpy roads like I used to. Over 50mph I noticed a drastic change. In a straight line it takes a lot more effort to change lanes. It feels stable and stiff now. Well worth the $160 for the increased stability at highway speeds alone.
If you see anything wrong with this procedure let me know so I can edit this post.

A little wet but no tears, cracks, or grease oozing out.
Here's a DIY:
I've never done this before on any car so if you're on the fence you might want to try it yourself. It's not that bad. Here are the Lexus parts you'll need:
Left ball joint assy: (1) 43340-39505
Right ball joint assy: (1) 43330-39625
Retainer clips/cotter pins: (2) 90468-16017
17mm Castle nuts: (2) 9017112002
Each ball joint assembly includes this (notice it doesn't come with a new castle nut or retaining clip for the tie rod end; just one for the control arm pivot or whatever you call it):


This is what a new clip looks like:

Here are the only tools I used. I needed pliers because the pitman arm that I borrowed did not allow for a socket to fit over top of it. The sockets you see are 17mm, 19mm, 21mm for the wheel lug nuts, and the wheel lock:

1. Jack up the front and put it on jack stands. For those of you looking for methods, I drive one of my wheels onto two boards that sit about 1.5" off the ground. Then I use a low profile jack to reach the lift point in front of the oil pan. After lowering the car onto the stands I like to lift the jack back onto the jack point with a little bit of pressure as a backup in case my jack stands fail. But for this procedure you'll need the floor jack to keep the steering knuckle elevated and out of the way. For the jack stands I cut out the top and bottom of a hockey puck. The puck ends up supporting the pinch weld itself as well as the frame that it protrudes from.


2. Turn the steering wheel so that the tie rod on the side you're working on is fully extended. You don't have to start the car. Just press the start button twice. Turn the power off when you're done so you don't drain the battery.
3. There are two ball joints with castle nuts on top of them. One acts as a pivot and the other allows the tie rod end to steer the entire knuckle. Remove the pins from both castle nuts and throw them away. Break loose the two 19mm bolts on the bottom of the steering knuckle. You need to do this first because when the tie rod end is removed, the knuckle will rotate freely while you're trying to get the 19mm bolts off and you won't be able to get any torque on them. Loosen the 17mm castle nut on the tie rod end.


4. I would back the castle nut out and keep it screwed onto the top threads to prevent the tie rod from flying off when it pops out. Remove the tie rod with a pitman arm puller or some other tool. You can borrow one at autozone for free (with a refundable deposit) or they're about $15. The pitman tool may flare out the top of the castle nut which means you may not be able to fit the 17mm socket over it again (unless you squeeze it back into shape with pliers like I did). I would just use a new castle nut during installation. Part # 9017112002. Remove the castle nut and move the tie rod out of the way.


5. You can't get to the larger castle nut since part of the steering knuckle is in the way so the next step is to remove the steering knuckle from the lower ball joint assembly. Support the weight of the knuckle by resting the wheel hub bolts on a jack. Remove the two 19mm bolts completely from the bottom of the knuckle. As you do this jack up the knuckle so that it's out of the way.


6. Loosen the larger 19mm castle nut and use the pitman arm tool to remove the entire ball joint assembly.

7. Clean the bottoms and insides of the pivot and tie rod end. I feel like if these have any pieces of dirt on them it would wear down the new rubber ball joints quicker.

8. Install the new ball joint assembly by tightening the new 19mm castle nut to 120 ft*lbf. I can't remember, but I might have temporarily placed the tie rod end into the assembly in order to hold the assembly in place while I torqued the 19mm castle nut. When the ball joint is installed it will not make a popping sound like it did when the old one was removed. Install the new retainer pin that came with the kit. edit: the service manual says "further tighten the nut up to 60 degrees if the holes for the clip are not aligned"

9. Lower the steering knuckle onto the new ball joint assembly and tighten the two large 19mm bolts on the bottom of the knuckle to 88 ft*lbf. It will take some finagling to get the knuckle to sit on the ball joint assembly properly. If you want to use new bolts for the knuckle here's their part # 90105A0232. If the knuckle won't hold still while you're trying to torque the bolts, skip to the next step and attach the tie rod end first so that the knuckle won't be able to rotate.

10. Attach the tie rod end and torque the 17mm castle nut to 48 ft*lbf (576 in*lbf). Only my smaller torque wrench could reach in there. The ball joint assembly does not come with a new castle nut for the tie rod end. Either reuse your old one or here's the part number for a new one: 9017112002. Install a new retainer pin that also does not come with the ball joint assembly (9046816017). If you weren't able to torque down the 19mm knuckle bolts, do so now (88 ft*lbf).
11. Repeat for the other side.
12. Get an alignment? Let the debate begin. Here's the results from an alignment at 59,692 miles with new tires and the old ball joints:

I installed the lower ball joints at 59939. Here's the alignment check I had done at 59952 on the same day:

At this shop alignment checks are free so obviously they want you to be out of spec and need an alignment and pay for it. No adjustments were needed.
Conclusion: The ball joints didn't make a big difference in handling around town. However, I no longer have to make tiny steering inputs and the steering wheel returns to center again when I let go of the wheel. I can't feel the front wheels wobbling all over the place when I drive over bumpy roads like I used to. Over 50mph I noticed a drastic change. In a straight line it takes a lot more effort to change lanes. It feels stable and stiff now. Well worth the $160 for the increased stability at highway speeds alone.
If you see anything wrong with this procedure let me know so I can edit this post.
Last edited by ZDCATC; 09-29-17 at 06:04 PM. Reason: fixed pictures to satisfy ocd
Trending Topics
 For the DIY and included part numbers.
07-20-17, 04:20 PM
For the DIY and included part numbers.
07-20-17, 04:20 PM
#9
Tech Info Resource

iTrader: (2)
Nothing wrong with the procedure, but I use air tools to dramatically simplify the job. It all comes apart in a few minutes with a good 1/2" drive air wrench and an air chisel (if you really need it). I also use a lead hammer instead of the puller when I'm tossing the ball joint anyway.
That car looks like it hasn't seen salt and snow. Nice!
That car looks like it hasn't seen salt and snow. Nice!
The following users liked this post:
Rickna (09-10-19)
07-20-17, 06:30 PM
#11
07-20-17, 07:45 PM
#12
It's spent it's whole life in Southeastern PA and Northern VA. Hopefully the original owners kept it in a garage. I've daily driven it even through the winters since I bought it in 2013 but was only able to keep it in a garage for 4 of the last 5 years. For the most part I really lucked out with the rust/corrosion.
As soon as I saw this thread I decided to pull the trigger and replace the ball joints. I was hoping to post my DIY before you made a decision in order to help you out. Did you end up doing the work yourself?
I probably should have done at least the tie outer tie rods for piece of mind since I was set on taking it to the alignment shop afterwards. Oh well. It really is less intimidating than it seems.
I probably should have done at least the tie outer tie rods for piece of mind since I was set on taking it to the alignment shop afterwards. Oh well. It really is less intimidating than it seems.
07-21-17, 07:31 AM
#13
Yup, I ended up doing it all myself with no alignment.
Only thing I did different from you was I took the two big 19 mm bolts off first and lifted the assembly up and moved it over and rested it on a jack using the rotor hat.
I then used an impact wrench to remove the bolts, as I drive my car year round so there was some rust build up.
The inner tie rods were fine and did not show any horizontal play at all, and well the outer tie rods are just a big metal loop, nothing to really do there.
Ony thing I want to remind folks that would be doing this on their own is that to please use a nice quality torque wrench for the bolts...this is your car's steering...
09-10-19, 05:54 PM
#15
Instructor
Just to avoid doing the job twice go OEM. I bought some moog parts for the rear and ended up doing the job again a year later and replaced those with OEM parts.