noobierices bumper removal guide and base model to f sport conversion
 06-25-17, 10:08 PM
#1
Rookie
Thread Starter
well club this will be my first guide thread and probably last because i wrote the WHOLE THING DOWN AND FINISHED IT AND IT WOULDNT LET ME UPLOAD IT, SO I HAD TO "RELOAD" the whole page and guess what? everything was DELETED!!!!!!  so second write up.... BTW STAY THE F*** AWAY FROM PHOTOBUCKET NOTHING BUT AN AD FEST AND STUPID ERRORS that would leave to alot of down time for me writing this.....lets get started... i noticed there wasnt any threads/post that ive discovered to remove or convert the base bumper... and if your asking why im converting and why didnt i just buy a f sport in the first place? well great question when i was in the "market" of searching for a new car there was no f sports that i can find at the time, i live in oklahoma btw but at the toyota dealer had this gorgeous 1h9 is250, so i went to look at it and it was in my price range, drove it and loved it and signed my life/papers away, sadly we took the car to texas and at the time i did tape my front end but when we got to texas it started peeling off the bumper so i peeled it off and when we where heading back, the highway we were on had a ton of construction and my bumper suffered massive rock chips

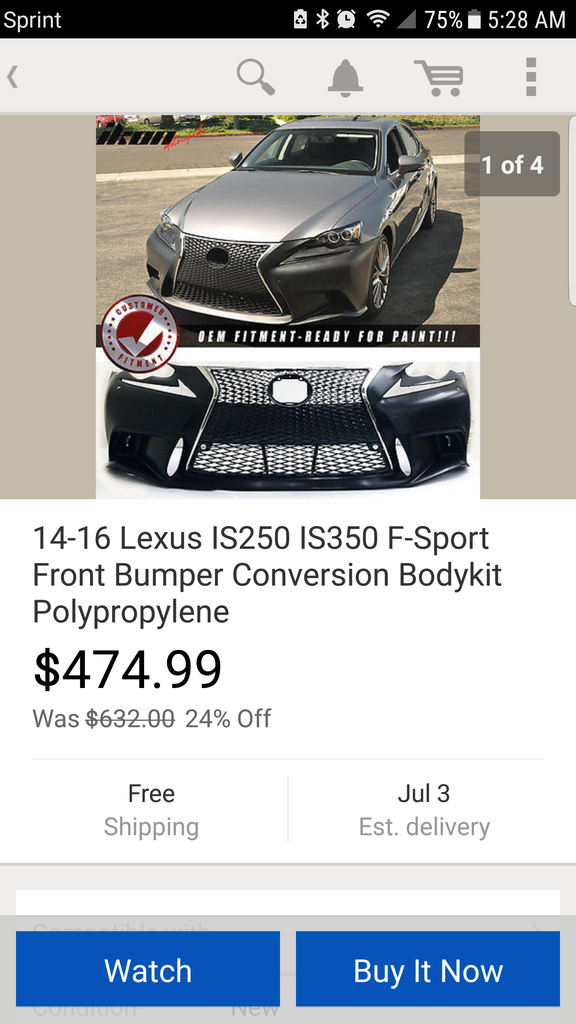
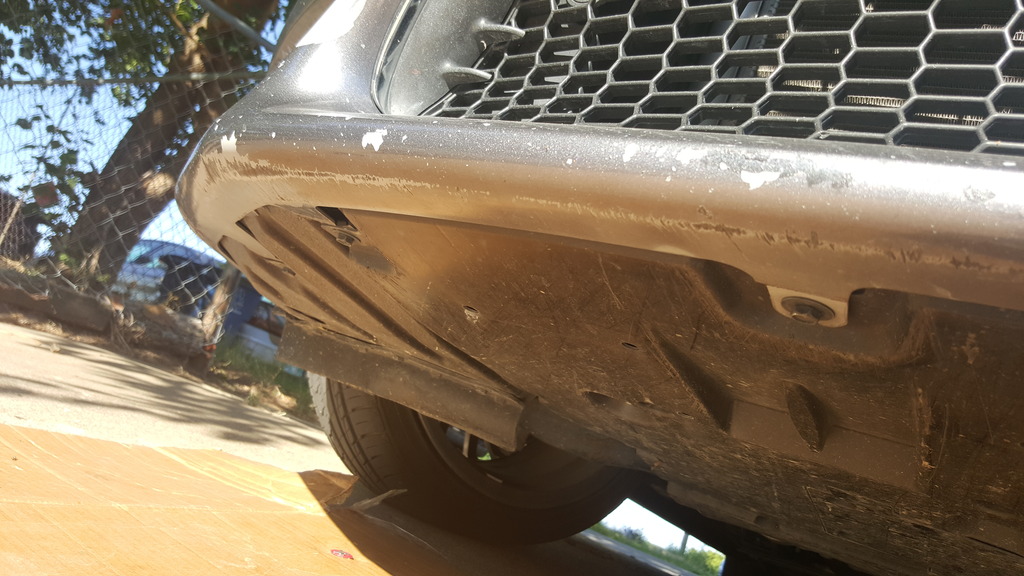
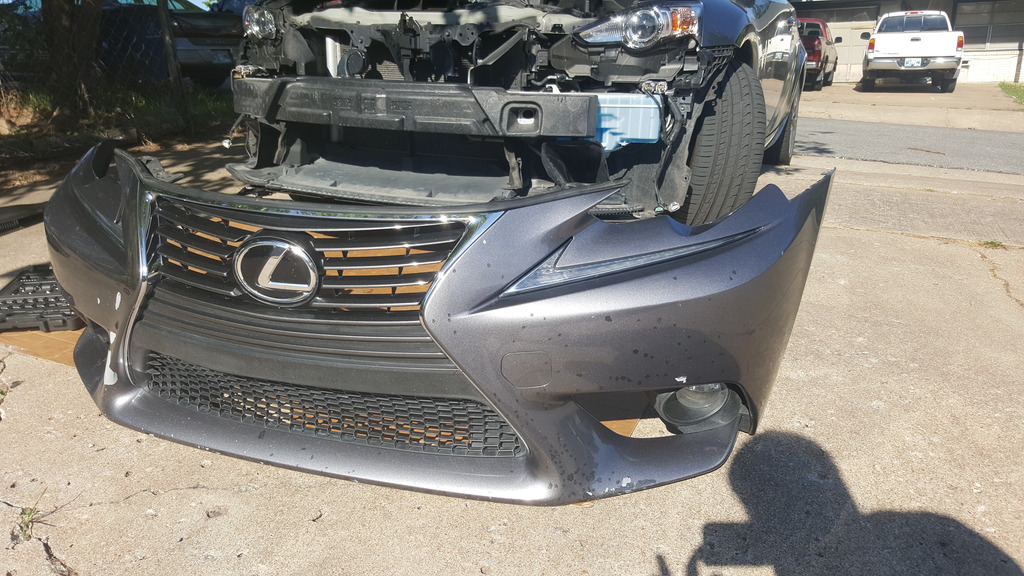
as you can tell on the dark spots i tried to cover all the rock chips with o'reilly auto parts paint.. sadly it was a darker shade and on the left of the bumper the paint is peeling bad.... any who i decided to either repaint my bumper or buy a f sport conversion, so i bit the bullet and looked for it on ebay and i found this one and purchased it, its the ikon motorsports one
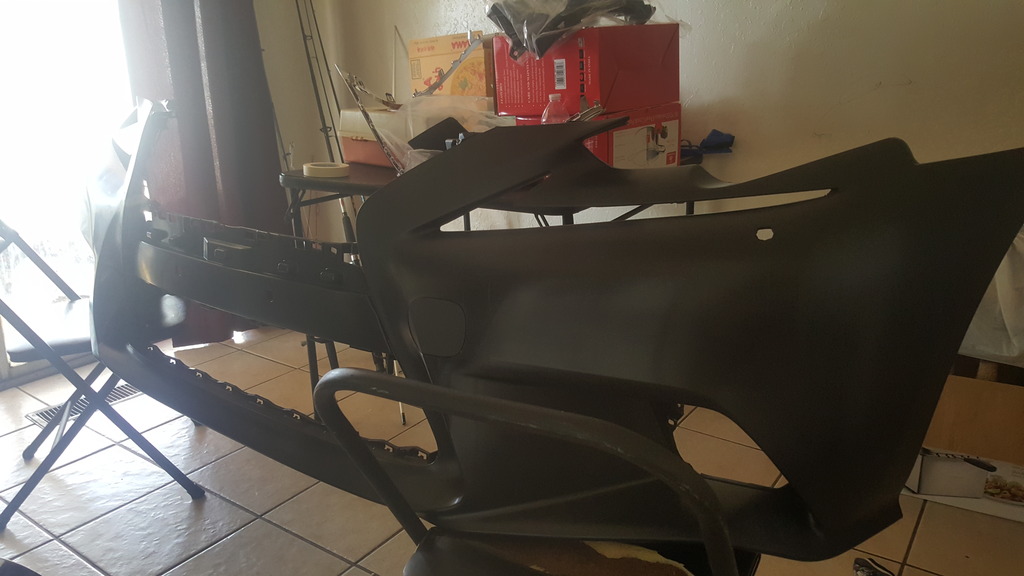
finally recieved it!
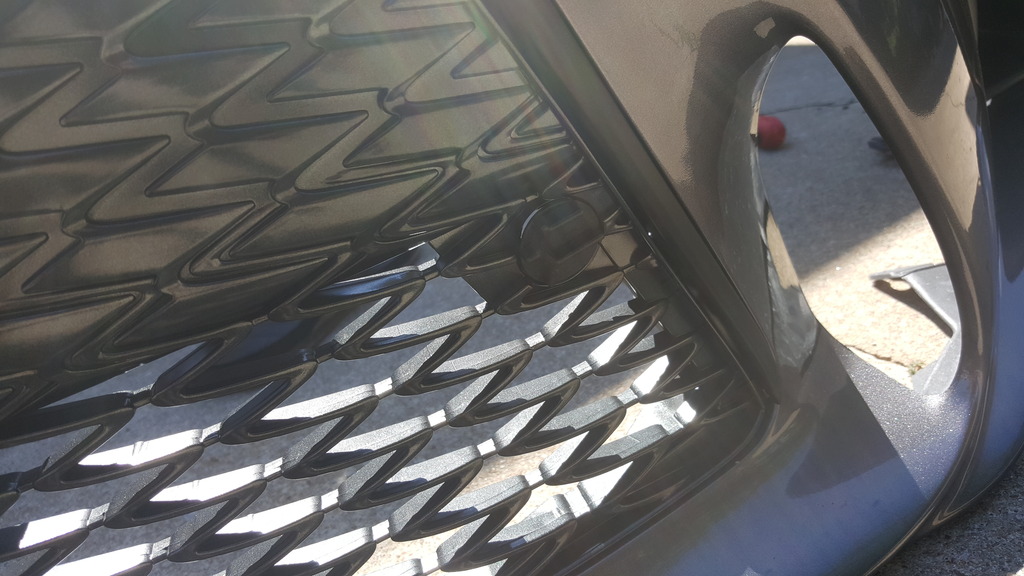
take note it does have that headlight washer thingy.. correct me if im wrong what ever it is but i dont have that so i had to tell the body shop to cover it up and if you dont know what im talking about its this

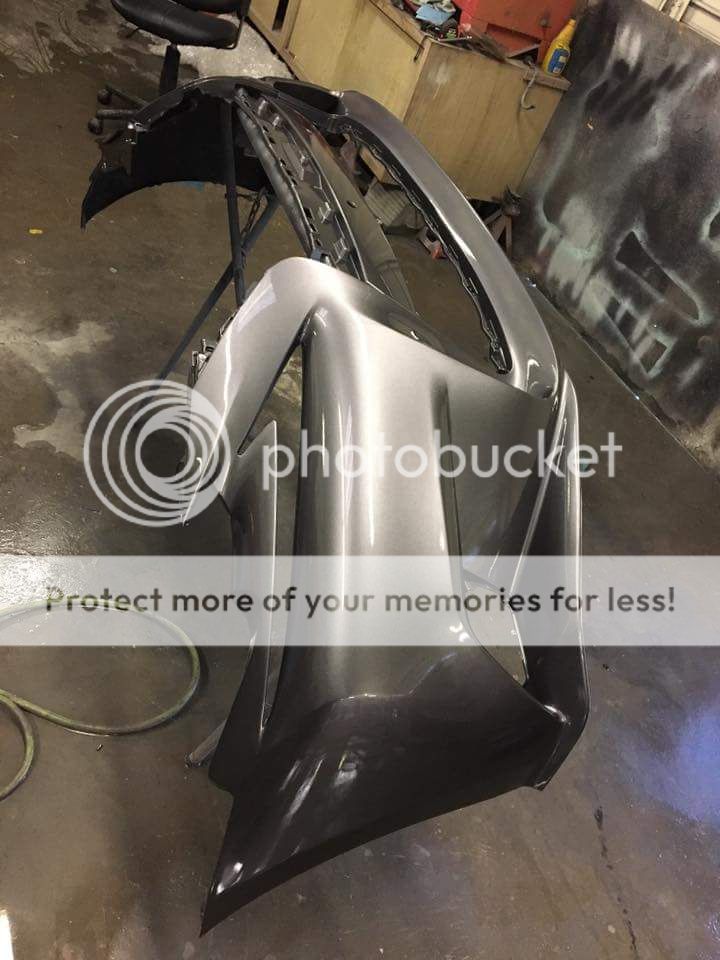
any who bumper was finished and the hole was covered up!
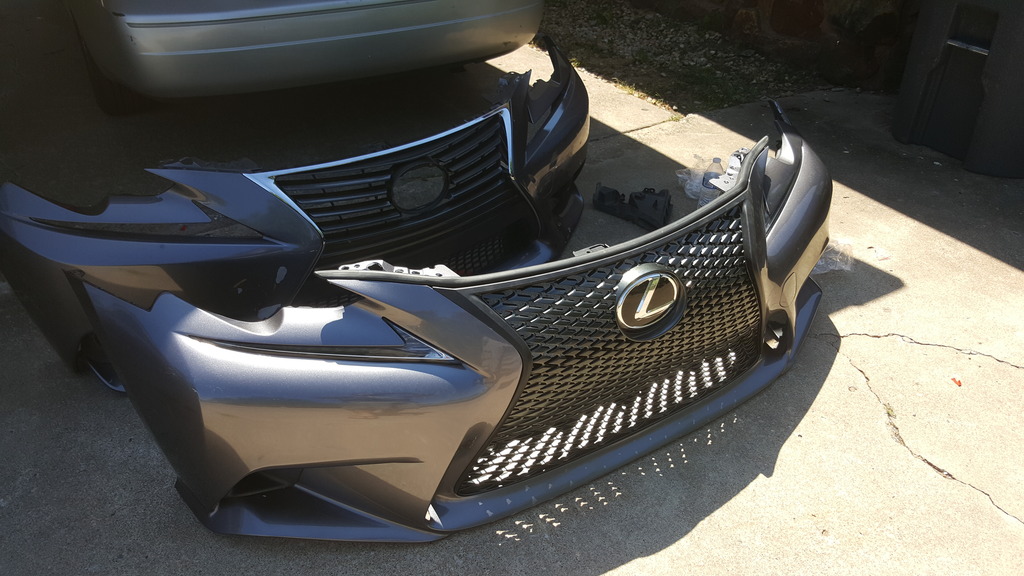
btw i didnt take pics of the grill install and etc srry..... i did that way before i thought about making this thread. sorry guys.. but what comes with the kit is the bumper of course
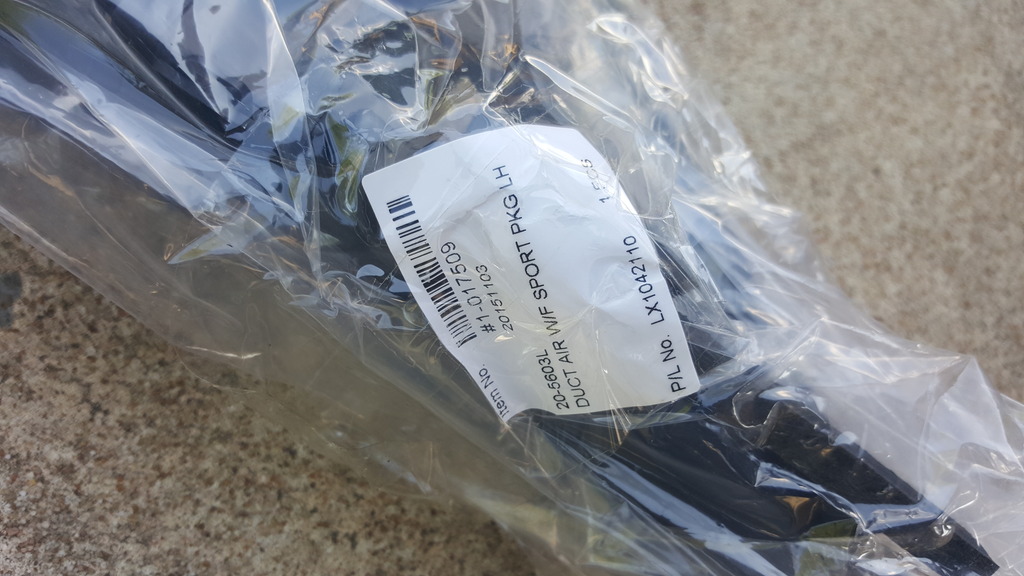
two air ducts for the f sport bumper i'll show you what we will do with these in a bit
and both the top and bottom grill and the chrome surrounding grill

take note that you want to mount the top grill on the chrome first then mount the bottom, sadly the conversion didnt come with any screws so your probably gonna have to use your old bumper screws for the grill...
the grill is pretty straight forward from there make sure when you mount it, start from top to bottom
WARNING! YOU WILL MAYBE VOID YOUR WARRENTY DO THIS AT YOUR OWN RISK I AM NOT RESPONSIBLE OF ANYTHING THAT YOU WILL BREAK, DO THIS AT YOUR ON RISK!
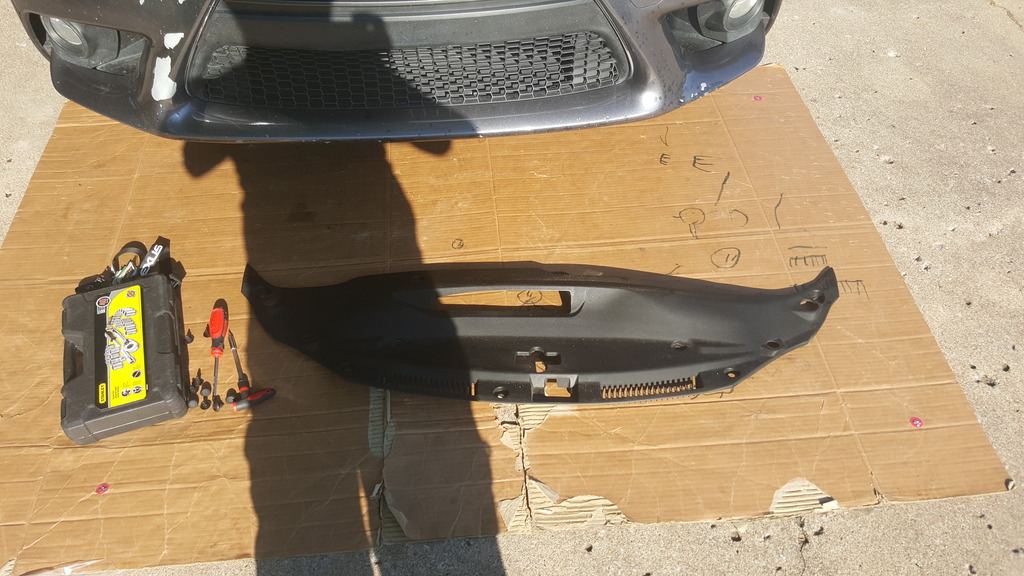
Tools that YOU will need/use
phillips screw driver, a flat head, and a 10mm socket wrench double sided tape
Optional:gloves! well that only if you dont wanna be dirty, a floor mat if you dont wanna scratch your bumper or get dirt on your back, i used the cardboard packaging that came with the bumper
A drill "i'll show you when you need it and a jack/jack stand these are optional so....LETS GET STARTED!!!!
first!!

make sure you are on a incline road or use a jack because YOU WILL NEED TO GO UNDER THE CAR! lucky my drive way has an incline!
alright time to remove this cover! your gonna have to remove these tabs! and no do not use ANY TOOLS!!! to remove this!
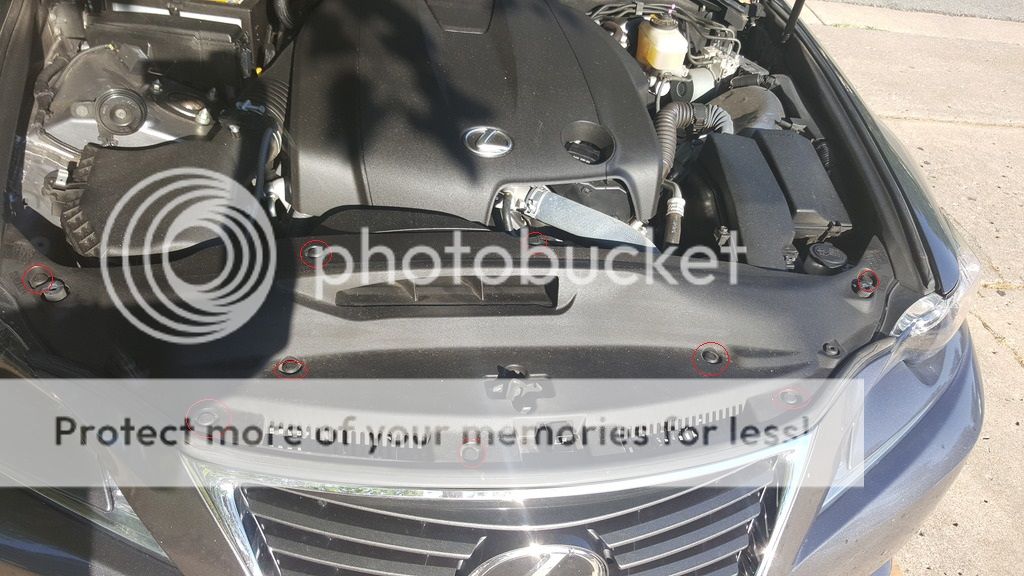
closer look at them!
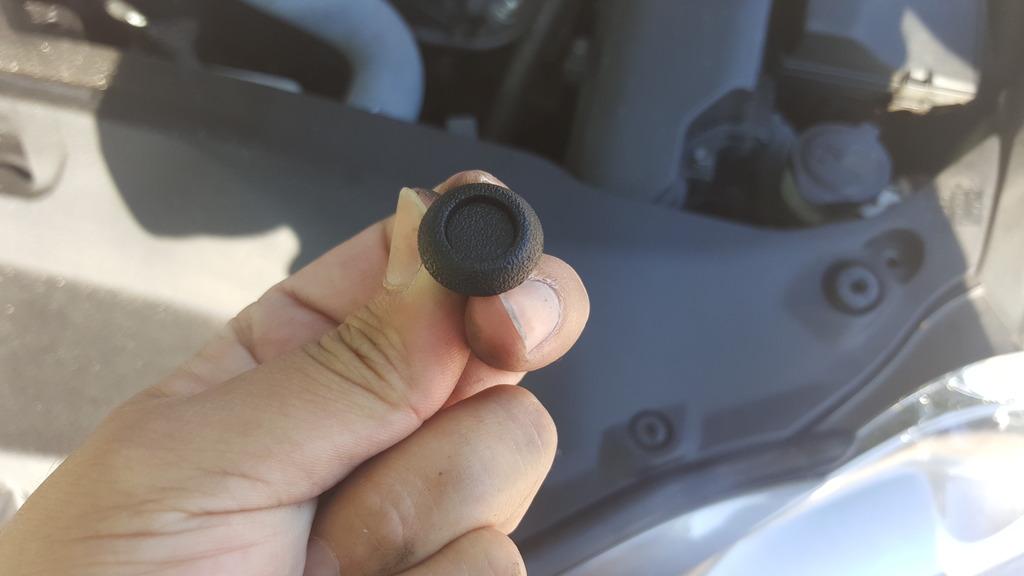
in order to pop them off, do not use tools all you have to do is press the center in and it will be able to pop right off!
and its off!
CRITICAL NOTE: place the screws in a cup/bag or back on it so you wont loose them!!
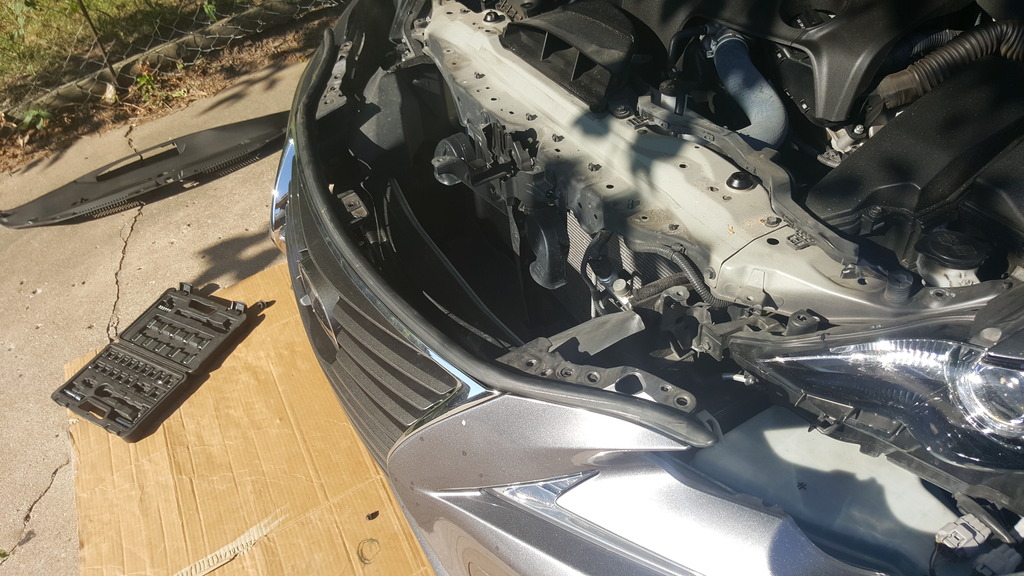
now things are starting to look OPEN!
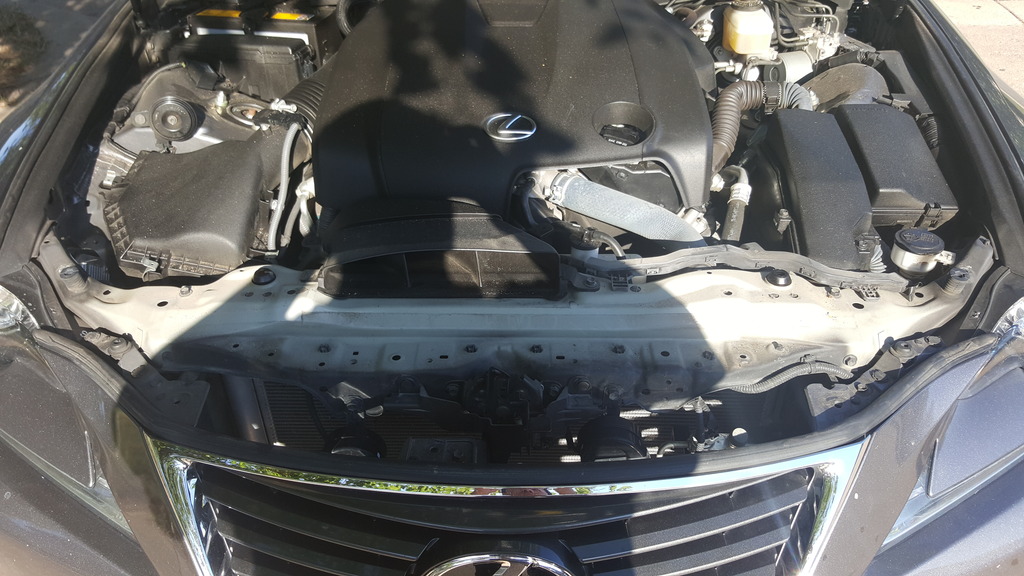
you will need a flat head, philips and the 10mm socket!
now on to the top of the bumper!
NOTE i will only show one side of each side, its basically mirrored so.. yea btw this is the left side/passanger side of the front bumper tab.

middle of the bumper
now on the side of the bumper!
NOTE your probably gonna have to turn your wheels depending on with side you start with first!
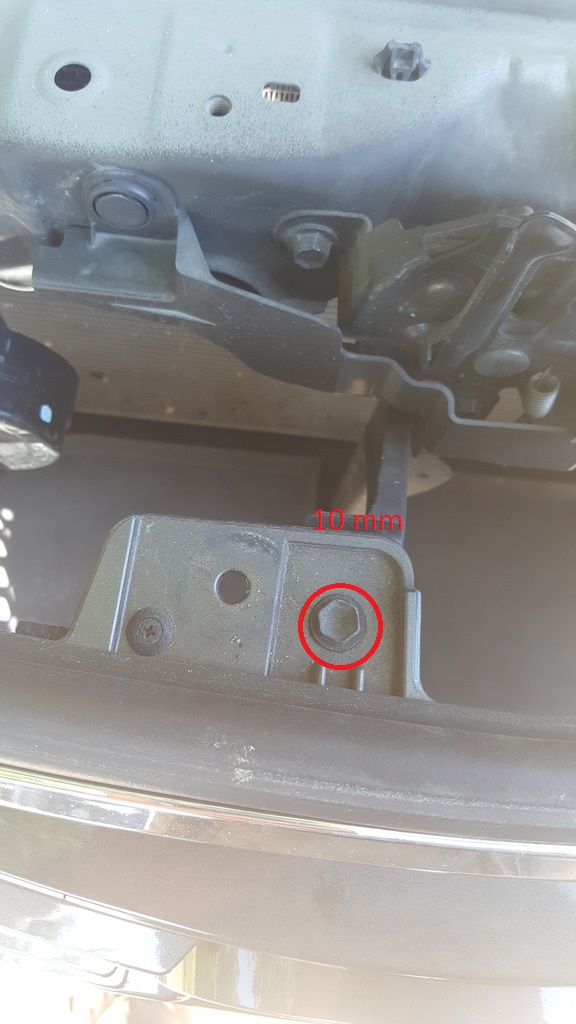
top of the edge of the bumper is a 10mm/philips i used a 10mm
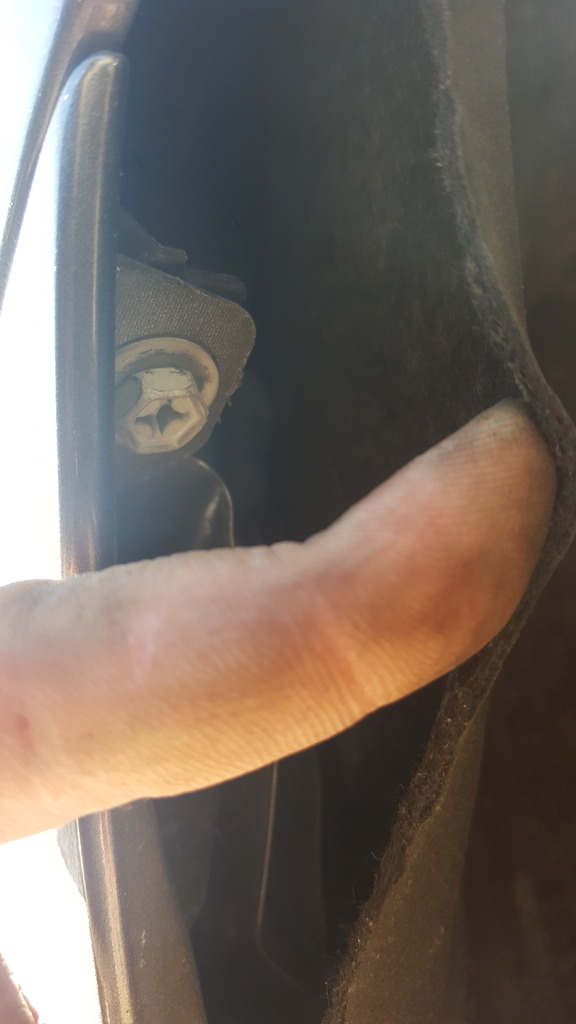
now these side tabs, use a flat head, turn them a quarter counter clock wise and it should pop off
there is also bolts on the bottom of the edge

now for the under side, all 10mm
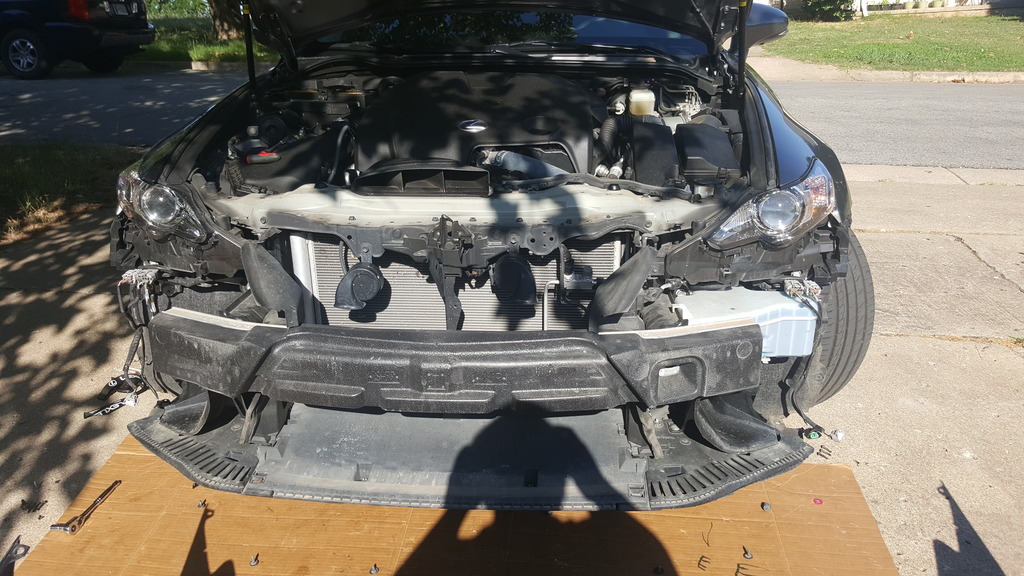
should be able to pop off the bumper now! "considering you did both sides already!
Be careful!!!

so second write up.... BTW STAY THE F*** AWAY FROM PHOTOBUCKET NOTHING BUT AN AD FEST AND STUPID ERRORS that would leave to alot of down time for me writing this.....lets get started... i noticed there wasnt any threads/post that ive discovered to remove or convert the base bumper... and if your asking why im converting and why didnt i just buy a f sport in the first place? well great question when i was in the "market" of searching for a new car there was no f sports that i can find at the time, i live in oklahoma btw but at the toyota dealer had this gorgeous 1h9 is250, so i went to look at it and it was in my price range, drove it and loved it and signed my life/papers away, sadly we took the car to texas and at the time i did tape my front end but when we got to texas it started peeling off the bumper so i peeled it off and when we where heading back, the highway we were on had a ton of construction and my bumper suffered massive rock chips
as you can tell on the dark spots i tried to cover all the rock chips with o'reilly auto parts paint.. sadly it was a darker shade and on the left of the bumper the paint is peeling bad.... any who i decided to either repaint my bumper or buy a f sport conversion, so i bit the bullet and looked for it on ebay and i found this one and purchased it, its the ikon motorsports one

finally recieved it!

take note it does have that headlight washer thingy.. correct me if im wrong what ever it is but i dont have that so i had to tell the body shop to cover it up and if you dont know what im talking about its this
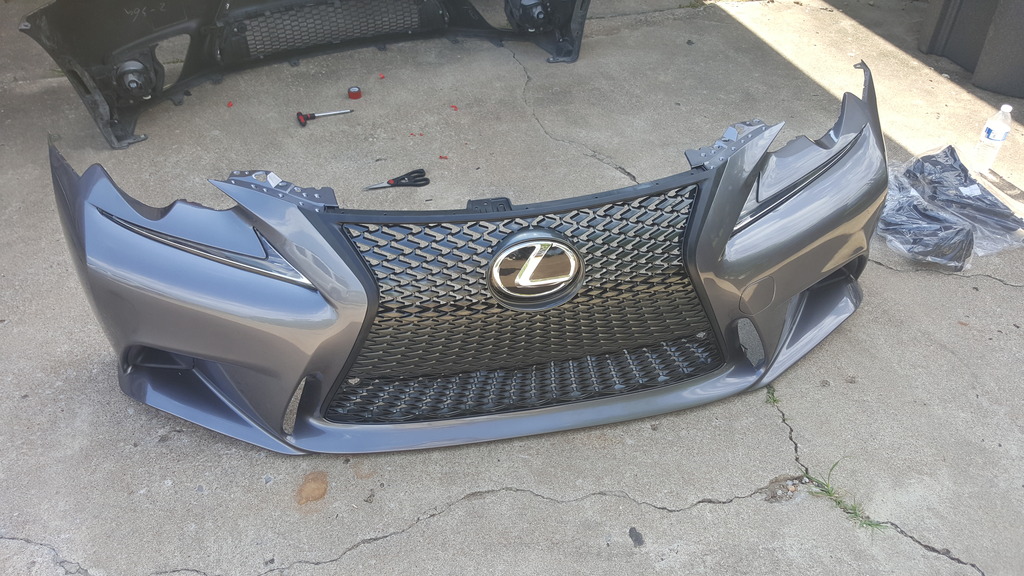
any who bumper was finished and the hole was covered up!

btw i didnt take pics of the grill install and etc srry..... i did that way before i thought about making this thread. sorry guys.. but what comes with the kit is the bumper of course
two air ducts for the f sport bumper i'll show you what we will do with these in a bit

and both the top and bottom grill and the chrome surrounding grill
take note that you want to mount the top grill on the chrome first then mount the bottom, sadly the conversion didnt come with any screws so your probably gonna have to use your old bumper screws for the grill...
the grill is pretty straight forward from there make sure when you mount it, start from top to bottom
WARNING! YOU WILL MAYBE VOID YOUR WARRENTY DO THIS AT YOUR OWN RISK I AM NOT RESPONSIBLE OF ANYTHING THAT YOU WILL BREAK, DO THIS AT YOUR ON RISK!
Tools that YOU will need/use
phillips screw driver, a flat head, and a 10mm socket wrench double sided tape
Optional:gloves! well that only if you dont wanna be dirty, a floor mat if you dont wanna scratch your bumper or get dirt on your back, i used the cardboard packaging that came with the bumper
A drill "i'll show you when you need it and a jack/jack stand these are optional so....LETS GET STARTED!!!!
first!!
make sure you are on a incline road or use a jack because YOU WILL NEED TO GO UNDER THE CAR! lucky my drive way has an incline!
alright time to remove this cover! your gonna have to remove these tabs! and no do not use ANY TOOLS!!! to remove this!

closer look at them!

in order to pop them off, do not use tools all you have to do is press the center in and it will be able to pop right off!
and its off!

CRITICAL NOTE: place the screws in a cup/bag or back on it so you wont loose them!!
now things are starting to look OPEN!

you will need a flat head, philips and the 10mm socket!
now on to the top of the bumper!
NOTE i will only show one side of each side, its basically mirrored so.. yea btw this is the left side/passanger side of the front bumper tab.

middle of the bumper

now on the side of the bumper!
NOTE your probably gonna have to turn your wheels depending on with side you start with first!
top of the edge of the bumper is a 10mm/philips i used a 10mm

now these side tabs, use a flat head, turn them a quarter counter clock wise and it should pop off


there is also bolts on the bottom of the edge


now for the under side, all 10mm


should be able to pop off the bumper now! "considering you did both sides already!
Be careful!!!

Last edited by Noobierice; 08-16-18 at 03:52 AM.

The following 4 users liked this post by Noobierice:
06-25-17, 10:12 PM
#2
Rookie
Thread Starter
DO NOT PULL THE BUMPER ALL THE WAY OFF LEAVE IT HANGING ON THE BUMPER SUPPORT BAR because where gonna have to disconnect the drive lights and foglights!
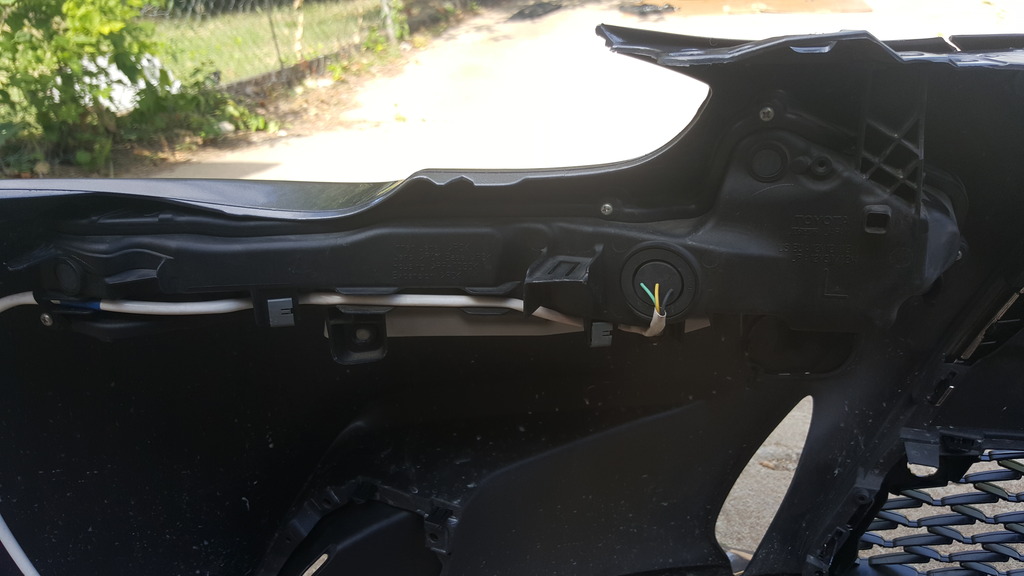
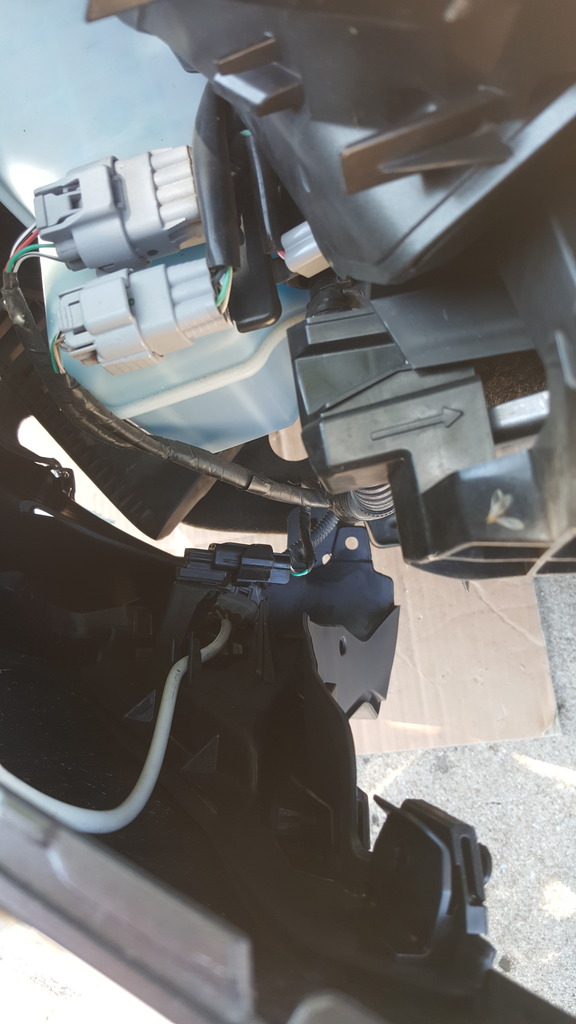
the wires
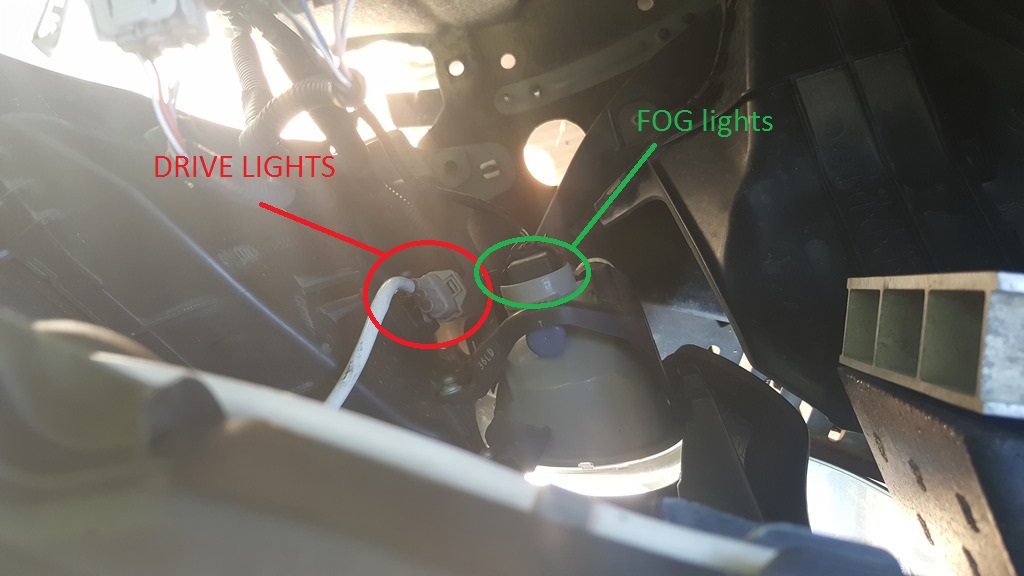
after you unplug the wires you should be able to pull the bumper off
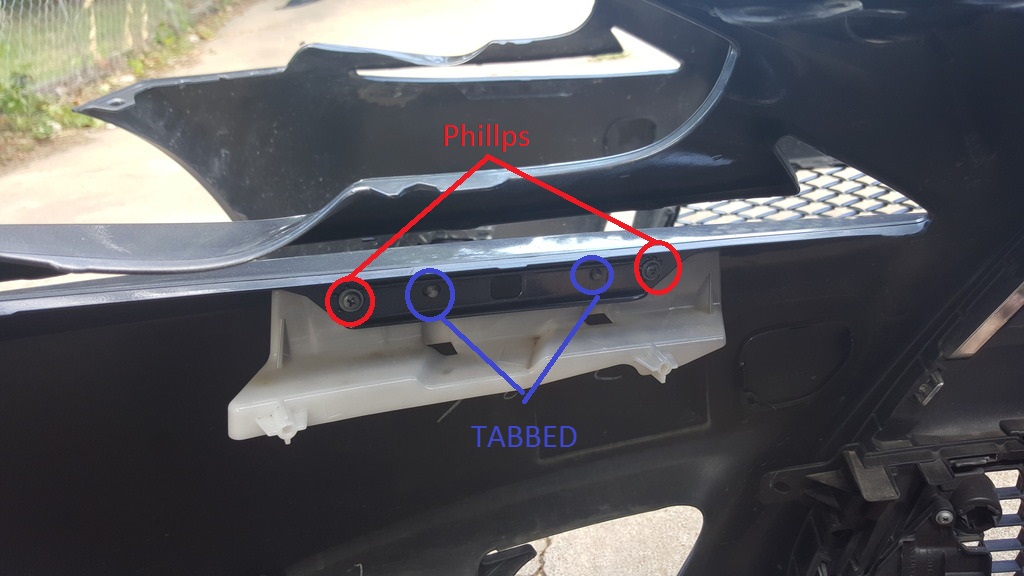
time to remove the driving lights, it takes two phillips to remove it, takes alittle force to remove them off but they should come off

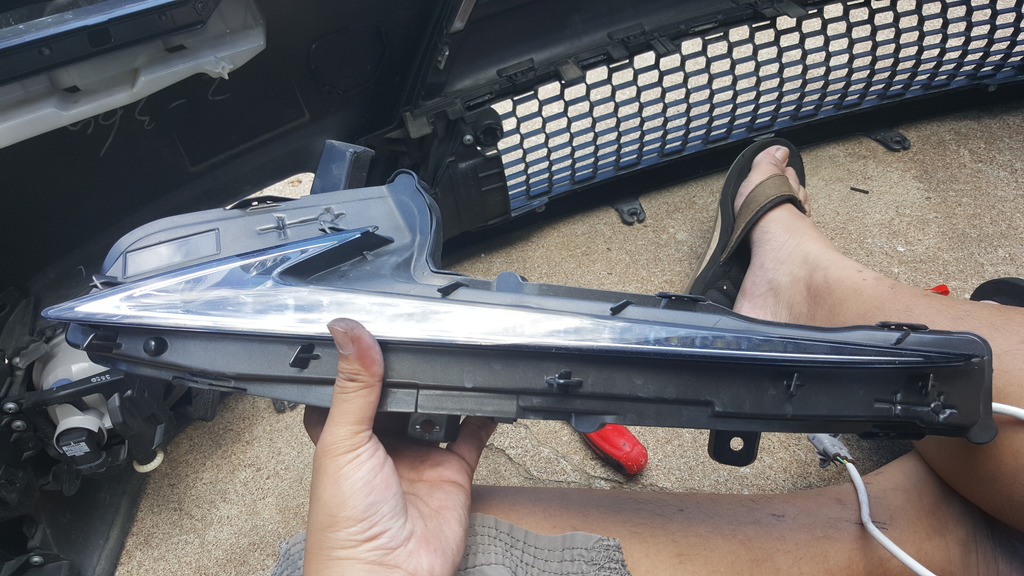
next you should see the driving light mount take two phillips also and its tabbed you can just use a flat head to pry the tabs
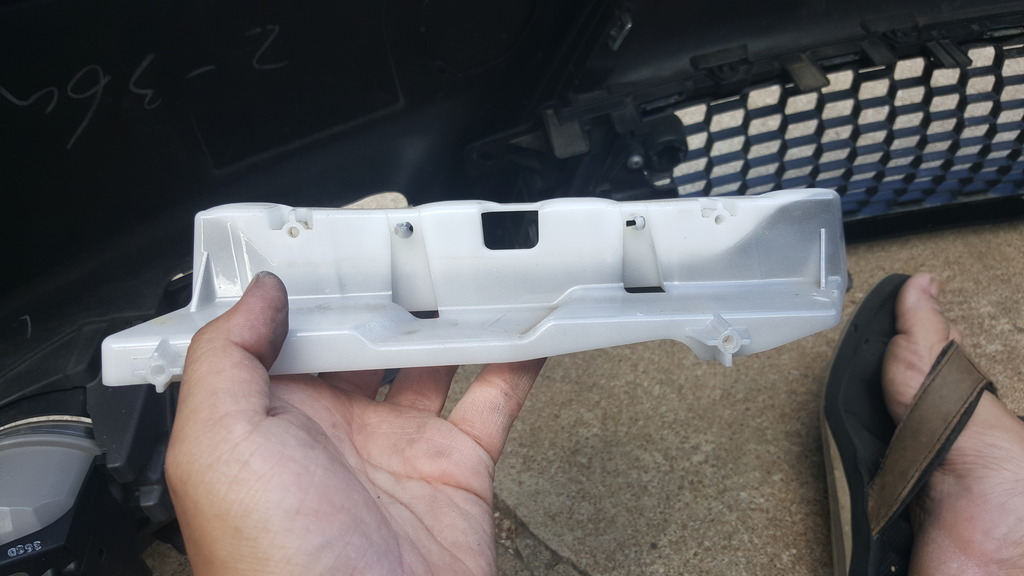
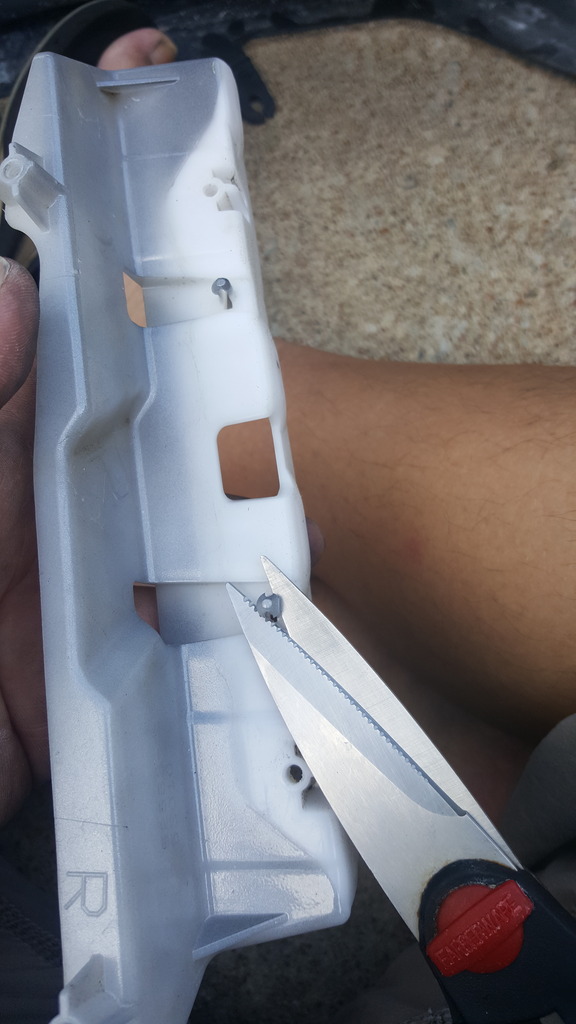
time to mount it to the f sport bumper.. looks like i hit a problem, the tabs werent lining up at all you can either drill new holes for the tabs or cut the tabs.. if you decide to drill make sure the philips screws line up with it..
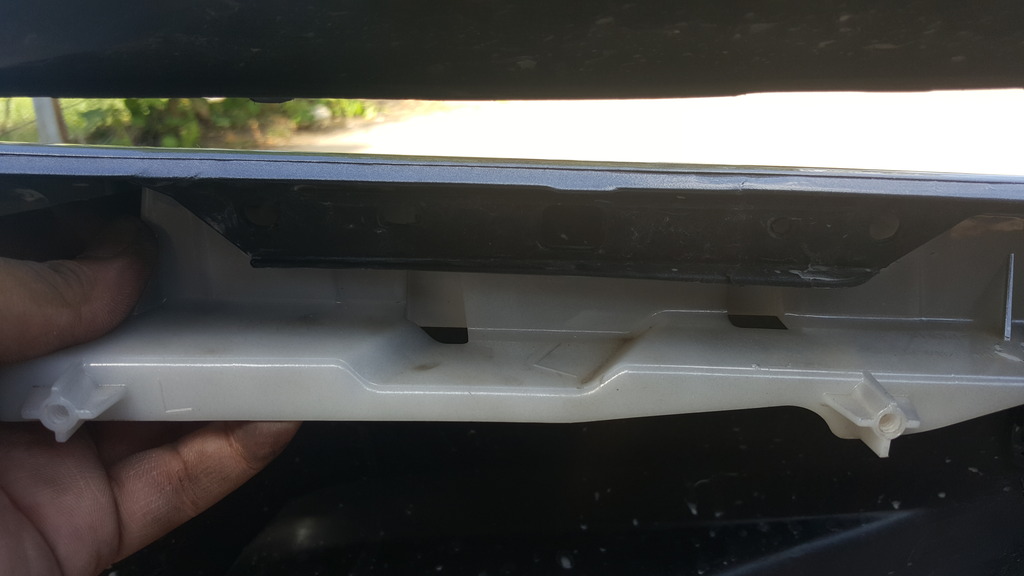
i decided to cut the tabs because i dont have access to a drill right now and yes my heart broke alittle...
mounted!
you should also be able to mount the city lights now
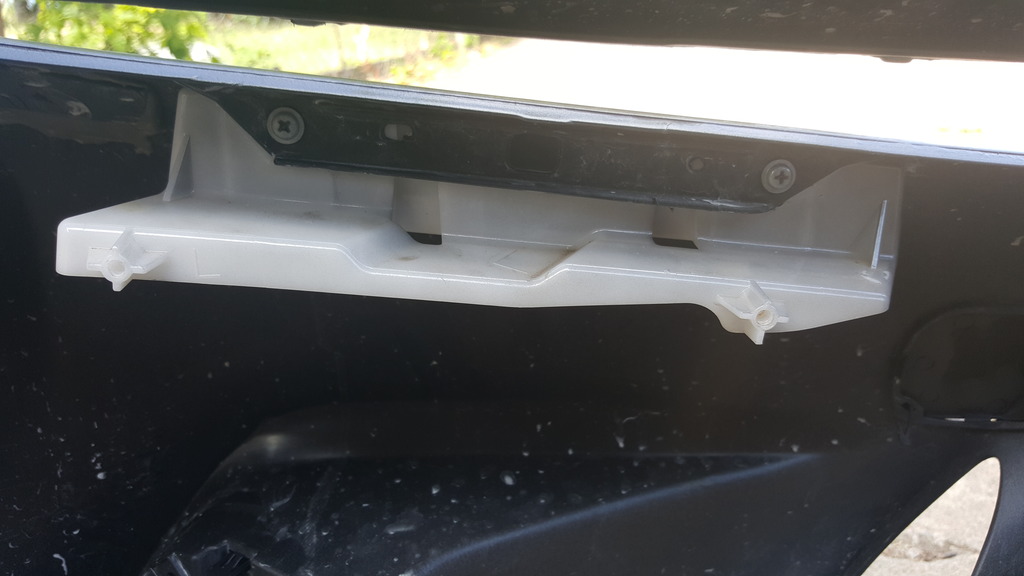
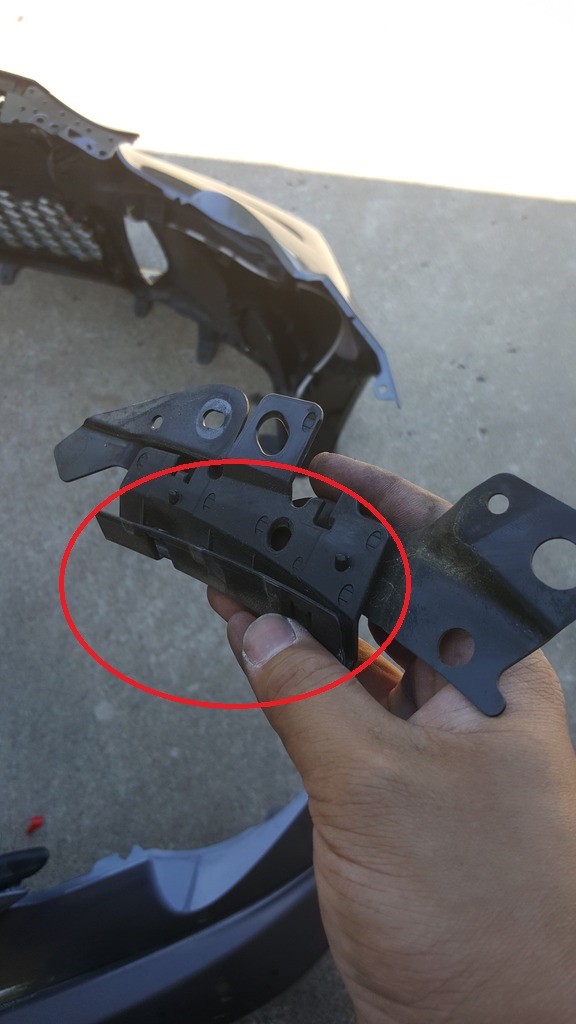
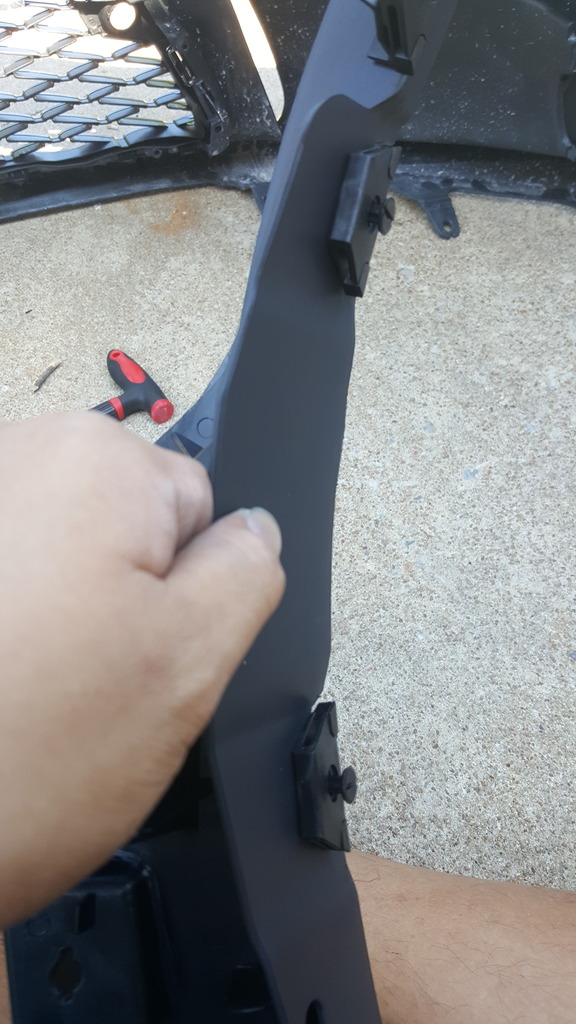
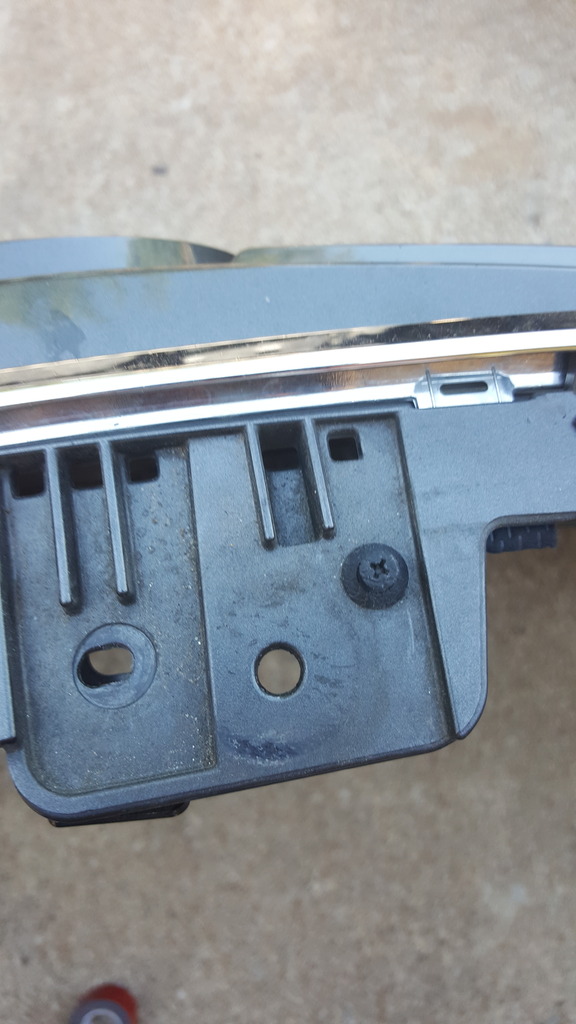
now time to remove the bumper mounts also, it located on top of the city lights its a metal bracket it looks like this
this part is hooked onto the bumper so try to unhook it it should come right off and remount it on the f sport bumper
emblem swap time!
its held by double sided tape and mounts with the bottom tap so un tab it and replace the tape with new ones circle is where the tape should go
and mounted!
time for the hard part!! the f sport air ducts i recommend a friend to help you out due to that it will take so good force to mount them on..
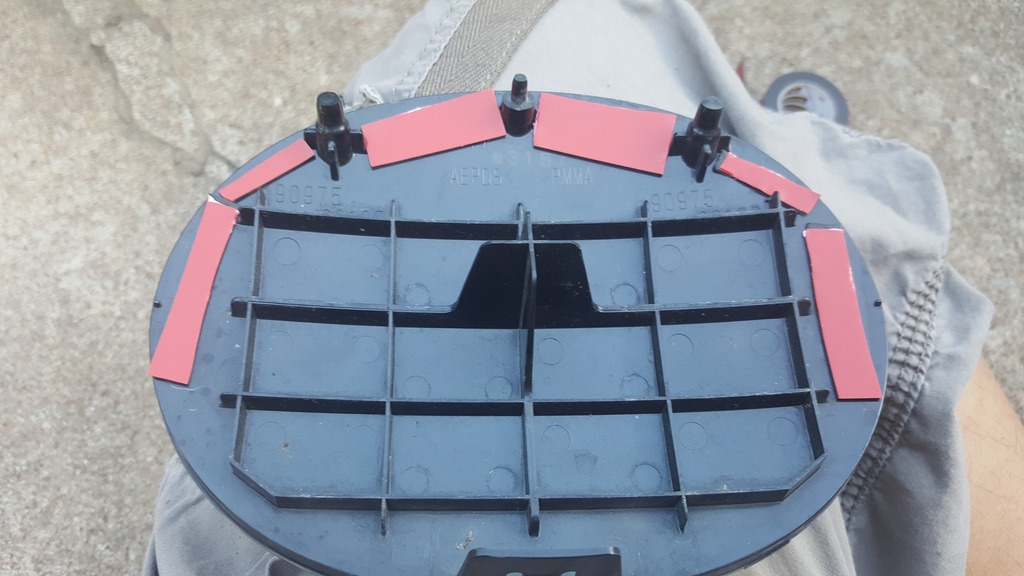
it does have foam padding so mount the foam where it is marked.
its gonna have to mount on here

took me a good hour to do but the easiest way that i found to do so is leave the tabs on the airduct and insert them half way like this
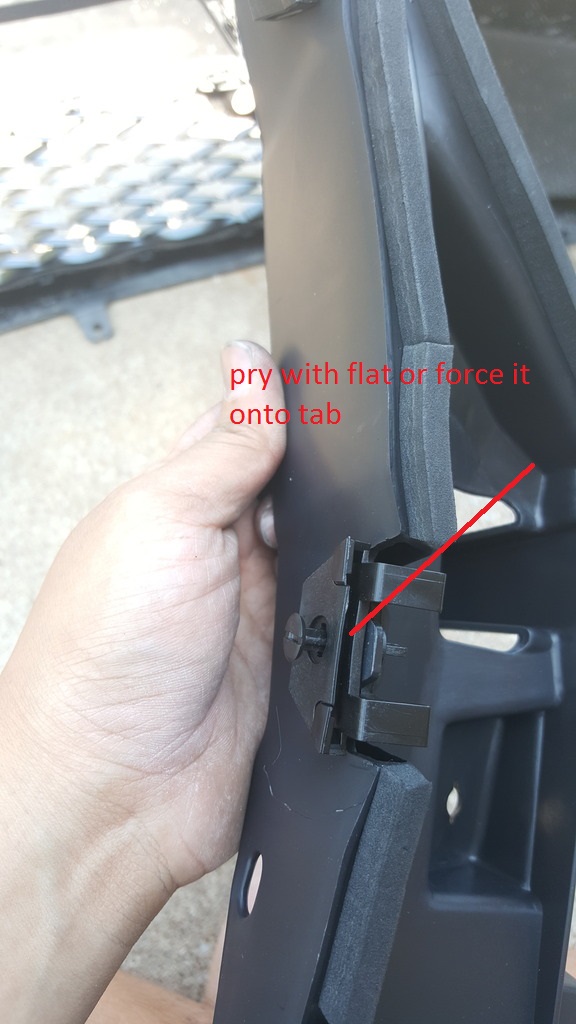
next your gonna have to pry this or force it on the tabs till you hear a click and when it clicks push the tab in to lock it in place should look like this when locked in place you can also tab in your driving lights on the air duct
good job you did it!!!
next you can probably scavange your old bumper for screw that you are missing on your f sport bumper, sadly this didnt fit from the base grill...
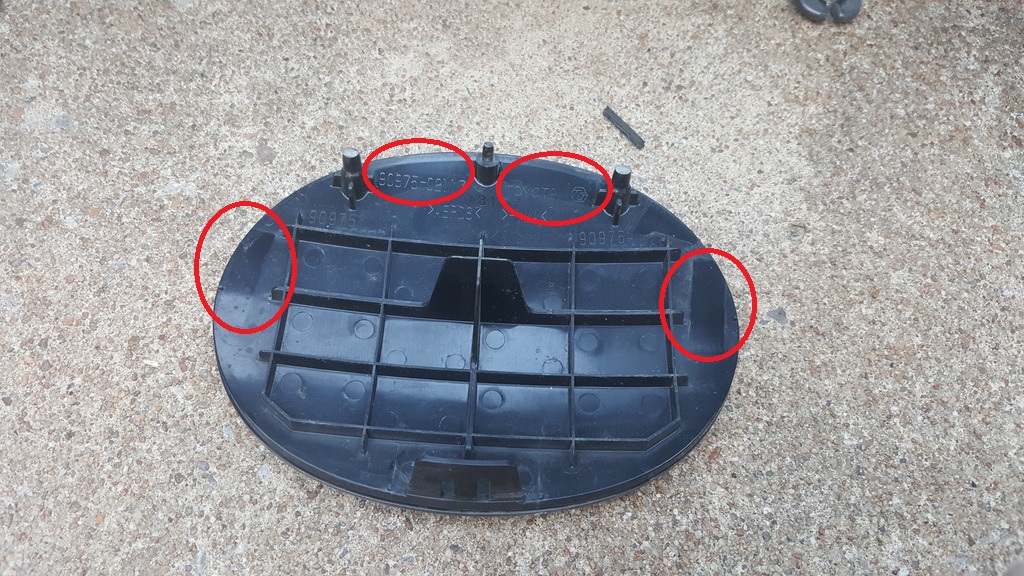
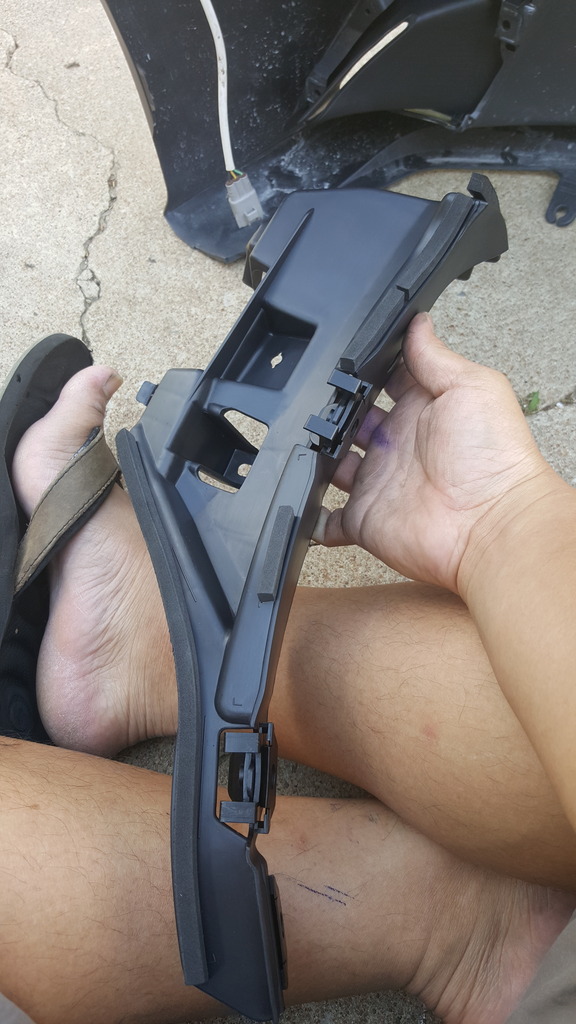
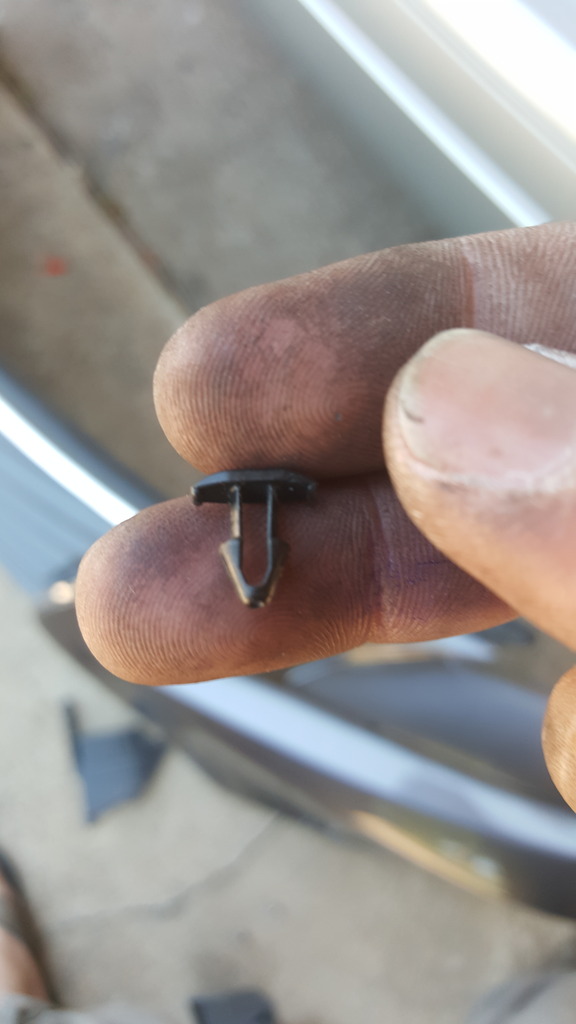
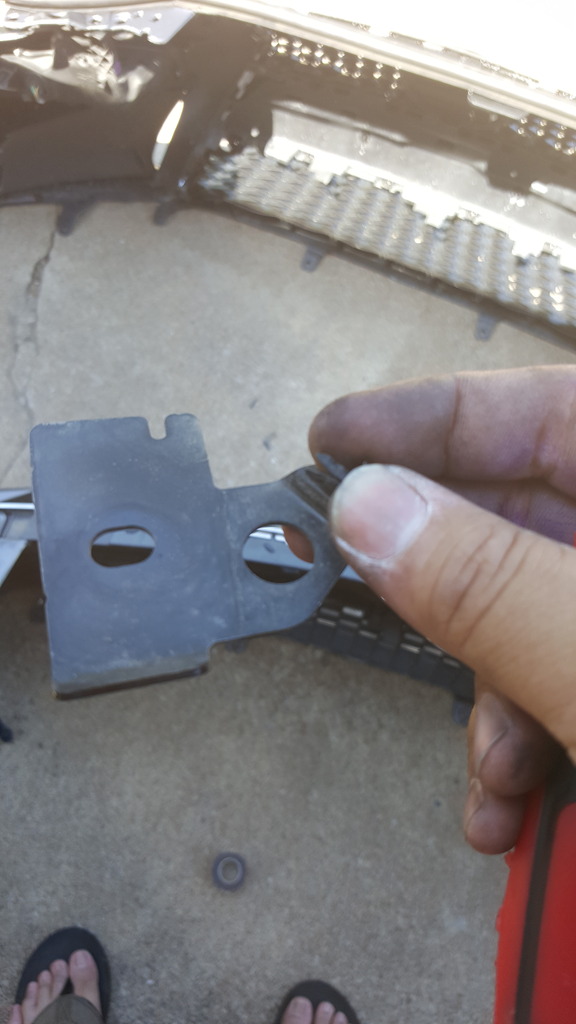
time to take off the rubber bumper thingy lol should be able to flat head it out or use a needle nose to pinch the hook tabs
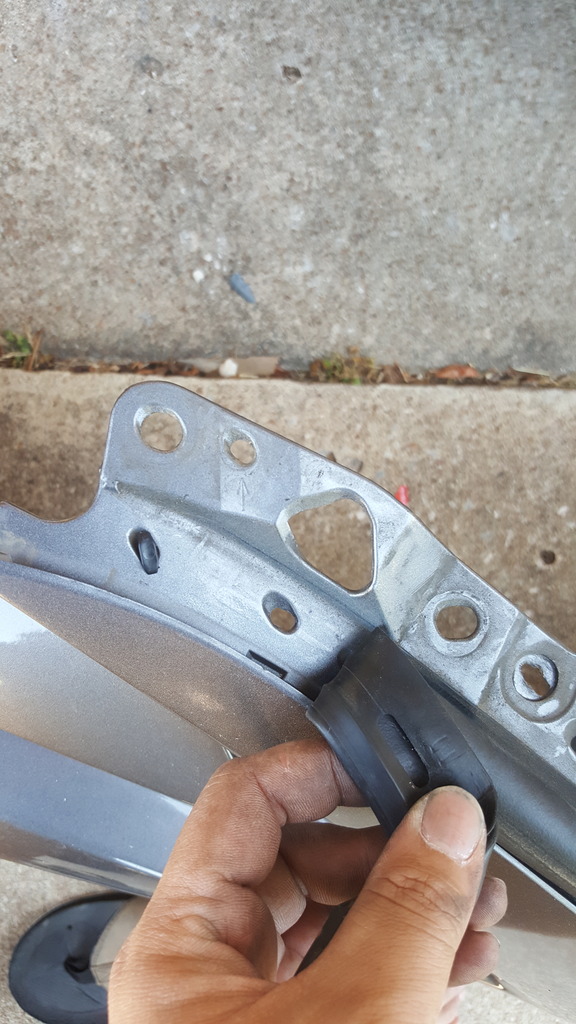
closer look at the hooked tabs

the wires

after you unplug the wires you should be able to pull the bumper off


time to remove the driving lights, it takes two phillips to remove it, takes alittle force to remove them off but they should come off


next you should see the driving light mount take two phillips also and its tabbed you can just use a flat head to pry the tabs


time to mount it to the f sport bumper.. looks like i hit a problem, the tabs werent lining up at all you can either drill new holes for the tabs or cut the tabs.. if you decide to drill make sure the philips screws line up with it..

i decided to cut the tabs because i dont have access to a drill right now and yes my heart broke alittle...

mounted!

you should also be able to mount the city lights now

now time to remove the bumper mounts also, it located on top of the city lights its a metal bracket it looks like this

this part is hooked onto the bumper so try to unhook it it should come right off and remount it on the f sport bumper

emblem swap time!
its held by double sided tape and mounts with the bottom tap so un tab it and replace the tape with new ones circle is where the tape should go


and mounted!

time for the hard part!! the f sport air ducts i recommend a friend to help you out due to that it will take so good force to mount them on..
it does have foam padding so mount the foam where it is marked.

its gonna have to mount on here

took me a good hour to do but the easiest way that i found to do so is leave the tabs on the airduct and insert them half way like this


next your gonna have to pry this or force it on the tabs till you hear a click and when it clicks push the tab in to lock it in place should look like this when locked in place you can also tab in your driving lights on the air duct

good job you did it!!!
next you can probably scavange your old bumper for screw that you are missing on your f sport bumper, sadly this didnt fit from the base grill...

time to take off the rubber bumper thingy lol should be able to flat head it out or use a needle nose to pinch the hook tabs

closer look at the hooked tabs

Last edited by Noobierice; 06-25-17 at 10:27 PM.
The following users liked this post:
whoismiked (02-23-20)
06-25-17, 10:13 PM
#3
Rookie
Thread Starter
and its mounted!
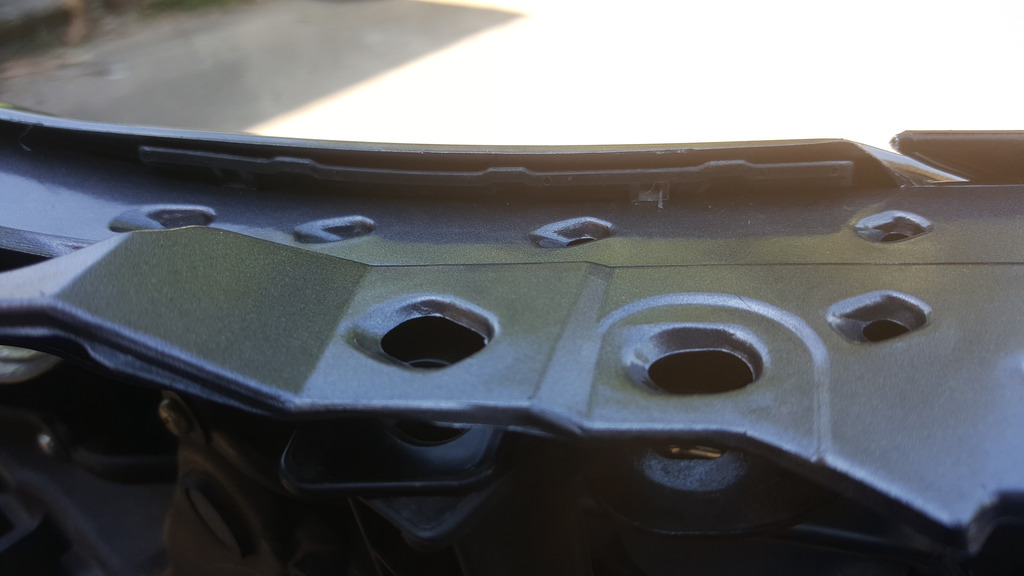
on the center top part of the base bumper thier is also a bumper mount its held by a tabbed phillip
how it looks off
looks like everything is set to mount on the car now!! considering you did each side of the bumper already!
before mounting the bumper make sure you use the small flat headed tab to lock the city light and metal mount so it wont fall out when installing the bumper and if your wondering what im talking about i mean this

before mounting it all the way let it rest on top of the bumper support and plug in the city light, if you bought fogs with your f sport bumper you can probably plug them in, if not you can tab it with the city lights so it wont dangle anywhere
now its time to mount it!, i reccomend a friend to help you if you dont want your bumper to fall off, but first start from top to bottom push the bumper on top to make it line up with the mounting brackets if it lines up tab one and then push the bottom of the bumper in and tab the bottom, do this center to left to right, you will have to yank/ force it around here and there it is a tight fit.
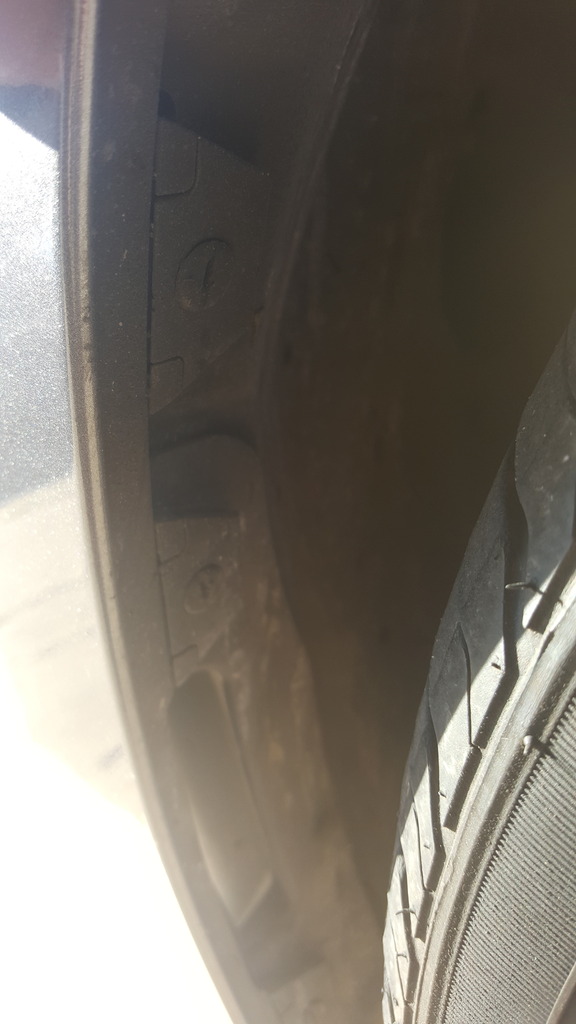
the wheel wells should be inside the bumper not sticking out, tab them to fit, should look like this
dont forget the bottom of the side bumper also, only one bolt will fit, use the tabbed bolt,the 10mm bolt wont fit due to the 10mm bolt mounting on to the bumper
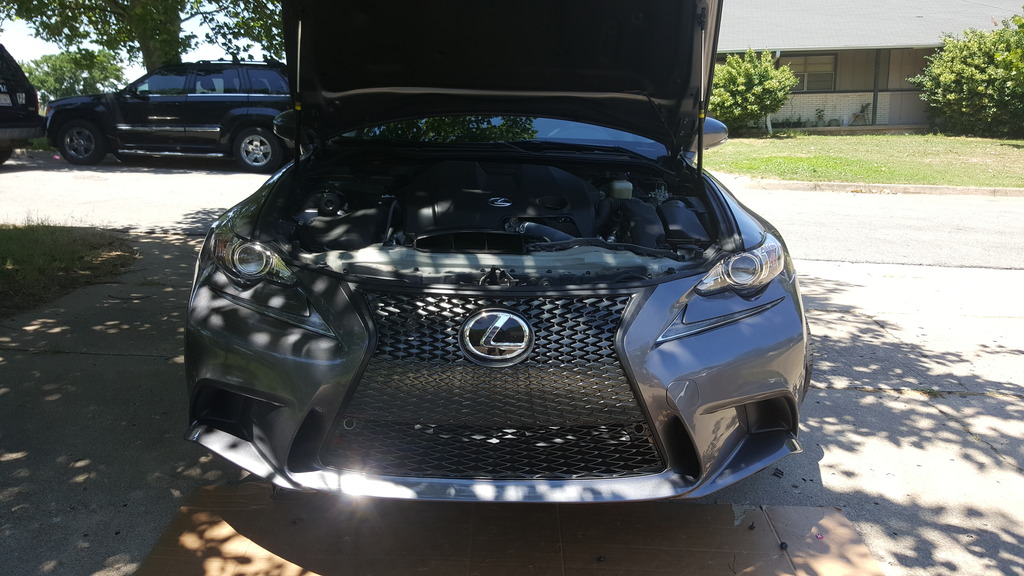
and congratulations! you did the conversion!!!!!!!!

on the center top part of the base bumper thier is also a bumper mount its held by a tabbed phillip

how it looks off

looks like everything is set to mount on the car now!! considering you did each side of the bumper already!
before mounting the bumper make sure you use the small flat headed tab to lock the city light and metal mount so it wont fall out when installing the bumper and if your wondering what im talking about i mean this
before mounting it all the way let it rest on top of the bumper support and plug in the city light, if you bought fogs with your f sport bumper you can probably plug them in, if not you can tab it with the city lights so it wont dangle anywhere

now its time to mount it!, i reccomend a friend to help you if you dont want your bumper to fall off, but first start from top to bottom push the bumper on top to make it line up with the mounting brackets if it lines up tab one and then push the bottom of the bumper in and tab the bottom, do this center to left to right, you will have to yank/ force it around here and there it is a tight fit.

the wheel wells should be inside the bumper not sticking out, tab them to fit, should look like this

dont forget the bottom of the side bumper also, only one bolt will fit, use the tabbed bolt,the 10mm bolt wont fit due to the 10mm bolt mounting on to the bumper
and congratulations! you did the conversion!!!!!!!!
Last edited by Noobierice; 06-25-17 at 10:16 PM.
The following 3 users liked this post by Noobierice:
06-25-17, 10:45 PM
#4
good detailed writeup especially for someone that needs this.
I can attest to it being pretty good guide as i've pulled my bumper off countless of times already that I can kind of do it in my sleep now.
I am surprised you didn't get some Fsport type foglights to install before you got the bumper on....
I can attest to it being pretty good guide as i've pulled my bumper off countless of times already that I can kind of do it in my sleep now.
I am surprised you didn't get some Fsport type foglights to install before you got the bumper on....
The following users liked this post:
Noobierice (06-25-17)
06-27-17, 09:43 PM
#6

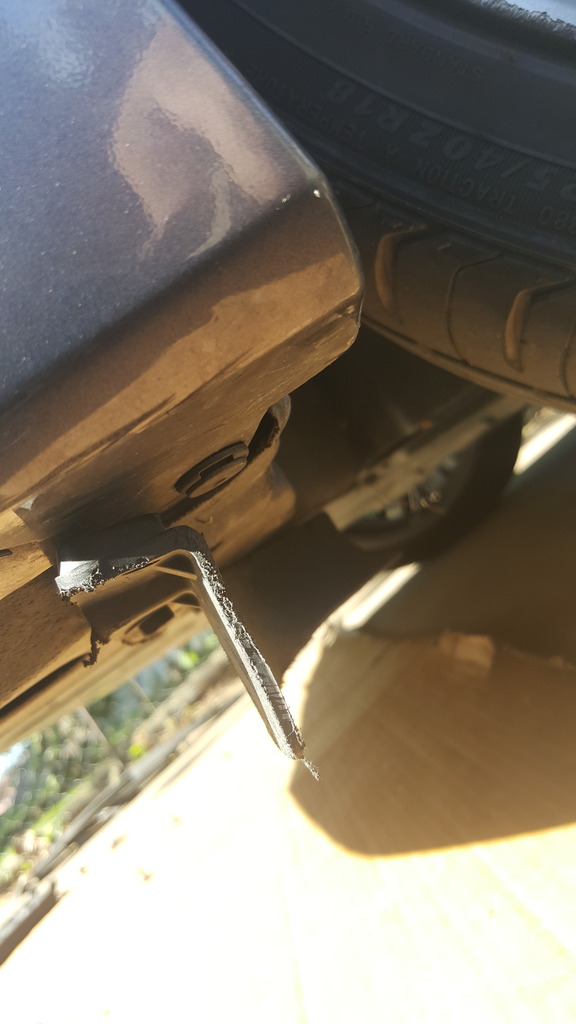
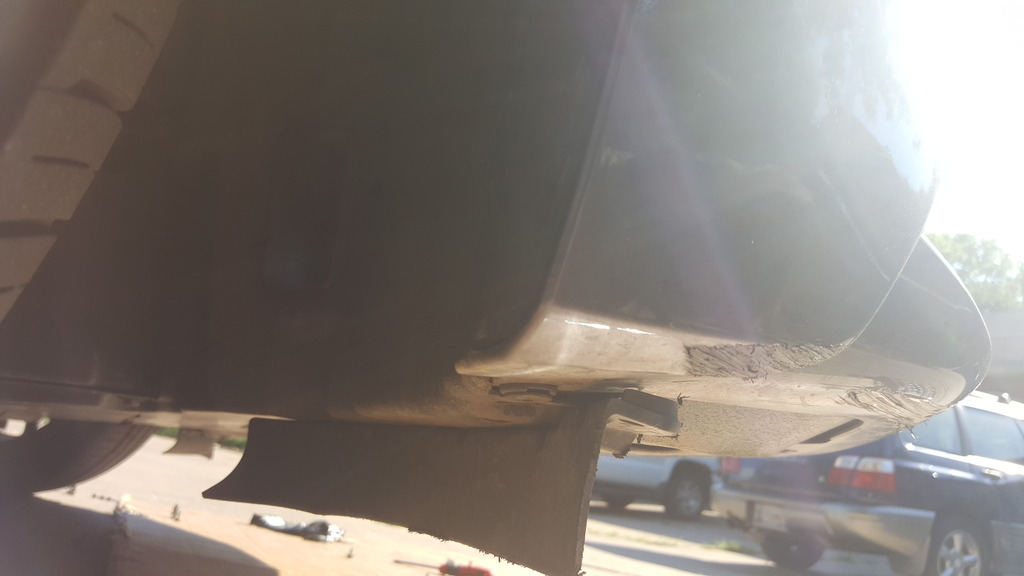
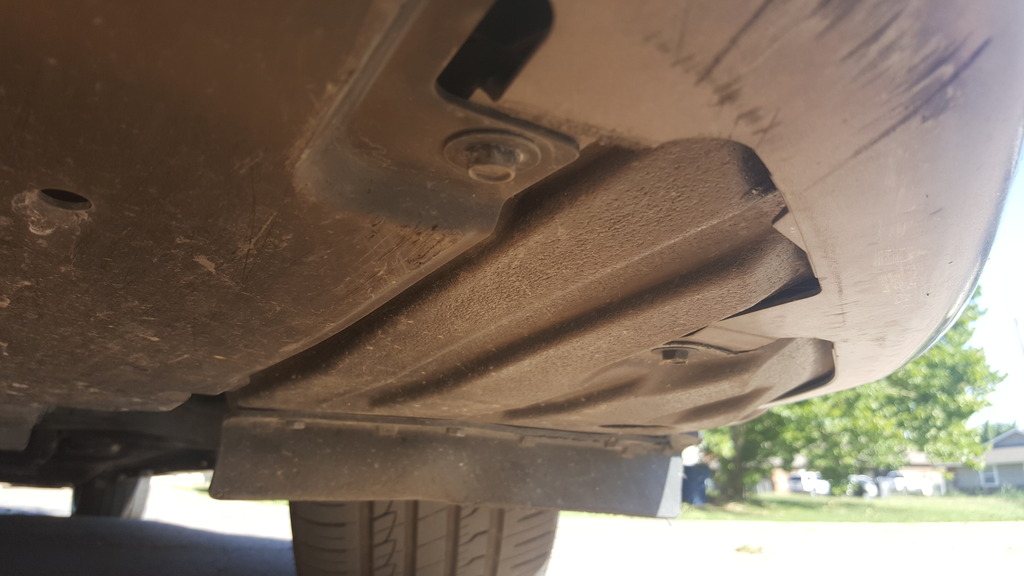
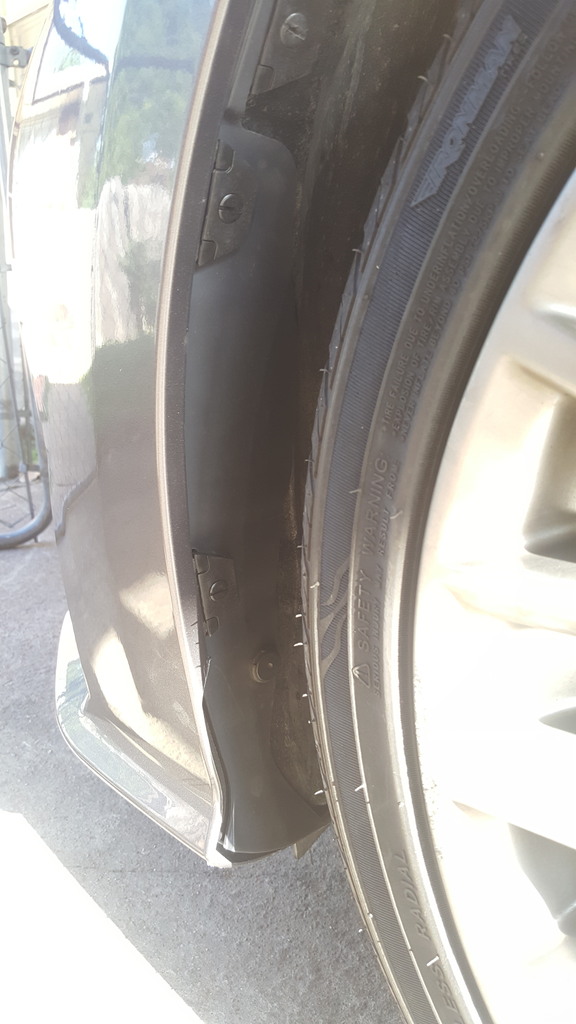
Hey thanks for the write up! Would you mind providing pictures of your fender liner? I've seen people say that doing the conversion causes gaps in the fender liner but I didn't see you mention anything about it.
06-28-17, 11:00 AM
#7
Lexus Test Driver
Join Date: Feb 2017
Location: Richmond Hill, Ontario, Canada
Posts: 6,260
Received 1,732 Likes
on
1,368 Posts
Great write-up noobierices! The non-F Sport members will definitely appreciate it.
One note about the front emblem...judging by the appearance of your original bumper and mention of the tape on the emblem, I'm pretty sure someone painted your original bumper before you owned the car.
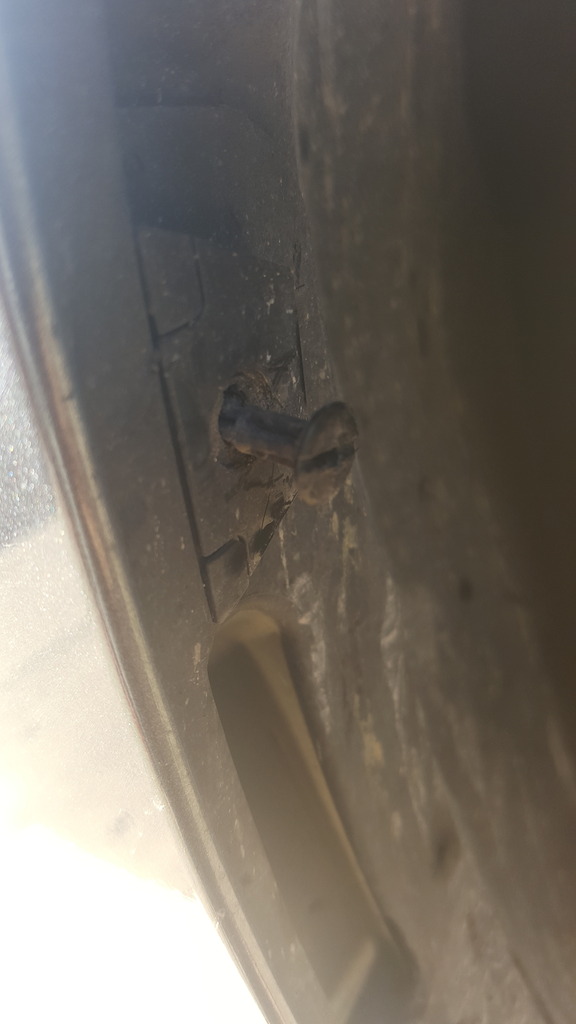
The emblem is supposed to have two poles that go threw the bumper and have a metal ring that secures each. From your pic, it appears both the poles are broken of the emblem, which is common when trying to remove the metal rings.
One note about the front emblem...judging by the appearance of your original bumper and mention of the tape on the emblem, I'm pretty sure someone painted your original bumper before you owned the car.
The emblem is supposed to have two poles that go threw the bumper and have a metal ring that secures each. From your pic, it appears both the poles are broken of the emblem, which is common when trying to remove the metal rings.
Trending Topics
06-28-17, 01:57 PM
#8
Rookie
Thread Starter
Great write-up noobierices! The non-F Sport members will definitely appreciate it.
One note about the front emblem...judging by the appearance of your original bumper and mention of the tape on the emblem, I'm pretty sure someone painted your original bumper before you owned the car.
The emblem is supposed to have two poles that go threw the bumper and have a metal ring that secures each. From your pic, it appears both the poles are broken of the emblem, which is common when trying to remove the metal rings.
06-28-17, 03:11 PM
#9
Lexus Test Driver
Join Date: Feb 2017
Location: Richmond Hill, Ontario, Canada
Posts: 6,260
Received 1,732 Likes
on
1,368 Posts
It's definitely why the paint was coming. Let's put it this way, anywhere the paint came off and it was anything other than black underneath, that was not from factory.
Bumpers need to be prepped and painted properly, with the proper flex additive mixed in for the paint to stick and not come off in chunks.
But hey, it's a used car and you can expect the unexpected. And besides, so got the F Sport number on now, so it's a wash in the end.
If you ever replace the emblem make sure you get the metal washer/rings to secure it...you won't need double sided tape anymore.
The following users liked this post:
Noobierice (06-29-17)
06-29-17, 02:45 AM
#10
Rookie
Thread Starter
 07-02-17, 02:14 AM
#11

Definitely agree with Specone, should get some fog lights installed on the car!
Luckily with the base model, your wires are all there, so your fog light installation will be a breeze without having to remove the bumper again, just pull out your fender liner and work from there. Direct Plug and Play with H16 bulbs
Luckily with the base model, your wires are all there, so your fog light installation will be a breeze without having to remove the bumper again, just pull out your fender liner and work from there. Direct Plug and Play with H16 bulbs
07-04-17, 10:35 PM
#12
Driver School Candidate
 07-05-17, 11:54 AM
#13
Rookie
Thread Starter

 07-05-17, 11:55 AM
#14
Rookie
Thread Starter
Definitely agree with Specone, should get some fog lights installed on the car!
Luckily with the base model, your wires are all there, so your fog light installation will be a breeze without having to remove the bumper again, just pull out your fender liner and work from there. Direct Plug and Play with H16 bulbs
Luckily with the base model, your wires are all there, so your fog light installation will be a breeze without having to remove the bumper again, just pull out your fender liner and work from there. Direct Plug and Play with H16 bulbs
07-05-17, 12:29 PM
#15
Driver School Candidate
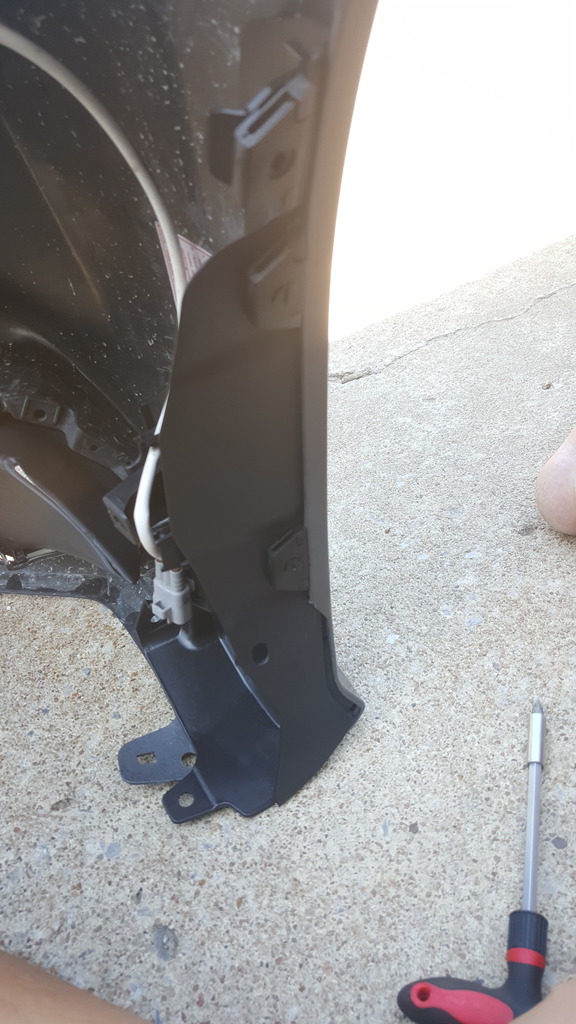
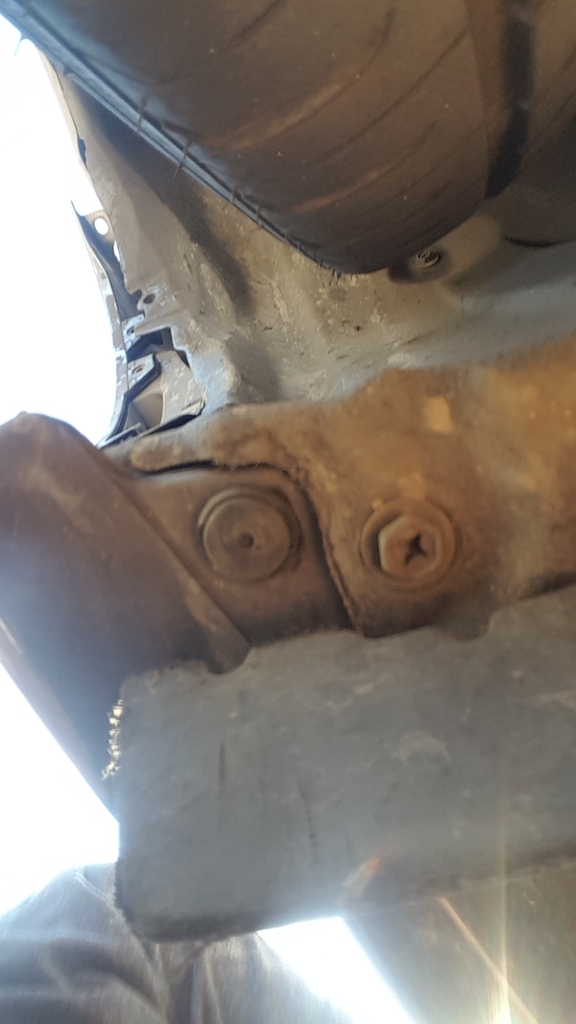
[QUOTE=Noobierice;9915818]sorry ive been busy with family stuff but here are the fender liners.. i didnt have any issue as stated if you want a certain pic of a part i'll take also...
[/QUOTE
Thanks for the pix. Is the liner supposed to be hanging like that?
Here's mine...
https://www.clublexus.com/forums/is-...liner-gap.html
[/QUOTE
Thanks for the pix. Is the liner supposed to be hanging like that?
Here's mine...
https://www.clublexus.com/forums/is-...liner-gap.html