
DIY: Immobilizer Hacking for Lost Keys or Swapped ECU
 03-07-16, 05:57 PM
#1
Lexus Champion
Thread Starter
Here's how to reprogram your car's engine immobilizer to program new keys in the invent of lost keys or a swapped ECU.
DIY Video:
Disclaimer:
The engine immobilizer is a security device. Use the information provided here in a legal and appropriate manner.
PDF Download
A full PDF download of this writeup can be found from this cloud storage location:
https://mega.nz/#!q8ojjSoQ
Modern Toyota’s use a key with an embedded RFID chip as an added means of theft prevention. The key is read by the computer and if it matches, it will enable all systems to start the car. If the key does not match, the car will only crank but not start.
This engine immobilizer system presents a barrier to many owners when it comes time to swap out a bad ECU, or if you’ve lost all the master keys and can't program new keys.
While taking the car to a dealership or locksmith is an option, it could get expensive because you are at their mercy. What follows is a cheaper method you can do yourself to “virginize” your ECU to accept new keys without a master key.
Here’s an overview on how the immobilizer system works on older Toyota and Lexus vehicles.
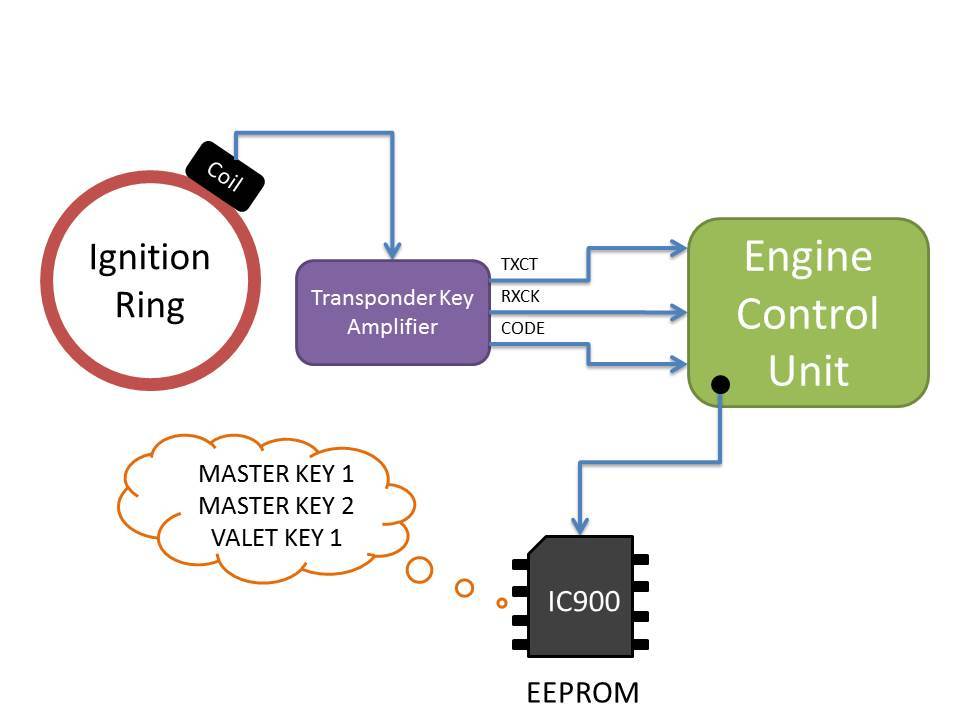
When you insert the key, a coil near the ignition ring picks up the RFID signal from your key and sends it to an amplifier. The amplifier then decrypts it and sends it to the ECU. Inside the ECU is a 93C56 EEPROM chip (IC900) that stores the key values. If the key code matches the stored values, the engine will start.
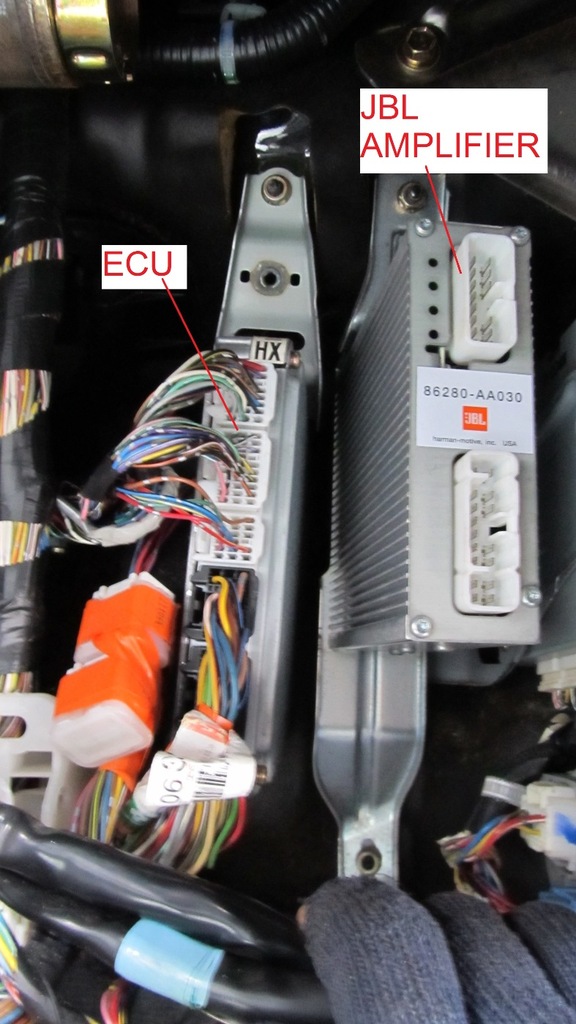
On newer Toyota and Lexus vehicles, the transponder ECU is a separate unit and it’s housed under the dashboard.
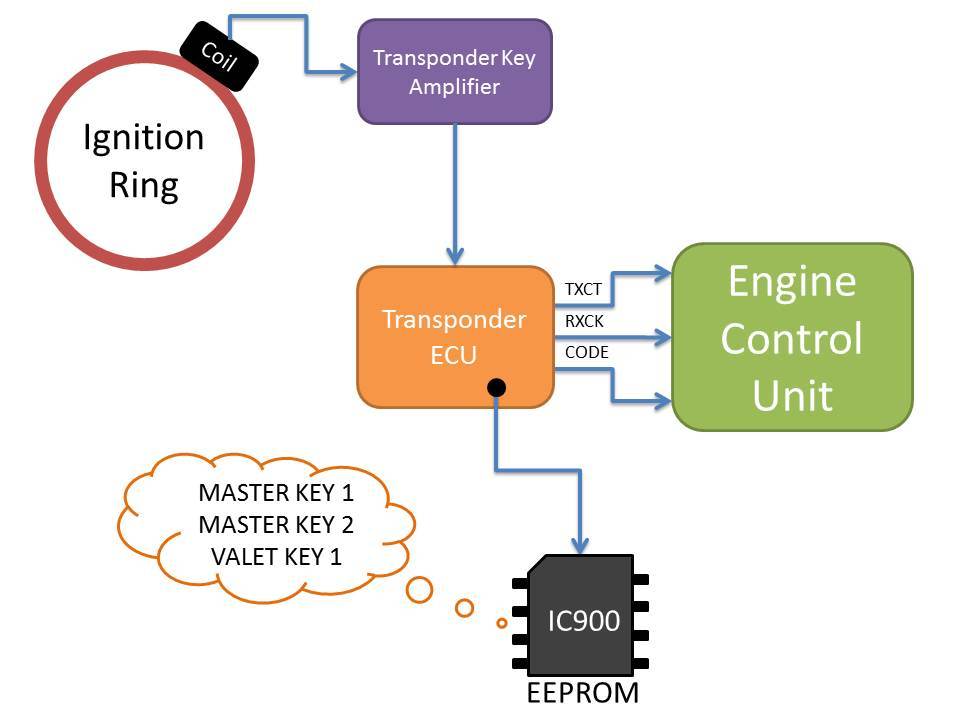
The reason for separating the Transponder ECU with the EEPROM storing the keys is that in the invent of lost keys, it would be cheaper for a dealership to replace the Transponder ECU than the Engine Control Unit. However its location under the dash means you will have to remove the entire dash pad. The procedure for reprogramming is similar, however you will have to short two wires on the OBDII port to perform a hand-shaking procedure between the ECUs to program new keys.
Here’s what the immobilizer system components look like:
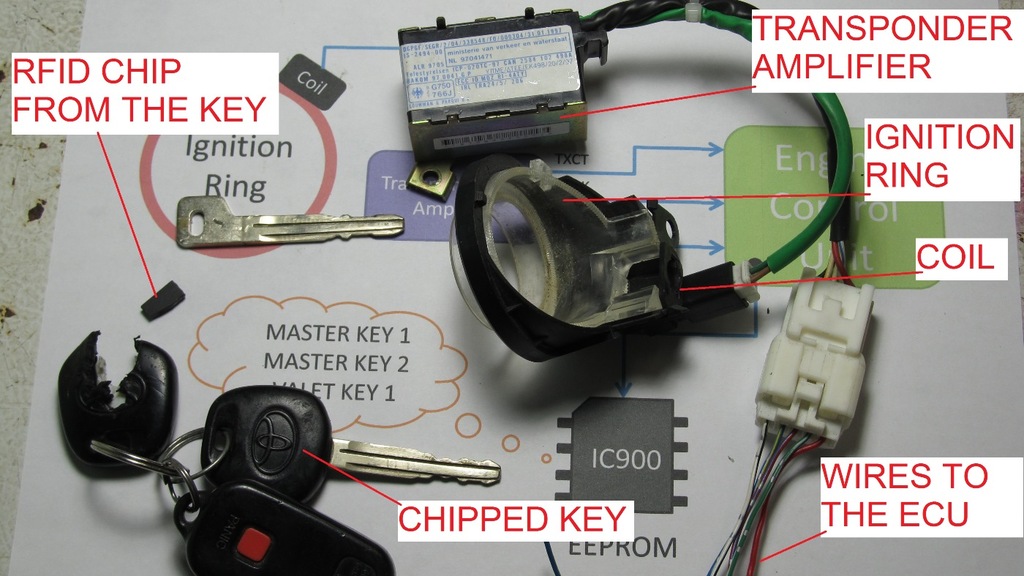
Here’s a closer look inside the transponder amplifier.
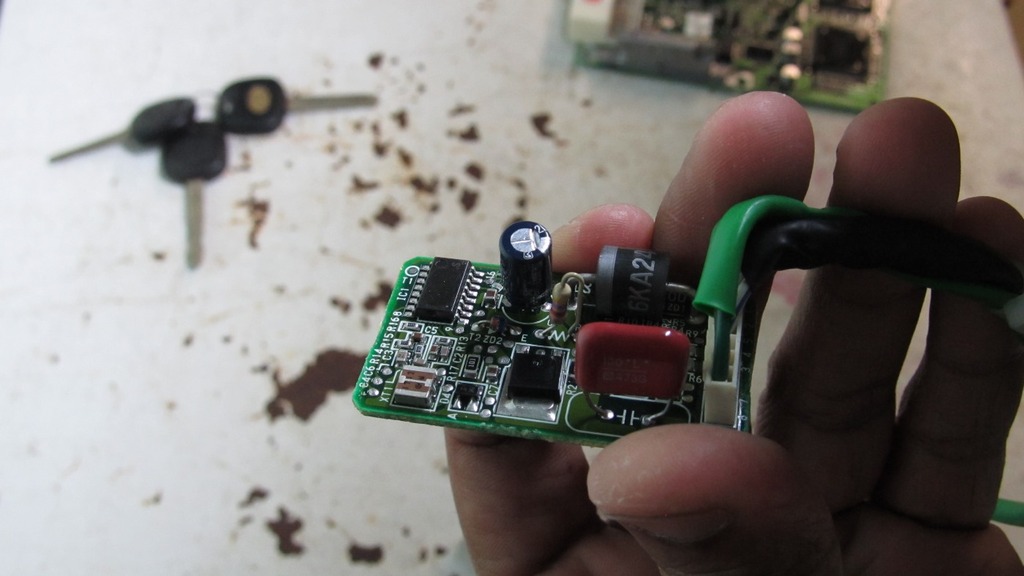
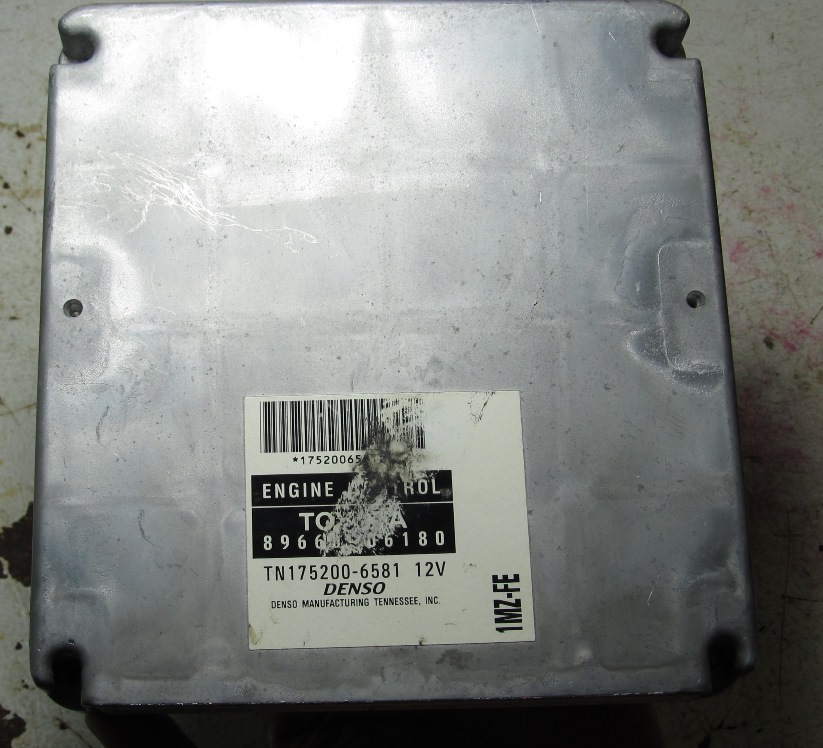
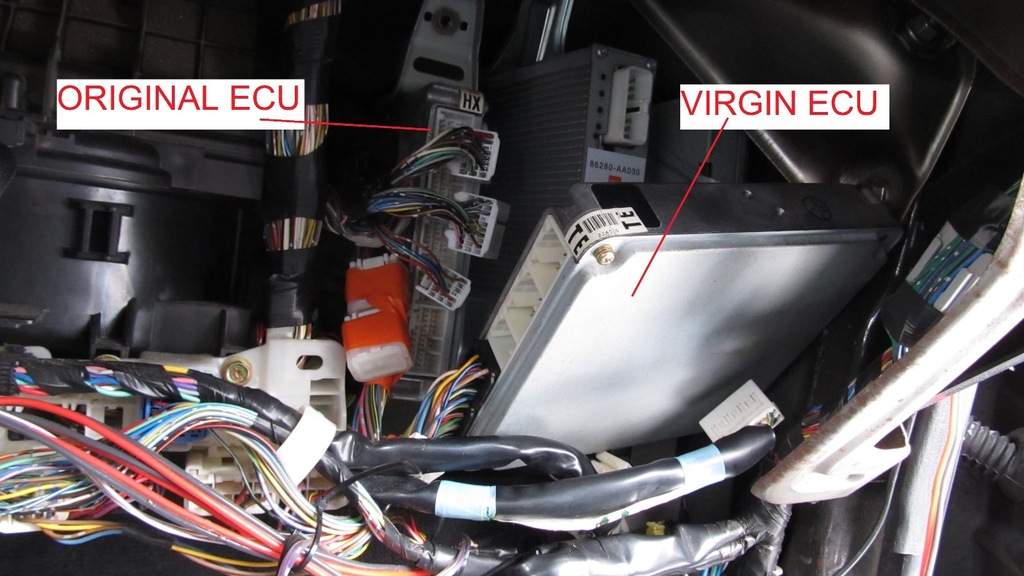
To demonstrate the immobilizer reprogram, I’ll be swapping ECU’s on my 1999 Toyota Solara with one from a 2001. Therefore my current keys won’t match what is in the new ECU.
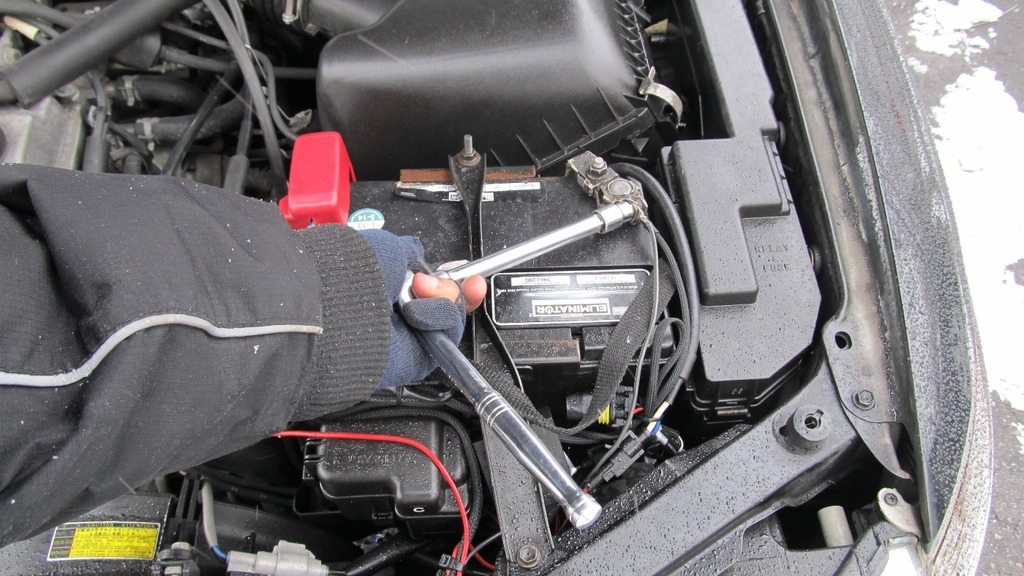
To be safe, pull the battery so you don’t cause any harm when unplugging the ECU.
In most cars the ECU is located behind the glove box.
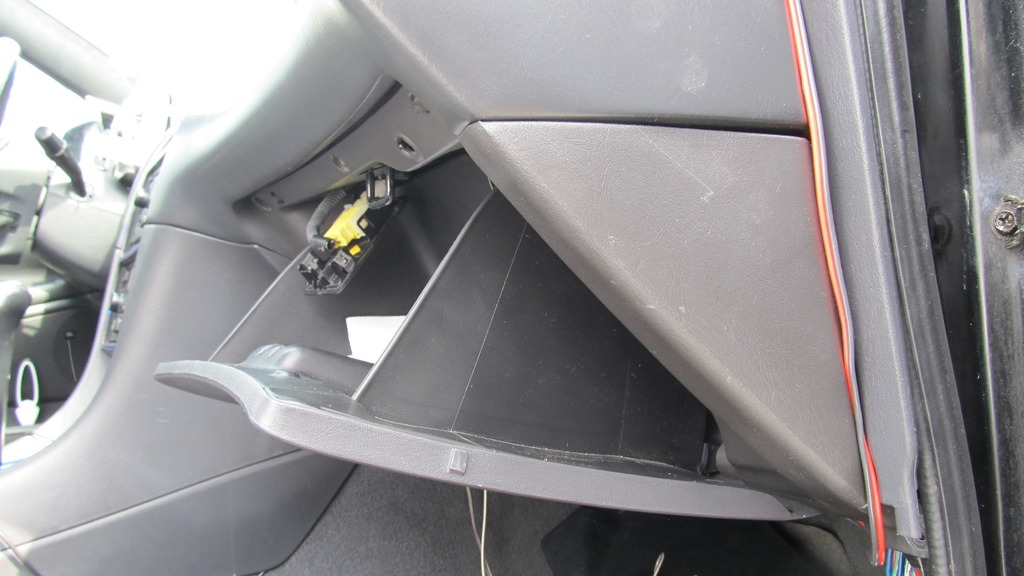
Here’s the ECU behind the glove box. It’s got 5 electrical connectors on it and is held in by two 10 mm nuts on the brackets.
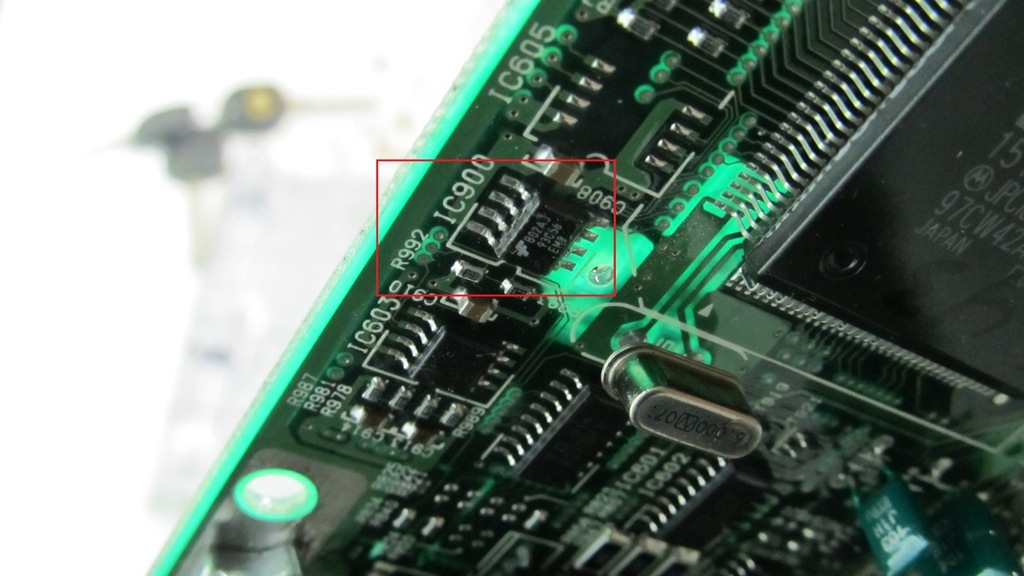
When you open up the ECU, we’re going to be looking for IC900.
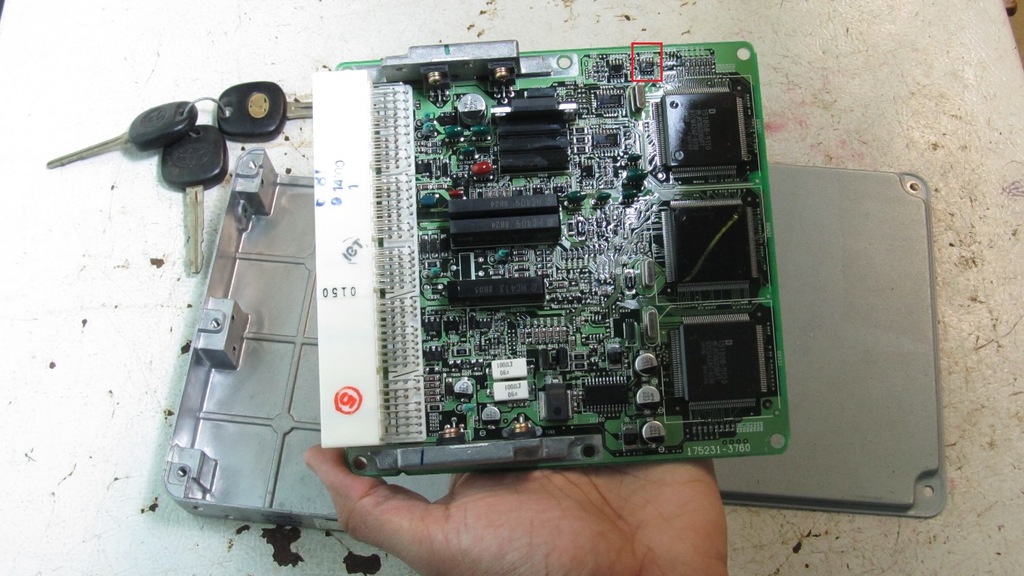
It’s a 93C56 EEPROM chip, surface mounted with 8 pins.
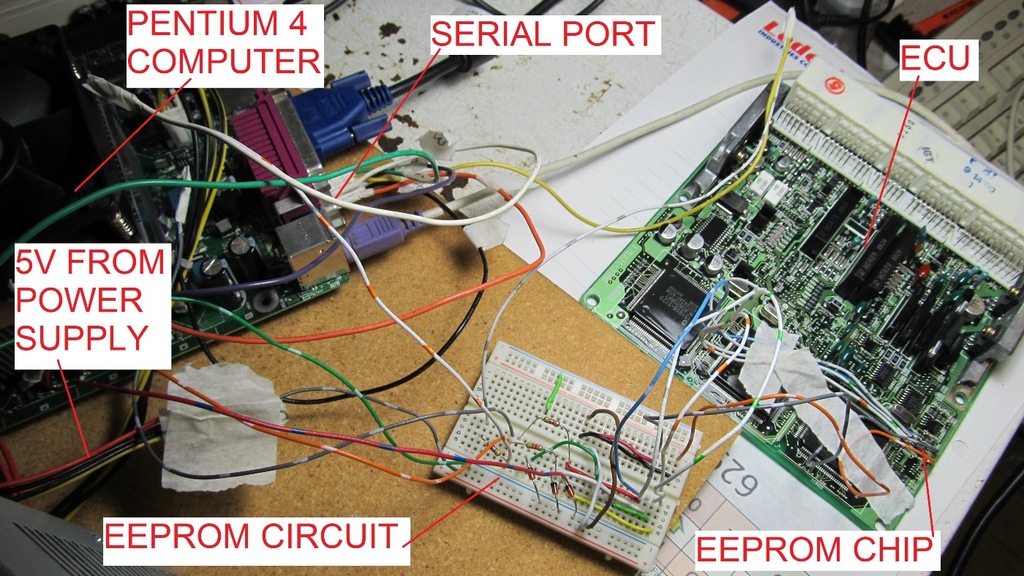
This is where you need to get a programmer to connect the chip to your PC. You can either buy a USB programmer from eBay or make your own to communicate to the serial port. In my case, I made my own, using the circuit below.
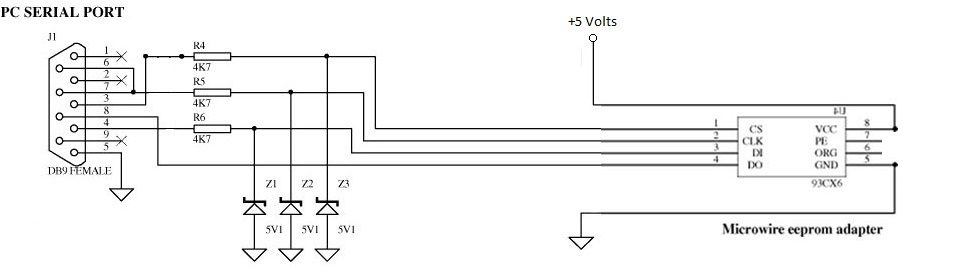
The components required are fairly basic, three 4.7K ohm resistors, three 5V zener diodes, and a computer with a serial port. To connect the 8-pin EEPROM chip to the computer you'll either have to solder hook-up wires to the pins or get a Test Clip for onboard programming.
Note: This is the same circuit for programming the odometer’s EEPROM.
http://www.toyotanation.com/forum/10...ogramming.html
Using a test clip helped a lot during prototyping.
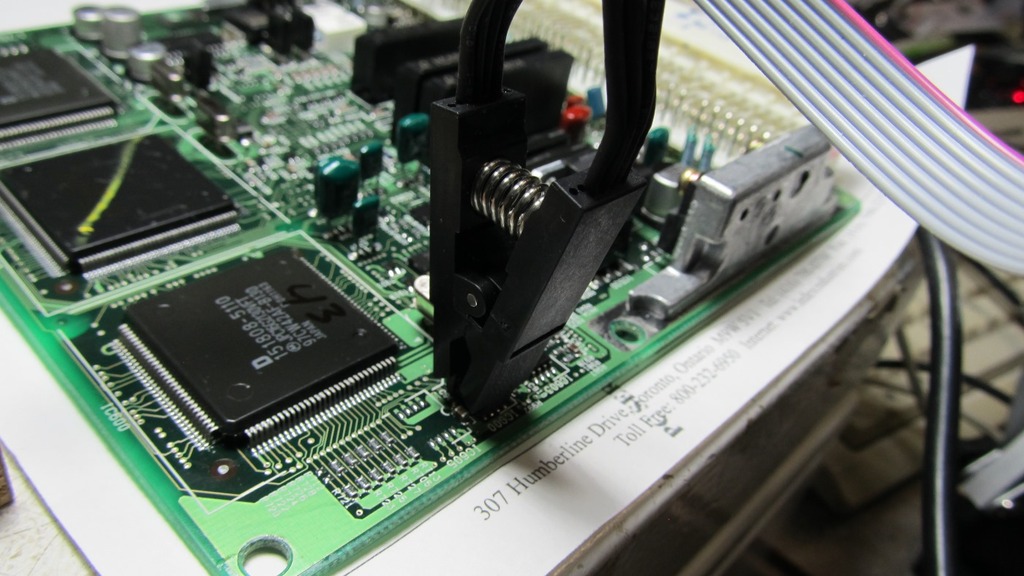
However the clip doesn’t have a good grip on the SMD chip so I chose to solder wires directly to the leads of the chip.
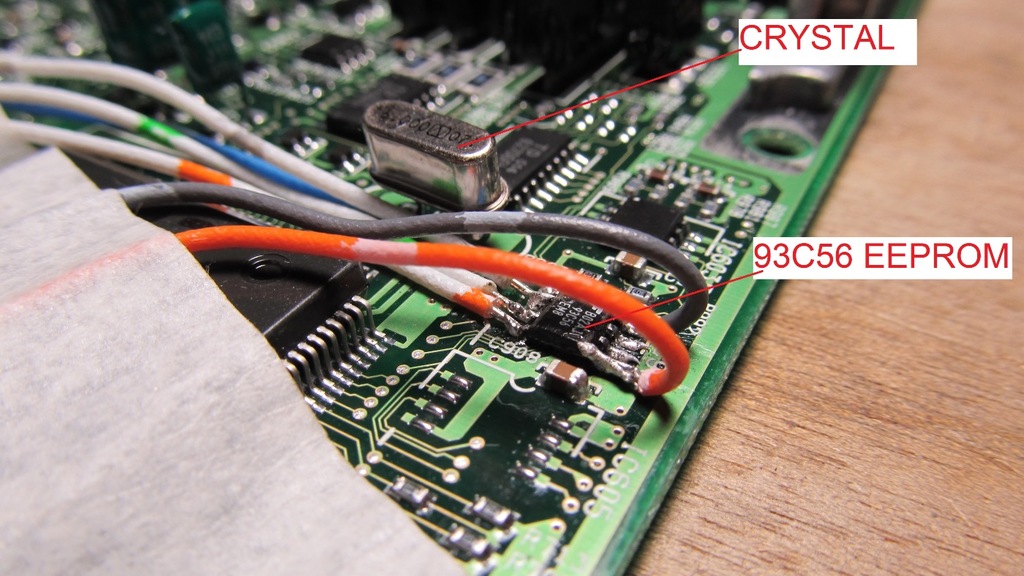
If you do have problems reading and writing from the chip, you have to short the crystal on the board.
Here’s the setup, with the computer connected to the ECU via the EEPROM circuit on a prototype breadboard.
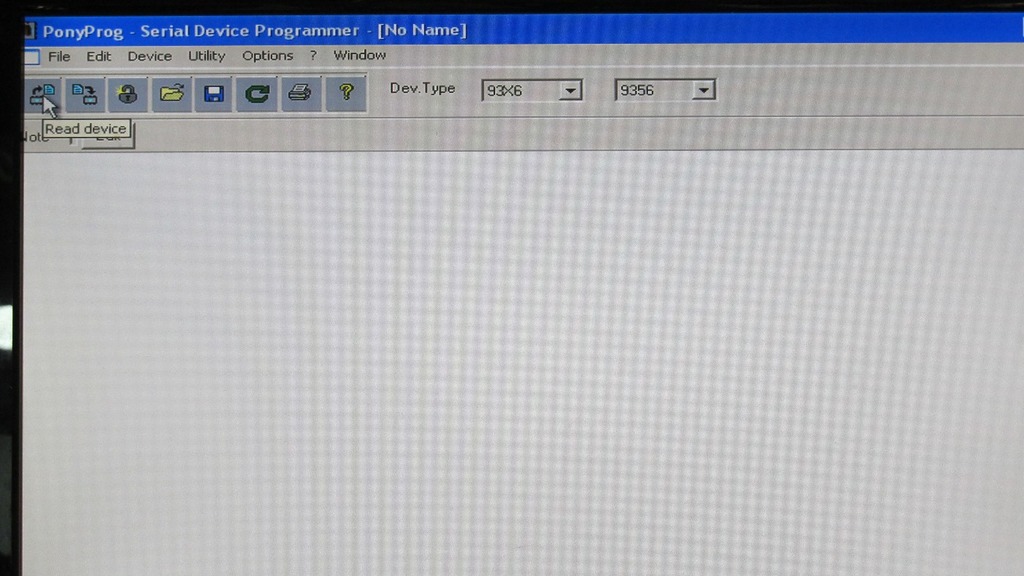
PonyProg, a free serial device programmer was the software used to read information from the serial port and "dump" the EEPROM's contents. First go to setup under options.
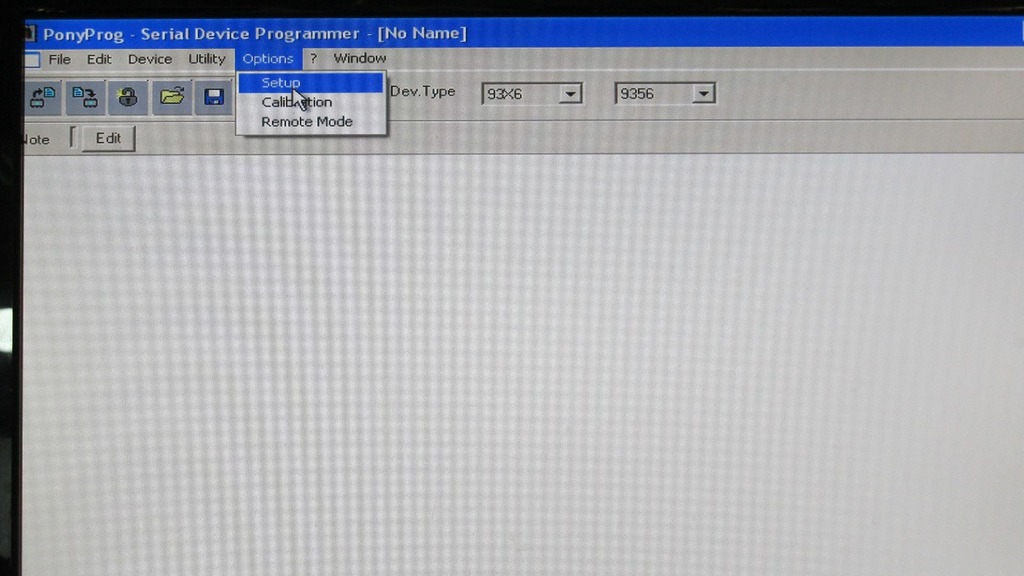
Select SI Prog I/O, COM 1 and then press Probe to check that the reader is communicating to the software.

Then select the device as 93C56 MicroWire EEPROM.
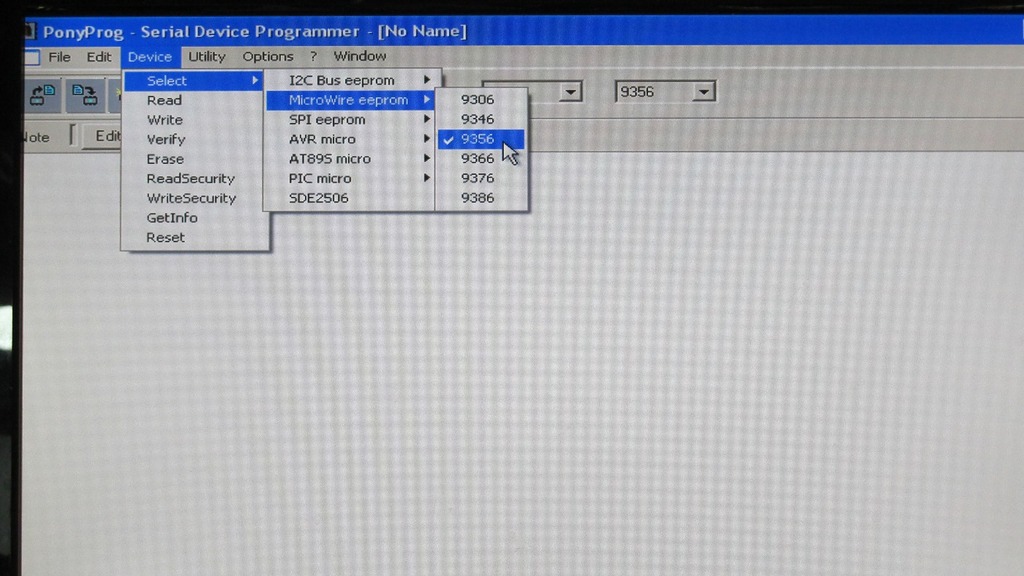
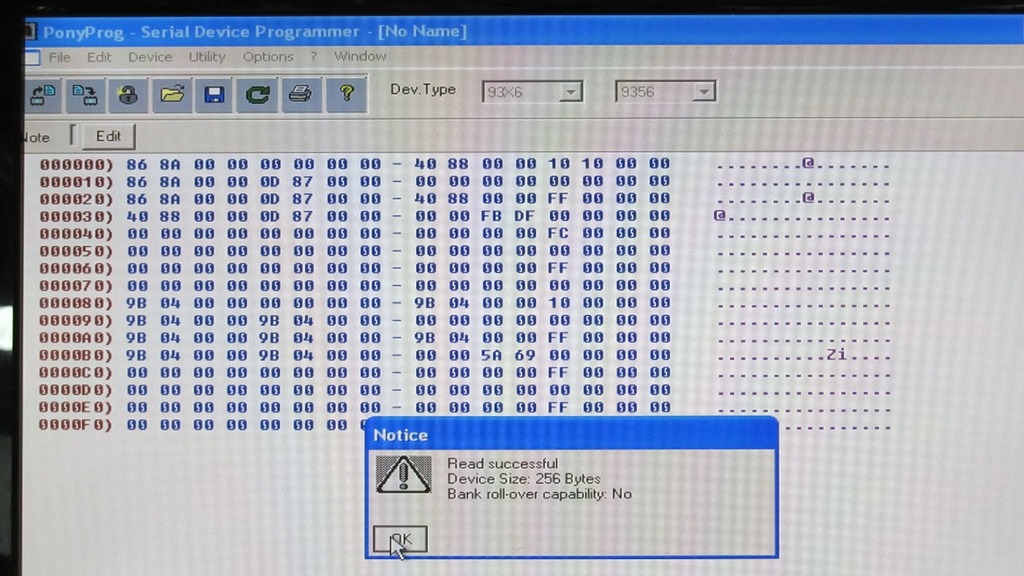
Click Read Device to dump the EEPROM’s contents.
The content should appear as an array of HEX characters. Each key has a unique 8 digit HEX code. There are also bits to indicate key count, enable programming mode and valet lockout.
DIY Video:
Disclaimer:
The engine immobilizer is a security device. Use the information provided here in a legal and appropriate manner.
PDF Download
A full PDF download of this writeup can be found from this cloud storage location:
https://mega.nz/#!q8ojjSoQ
Modern Toyota’s use a key with an embedded RFID chip as an added means of theft prevention. The key is read by the computer and if it matches, it will enable all systems to start the car. If the key does not match, the car will only crank but not start.
This engine immobilizer system presents a barrier to many owners when it comes time to swap out a bad ECU, or if you’ve lost all the master keys and can't program new keys.
While taking the car to a dealership or locksmith is an option, it could get expensive because you are at their mercy. What follows is a cheaper method you can do yourself to “virginize” your ECU to accept new keys without a master key.
Here’s an overview on how the immobilizer system works on older Toyota and Lexus vehicles.

When you insert the key, a coil near the ignition ring picks up the RFID signal from your key and sends it to an amplifier. The amplifier then decrypts it and sends it to the ECU. Inside the ECU is a 93C56 EEPROM chip (IC900) that stores the key values. If the key code matches the stored values, the engine will start.
On newer Toyota and Lexus vehicles, the transponder ECU is a separate unit and it’s housed under the dashboard.

The reason for separating the Transponder ECU with the EEPROM storing the keys is that in the invent of lost keys, it would be cheaper for a dealership to replace the Transponder ECU than the Engine Control Unit. However its location under the dash means you will have to remove the entire dash pad. The procedure for reprogramming is similar, however you will have to short two wires on the OBDII port to perform a hand-shaking procedure between the ECUs to program new keys.
Here’s what the immobilizer system components look like:

Here’s a closer look inside the transponder amplifier.

To demonstrate the immobilizer reprogram, I’ll be swapping ECU’s on my 1999 Toyota Solara with one from a 2001. Therefore my current keys won’t match what is in the new ECU.

To be safe, pull the battery so you don’t cause any harm when unplugging the ECU.

In most cars the ECU is located behind the glove box.

Here’s the ECU behind the glove box. It’s got 5 electrical connectors on it and is held in by two 10 mm nuts on the brackets.

When you open up the ECU, we’re going to be looking for IC900.

It’s a 93C56 EEPROM chip, surface mounted with 8 pins.

This is where you need to get a programmer to connect the chip to your PC. You can either buy a USB programmer from eBay or make your own to communicate to the serial port. In my case, I made my own, using the circuit below.

The components required are fairly basic, three 4.7K ohm resistors, three 5V zener diodes, and a computer with a serial port. To connect the 8-pin EEPROM chip to the computer you'll either have to solder hook-up wires to the pins or get a Test Clip for onboard programming.
Note: This is the same circuit for programming the odometer’s EEPROM.
http://www.toyotanation.com/forum/10...ogramming.html
Using a test clip helped a lot during prototyping.

However the clip doesn’t have a good grip on the SMD chip so I chose to solder wires directly to the leads of the chip.

If you do have problems reading and writing from the chip, you have to short the crystal on the board.
Here’s the setup, with the computer connected to the ECU via the EEPROM circuit on a prototype breadboard.

PonyProg, a free serial device programmer was the software used to read information from the serial port and "dump" the EEPROM's contents. First go to setup under options.

Select SI Prog I/O, COM 1 and then press Probe to check that the reader is communicating to the software.

Then select the device as 93C56 MicroWire EEPROM.

Click Read Device to dump the EEPROM’s contents.

The content should appear as an array of HEX characters. Each key has a unique 8 digit HEX code. There are also bits to indicate key count, enable programming mode and valet lockout.

Last edited by speedkar9; 03-30-19 at 07:29 AM.
 03-07-16, 06:01 PM
#2
Lexus Champion
Thread Starter
Here’s a breakdown of an EEPROM dump. After a lot of experimentation, it was observed that there are three distinct keys. Each key is an 8 digit HEX value, repeated three times. It is split across two groups of four, but there is symmetry in their positioning within the dump.
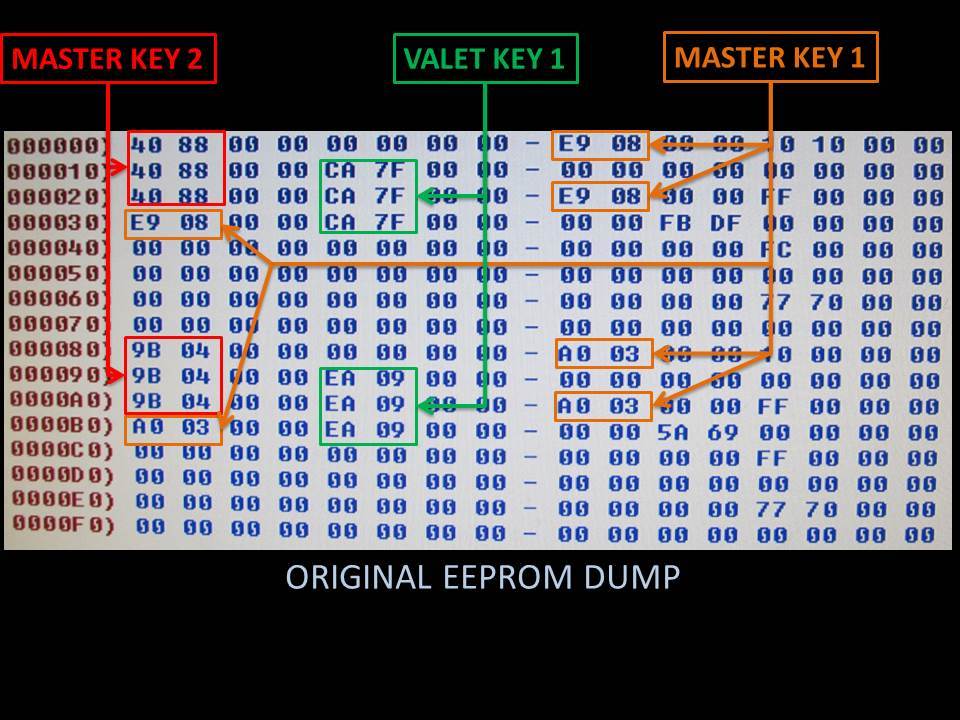
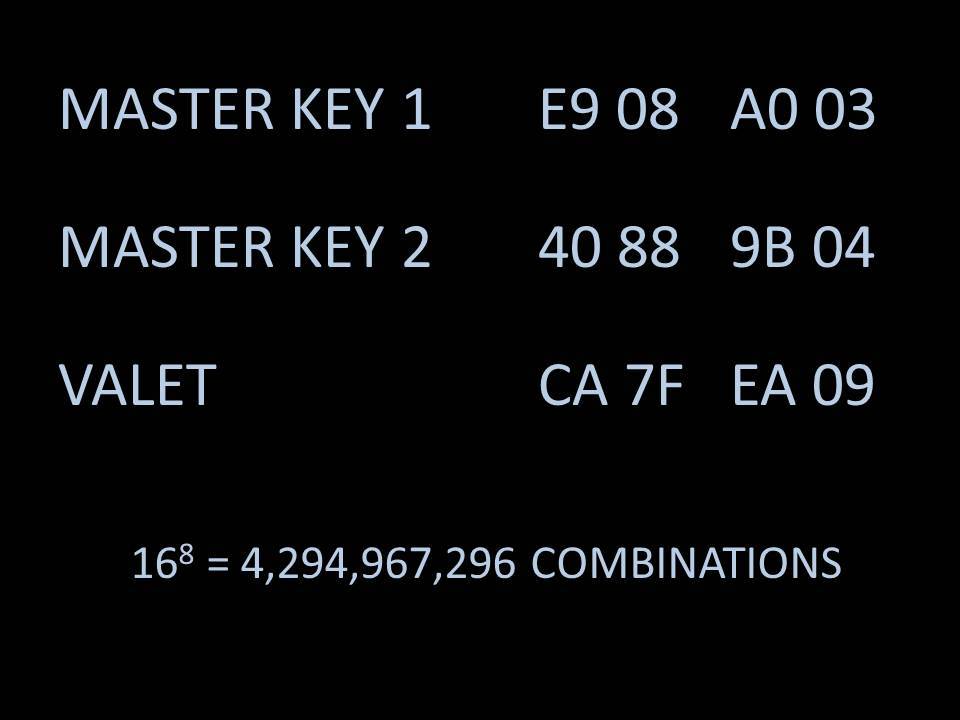
With 8 digits and 16 HEX characters, there are 4.2 billion different key combinations. For the example above, here is the breakdown of key codes:
Looking on the right side of the EEPROM dump, there are three noteworthy HEX clusters.
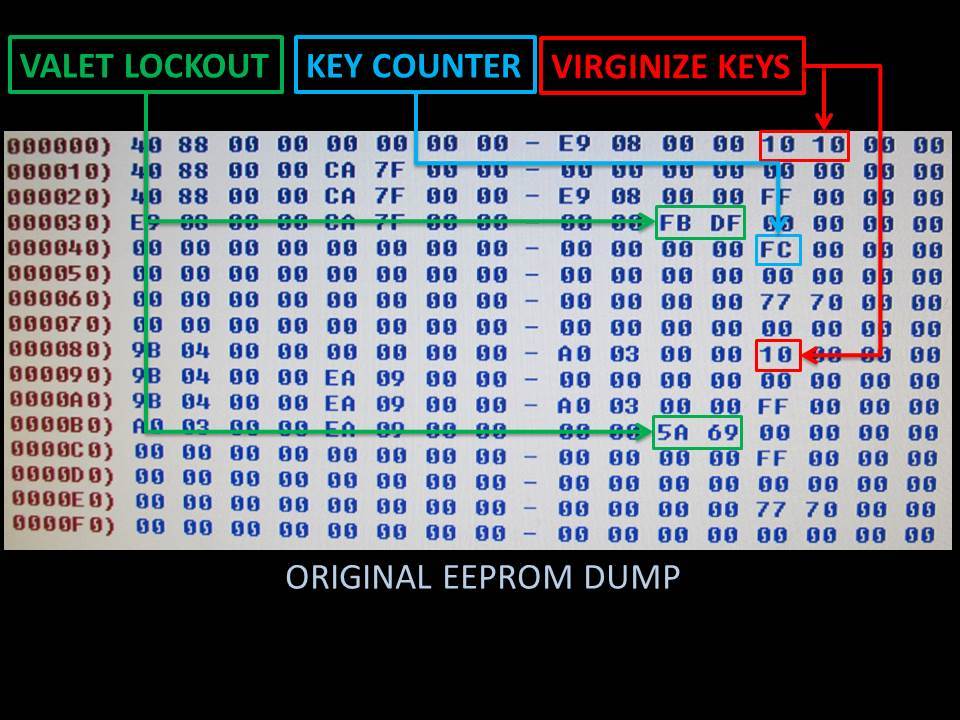
The Valet Lockout should be kept as is, FB DF 5A 69. Erasing this will only allow you to program one Valet key, and then you’re stuck.
The virginize keys are values that are “10” in the original dump but must be changed to “00” to tell the computer to go into auto-programming mode.
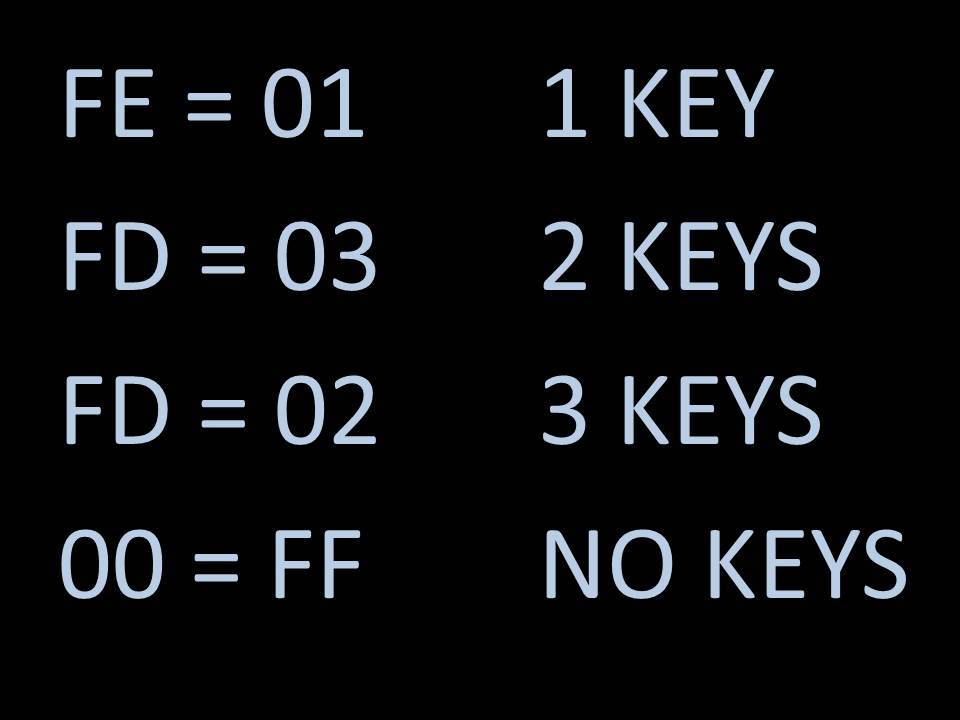
The Key counter is a number count, in inverse HEX, of how many keys are currently stored in the ECU. This must be zeroed as well.
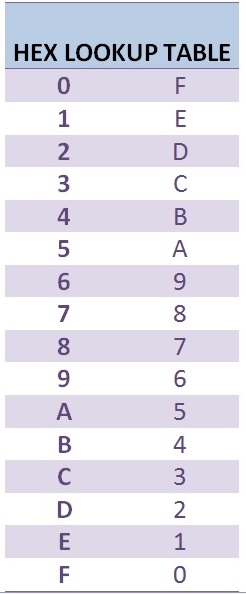
Here’s a look-up table to invert HEX. It’s pretty much 0 to F and F to 0 backward.
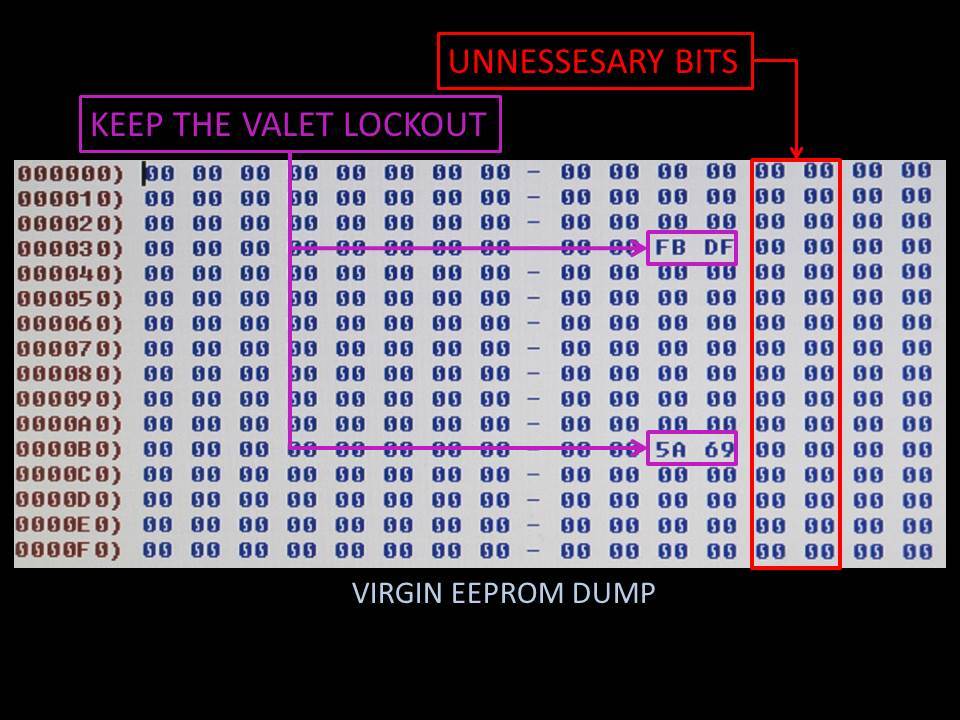
All other characters in the EEPROM dump must be changed to 00 to “virginize” the chip.
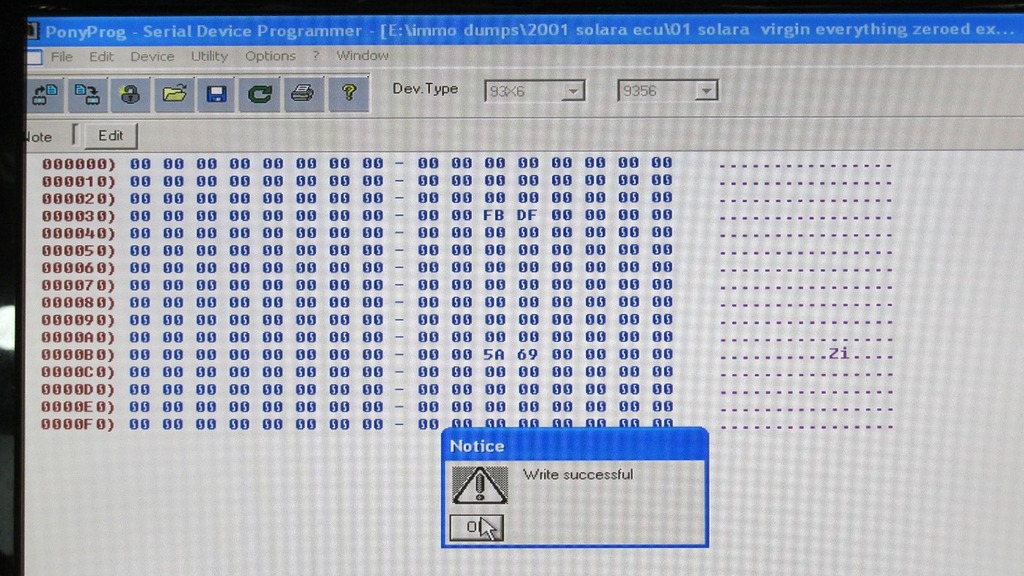
In PonyProg, to do this, click Edit Buffer Enabled.
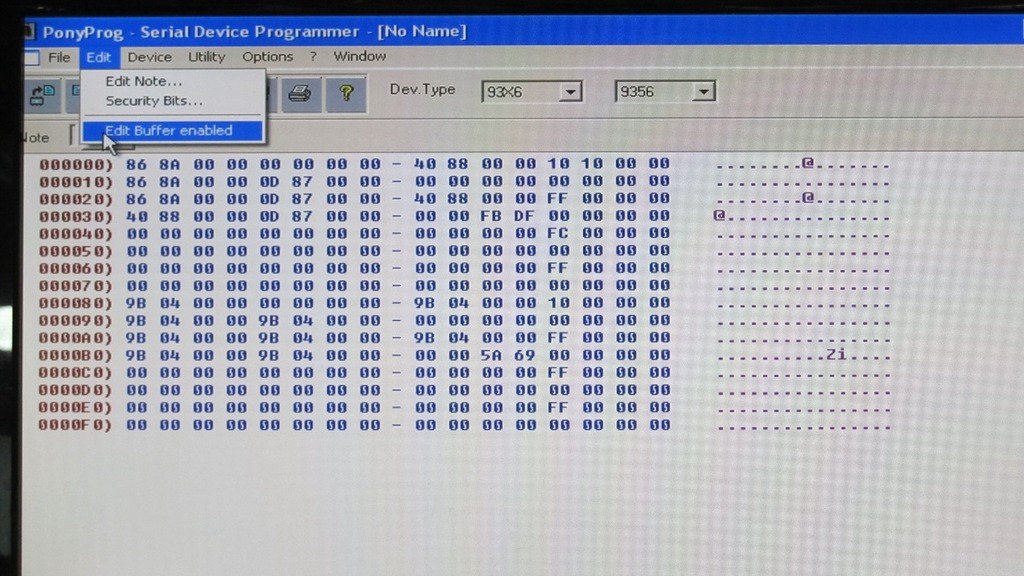
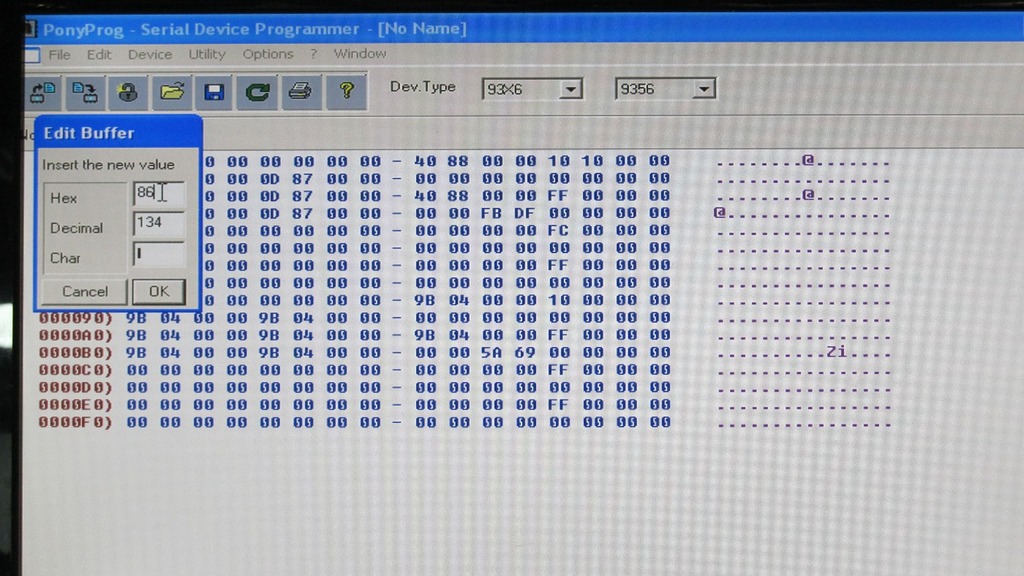
Then click on any HEX character to edit that bit.
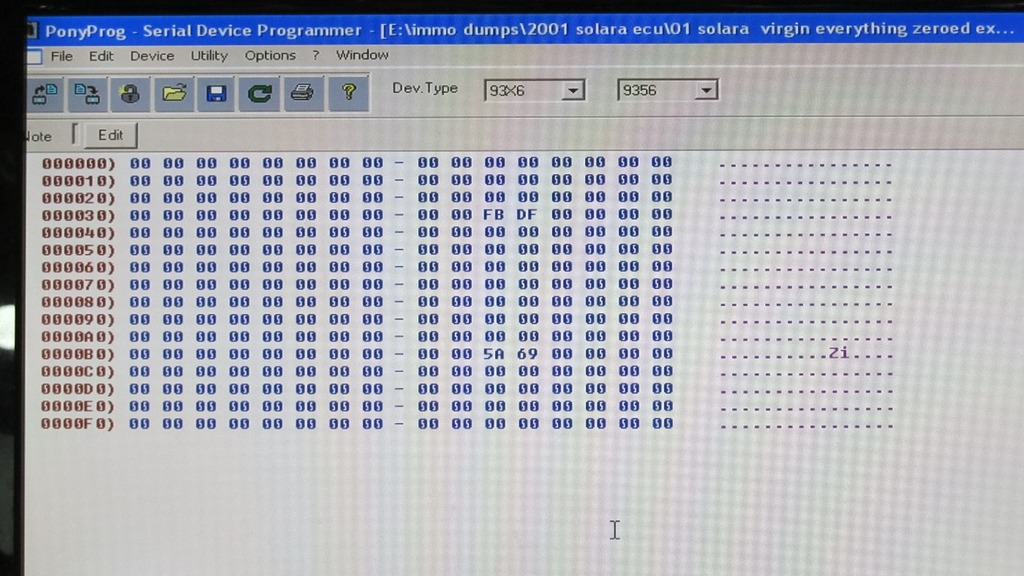
Everything is zeroed (except for FB DF 5A 69), and you have your virgin dump:
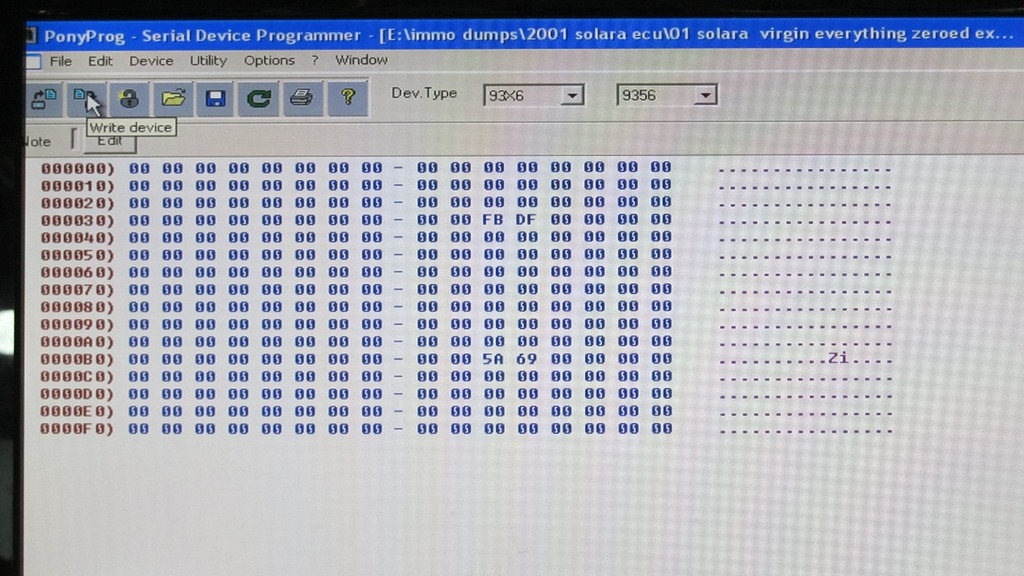
You can then write to the chip:
And then proceed to replace the ECU back in the car.
Key Programming:
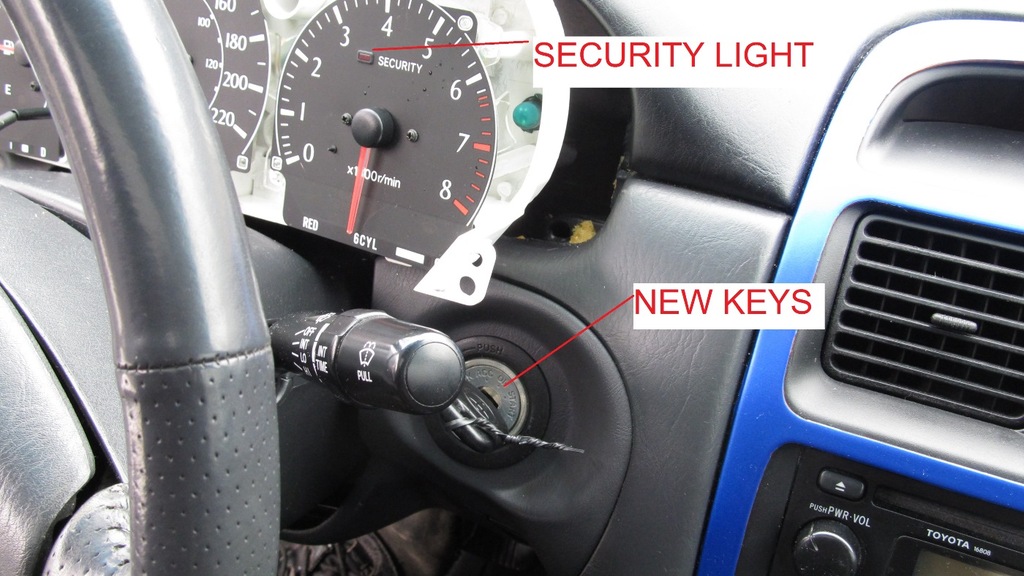
When reconnected to the car, the ECU will be in auto-programming mode and will accept new keys as per the procedure below:
1. Briefly insert any key into ignition lock cylinder and remove immediately. The security light should illuminate and remain on.
2. Insert the first transponder key into ignition lock cylinder for registration DO NOT TURN ON. The Security light may blink indicating it has accepted the key. After 3-5 seconds remove the first key from the ignition. Security light should remain on indicating you're still in programming mode.
3. Insert the second transponder key into ignition lock cylinder for registration DO NOT TURN ON. The Security light may blink indicating it has accepted the key. After 3-5 seconds remove the second key from ignition. Security light should remain on indicating you're still in programming mode.
4. Insert third transponder key into ignition lock cylinder for registration DO NOT TURN ON. After security light goes off remove third key from ignition. The security light should extinguish and then commence to blink regularly.
5. Wait 30 seconds for the programming cycle and programming mode to close.
The first two keys are internally (inside the ECU) designated as MASTER keys and the 3rd key inserted will be internally designated as the VALET key.
As a test, when you insert a MASTER key, the security light should stop blinking right away. If you insert a VALET key, the security light will remain solid for 2 seconds and then go out. If the security light does not stop blinking, that key is not programmed to the car.
This procedure should work on many Toyota and Lexus vehicles from the 1990's to early 2000's. Newer Toyota/Lexus/Scion cars have a separate transponder ECU under the dashboard instead of having the EEPROM store key info in the ECU. The procedure is similar, though a hand-shaking procedure must be performed between the Transponder ECU and Engine Control Unit before key programming by shorting two wires on the OBDII port for 30 minutes.
Reference material:
http://qcwo.com/technicaldomain/work...ginizing-files
http://www.spyderchat.com/forums/sho...mmobilizer-Fix
http://www.locksmithcharley.com/toyotapostflash.pdf

With 8 digits and 16 HEX characters, there are 4.2 billion different key combinations. For the example above, here is the breakdown of key codes:

Looking on the right side of the EEPROM dump, there are three noteworthy HEX clusters.

The Valet Lockout should be kept as is, FB DF 5A 69. Erasing this will only allow you to program one Valet key, and then you’re stuck.
The virginize keys are values that are “10” in the original dump but must be changed to “00” to tell the computer to go into auto-programming mode.
The Key counter is a number count, in inverse HEX, of how many keys are currently stored in the ECU. This must be zeroed as well.

Here’s a look-up table to invert HEX. It’s pretty much 0 to F and F to 0 backward.

All other characters in the EEPROM dump must be changed to 00 to “virginize” the chip.

In PonyProg, to do this, click Edit Buffer Enabled.

Then click on any HEX character to edit that bit.

Everything is zeroed (except for FB DF 5A 69), and you have your virgin dump:

You can then write to the chip:


And then proceed to replace the ECU back in the car.

Key Programming:
When reconnected to the car, the ECU will be in auto-programming mode and will accept new keys as per the procedure below:
1. Briefly insert any key into ignition lock cylinder and remove immediately. The security light should illuminate and remain on.
2. Insert the first transponder key into ignition lock cylinder for registration DO NOT TURN ON. The Security light may blink indicating it has accepted the key. After 3-5 seconds remove the first key from the ignition. Security light should remain on indicating you're still in programming mode.
3. Insert the second transponder key into ignition lock cylinder for registration DO NOT TURN ON. The Security light may blink indicating it has accepted the key. After 3-5 seconds remove the second key from ignition. Security light should remain on indicating you're still in programming mode.
4. Insert third transponder key into ignition lock cylinder for registration DO NOT TURN ON. After security light goes off remove third key from ignition. The security light should extinguish and then commence to blink regularly.
5. Wait 30 seconds for the programming cycle and programming mode to close.
The first two keys are internally (inside the ECU) designated as MASTER keys and the 3rd key inserted will be internally designated as the VALET key.

As a test, when you insert a MASTER key, the security light should stop blinking right away. If you insert a VALET key, the security light will remain solid for 2 seconds and then go out. If the security light does not stop blinking, that key is not programmed to the car.
This procedure should work on many Toyota and Lexus vehicles from the 1990's to early 2000's. Newer Toyota/Lexus/Scion cars have a separate transponder ECU under the dashboard instead of having the EEPROM store key info in the ECU. The procedure is similar, though a hand-shaking procedure must be performed between the Transponder ECU and Engine Control Unit before key programming by shorting two wires on the OBDII port for 30 minutes.
Reference material:
http://qcwo.com/technicaldomain/work...ginizing-files
http://www.spyderchat.com/forums/sho...mmobilizer-Fix
http://www.locksmithcharley.com/toyotapostflash.pdf
The following 5 users liked this post by speedkar9:
03-07-16, 06:50 PM
#3
Lexus Fanatic
This is really awesome stuff I love seeing this type of hacking plus it could save someone a whole lot of money. If it was me I'd try and find a way to socket that ROM in case I needed to program it again.
I didn't know the valet key caused the security light to act differently learned something new.
I didn't know the valet key caused the security light to act differently learned something new.

The following users liked this post:
Rriley77 (07-23-23)
03-18-16, 05:40 PM
#5
Lexus Champion
Thread Starter
This is really awesome stuff I love seeing this type of hacking plus it could save someone a whole lot of money. If it was me I'd try and find a way to socket that ROM in case I needed to program it again.
I didn't know the valet key caused the security light to act differently learned something new.
I didn't know the valet key caused the security light to act differently learned something new.
I believe the owners manual (or service manual?) tells you about distinguishing valet and master keys through the security light. Valet keys can start the car, but it won't allow you to program new key fobs, new keys or open the glove box and trunk.
Since the IC900 chip is a surface mount EEPROM chip you won't be able to easily socket it the way I did the odometer chip:
http://www.toyotanation.com/forum/10...ogramming.html

Thanks. Those last few links in the references really helped me a lot to understand how the chip is programmed. Locksmiths virginize Immobilizer chips all the time but don't reveal their secrets and want you to buy the virgin dumps. I got a few chips and a used ECU with some keys from the junkyard and did a bunch of experimenting with the HEX values in the dump until I found out what each set of characters translated to. A lot of trial and error but having the odometer reprogramming experience behind me made it a lot easier to tread through unknown territory.
03-19-16, 07:11 AM
#6
Driver School Candidate

Wow, that is good stuff to know. Just a though, Is there a way to read new key's code from the transponder? If you could, then edit dump hex from ic900 and program back into the original ic900. This way, you could still use the original ecu. It is much easier to remove it, read it, reprogram it, and put it back. May be reprogram blank/0 key code so that whatever keys you first insert will auto program and remember in the ic900.
Way back, i used to do this with computer bios chip and others telecom circuit board. It could be done with an ic that has over 100 pins. But, it is very painful to understand the dump hex.
Way back, i used to do this with computer bios chip and others telecom circuit board. It could be done with an ic that has over 100 pins. But, it is very painful to understand the dump hex.

Trending Topics
05-19-18, 12:03 PM
#8
Pit Crew

Wow. This is a great write-up, speedkar9! Although I'm generally comfortable with this sort of technology, I'm not really up to a project that may involve soldering leads to a surface-mount eprom... Besides, my laptop doesn't have a serial port :-).
Nonetheless, I recently bought a 1998 Lexus ES 300 for cheap that only came with one working Valet Key to start the engine and one working remote/key fob... It also came with a second key ring containing: one cut Master Key that cranks but doesn't start the engine, a non-working remote/key fob, and an aluminum key code tag that I assume was used to cut said Master Key.
All of the above appear to be originals or OEM replacements. I assume that the Master key's transponder is not registered because all the original master keys had been lost (and this complicate$ thing$).
As you might gather from the 20-year-old car I'm talking about, I'm rather scared about the cost of enlisting a Lexus dealer to sort this out :-). About what should I expect to pay to have a competent locksmith flash my ECU and get all of these keys/remotes functional?
06-20-18, 12:20 AM
#9
Driver School Candidate

Join Date: Nov 2003
Location: Washington
Posts: 11
Likes: 0
Received 0 Likes
on
0 Posts
Would it be possible to use a non-Lexus-key RFID? The fob is so large and bulky, I wish there was a way to have a tiny passive RFID only fob. Or even a rfid ring that you can wear.
06-21-18, 03:31 PM
#10
Intermediate

I was wondering if after switching out the ECM, if you could just use Techstream to reprogram the keys? If not my second option would be to use a Arduino and figure out how to attach to the chip.
I saw that in your method you use zeno diodes and resistors, can you link to the ones that you used or even a parts list.
I saw that in your method you use zeno diodes and resistors, can you link to the ones that you used or even a parts list.
06-30-18, 12:51 PM
#11

Hello, new here. I attempted this hack on my 1998 Lexus LX470. I did something wrong and ended up zeroing the eeprom (all Fs) but cannot start car and it wont go into auto registration mode. I ordered another ecu, but it wont be here for a little while, and I'd like to get my truck running .Can someone help me? Or do I just wait for another box and hope it works? Thank you
Last edited by Mauser; 06-30-18 at 12:52 PM. Reason: Spelling
07-02-18, 05:06 PM
#13
Intermediate
This got me thinking, since I already have a master key. I can just get 2 more keys, program them into my current ECM and them copy and paste the EEPROM contents from old to replacement ECM. What do you guys think about this route?
07-03-18, 07:31 PM
#15
Lexus Champion
Thread Starter
I was wondering if after switching out the ECM, if you could just use Techstream to reprogram the keys? If not my second option would be to use a Arduino and figure out how to attach to the chip.
I saw that in your method you use zeno diodes and resistors, can you link to the ones that you used or even a parts list.
I saw that in your method you use zeno diodes and resistors, can you link to the ones that you used or even a parts list.
Hello, new here. I attempted this hack on my 1998 Lexus LX470. I did something wrong and ended up zeroing the eeprom (all Fs) but cannot start car and it wont go into auto registration mode. I ordered another ecu, but it wont be here for a little while, and I'd like to get my truck running .Can someone help me? Or do I just wait for another box and hope it works? Thank you
Yes this would work.