DIY - Rear Axle Carrier (Knuckle) Bushing Replacement
 10-02-11, 09:14 PM
#1
Advanced
Thread Starter

I replaced the rear axle carrier bushings this weekend, and wanted to write up this DIY tutorial for anyone who might need to do the same job.
My symptom of bushing wear was constant clunking from the rear. I checked balljoints, suspension arm bushings, shock bolts, stabilizer bolts- nothing. Finally, when I was just about to give up, I jacked up the rear end one last time and shook the tire while holding it at 6 and 12 positions - and could clearly hear the clunking! I had my buddy look while I was shaking the tire, and we saw a good 1/8" of play where the axle carrier met the lower suspension arm. There is a "bushing" at that location, which is actually a spherical bearing.
I would say that by far the biggest challenge in this DIY is not the actual job, it's the task of finding replacement bushings! Naturally you cannot buy just the bushings from Lexus, you have to buy the entire axle carrier (~ $215 each). And if you went that route, you will probably also need new rear wheel bearings (~ $60 each), since you are likely to damage the old ones during separation of the axle from the axle carrier. So, you would be looking at almost $600 worth of parts to replace two measly bushings. To make matters worse, this was looking like a full weekend worth of work, something I did not feel like taking on at this point.
So I started looking for alternate solutions. I found a couple of options from browsing this forum - one was from an ebay seller in England (Martin?), who used an all poly bushing. But his bushing did not have any material at the ends, which allowed the control arm to float back and forth. I did not like that at all. I also touched base with a poster here, Diamondmit, who designed his own (improved) solution - also all-poly, but with end "donuts" added, to keep the arm stable. I still preferred the OEM type spherical bearing, but was going to go with Dave's idea when by sheer luck another poster (1nz) posted a picture of the bushing I needed, from The Mount Shop's website:
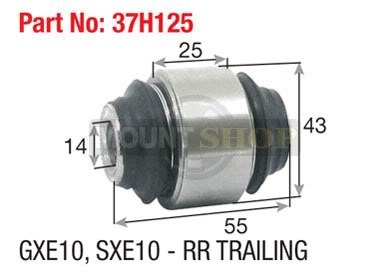
I knew that the shape of the bushing was right, and after taking some measurements, I was able to confirm that the dimensions shown were right too. All I had to do now was get the bushings, but I could only find them on The Mount Shop's website, and they are in New Zealand! 1nz (who is also in NZ) was kind enough to offer to pick some up for me and send them to me, but by this time I figured out what car these were for - an IS200, or the Altezza. Another evening's worth of Googling, and I found an ebay seller who was selling something similar- http://myworld.ebay.com/irl_car_parts. Granted, these are not OEM, they are Chinese made, but what isn't these days? The seller said he sold hundreds of them and never had a problem. They were about $120 delivered. He doesn't show any more of them available, but I believe he can get access to more if you ping him. He lists these bushings as "REAR STUB AXEL BUSH IS200 / ALTEZZA", so ask for those.
*****2020 Update - looks like an option for finding these bushings is at https://febestparts.com/REAR_KNUCKLE.../TAB-124Z*****
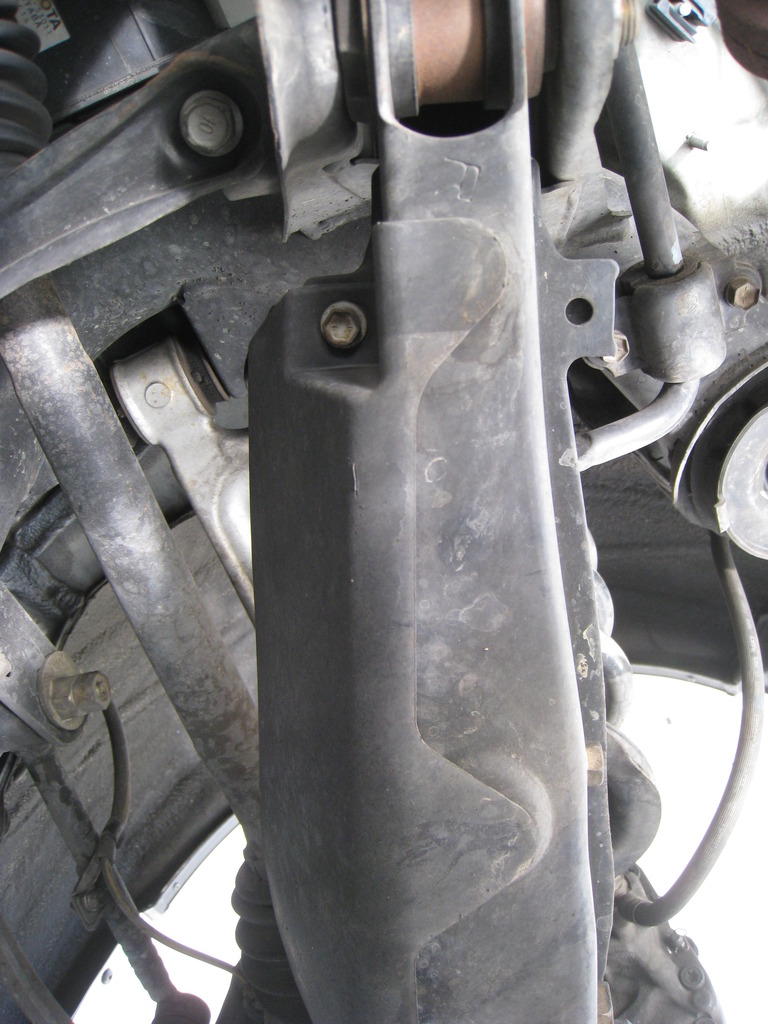
Anyway, I finally got my bushings, and started the project yesterday. I started by jacking up the rear end and supporting the car with jackstands. The first thing you have to remove is the rear suspension arm cover - a plastic piece held with 2 10mm (head size) bolts: (the photo only shows one bolt, the other one is nearby)
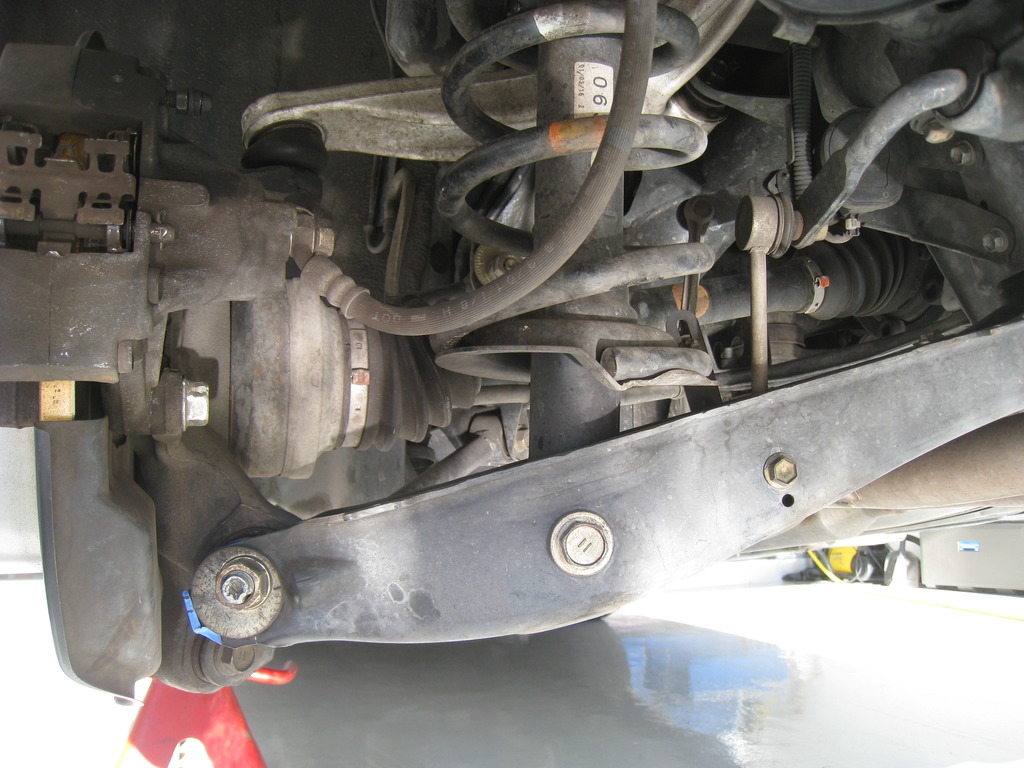
The next photo shows the three main fasteners you need to remove on the lower control arm (from right to left) - the stabilizer link bolt (12mm), the shock bolt (19mm), and the camber bolt, which is where the bushing that we are going to replace is (19mm):
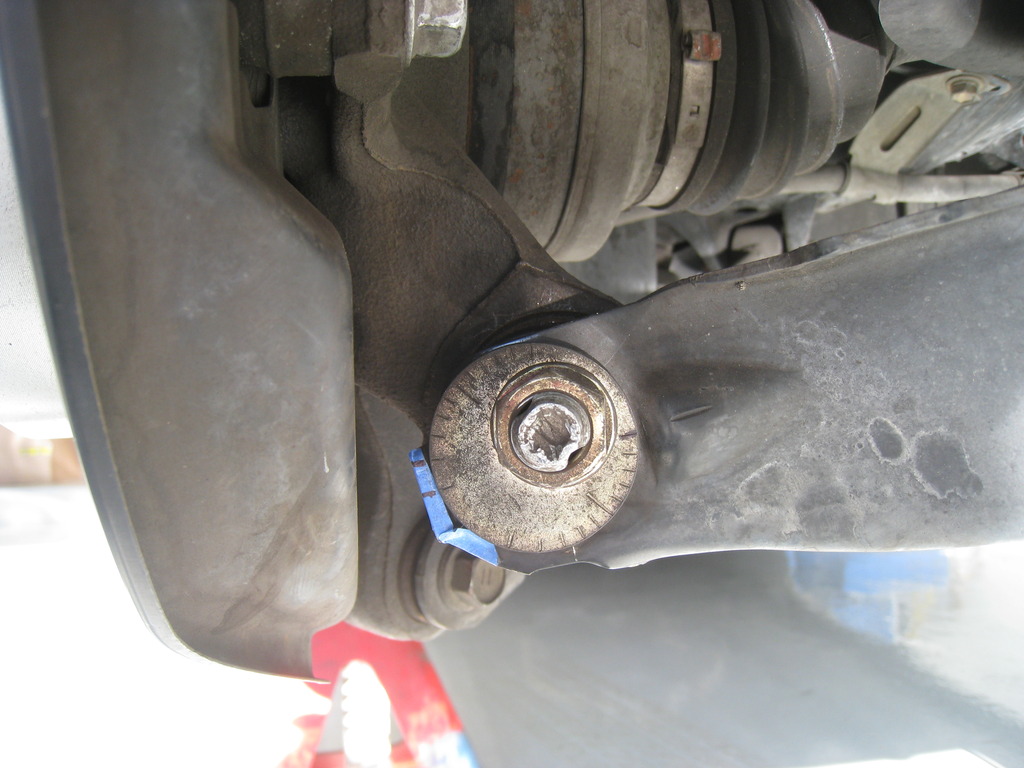
Before removing the camber bolt, I marked its orientation with a sharpie, to ensure proper alignment on reassembly:
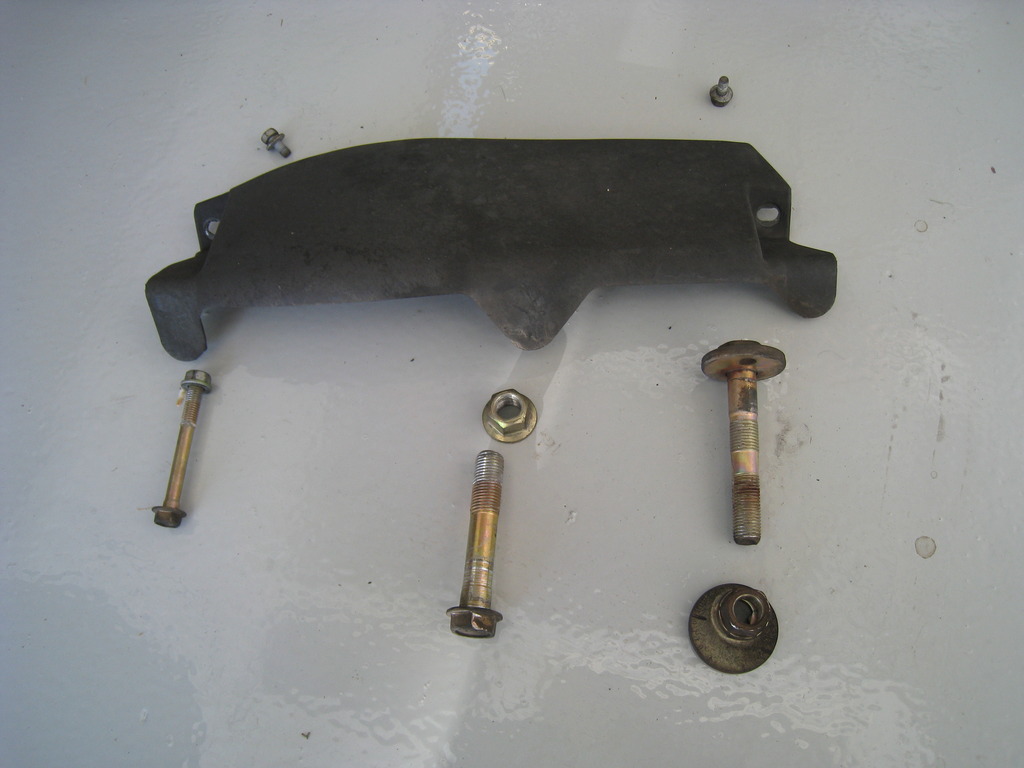
Here are all the fasteners and the cover removed:
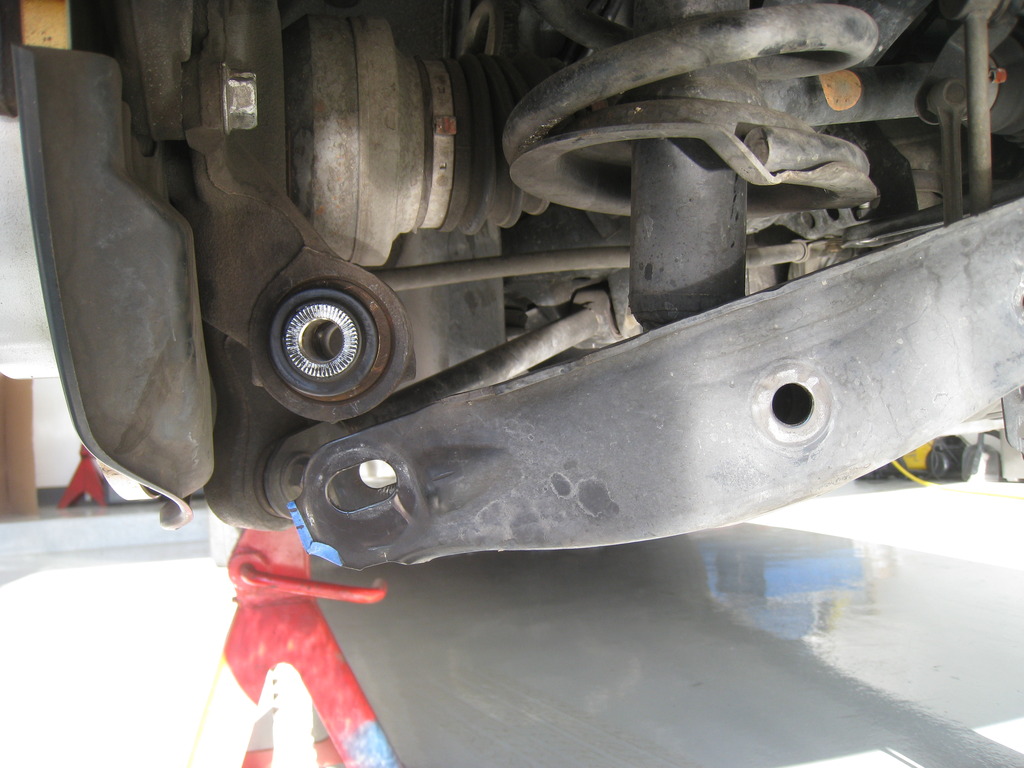
Now the arm and axle carrier easily come apart, you can see the bushing on the left:
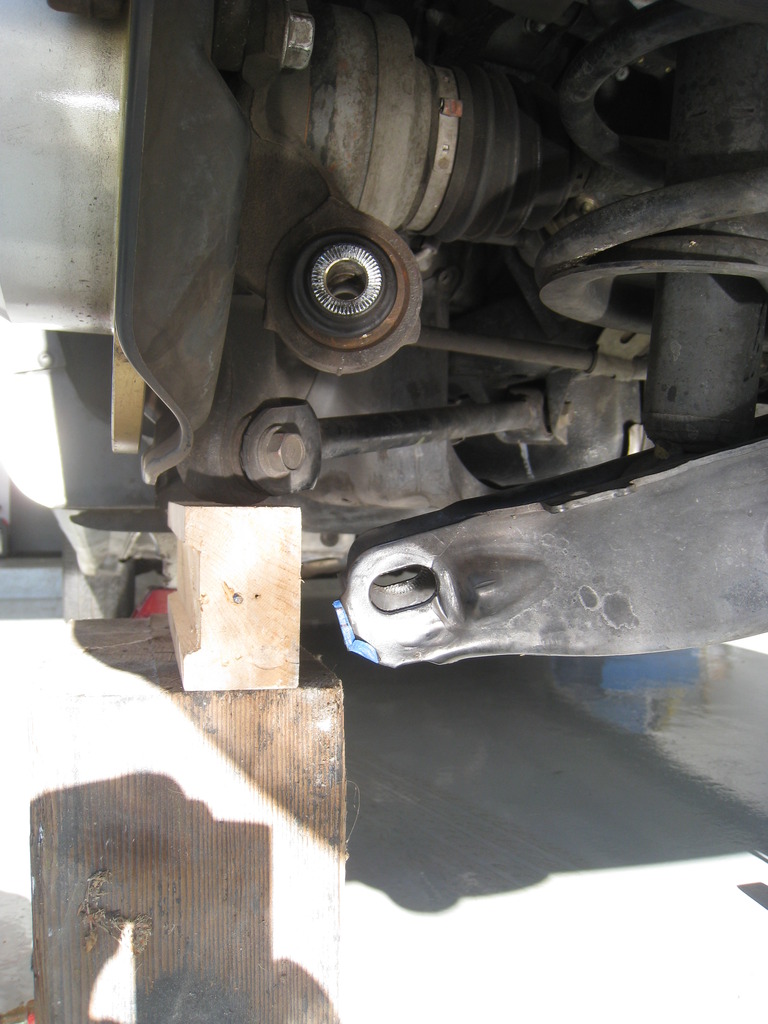
I pried the axle carrier up a little with a wooden block, to give me more working room:
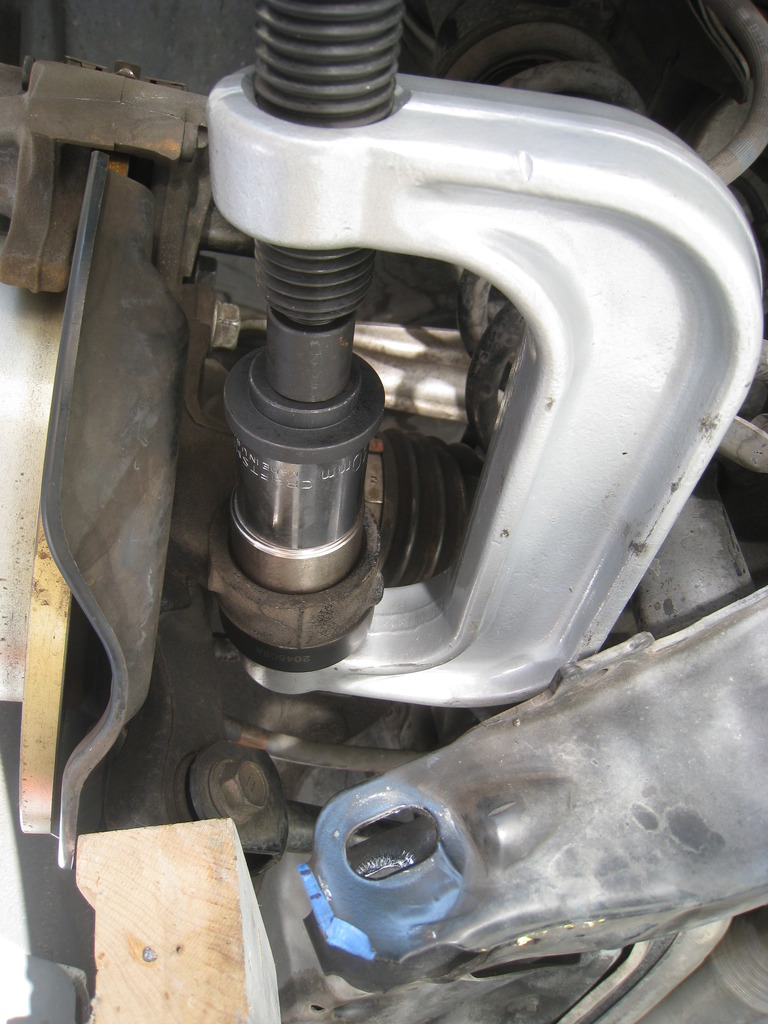
I've seen other tutorials where the bushing is hammered out, but that seemed somewhat brute force. I also was told that the bushing can be removed with a regular gear puller, but I wanted to try out my new toy, the OTC Balljoint Press kit ( ). Here is a photo of what you get:
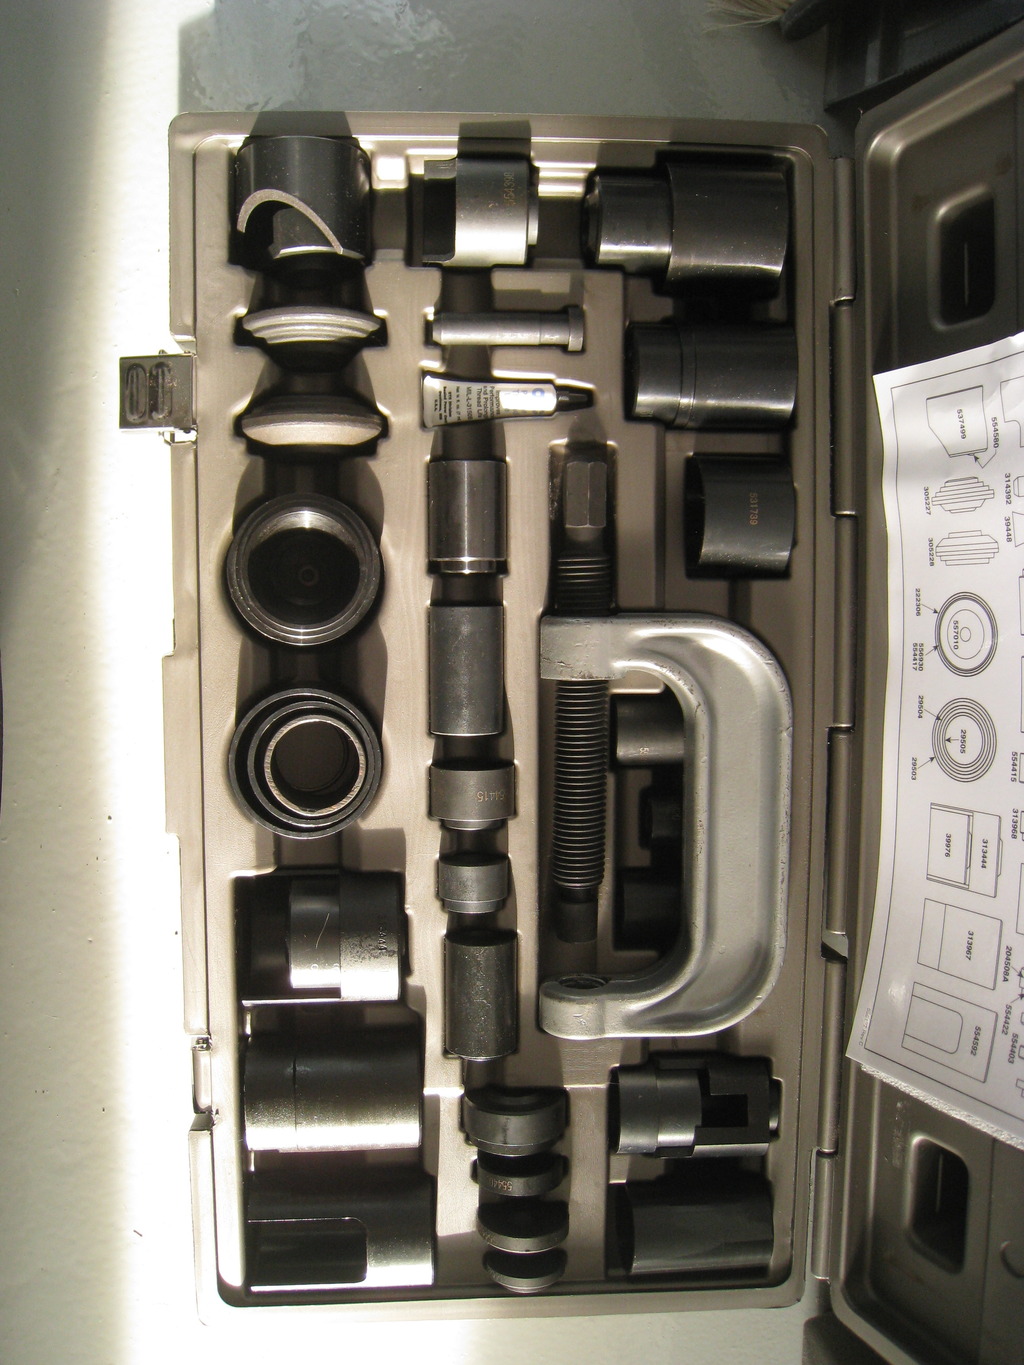
I looked around for sleeves that would serve as pushers and receiving tubes; in the end, I had to use a 30mm socket as the pusher, because nothing in the kit worked for this bushing .
.
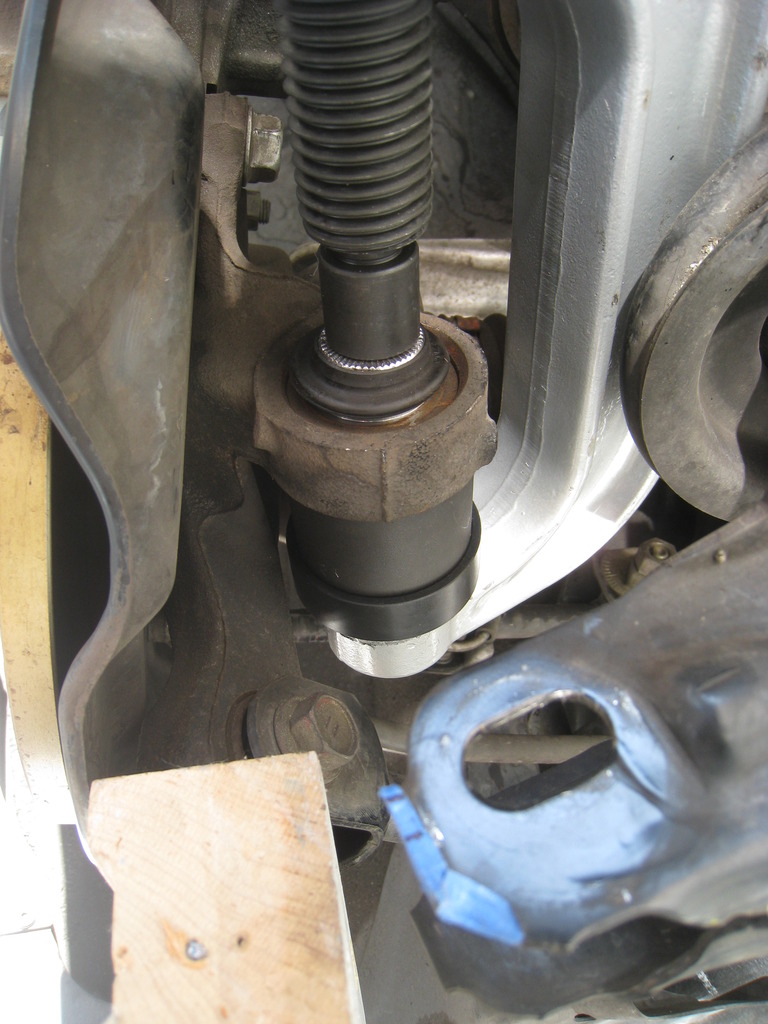
First, I pressed out the old bushing:
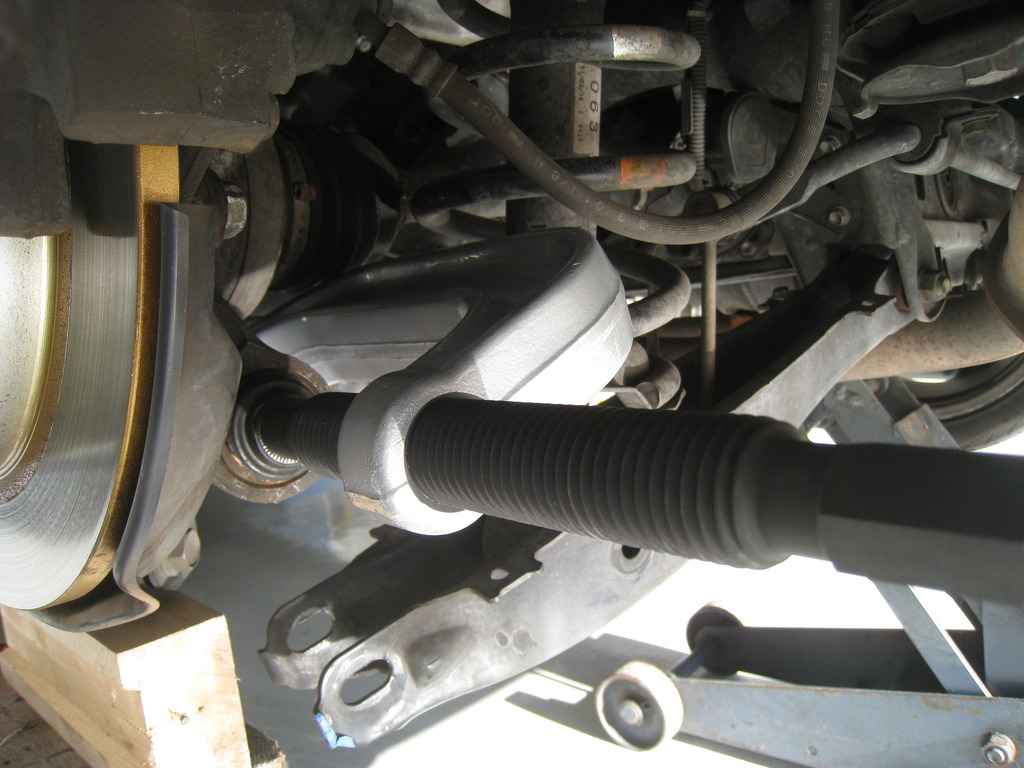
It pressed out quite easily, which tells me that a gear puller probably would have worked just fine too. Here is another view with the bushing nearly out:
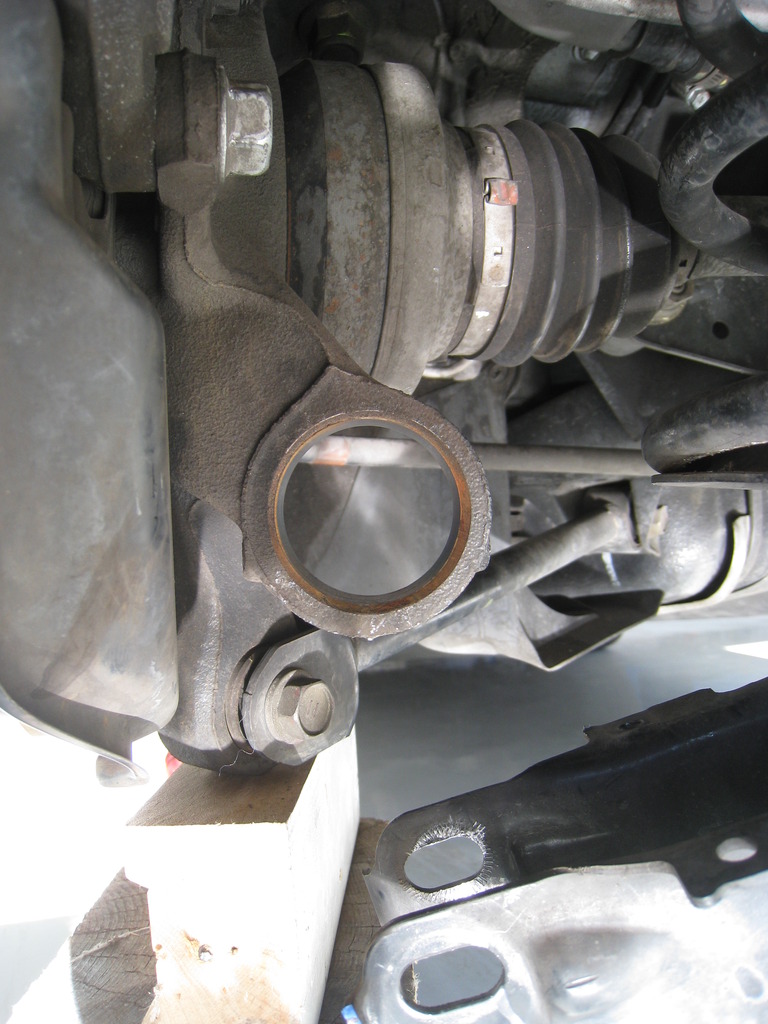
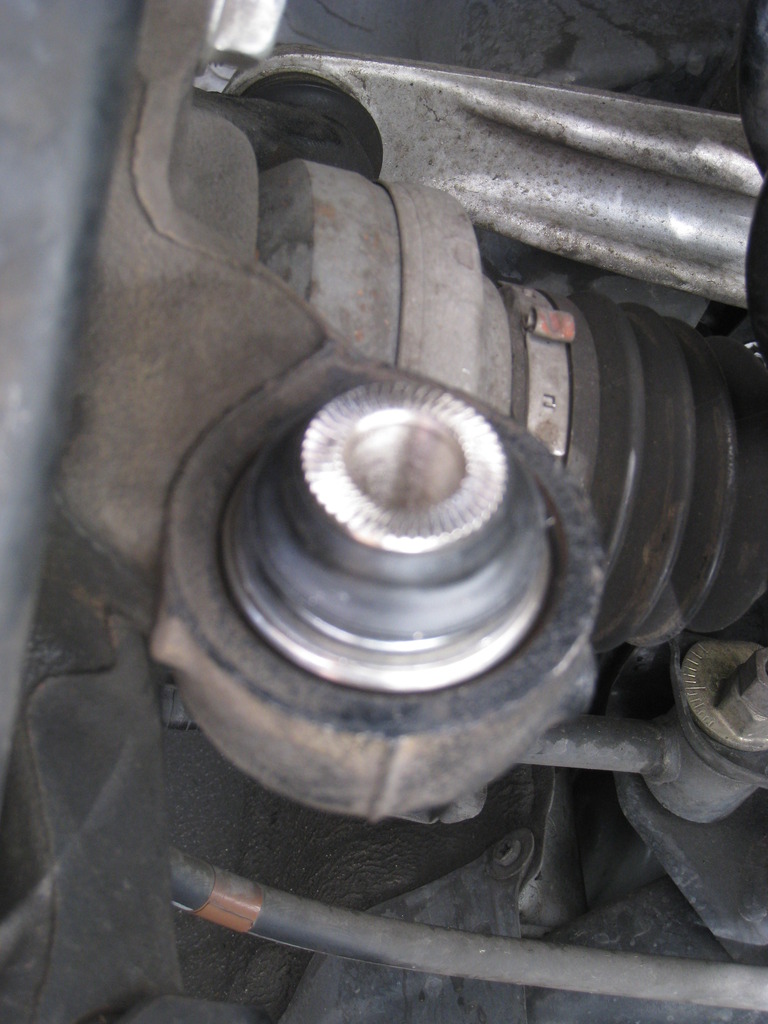
Here is how things look with the bushing out:
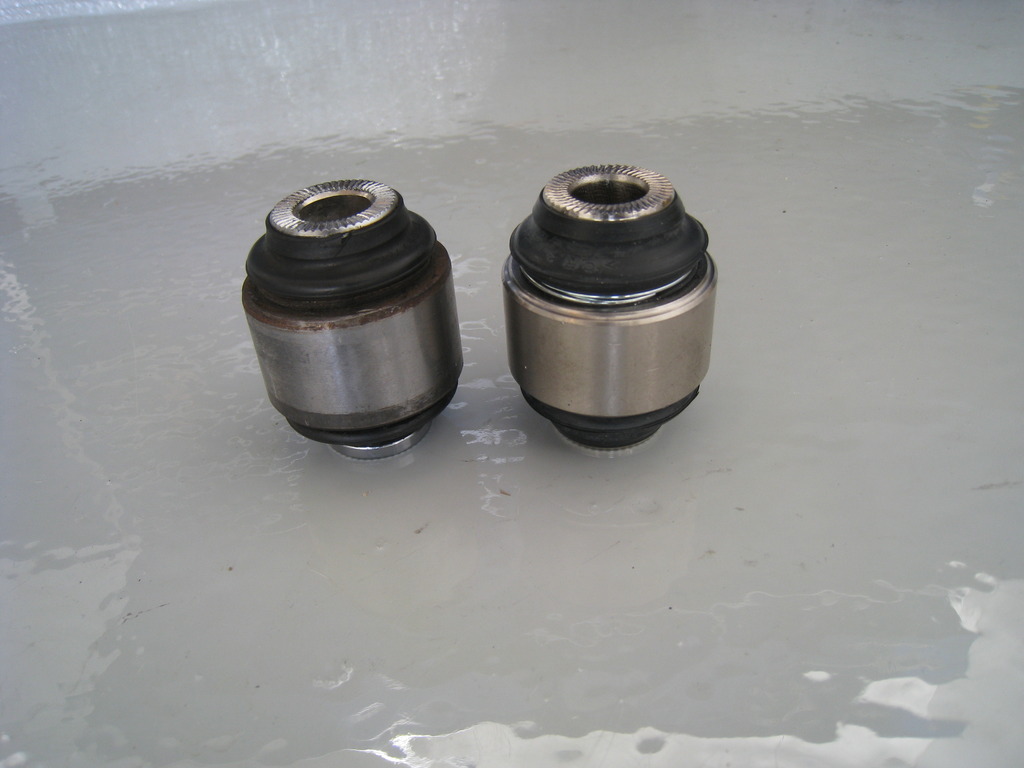
Here are the old and new bushings side by side:
I gave a light coat of oil to the axle carrier, and started pressing the new bushing in (note the 30mm socket ).
).
It went in very easily, here is the installed bushing (sorry about the focus):
I reinstalled all the bolts that I removed, being careful to line up the camber bolt with the previous marks. I then torqued the shock and the camber bolts to 81 ft-lbs, and the stabilizer bolt to 22 ft-lbf. Then I reinstalled the plastic arm cover with the two 10mm bolts. Repeat for the other side, and that is that, easy. Took me about two hours from start to finish, and no more clunking!
Hope this helps you guys.
My symptom of bushing wear was constant clunking from the rear. I checked balljoints, suspension arm bushings, shock bolts, stabilizer bolts- nothing. Finally, when I was just about to give up, I jacked up the rear end one last time and shook the tire while holding it at 6 and 12 positions - and could clearly hear the clunking! I had my buddy look while I was shaking the tire, and we saw a good 1/8" of play where the axle carrier met the lower suspension arm. There is a "bushing" at that location, which is actually a spherical bearing.
I would say that by far the biggest challenge in this DIY is not the actual job, it's the task of finding replacement bushings! Naturally you cannot buy just the bushings from Lexus, you have to buy the entire axle carrier (~ $215 each). And if you went that route, you will probably also need new rear wheel bearings (~ $60 each), since you are likely to damage the old ones during separation of the axle from the axle carrier. So, you would be looking at almost $600 worth of parts to replace two measly bushings. To make matters worse, this was looking like a full weekend worth of work, something I did not feel like taking on at this point.
So I started looking for alternate solutions. I found a couple of options from browsing this forum - one was from an ebay seller in England (Martin?), who used an all poly bushing. But his bushing did not have any material at the ends, which allowed the control arm to float back and forth. I did not like that at all. I also touched base with a poster here, Diamondmit, who designed his own (improved) solution - also all-poly, but with end "donuts" added, to keep the arm stable. I still preferred the OEM type spherical bearing, but was going to go with Dave's idea when by sheer luck another poster (1nz) posted a picture of the bushing I needed, from The Mount Shop's website:

I knew that the shape of the bushing was right, and after taking some measurements, I was able to confirm that the dimensions shown were right too. All I had to do now was get the bushings, but I could only find them on The Mount Shop's website, and they are in New Zealand! 1nz (who is also in NZ) was kind enough to offer to pick some up for me and send them to me, but by this time I figured out what car these were for - an IS200, or the Altezza. Another evening's worth of Googling, and I found an ebay seller who was selling something similar- http://myworld.ebay.com/irl_car_parts. Granted, these are not OEM, they are Chinese made, but what isn't these days? The seller said he sold hundreds of them and never had a problem. They were about $120 delivered. He doesn't show any more of them available, but I believe he can get access to more if you ping him. He lists these bushings as "REAR STUB AXEL BUSH IS200 / ALTEZZA", so ask for those.
*****2020 Update - looks like an option for finding these bushings is at https://febestparts.com/REAR_KNUCKLE.../TAB-124Z*****
Anyway, I finally got my bushings, and started the project yesterday. I started by jacking up the rear end and supporting the car with jackstands. The first thing you have to remove is the rear suspension arm cover - a plastic piece held with 2 10mm (head size) bolts: (the photo only shows one bolt, the other one is nearby)

The next photo shows the three main fasteners you need to remove on the lower control arm (from right to left) - the stabilizer link bolt (12mm), the shock bolt (19mm), and the camber bolt, which is where the bushing that we are going to replace is (19mm):

Before removing the camber bolt, I marked its orientation with a sharpie, to ensure proper alignment on reassembly:

Here are all the fasteners and the cover removed:

Now the arm and axle carrier easily come apart, you can see the bushing on the left:

I pried the axle carrier up a little with a wooden block, to give me more working room:

I've seen other tutorials where the bushing is hammered out, but that seemed somewhat brute force. I also was told that the bushing can be removed with a regular gear puller, but I wanted to try out my new toy, the OTC Balljoint Press kit ( ). Here is a photo of what you get:

I looked around for sleeves that would serve as pushers and receiving tubes; in the end, I had to use a 30mm socket as the pusher, because nothing in the kit worked for this bushing
.First, I pressed out the old bushing:

It pressed out quite easily, which tells me that a gear puller probably would have worked just fine too. Here is another view with the bushing nearly out:

Here is how things look with the bushing out:

Here are the old and new bushings side by side:

I gave a light coat of oil to the axle carrier, and started pressing the new bushing in (note the 30mm socket
).
It went in very easily, here is the installed bushing (sorry about the focus):

I reinstalled all the bolts that I removed, being careful to line up the camber bolt with the previous marks. I then torqued the shock and the camber bolts to 81 ft-lbs, and the stabilizer bolt to 22 ft-lbf. Then I reinstalled the plastic arm cover with the two 10mm bolts. Repeat for the other side, and that is that, easy
. Took me about two hours from start to finish, and no more clunking!Hope this helps you guys.
Last edited by lyonkster; 11-01-20 at 07:51 AM.

The following 2 users liked this post by lyonkster:
bryceis250 (06-30-19),
davintosh (04-29-23)

 10-03-11, 06:21 AM
#4
Advanced
Thread Starter
http://youtu.be/p5KF52MfD0M
Last edited by lyonkster; 10-03-11 at 12:32 PM.


The following users liked this post:
Hambone63 (04-17-24)
Trending Topics
10-03-11, 09:29 PM
#8
http://www.ebay.com/itm/REAR-STUB-AX...75715490169971
 10-04-11, 03:48 PM
#10
Advanced
Thread Starter
10-04-11, 04:27 PM
#11
Like I said, getting the parts is 80% of the battle. If the ebay seller no longer has them, you can try these guys in NZ: http://www.mountshop.co.nz/
10-05-11, 07:01 AM
#12

no he did not....
i emailed him yesterday....i dont need the bushing ATM but i wouldnt mind keeping a pair on hand since they hard to come by plus it seems easy enough i would go ahead and do it myself
GREAT write up BTW, mods can we sticky?
so after a few days driving, any issues?
GREAT write up BTW, mods can we sticky?
so after a few days driving, any issues?
10-05-11, 07:24 AM
#13
Advanced
Thread Starter
plus it seems easy enough i would go ahead and do it myself
so after a few days driving, any issues?
10-05-11, 09:28 AM
#14
only thing stopping me would be the OTC 6529 Car Ball Joint Service Kit that price is crazy, i wonder if i could borrow my mechanics or rent one. i saw you used a 30mm to push the bearing in/out so essentially i wouldn't even need the ball joint kit? any thoughts that since these slide in/out so easily its not the right bushing? you didnt happen to put a micrometer on the bushing and on the inside of the rear spindle (or axle carrier) i guess would be the best description? a digital one would probably be best here
im STILL waiting on the guy from ebay to email me back....
so which bushing if you had access to all of them would you have preferred?
37h125 from the mountshop (i tried to register but wth do i have to register to get a price, and who was the member in NZ i might see if they could pick me up a set if all else fails)
the one from ebay you did get (which im waiting to hear about)
or the one from diamondmit
10-05-11, 09:49 AM
#15
Lexus Champion
iTrader: (18)

Join Date: Nov 2005
Location: Southern Ca
Posts: 1,759
Likes: 0
Received 0 Likes
on
0 Posts
Thank you lyonkster for posting this and helping the community out with the source on where to get them.
My squeakings are for sure this part, ever since I lowered and put my car back to stock. Now it's been squeaking really obnoxiously loud where I can not cruise in my school parking lot without having the whole school turn around looking at me.
I too, emailed the ebay seller and I am still waiting for a reply from him. It really sucks that Lexus or any other US aftermarket manufacturer doesn't sell this specific bushing. I was getting ready to shell out about $450 bucks for new rear axle carrier assembly from Sewell Lexus, until vwynn linked this to me via facebook.
I am starting to wonder if these can be made by maybe FIGS Engineering and turning it into a full on spherical bushing replacement instead of the OEM bushing type. Are maybe some other motor mount company to make any reinforced products in replacement of the OEM versions.
Also wanted to point out to everyone else who has been posting up this link....
http://www.rhdjapan.com/trd-rear-low...0-jzs161-17917
They are the wrong bushings. I just received mines and was getting ready to change out the bushings (rear axle carrier/knuckle) and found out that those bushings from RHD Japan are for your Rear Lower Control Arm inner bushings (the one that mounts up to your rear sub frame).
Dara