SC430 Timing Belt Installation Notes
 09-28-07, 03:38 PM
#1

Got around to replacing the timing belt in the SC. A pretty straightforward job and I added some notes and pics to assist those that would either like to do things themselves and/or save the $700+ dollars. This is more of a reference thread in order for others in the future to refer to as I doubt many will read it and then want to run out and do this.
WARNING! An improper timing belt installation will result in severe engine damage. Do not attempt if you are not comfortable and skilled to tackle such a task.
This is not a 100% detailed installation post but will guide those that already have some level of automotive repair background.
A few notes:
1) The radiator DOES NOT have to be removed though the fan shroud assembly should be (10 minutes max)
2) Align the timing marks BEFORE removing the old belt.
3) A powerful impact wrench is highly recommended. No more than 7 3/4" long.
4) Time, 4 hours for those with the right tools and experience, 8-9 hours for the novice.
5) Since your in there ,might as well change the water pump.
6) Recommend replacing the tensioner rollers as well. Two of them (not pictured below).
Recommended tools:
1) 14mm,12mm ,22m, 10mm sockets.
2) 17mm, 14mm open end wrenches
3) Vice
4) Powerful impact wrench
5) Gear puller
6) Small allen wrench
The number one question I get to this day from my GS days is ,"How do I remove the crankshaft bolt?" My answer: Use a compact and powerful impact wrench-see below. Keep in mind that the bolt should be torqued back on so one should be familiar with the torque settings on the impact wrench.
The belt I am using is a Goodyear GatorBack timing belt: part number #40298. Cost me around $22.00 with shipping ( I get discounts, don't ask).
Anyhow, here are some pictures with a few notes. Feel free to ask any questions.
Line up the crank pulley first.
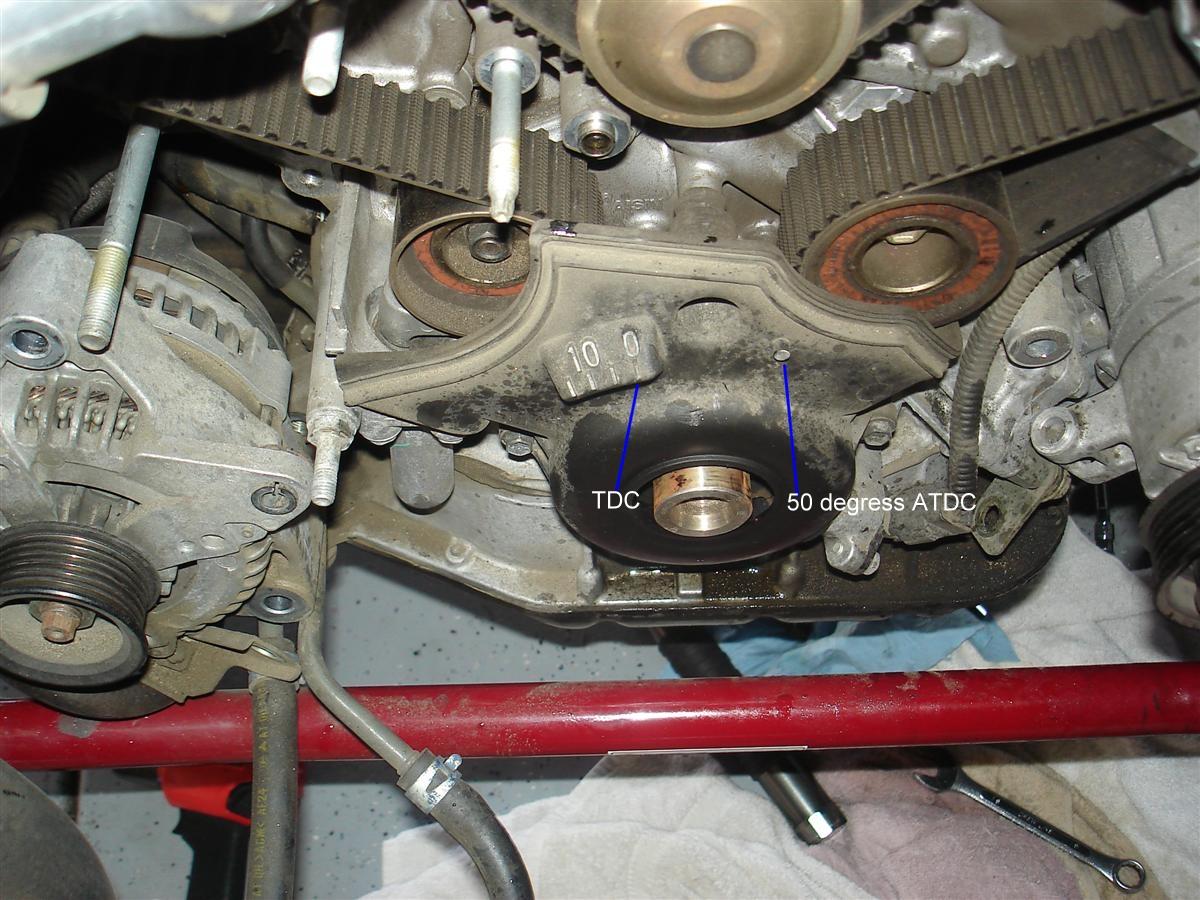
Timing marks:
Two ways to do this. This is where it gets confusing:
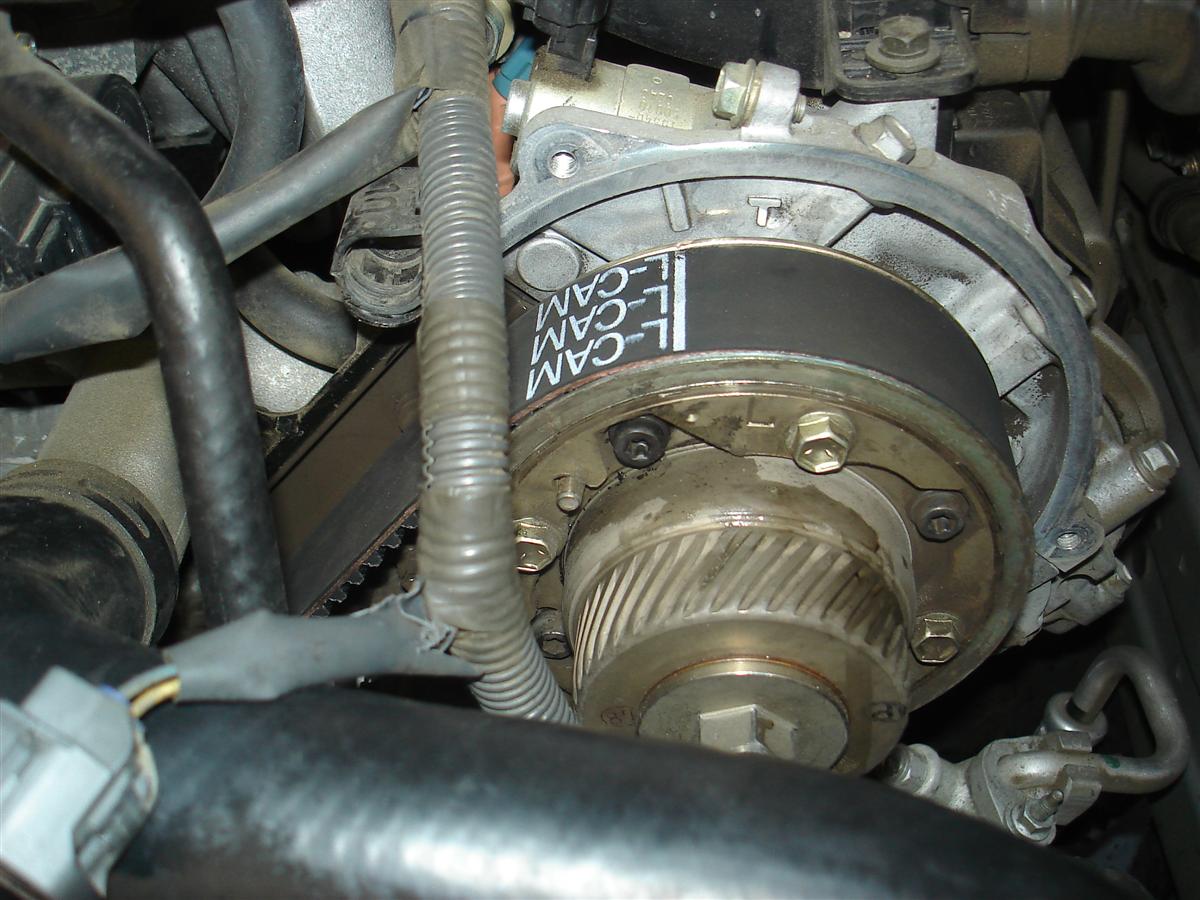
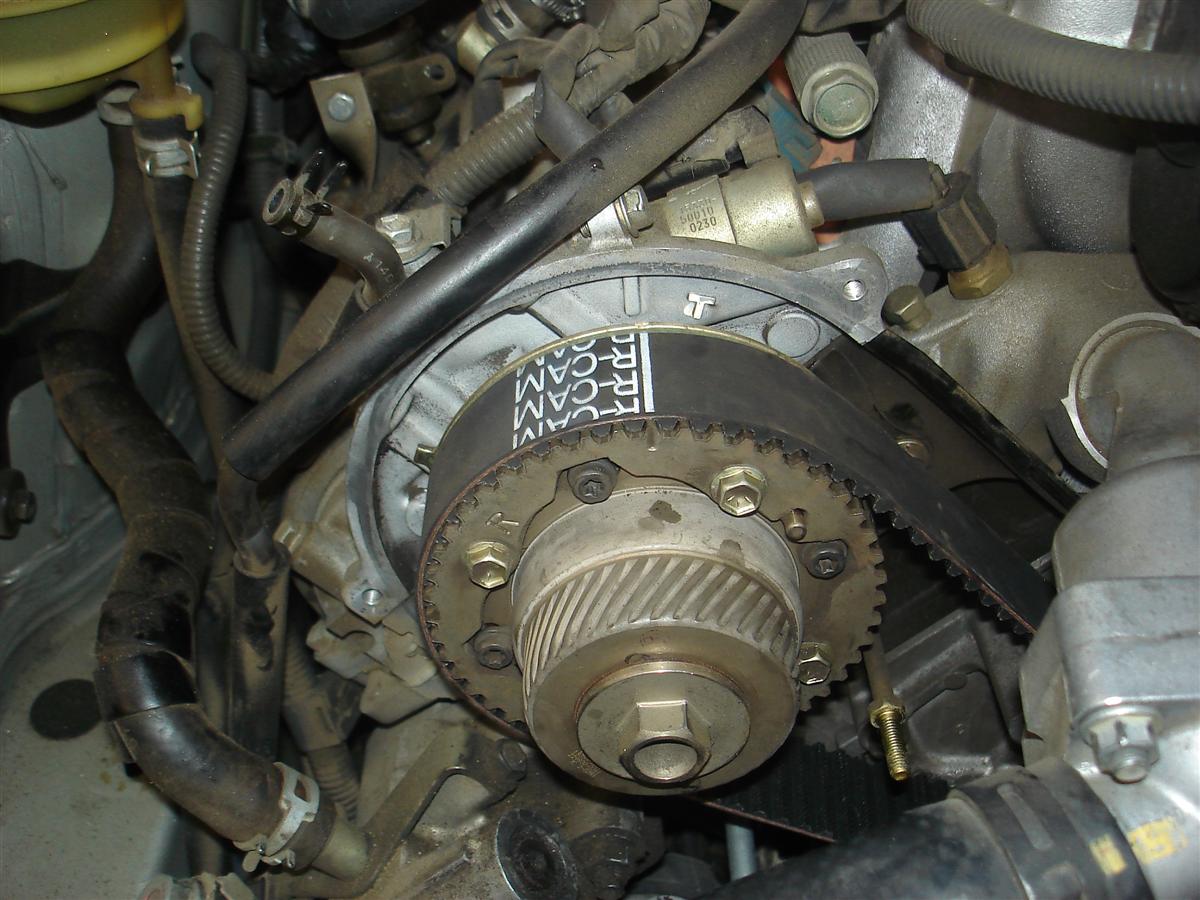
Lexus method: as the motor sits at TDC the left camshaft (as you sit in the car) is spring loaded and can (will) spring counter clockwise with the timing belt removed with very little effort.
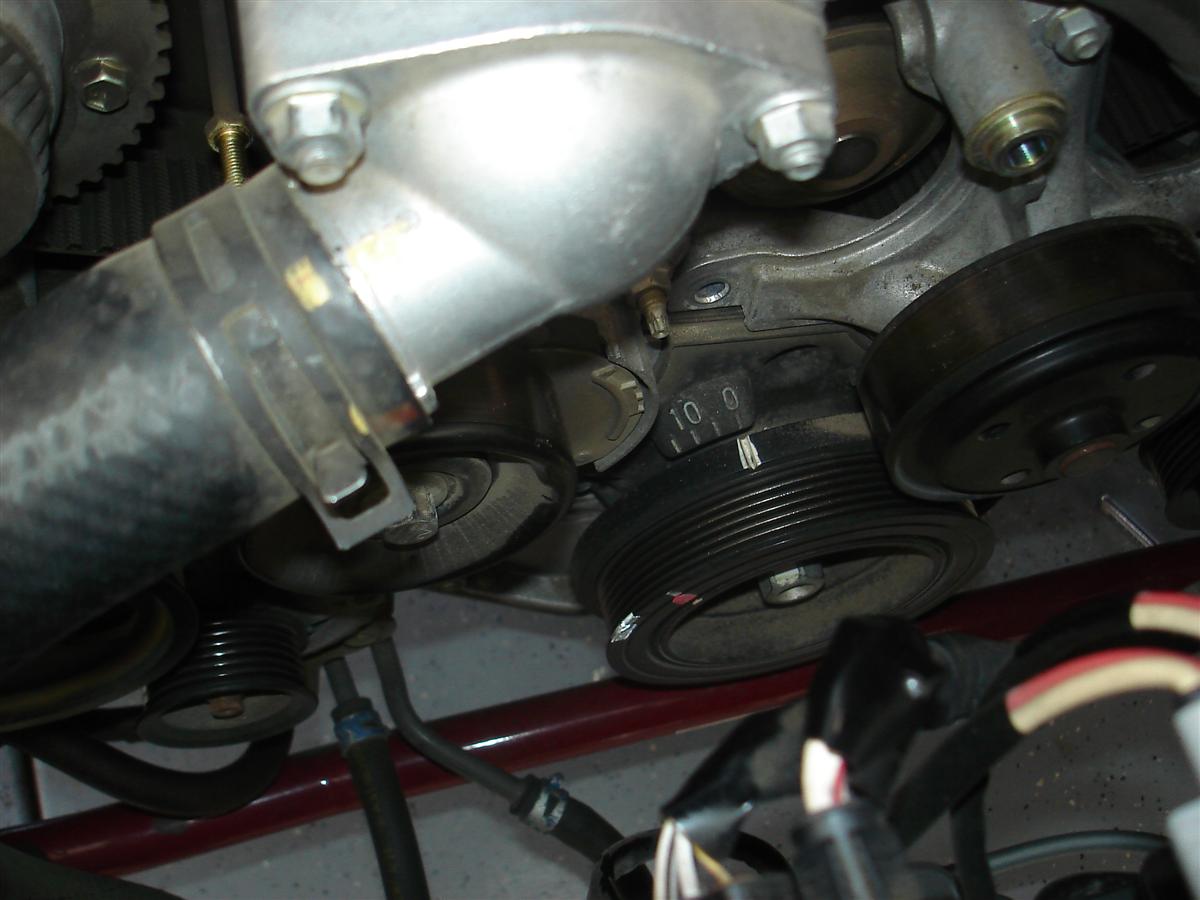
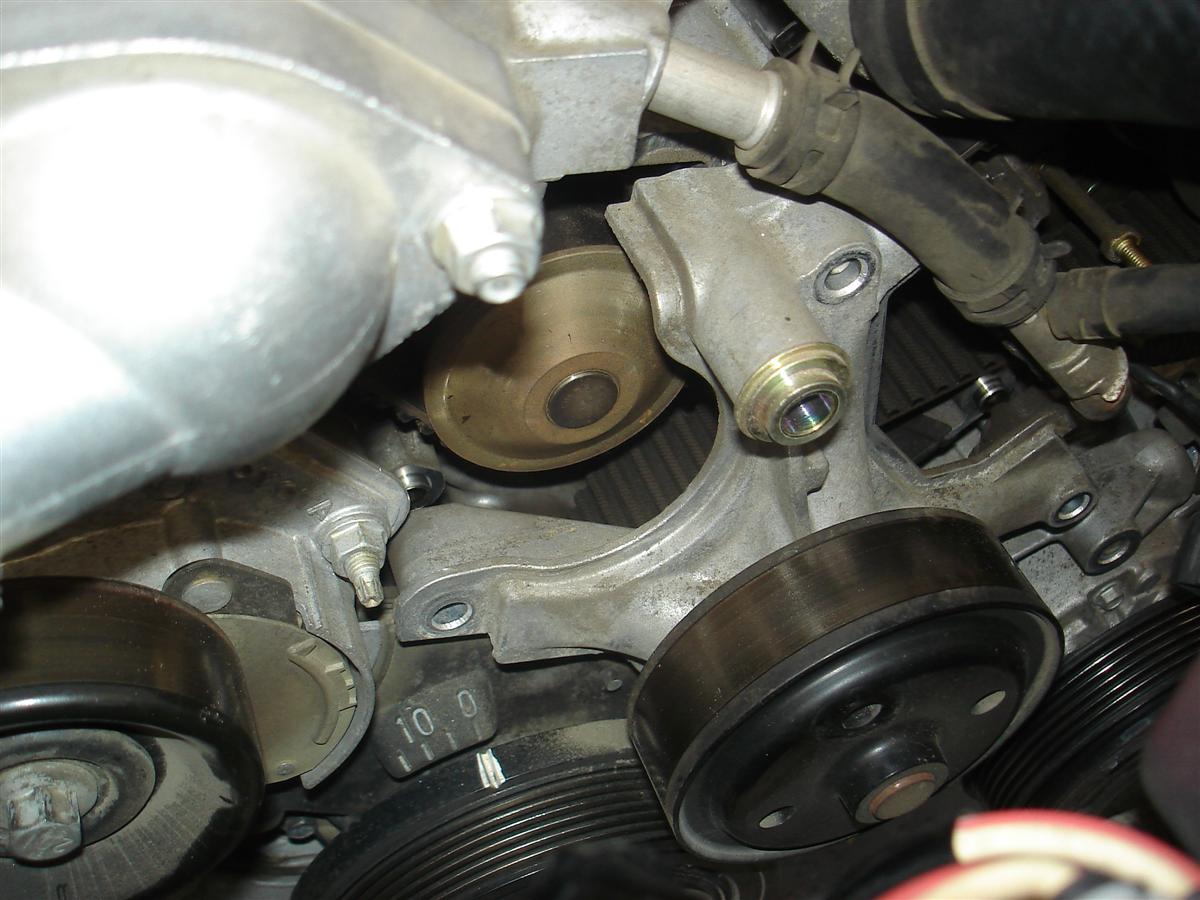
TDC means the marks on the camshaft line up with the I on the housing of the camshafts (as seen in pics) and the dots on the crank pulley match the dot on the oil pump (see below) and the harmonic balancer notch is on 0. To prevent this spring loaded camshaft from moving, Lexus calls out to place the notches on the camshaft on the T and the crank pulley 50 degrees ATDC. This is marked on the plastic cover with a dot (see pic). This is to remove the belt and also keeps the camshafts in place where they are not prone to moving with the slightest pressure. Once the belt is removed then move the gears manually and individually over to TDC which is I on the camshafts and notch to notch for the crank pulley. The reason for this is that there is no mark on the oil pump for 50 degrees, only for TDC.
Some prefer to line up everything on the I from the start and finish that way and not move the gears individually. The choice is yours.

Same for the right side.
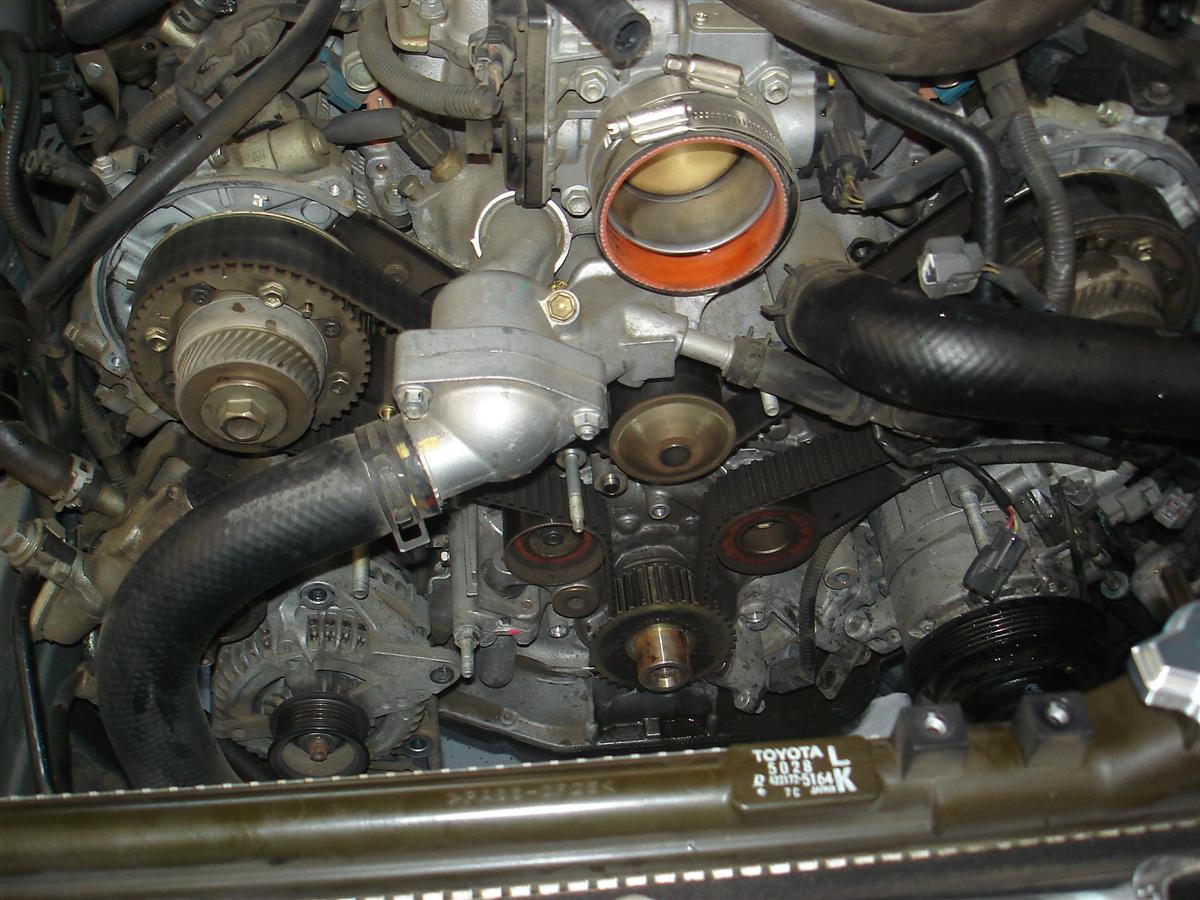
Engine pic
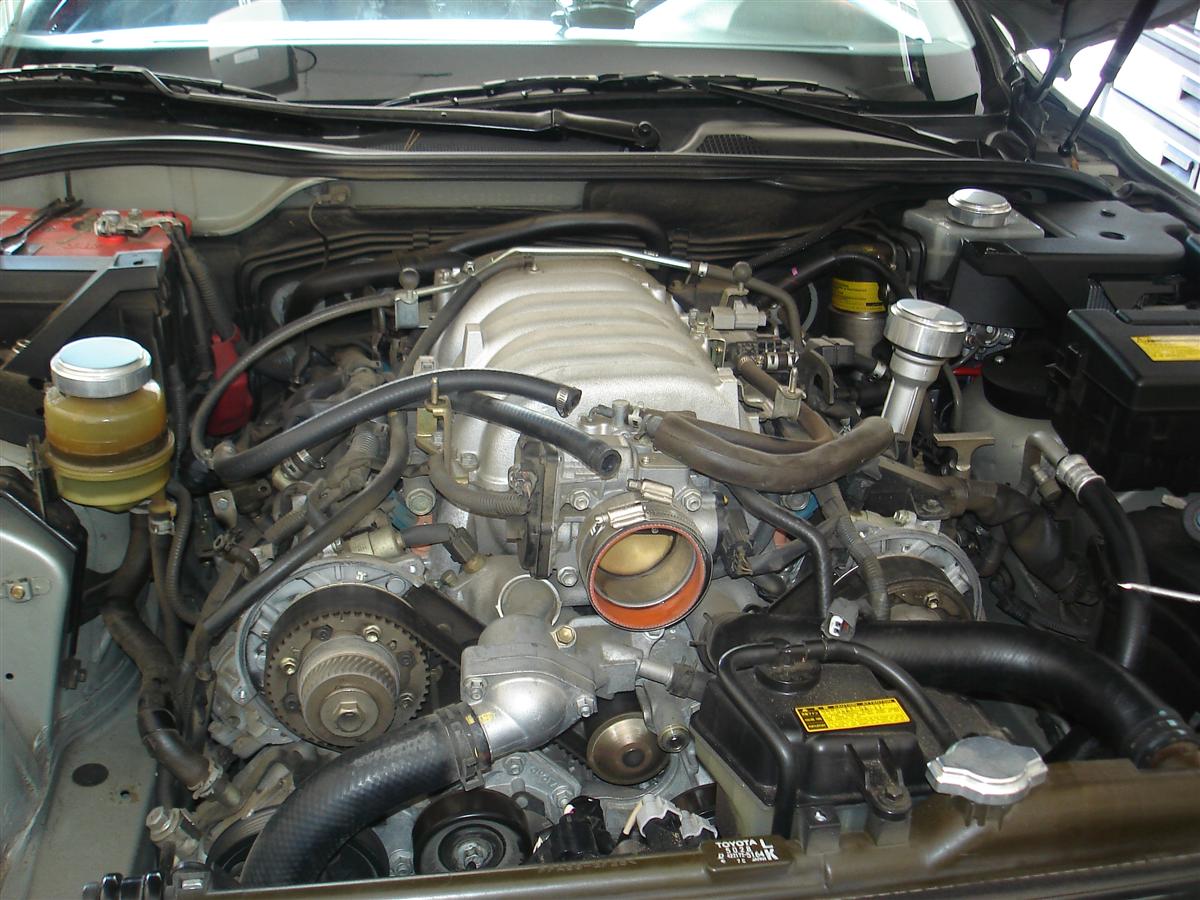
A/C compressor does not need to be removed, just moved out of the way. 3 bolts hold in in place.

Removing the idler pulley bracket
Remove the power steering pulley to allow the alternator to be moved out of the way. This is needed to remove the bracket behind.

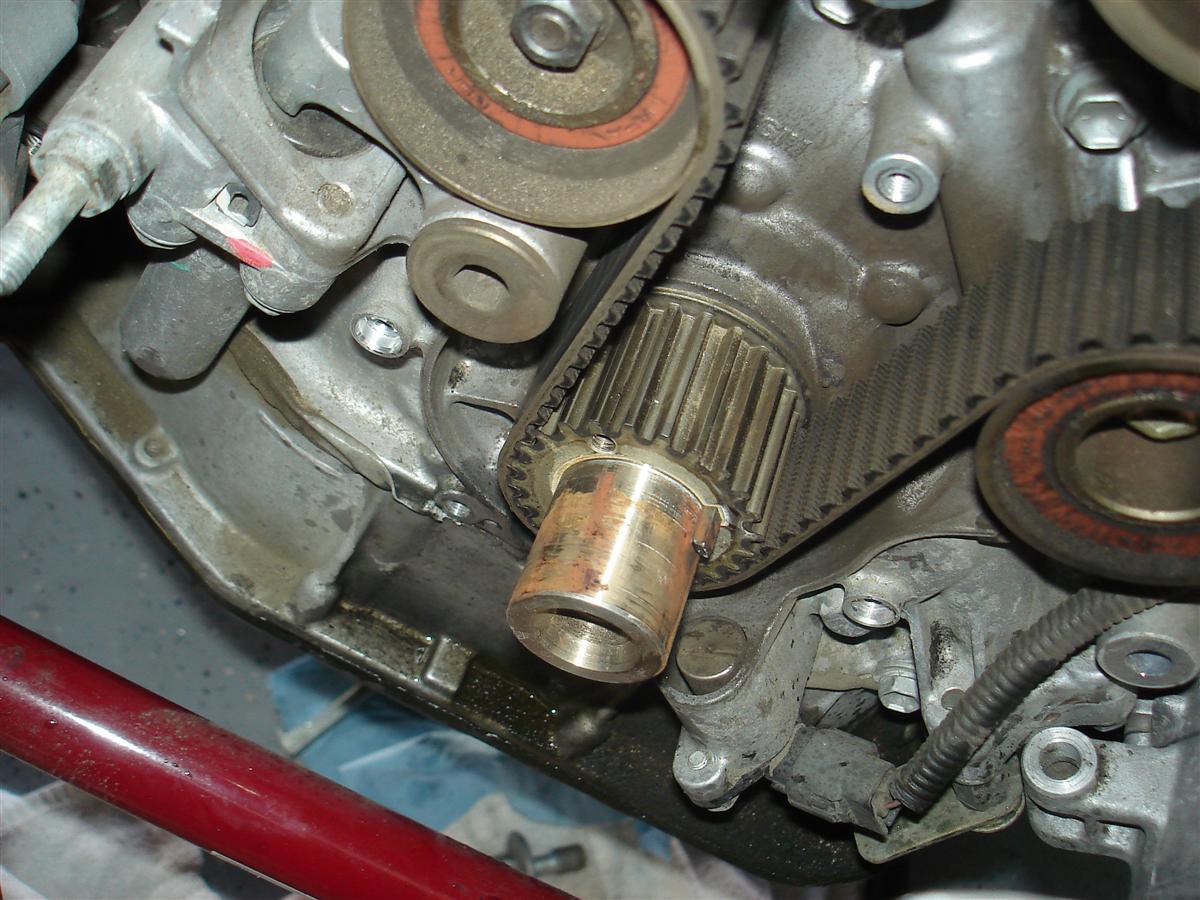
OK, this is the big one. Note: Take no shortcuts here. Some try to wedge something into the flexplate gear located in the bellhousing. There is potential to cause damage and that is one thing you do not want to have to repair as the labor involved is more than the timing belt.
The Lexus repair manual calls for a special tool (read: expensive) that attaches to the pulley. Again- not my cup of tea as one would still have to use a breaker bar and much force to loosen the bolt.
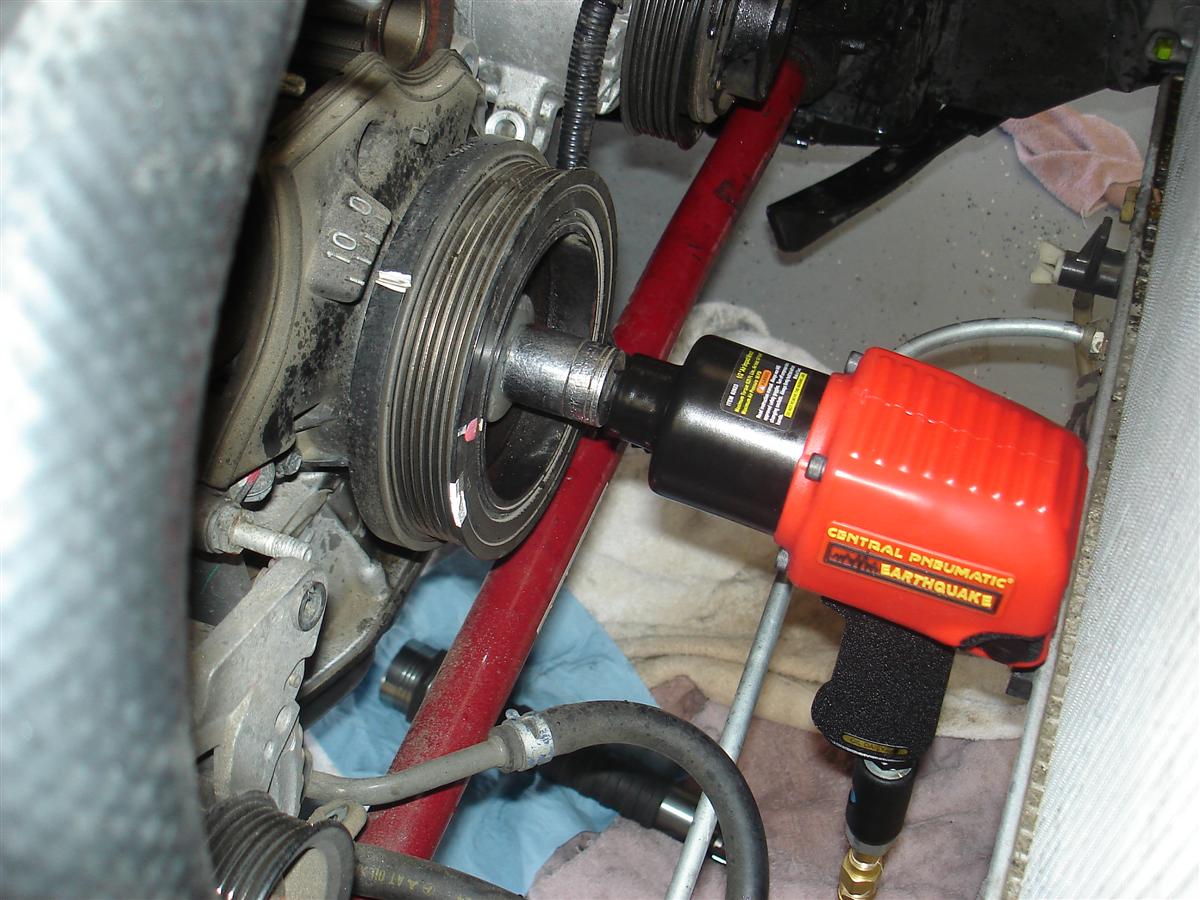
My method: One big bad impact wrench.
In this case I used a very nice Central Pneumatic Earthquake 1/2" with 625lbs of max torque at 90psi( I recommend this). I ran it at 130psi. Shhhh, don't tell them as anything over 90psi is not covered by warranty so says the little card in the box.
I am normally a Ingersoll Rand fanboy but this thing is awesome. Available on sale from Harbor Freight for $80.00! The crank bolt came loose within 1 second. Note: There is very little clearance between the back of the impact and the radiator-look at the pic. Do not try to remove the crank pulley all of the way or the impact will wedge into the radiator. Just loosen it. The benefit of using this method is that it works, it is much safer vs the other methods, does not move the pulleys, and requires very little effort on my part. In other words, I'm tired, lazy, and just want the tools to do the work for me.
Look at the photo and notice the timing marks are not lined up. This is for a pose shot showing the impact wrench in place as well as showing the available room between it and the radiator. Obviously I am not going to hold a camera in one hand and remove the bolt with the other. This was just a pose shot taken before the bolt was actually removed. Once lined up the pulley will not move with a high torque gun.
 +-
+-
WARNING! An improper timing belt installation will result in severe engine damage. Do not attempt if you are not comfortable and skilled to tackle such a task.
This is not a 100% detailed installation post but will guide those that already have some level of automotive repair background.
A few notes:
1) The radiator DOES NOT have to be removed though the fan shroud assembly should be (10 minutes max)
2) Align the timing marks BEFORE removing the old belt.
3) A powerful impact wrench is highly recommended. No more than 7 3/4" long.
4) Time, 4 hours for those with the right tools and experience, 8-9 hours for the novice.
5) Since your in there ,might as well change the water pump.
6) Recommend replacing the tensioner rollers as well. Two of them (not pictured below).
Recommended tools:
1) 14mm,12mm ,22m, 10mm sockets.
2) 17mm, 14mm open end wrenches
3) Vice
4) Powerful impact wrench
5) Gear puller
6) Small allen wrench
The number one question I get to this day from my GS days is ,"How do I remove the crankshaft bolt?" My answer: Use a compact and powerful impact wrench-see below. Keep in mind that the bolt should be torqued back on so one should be familiar with the torque settings on the impact wrench.
The belt I am using is a Goodyear GatorBack timing belt: part number #40298. Cost me around $22.00 with shipping ( I get discounts, don't ask).
Anyhow, here are some pictures with a few notes. Feel free to ask any questions.
Line up the crank pulley first.
Timing marks:
Two ways to do this. This is where it gets confusing:
Lexus method: as the motor sits at TDC the left camshaft (as you sit in the car) is spring loaded and can (will) spring counter clockwise with the timing belt removed with very little effort.
TDC means the marks on the camshaft line up with the I on the housing of the camshafts (as seen in pics) and the dots on the crank pulley match the dot on the oil pump (see below) and the harmonic balancer notch is on 0. To prevent this spring loaded camshaft from moving, Lexus calls out to place the notches on the camshaft on the T and the crank pulley 50 degrees ATDC. This is marked on the plastic cover with a dot (see pic). This is to remove the belt and also keeps the camshafts in place where they are not prone to moving with the slightest pressure. Once the belt is removed then move the gears manually and individually over to TDC which is I on the camshafts and notch to notch for the crank pulley. The reason for this is that there is no mark on the oil pump for 50 degrees, only for TDC.
Some prefer to line up everything on the I from the start and finish that way and not move the gears individually. The choice is yours.
Same for the right side.
Engine pic
A/C compressor does not need to be removed, just moved out of the way. 3 bolts hold in in place.
Removing the idler pulley bracket
Remove the power steering pulley to allow the alternator to be moved out of the way. This is needed to remove the bracket behind.
OK, this is the big one. Note: Take no shortcuts here. Some try to wedge something into the flexplate gear located in the bellhousing. There is potential to cause damage and that is one thing you do not want to have to repair as the labor involved is more than the timing belt.
The Lexus repair manual calls for a special tool (read: expensive) that attaches to the pulley. Again- not my cup of tea as one would still have to use a breaker bar and much force to loosen the bolt.
My method: One big bad impact wrench.
In this case I used a very nice Central Pneumatic Earthquake 1/2" with 625lbs of max torque at 90psi( I recommend this). I ran it at 130psi. Shhhh, don't tell them as anything over 90psi is not covered by warranty so says the little card in the box.
I am normally a Ingersoll Rand fanboy but this thing is awesome. Available on sale from Harbor Freight for $80.00! The crank bolt came loose within 1 second. Note: There is very little clearance between the back of the impact and the radiator-look at the pic. Do not try to remove the crank pulley all of the way or the impact will wedge into the radiator. Just loosen it. The benefit of using this method is that it works, it is much safer vs the other methods, does not move the pulleys, and requires very little effort on my part. In other words, I'm tired, lazy, and just want the tools to do the work for me.
Look at the photo and notice the timing marks are not lined up. This is for a pose shot showing the impact wrench in place as well as showing the available room between it and the radiator. Obviously I am not going to hold a camera in one hand and remove the bolt with the other. This was just a pose shot taken before the bolt was actually removed. Once lined up the pulley will not move with a high torque gun.
+-
Last edited by Pearlpower; 04-30-10 at 06:42 PM.

The following users liked this post:
AT3618 (05-20-22)
09-28-07, 03:40 PM
#2
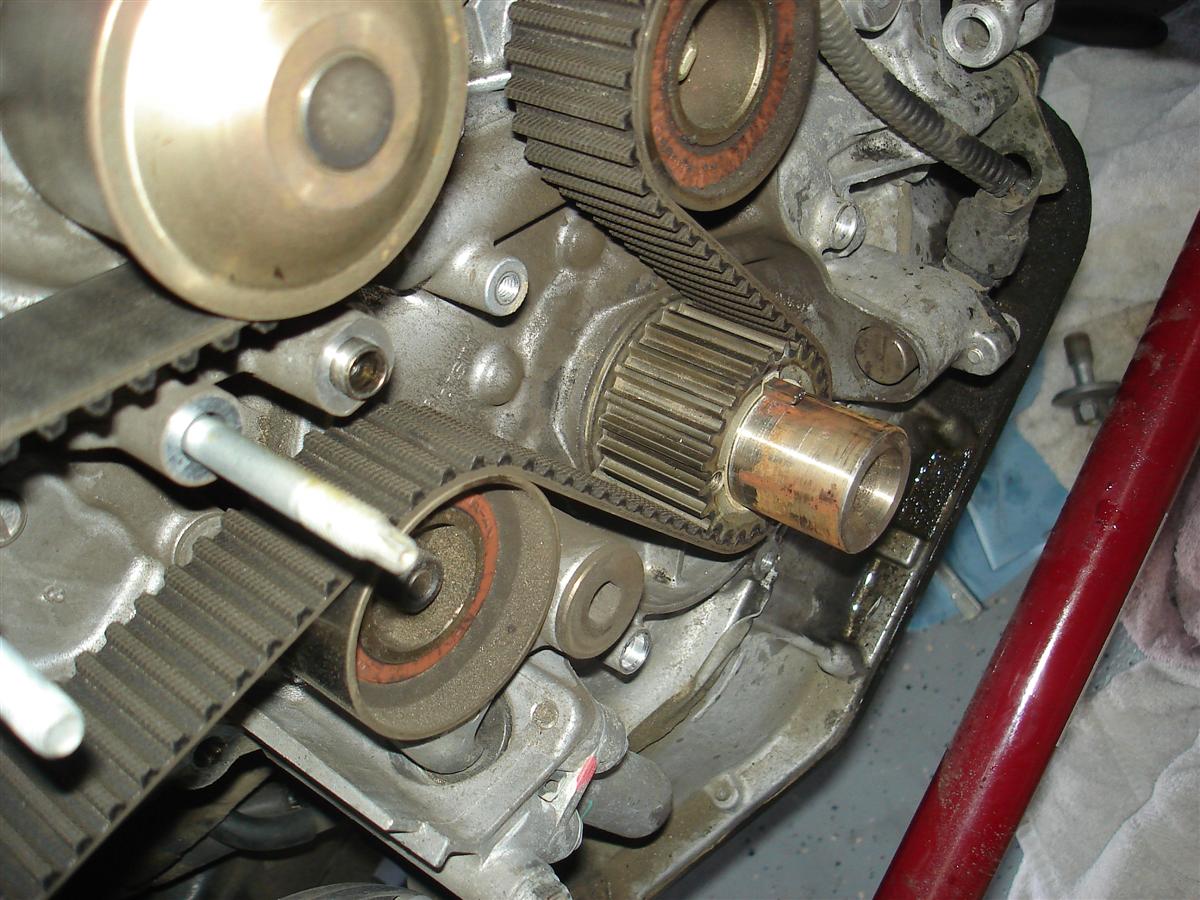
Overview with the cam covers and much of the front including the crank pulley removed.
Notice the rust on the crankshaft? A future mechanic will send you love if you use fine sandpaper and remove this plus it will make installing the pulley easier. Some crank pulleys will slide right off with some back and forth motion. Not this one as I needed to use a gear puller to remove it (not pictured).
Another angle
Came me weird but I always like to do a test fit of the new timing belt first to ensure it is actually the right belt before going any farther.
Left camshaft belt aligned. The mark on the belt should be dead on.
Right camshaft alignment. I moved it slightly to get the belt on.
Bottom of the new belt. Notice the belt has CR marked on it and this aligns with the dot on the crank pulley. Note: There are two marks on the pulley. One for the belt as pictured and one on top to line up with the oil pump mark.
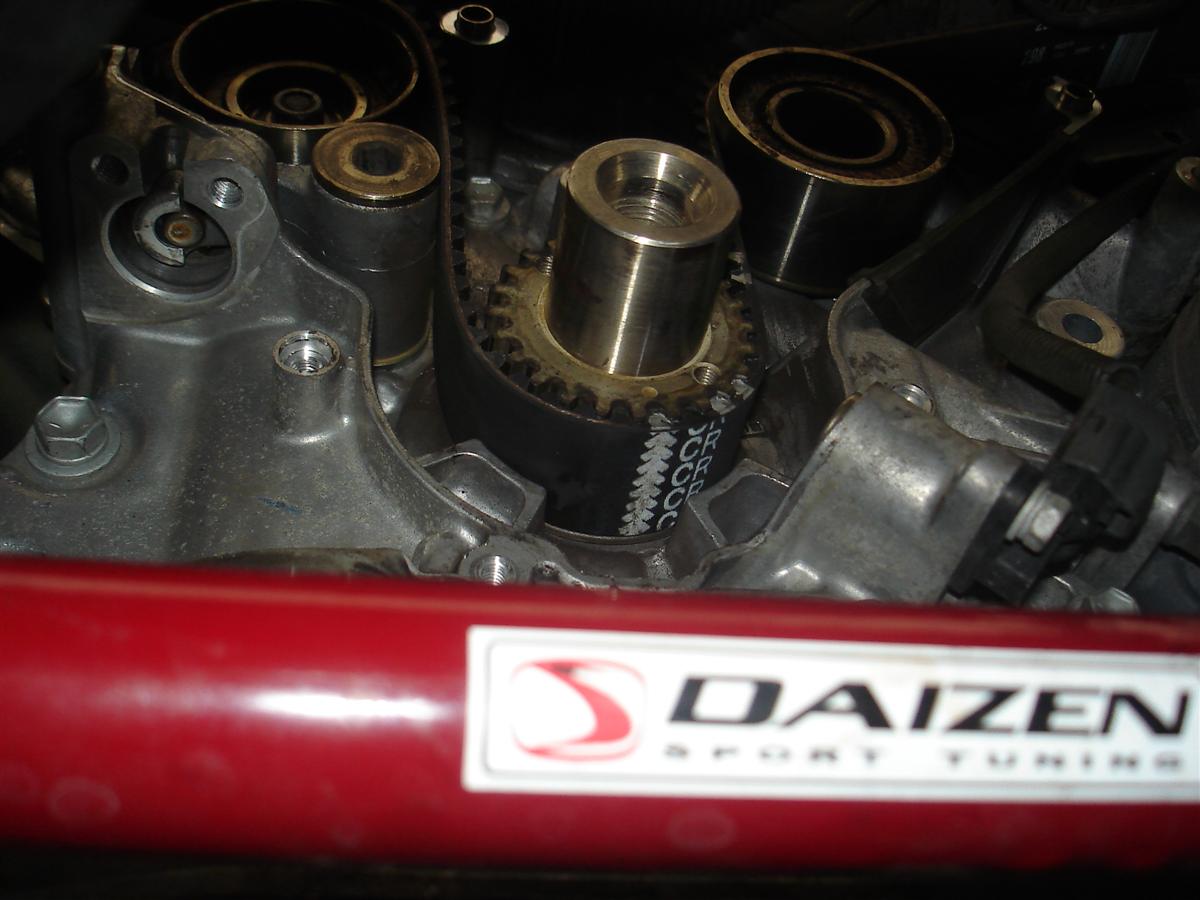
Notice the alignment mark (dot) on the upper right side of gear and oil pump. They must line up.
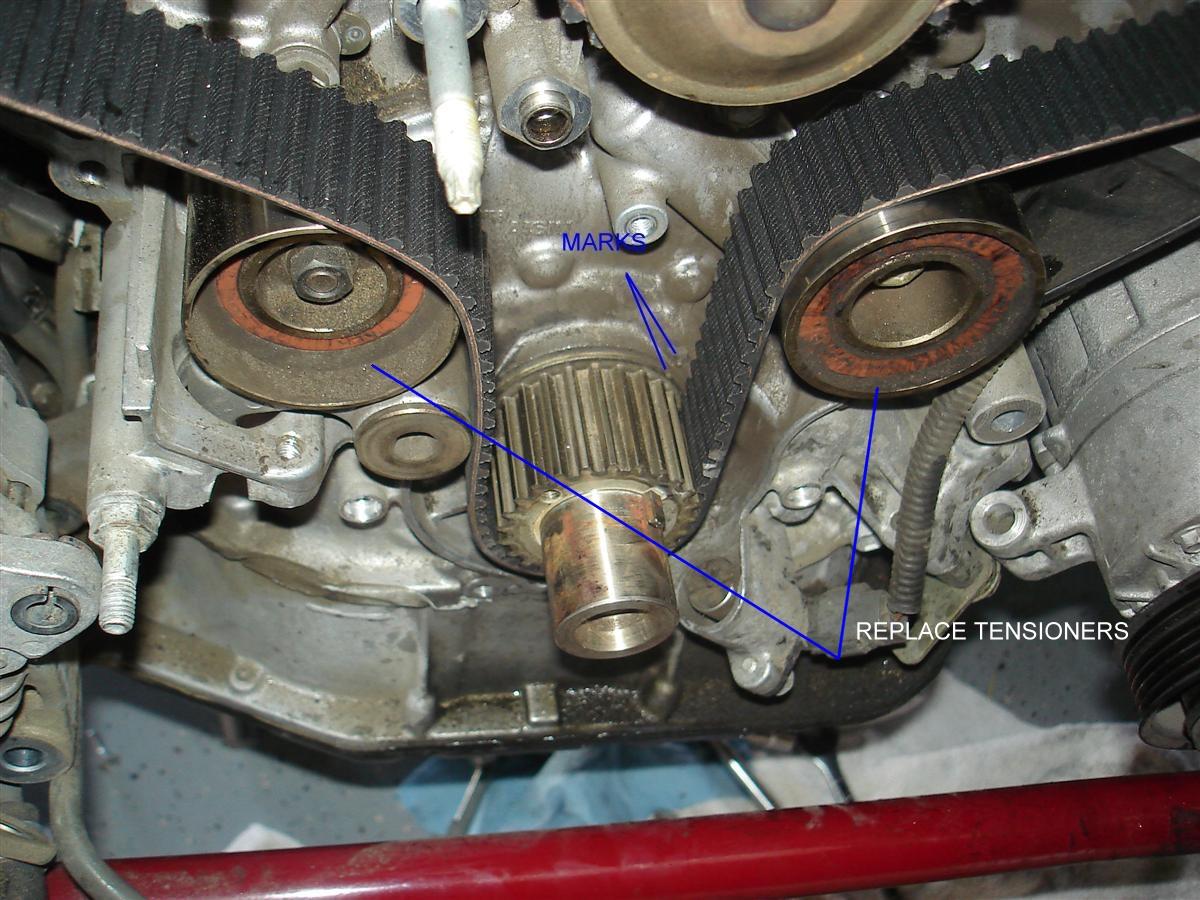
A vice is required to compress the tensioner rod back into place. Turn the vice slowly. Notice the holes on the rod and on the tensioner? They must line up exactly. Once aligned a tool is inserted to keep the rod in place. I used a small allen wrench.

Notice the rust on the crankshaft? A future mechanic will send you love if you use fine sandpaper and remove this plus it will make installing the pulley easier. Some crank pulleys will slide right off with some back and forth motion. Not this one as I needed to use a gear puller to remove it (not pictured).
Another angle
Came me weird but I always like to do a test fit of the new timing belt first to ensure it is actually the right belt before going any farther.
Left camshaft belt aligned. The mark on the belt should be dead on.
Right camshaft alignment. I moved it slightly to get the belt on.
Bottom of the new belt. Notice the belt has CR marked on it and this aligns with the dot on the crank pulley. Note: There are two marks on the pulley. One for the belt as pictured and one on top to line up with the oil pump mark.
Notice the alignment mark (dot) on the upper right side of gear and oil pump. They must line up.
A vice is required to compress the tensioner rod back into place. Turn the vice slowly. Notice the holes on the rod and on the tensioner? They must line up exactly. Once aligned a tool is inserted to keep the rod in place. I used a small allen wrench.
Last edited by Pearlpower; 04-30-10 at 06:50 PM.
The following users liked this post:
AceWright (04-16-22)
09-28-07, 03:50 PM
#3
Sorry for the blurred photo, but still, you can make out the allen wrench I used to secure the tensioner rod. Once the tensioner is bolted on the allen wrench is pulled out which allows the rod to apply tension to the timing belt arm.
Once the new timing belt in installed, rotate the crank 2 revolutions (1 for the cams) and ensure all of the marks line up where they should before starting the car. This is critical as if the timing is off while starting the car you will end up with bent valves. Rotating by hand will not bend valves and if the engine will not move manually then the timing is off.

These cannot go back in this dirty. Time for a paint job.

Much nicer

The finished product. Just picture a brand new belt in there. While things were out I figure it would be a good time to clean up everything.

Once the new timing belt in installed, rotate the crank 2 revolutions (1 for the cams) and ensure all of the marks line up where they should before starting the car. This is critical as if the timing is off while starting the car you will end up with bent valves. Rotating by hand will not bend valves and if the engine will not move manually then the timing is off.
These cannot go back in this dirty. Time for a paint job.
Much nicer
The finished product. Just picture a brand new belt in there. While things were out I figure it would be a good time to clean up everything.
Last edited by Pearlpower; 04-30-10 at 07:00 PM.
 09-29-07, 01:15 PM
#6
Timing belt is 90k. Nothing for the water pump as it is not considered a maintenance item. The belt is pretty stout on these V8 and can last much longer but to side with caution I recommend 80-90k. My other cars V8 is only good for 30k. Smaller belt and very sensitive.
I once saw an LS400 come in with 170k+ miles.After he was shown his timing belt he decided to get it done. He was actually missing a few teeth on his belt.
Had another friend tell the dealer that they were thieves for trying to push a timing belt change on his Honda. 6 months later the belt went and so did his motor. 2k+ later he was on the road with a new belt-and top end. He took back to the same dealer to fix it. I was not about to touch the car as he is a PITA to deal with when it comes to money which is what put himself in the situation to begin with.
After inspecting my old belt I noticed it had some cracks in it. I also drive harder than most and my car has a bit more HP than stock so I'm glad I changed it when I did.
Timing belt service is serious business and not something to take lightly for those wanting to put it off.
I once saw an LS400 come in with 170k+ miles.After he was shown his timing belt he decided to get it done. He was actually missing a few teeth on his belt.
Had another friend tell the dealer that they were thieves for trying to push a timing belt change on his Honda. 6 months later the belt went and so did his motor. 2k+ later he was on the road with a new belt-and top end.
He took back to the same dealer to fix it. I was not about to touch the car as he is a PITA to deal with when it comes to money which is what put himself in the situation to begin with.After inspecting my old belt I noticed it had some cracks in it. I also drive harder than most and my car has a bit more HP than stock so I'm glad I changed it when I did.
Timing belt service is serious business and not something to take lightly for those wanting to put it off.
Last edited by Pearlpower; 09-29-07 at 01:27 PM.
09-29-07, 01:59 PM
#7
Lexus Test Driver

Join Date: Mar 2007
Location: San Diego
Posts: 1,571
Likes: 0
Received 0 Likes
on
0 Posts
Ahh ok, I figured it was 90k miles on the belt. Thanks for the info. I completely agree with you on how important it is to change that belt, and have it done by someone who knows what they're doing.
Trending Topics
09-29-07, 09:06 PM
#8
Dear Mr. Pearlpower, Is your car interference or non interference engine? Okay, next question is whats the difference? Thanks for the great write up, But I still dont have the slightest clue what and how you did it. But thats just me. BTW, so you're changing your Tbelt at 30k Miles????
P.s. if anyone here on this forum wants to change my waterpump, I'll buy U an Iphone!
But thats just me. BTW, so you're changing your Tbelt at 30k Miles????P.s. if anyone here on this forum wants to change my waterpump, I'll buy U an Iphone!
09-29-07, 09:13 PM
#9
Lexus Test Driver
Join Date: Mar 2007
Location: San Diego
Posts: 1,571
Likes: 0
Received 0 Likes
on
0 Posts
Dear Mr. Pearlpower, Is your car interference or non interference engine? Okay, next question is whats the difference? Thanks for the great write up, But I still dont have the slightest clue what and how you did it. But thats just me. BTW, so you're changing your Tbelt at 30k Miles????
P.s. if anyone here on this forum wants to change my waterpump, I'll buy U an Iphone!
But thats just me. BTW, so you're changing your Tbelt at 30k Miles????P.s. if anyone here on this forum wants to change my waterpump, I'll buy U an Iphone!
09-29-07, 11:15 PM
#10
My car is actually approaching 90k miles though holds it's age well.
Here are some links of what happens on a incorrectly installed belt.
https://www.clublexus.com/forums/sho...ht=timing+belt
https://www.clublexus.com/forums/sho...ht=timing+belt
https://www.clublexus.com/forums/sho...+valves&page=2
Last edited by Pearlpower; 09-30-07 at 01:41 AM.
 12-30-07, 06:12 PM
#12
Lexus Test Driver

Search is my friend....
According to this thread, it looks like 80-90k miles is about right to change out the timing belt.
My baby just hit 60k and I'm gonna bring her in for the next major tune-up.
Pearlpower, is it a good idea to get the timing belt change out at my 60K as well rather than wait for the 80-90k miles?
thanks...teeman3
12-31-07, 09:17 AM
#14
Lexus Test Driver
cool, thanks pearlpower. I've haven't had any issues that I've noticed so looks like I'm good for another 30k on the original belt before changing it out.
thanks...teeman3
thanks...teeman3
04-30-10, 03:59 PM
#15
Driver School Candidate

Join Date: Apr 2010
Location: CA
Posts: 2
Likes: 0
Received 0 Likes
on
0 Posts
Sorry for the post resurrection, but I was wondering if anyone made a PDF of these instructions when the pics were here. The post is 3 years old, so I doubt the original poster still has the pics.
Otherwise, does anyone have this information documented somewhere else (link)? I have changed dozens of timing belts in the past, but each make/model has it's own specifics.
Thanks in advance. I'm a newbie here. I'm really impressed with the great amount of information on this site!
Otherwise, does anyone have this information documented somewhere else (link)? I have changed dozens of timing belts in the past, but each make/model has it's own specifics.
Thanks in advance. I'm a newbie here. I'm really impressed with the great amount of information on this site!