DIY: (w/pictures) Make your SC seatbelt dash light work with a Supra TT seat swap
 10-13-11, 05:32 AM
#1
This is for anyone with an SC300/400 of all years (though wiring depicted is from a '93) who has a Supra TT seat swap. Anyone who has done this swap has noted that there has been no direct way to hook up their seatbelt buckle wiring to the SC floor harness.
This means your seatbelt light on the dash is going to be on constantly. Some people have just taken out the dash bulb but this doesn't really complete the swap satisfactorily. I had read about some others having solved the issue but none of that knowledge and example made it onto these forums.
With the help of CL member StiCk3, there is now a DIY solution for this!
PLEASE NOTE: My solution for this involved using an OEM SC seat connector. I ordered one of these from Toyota (should be P/N # E19-10812 as indicated on on my spare SC seat connector). This was done to keep my car's body harness OEM plug-and-play.
Also, as you probably already know, the dash light only responds to the driver's side seatbelt. Even though the passenger side has wiring for its connector as well, it doesn't get hooked up in this swap.
FOR 97+ OWNERS: StiCk3 noted to me that he "had to connect one end to the black/yellow stripe (12V) wire and the other wire into the white/black stripe (ground). However... there is a difference between the 97+ and the 92-96 wires. If yours is a 92-96 then the power wire is a blue wire/white strip..."
Step 1.) Unbolt your seat (14mm socket, about 25-35 ft-lbs), disconnect the seat connector (or whatever you have wired up) and lean it back on the carpet so that you can reference both harnesses (body and seat). Be careful not to damage your carpet with the seat mounting points digging in!
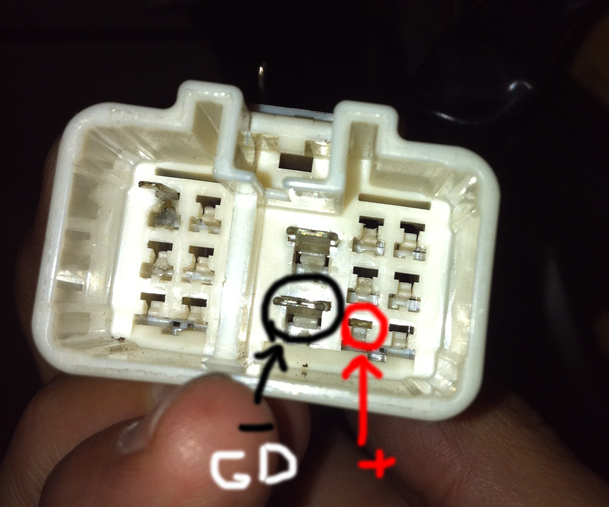
Step 2.) Note the wires in this picture. On the original SC300/400 buckle connector (orange) there is a White/Black-Stripe (Ground "-") and a Blue/Black-Stripe/Silver-Dashes (Positive "+12V"). Note that on the SC body harness there is also an identical set of wires: the large-gauge main Ground and a smaller gauge just next to it which is +12V. The whole point of this very simple seatbelt system is to complete the circuit to turn the light off.
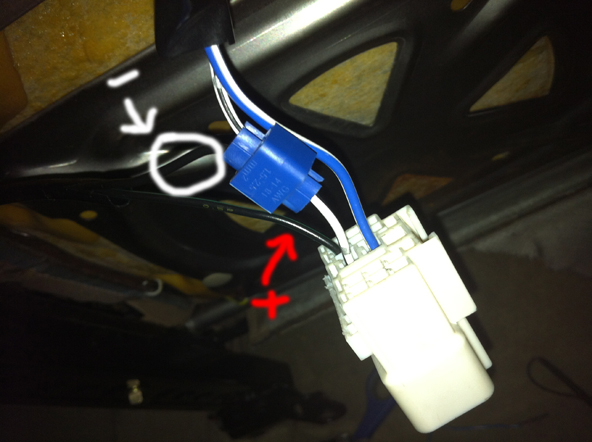
The (white) Supra buckle connector wires are Black ( - Ground) and Black/Green-Stripe (+12V). Sorry if the picture below is confusing. It is of the SC seat connector and the SC buckle connector (orange) and not the Supra buckle connector (white). The picture is to show that the two sets of wires correspond on the SC wiring. The Supra connector wires functionally do the same thing. They are just colored differently.

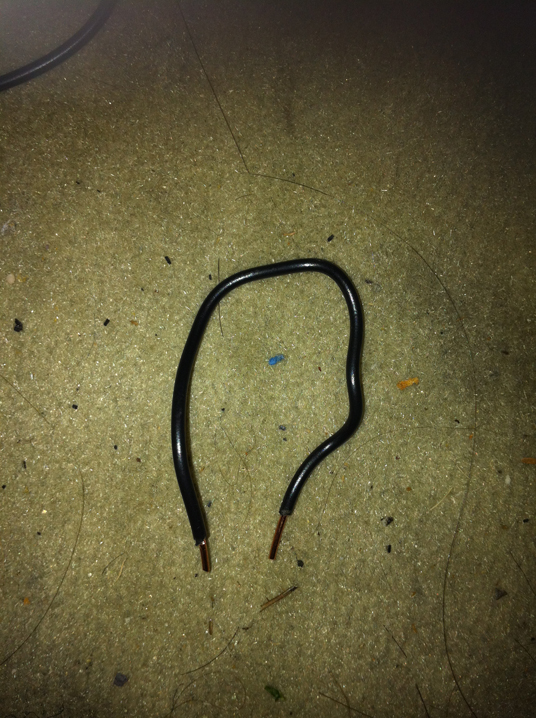
Step 3.) The next pictures show which wires we are looking for on the SC300/400 body connector. If you have obtained a new or spare SC seat harness connector this will be like OEM when you are done. I preferred to modify the seat rather than the car. Testing the connections shown with a small piece of wire makes the light go off. You can try this yourself with the ignition in the ACC position.
SEE DEMONSTRATION VIDEO:


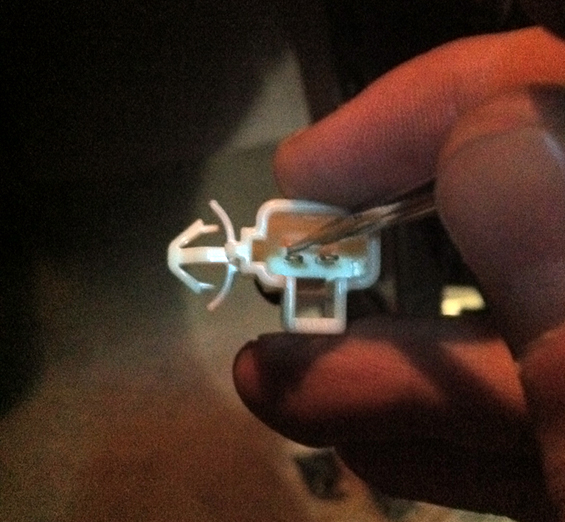
Step 4.) First we will connect the +12V Black/Green-Stripe wire prong into the SC seat connector. This is the easiest part. On the Supra buckle connector, use a needle tool to carefully pry up the retaining panel and then insert the needle tool into the mouth of the connector. Just below the prongs, you should see a tiny plastic catch. VERY CAREFULLY PRY THIS. At the same time, you should be able to pull the prong out of the connector gently. Do this for both wires. Now you should have two exposed wires with prongs.
NOTE: Before doing anything else, you may want to splice and elongate these two Supra buckle wires about 2". They will make the connections a bit taut if you don't but the body connectors should still fit. I'd recommend doing so but you don't need to.


Step 5.) Now, take the Black/Green-Striped Supra wire's prong and (note which way the prongs are crimped as they only go in one way) insert it into the SC seat connector in the location corresponding to the one you noted on the body connector. With the flat side down, it will be immediately to the left of the main Ground wire.


Step 6.) You will now need to snip off the connector on the Black wire on the Supra buckle. You won't need it. Strip it and now you'll need to splice this into the SC seat connector's main Ground wire (White/Black-Stripe). Use some very fine cutting scissors to strip away the large insulating tube as needed and be careful of those wires when doing so.
I STRONGLY recommend elongating this wire to reach your splice connection. It is just so short that hardly any tugging will probably pull it free from the splice.


Step 7.) Clean up your connections as necessary, use zip ties to tidy it up and optionally use electrical tape or just some plastic wire tubing to protect everything. DONE! Reinstall the seat, reconnect the SC seat connector to the body harness and torque the mounting bolts down again. You should now be able to see your seatbelt warning light go OFF when you buckle yourself into the driver's seat, just like the original SC seat
This means your seatbelt light on the dash is going to be on constantly. Some people have just taken out the dash bulb but this doesn't really complete the swap satisfactorily. I had read about some others having solved the issue but none of that knowledge and example made it onto these forums.
With the help of CL member StiCk3, there is now a DIY solution for this!
PLEASE NOTE: My solution for this involved using an OEM SC seat connector. I ordered one of these from Toyota (should be P/N # E19-10812 as indicated on on my spare SC seat connector). This was done to keep my car's body harness OEM plug-and-play.
Also, as you probably already know, the dash light only responds to the driver's side seatbelt. Even though the passenger side has wiring for its connector as well, it doesn't get hooked up in this swap.
FOR 97+ OWNERS: StiCk3 noted to me that he "had to connect one end to the black/yellow stripe (12V) wire and the other wire into the white/black stripe (ground). However... there is a difference between the 97+ and the 92-96 wires. If yours is a 92-96 then the power wire is a blue wire/white strip..."
Step 1.) Unbolt your seat (14mm socket, about 25-35 ft-lbs), disconnect the seat connector (or whatever you have wired up) and lean it back on the carpet so that you can reference both harnesses (body and seat). Be careful not to damage your carpet with the seat mounting points digging in!
Step 2.) Note the wires in this picture. On the original SC300/400 buckle connector (orange) there is a White/Black-Stripe (Ground "-") and a Blue/Black-Stripe/Silver-Dashes (Positive "+12V"). Note that on the SC body harness there is also an identical set of wires: the large-gauge main Ground and a smaller gauge just next to it which is +12V. The whole point of this very simple seatbelt system is to complete the circuit to turn the light off.
The (white) Supra buckle connector wires are Black ( - Ground) and Black/Green-Stripe (+12V). Sorry if the picture below is confusing. It is of the SC seat connector and the SC buckle connector (orange) and not the Supra buckle connector (white). The picture is to show that the two sets of wires correspond on the SC wiring. The Supra connector wires functionally do the same thing. They are just colored differently.
Step 3.) The next pictures show which wires we are looking for on the SC300/400 body connector. If you have obtained a new or spare SC seat harness connector this will be like OEM when you are done. I preferred to modify the seat rather than the car. Testing the connections shown with a small piece of wire makes the light go off. You can try this yourself with the ignition in the ACC position.
SEE DEMONSTRATION VIDEO:
Step 4.) First we will connect the +12V Black/Green-Stripe wire prong into the SC seat connector. This is the easiest part. On the Supra buckle connector, use a needle tool to carefully pry up the retaining panel and then insert the needle tool into the mouth of the connector. Just below the prongs, you should see a tiny plastic catch. VERY CAREFULLY PRY THIS. At the same time, you should be able to pull the prong out of the connector gently. Do this for both wires. Now you should have two exposed wires with prongs.
NOTE: Before doing anything else, you may want to splice and elongate these two Supra buckle wires about 2". They will make the connections a bit taut if you don't but the body connectors should still fit. I'd recommend doing so but you don't need to.
Step 5.) Now, take the Black/Green-Striped Supra wire's prong and (note which way the prongs are crimped as they only go in one way) insert it into the SC seat connector in the location corresponding to the one you noted on the body connector. With the flat side down, it will be immediately to the left of the main Ground wire.
Step 6.) You will now need to snip off the connector on the Black wire on the Supra buckle. You won't need it. Strip it and now you'll need to splice this into the SC seat connector's main Ground wire (White/Black-Stripe). Use some very fine cutting scissors to strip away the large insulating tube as needed and be careful of those wires when doing so.
I STRONGLY recommend elongating this wire to reach your splice connection. It is just so short that hardly any tugging will probably pull it free from the splice.
Step 7.) Clean up your connections as necessary, use zip ties to tidy it up and optionally use electrical tape or just some plastic wire tubing to protect everything. DONE! Reinstall the seat, reconnect the SC seat connector to the body harness and torque the mounting bolts down again. You should now be able to see your seatbelt warning light go OFF when you buckle yourself into the driver's seat, just like the original SC seat
Last edited by KahnBB6; 12-15-12 at 03:41 AM. Reason: Added Toyota-Lexus P/N for SC Seat connector

The following users liked this post:
MrJohnE (06-01-18)


Trending Topics
10-13-11, 05:27 PM
#8
Very nicely done, and thanks for the props! When i did mine though, i simply cut the black/yellow stripe wire and spliced the white/black stripe wire and made a separate connnector setup with the belt switch. Either way works just as effectively. Again, well done!
10-14-11, 09:22 PM
#9
Thanks all and thanks StiCk3! I could have used the seatbelt connectors from the SC seat but it seemed custom enough as it was to just do it this way. Also, if I ever put the great paperweight up for sale for a penny someone might want the electrical systems to function normally.
11-02-12, 06:44 AM
#11

Bump from the dead because I know how to use the search function....
This is great info. Just a few questions that I couldn't find elsewhere in a search:
1) Does anyone know the part number for the seat harness? I couldn't find it in a diagram and it's not a commonly ordered part so I want to ensure I get the right thing.
2) Does anyone know how to keep the memory-mirror position functionality with aftermarket seats? While I don't care about the seat and tilt moving (as I'm the only one who drives my car), I used to use the second mirror setting to drop the mirrors down when reversing (as my mothers RX does automatically) so I can park as close to the curb as possible without curbing my wheels.Now I have to drop the mirror down manually and then raise it again manually afterwards. Am I just being too posh?
11-03-12, 04:13 AM
#12
Bump from the dead because I know how to use the search function....
This is great info. Just a few questions that I couldn't find elsewhere in a search:
1) Does anyone know the part number for the seat harness? I couldn't find it in a diagram and it's not a commonly ordered part so I want to ensure I get the right thing.
2) Does anyone know how to keep the memory-mirror position functionality with aftermarket seats? While I don't care about the seat and tilt moving (as I'm the only one who drives my car), I used to use the second mirror setting to drop the mirrors down when reversing (as my mothers RX does automatically) so I can park as close to the curb as possible without curbing my wheels.Now I have to drop the mirror down manually and then raise it again manually afterwards. Am I just being too posh?
This is great info. Just a few questions that I couldn't find elsewhere in a search:
1) Does anyone know the part number for the seat harness? I couldn't find it in a diagram and it's not a commonly ordered part so I want to ensure I get the right thing.
2) Does anyone know how to keep the memory-mirror position functionality with aftermarket seats? While I don't care about the seat and tilt moving (as I'm the only one who drives my car), I used to use the second mirror setting to drop the mirrors down when reversing (as my mothers RX does automatically) so I can park as close to the curb as possible without curbing my wheels.Now I have to drop the mirror down manually and then raise it again manually afterwards. Am I just being too posh?
1) What part of the seat are you looking for and from which seat? The SC seat or the TT seat? And is this the SC seat connector or something else. If it's the SC seat connector I will see if I can find it in my records. It should be visible (although TINY) on your exising SC seat connector. I do believe these were in short supply in the USA when I ordered mine so I would check. I hope I haven't misinterpreted.
2) Certainly not too posh of a question
The car was built with that useful functionality after all. Your memory-mirror and memory steering column functions remain unaffected after installing the TT (or any) seat, so rest easy I use my column and sideview mirror memory almost every day after ditching the SC seats.
Last edited by KahnBB6; 11-03-12 at 04:17 AM.
11-03-12, 11:40 AM
#13
First of all, thanks! I'm glad this helps. To answer you:
1) What part of the seat are you looking for and from which seat? The SC seat or the TT seat? And is this the SC seat connector or something else. If it's the SC seat connector I will see if I can find it in my records. It should be visible (although TINY) on your exising SC seat connector. I do believe these were in short supply in the USA when I ordered mine so I would check. I hope I haven't misinterpreted.
2) Certainly not too posh of a question The car was built with that useful functionality after all. Your memory-mirror and memory steering column functions remain unaffected after installing the TT (or any) seat, so rest easy I use my column and sideview mirror memory almost every day after ditching the SC seats.
1) What part of the seat are you looking for and from which seat? The SC seat or the TT seat? And is this the SC seat connector or something else. If it's the SC seat connector I will see if I can find it in my records. It should be visible (although TINY) on your exising SC seat connector. I do believe these were in short supply in the USA when I ordered mine so I would check. I hope I haven't misinterpreted.
2) Certainly not too posh of a question
The car was built with that useful functionality after all. Your memory-mirror and memory steering column functions remain unaffected after installing the TT (or any) seat, so rest easy I use my column and sideview mirror memory almost every day after ditching the SC seats.
1) I'm looking for the part that you referenced here:
"PLEASE NOTE: My solution for this involved using an OEM SC seat connector. I ordered one of these from Toyota. This was done to keep my car's body harness OEM plug-and-play."
Unfortunately, I already ditched my factory seats and I try to avoid hacking any of the factory wiring at all costs so I either have to source a used one from the forums (if someone is willing to pull one off a seat for me) or get one from Toyota. I can't reference my factory seat so honestly I'm not sure exactly what I'm looking for, however.
FYI I'm not using a TT seat. I have an after market seats but I'm reusing the SC buckles.
2) Ahhh *&%^. - mine doesn't work. Worked perfectly for 6-years before I ditched my SC seats, now nothing, though I did a LOT of work at the same time the seats were installed so maybe the seats aren't the culprit. Time to start the troubleshooting I suppose...
 11-06-12, 08:06 PM
#14
Thanks for the prompt response OP!
1) I'm looking for the part that you referenced here:
"PLEASE NOTE: My solution for this involved using an OEM SC seat connector. I ordered one of these from Toyota. This was done to keep my car's body harness OEM plug-and-play."
Unfortunately, I already ditched my factory seats and I try to avoid hacking any of the factory wiring at all costs so I either have to source a used one from the forums (if someone is willing to pull one off a seat for me) or get one from Toyota. I can't reference my factory seat so honestly I'm not sure exactly what I'm looking for, however.
FYI I'm not using a TT seat. I have an after market seats but I'm reusing the SC buckles.
2) Ahhh *&%^. - mine doesn't work. Worked perfectly for 6-years before I ditched my SC seats, now nothing, though I did a LOT of work at the same time the seats were installed so maybe the seats aren't the culprit. Time to start the troubleshooting I suppose...
Here is the short version. I'm worn out:
Your problem must be with a faulty Memory ECU or fuse(s) for the Memory circuits. Try those before anything else.
In the meantime, I'll look in my records for that P/N or I'll check my spare SC seat. I'll update my top posting with that number, too if I find it.
