Roof Bag Cargo Carrier Review
 08-20-12, 08:26 AM
#1
Lead Lap
Thread Starter
The following is my personal experience with the “Roof Bag” (www.roofbag.com) Your experience may vary, however, this review based on my experience in July 2012. “And away we go!!!”
It was coming up on the Annual In-Law vacation and I knew with me, my wife and two dogs plus all the extraneous materials needed for a week’s beach house rental I needed some extra storage above and beyond what the Lexus RX 350 could handle. So in searching for some additional cargo capabilities I looked on clublexus.com (for which I am writing this review) as well as Google for a solution. Of course I ran across the numerous boxes to strap to the roof but I didn't feel like discussing with my wife where we would store it during the 51 weeks it isn't being used. I already have an over abundance of solid objects taking up garage/under deck/closet and all other types of storage space. I would not win and for all the right reasons. Ultimately I decided it would be best to try out a cargo bag vs. the cargo box. From what I read they have comparable cargo room and can fold away into a storage bag and put in a closet. Thule and Yakima caught my eye as storage bags due to brand recognition, however, after doing some checking and making some inquiries with current owners they went out the door due to initial quality issues, weather "resistance" (or lack thereof), and overall value. I then ran across RoofBag.com thanks to a friend’s recommendation. Waterproof, 11 cu. ft., made in USA (nice touch) and some great reviews. I did some research via online resources and it seemed like an OK gamble so I decided to take the plunge.
I ordered an 11 cubic foot model with the storage bag, 3 interior duffels for packing, extra straps w/ hooks if I want to attach it to a vehicle without a roof rack, side step stool for any helpers get up on the side to reach the mid-roof, a protective mat to prevent scratches on the roof and… uh… that’s it. $193 shipped to my door.
First thing I noticed after opening the incredibly well packed shipping container was the bag looked as though it was meant for rain forest battle. Heavy duty “canvas” (not canvas but a rubberized canvas) and all the seams were not only well stitched but welded and sealed. So far so good. Storage bag was more than adequate for me to roll the thing up and fit it in and the duffels reminded me of the old military style army duffels with handles on either end for carrying. The mat… well… to be frank it’s tool cabinet liner. BUT for me to get enough cabinet liner to fit the size of the bag I would have spent more than the $14 they wanted for the liner – even if I went to Harbor Freight or Wal-Mart; plus it was one piece so that made it easier.
Vacation was only two days away and I knew rain was coming. So I figured the best thing to do was to install it (sans clothes and whatever) and see what happens. After all, I didn’t know what return weather was going to be like so I needed to know if I was going to be able to put stuff up there that could get wet with no worries or if I was going to be able to put items up there that couldn’t stand a drop of water. So away we went…
First thing is first… you do NOT want to put anything on top of your roof that is meant to protect it from scratching without first CLEANING your roof. I washed the RX, thoroughly dried it, then took some Spray Wax over the top as a protector above and beyond the clear coat and polish/wax that was already on it. OK? Do NOT put a “protector” on top of a dirty vehicle. Bad things can and will happen to your paint. Here is a pic of what the mat looks like under the cross bars…
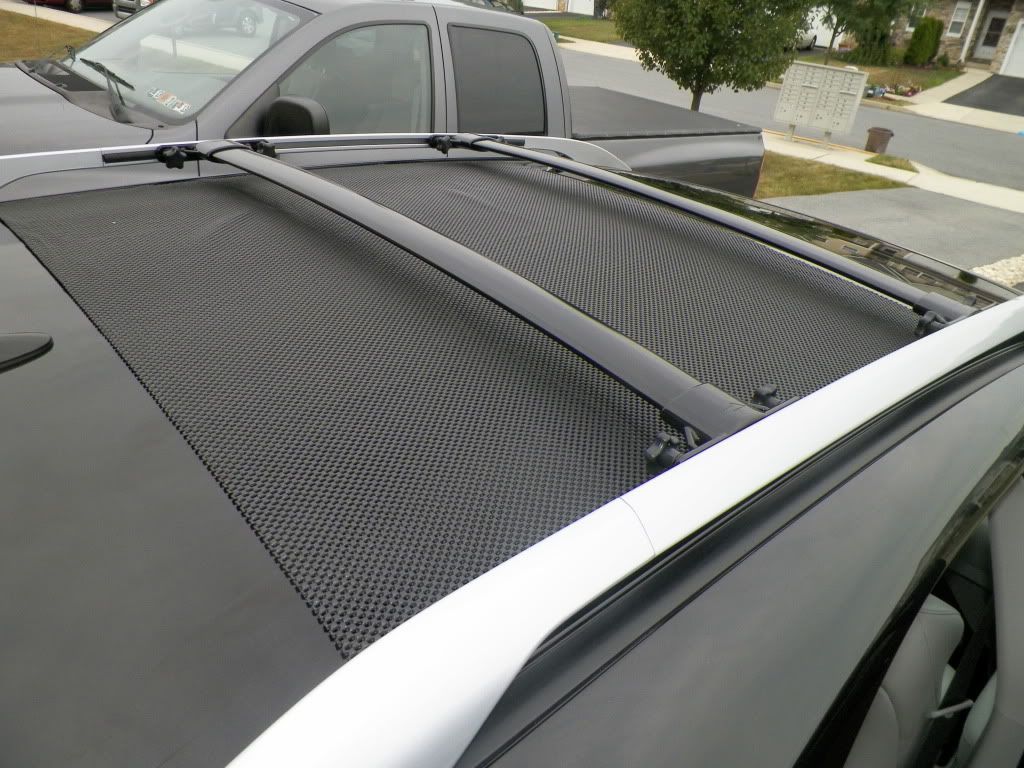
We placed the bag on the mat and had to shift it around a little bit in order to get it to line up properly. As you can see the mat was not in the perfect spot straight away. You’ll need to take the mat and lay it over the first couple inches of the shark fin antenna to protect the fin from any rubbing that might take place. Now the bag itself DOES have a welded liner on the bottom of it and isn’t very harsh but the mat, again, was only $14 so I thought it a good investment no matter.
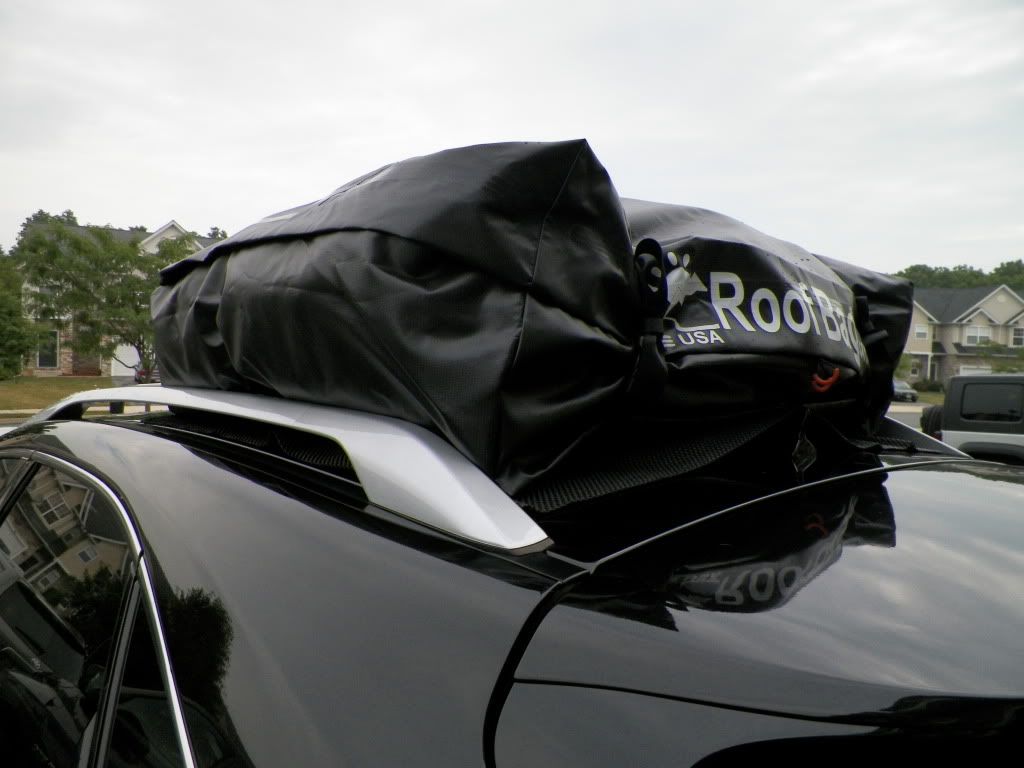
Next were the straps. The below pic will hopefully illustrate what I am about to describe. There are 6 straps. Two rear straps you cannot see well except for one of the buckles in the lower portion of the view. These two hidden straps along with the two front straps wrap around the cross bars via a loop on one end. You have 4 straps with a loop on their one end then you pass a military clip through the loop to wrap around the cross bar. The remaining two straps are used to secure and hold down the bag to the roof. “How do they do that?” Well… see that funky looking tattoo in the lower left of the below pic? That’s where the straps pass through (front to back). “Why are they on 45 degree angles?” is a good question. You see the bags are made for both roof rack w/ cross bars and non-cross bar/roof rack vehicles. Ones with a roof rack and cross bars, like my RX, secure front to back. Others vehicles with a rack but sans cross bars and other cars like my alternate ones without a rack secure side to side. With a rack the straps I am using in the pic work, just side to side instead of front to back. Without a rack the bag requires straps that have hooks that attach to your door frames in order to work; again side to side attachment. I know… complicated, but it makes sense if you look at their website (www.roofbag.com) Anyway, the 45 degree angle thing and “why?”. Honestly, I don’t truly know but can only guess they figured it best to keep cost down by designing the pass-thru’s to be universal fit instead of trying to guess how many they would sell for vehicles like my RX or vehicles like my C70 as an example. Short story is they work and are well constructed. So here are the straps, funky-functional pass thru’s, and top of the bag –
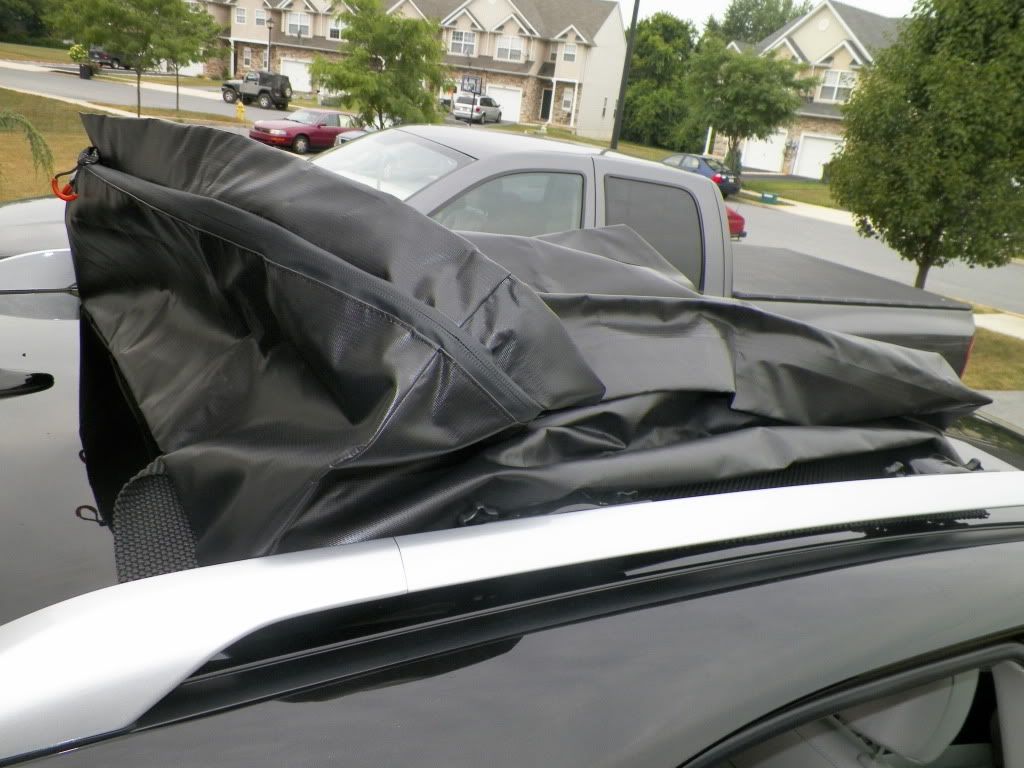
Yes rain was coming. Yes my original plan was to let it sit empty and see how well it held water at bay. Then in a bout of what my wife would call idiocy I decided to load 2 of the 3 duffels. It took me a couple of convincing “Let’s try it”’s to get it done along with a few tries on the step thingus that I bought to let my wife help me get the thing up onto the roof. “Once more unto the breach!!!” So barring any additional King Henry V quotes let’s just say the duffels load rather easily. Just pack them full of clothes or whatever you can lift yourself or heavier loads, as in our case, that you can lift with two people using the handles on either end OR aren’t afraid of bending in your roof. Personally I won’t be loading any gold bricks up there so I decided on two duffels packed with clothes enough for a week. 0.5 duffels for me, 1.5 duffels for my wife… I’m really not kidding on that one. She wasn’t happy I was putting that stuff up there to “test” the water proofing capabilities but she was also confident in my decision on the Roof Bag. Me? I was crossing my fingers even though initial impressions were positive. So below is my first attempt at attaching the straps and securing the 2/3 full roof bag. I am not proud of it, but it isn’t a bad first swag at the thing, really.
After a bit of finagling and a realization of having to shift the bag a bit towards the rear (maybe I should THOROUGHLY read the instructions, however, I AM a guy) I was able to tighten the straps rather well and secure the bag and contents to the point of being able to move a 3500 lb. SUV side to side without moving the bag itself. Pretty impressive.
Did I mention the zippers? I don’t think I did as I am typing this so I may as well while I am at it. Now normally I am not a fan of ANY type of zippers on a product that claims it can withstand water, driving rain, heavy rain, or even someone deciding it would be a good idea to let a car outside overnight for a water test… eh hem. Anyhow, the way this bag is designed it has heavy duty zippers easily accessible from any side of the vehicle and provides an ample flap (with welded seams) to cover the zippers to prevent water from penetrating from above, fronts, sides, back, and a good effort underneath. Neat design and much appreciated.
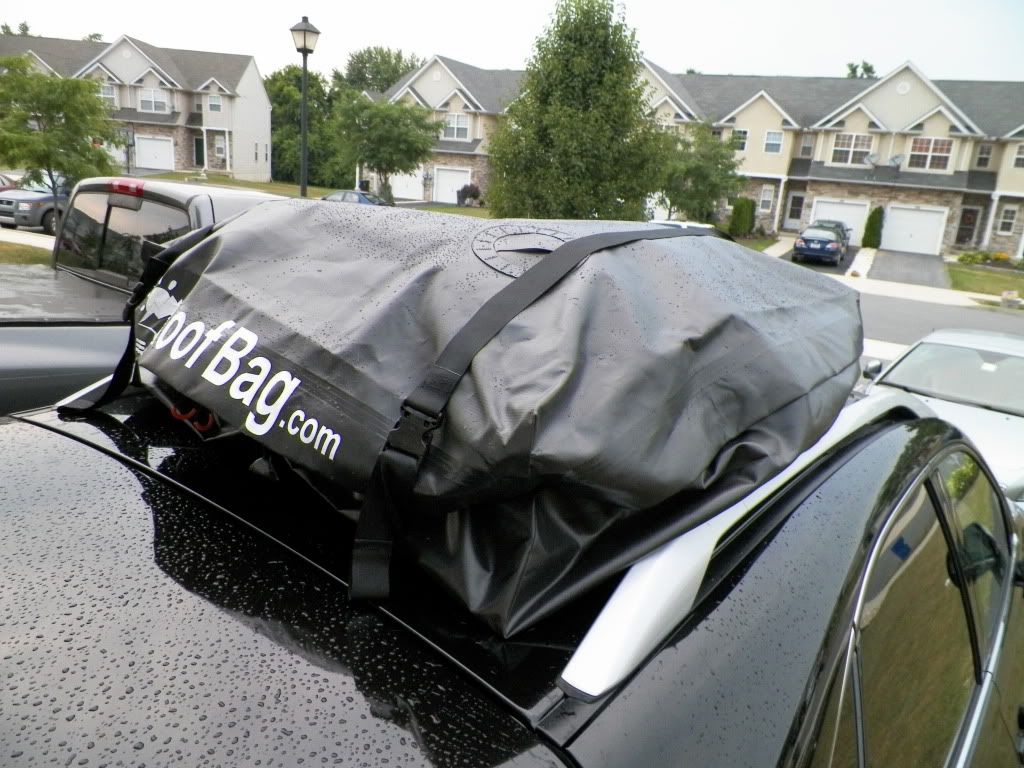
“Oh I love a rainy night, I love a rainy night…” I said no more Henry V… I didn’t say anything about Eddie Rabbitt. The night before our vacation it rained. A lot. I felt I didn’t need to have our irrigation timer come on for a couple of days due to the deluge that came through. I also was thinking I would be heading to the industrial Laundromat before we headed on our excursion since there couldn’t have been any way a cargo BAG could have kept out the mess which was dumped on us that night. I was wrong. My wife brought down the 3rd duffel before I could get down and check the damage and I was nervous beyond comprehension. She put the step stool on the wheel and climbed up, I stood upon the rear passenger sill and opened the zipper. DRY AS A BONE. I sighed, I thanked my lucky stars, and I praised the Roof Bag. Of course I took all the credit for this since I made the decision to purchase the bag and my wife, bless her heart, played along and stroked my ego. Yes, I am the King of Decisions and everything I do is right… for now. OK, LOAD IT UP!!! 3rd duffel put in the bag and, since I am now an expert on tightening military straps after 3 attempts, we’re ready!
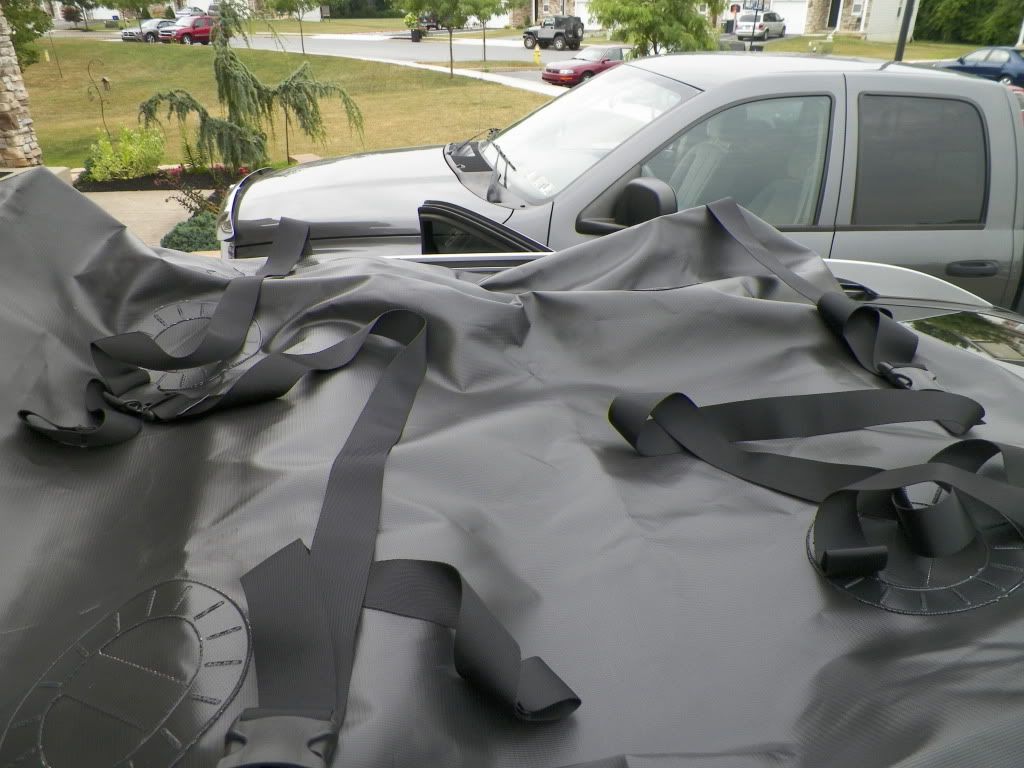
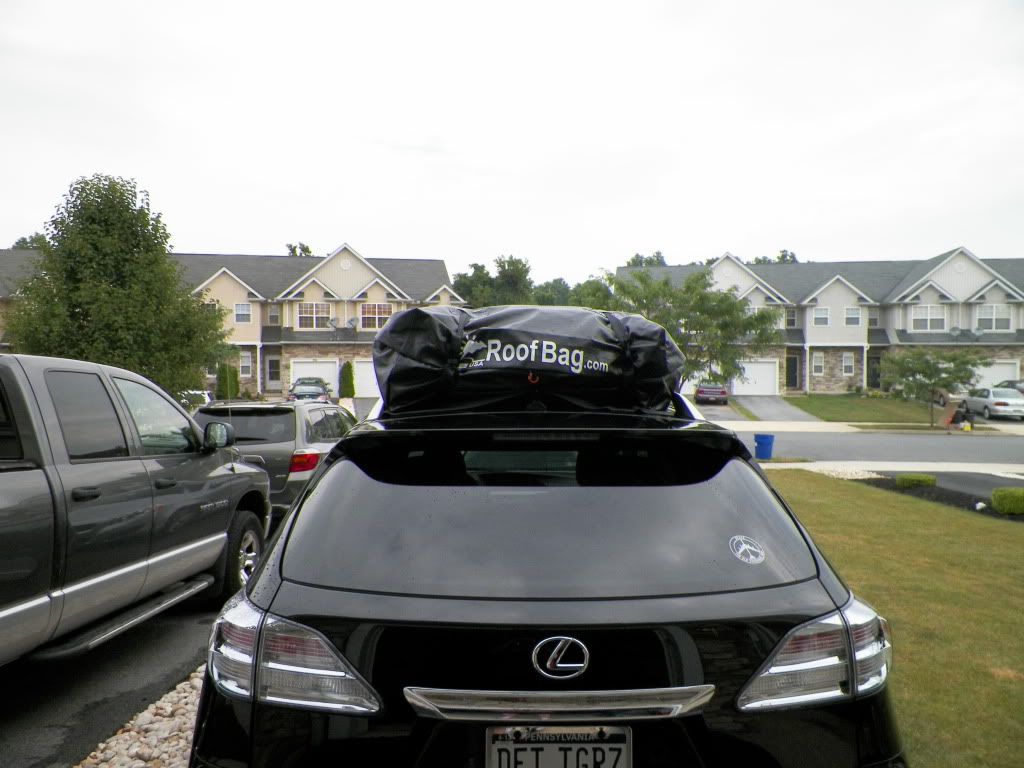
I was so proud of my manly accomplishment I decided to take another pic from the back. Look how symmetrical for an organic form. Ah… to be a data geek…
There is one additional thing I did that Roof Bag didn’t recommend. The strap excess is loose and will flop around. This, to me, is asking for paint damage and if you are as loving of vehicles as I am this means nothing but bad. So I used Velcro type zip ties to wrap the straps and secure them from frolicking in the wind while at speed. Take the extra few minutes and few dollars (available at Harbor Freight, Radio Shack, etc) and secure the flopping straps; please.
We left after about 15 minutes from me taking the pic above. It was a 3+ hour drive along 35 mph roads, the onto a dreaded Pennsylvania Turnpike at 65 mph+ then onto rural NJ roads with one way totaling 150 miles and showers/rain most of the way. Mid-way we stopped at a Wawa (that’s like a Mini-mart thing on the East Coast). I checked the security of the bag when we stopped whilst allowing our two dogs to do their business and it hadn’t budged. As my wife was in grabbing some hoagies I checked my fuel consumption. I drive an SUV (or CUV if you are technically correct) and I wasn’t expecting having a large bag sitting on the top of the thing to do much good for my fuel economy on this trip. Normally I average at a 60/40 (rural/hwy) driving style 22 miles per gallon. I was expecting around 19 mpg. My fuel computer rated me at 21.2 mpg and I was shocked. And proud. To me it was an incredible accomplishment and worthy of a celebratory beer. Not so much to my passenger so I kept my excitement to myself in order to await the eventual male bonding experience with the father- and brother-in-law.
It doesn’t even make noise when it’s up there. Of course, we had all the windows closed due to heat/humidity/showers but we didn’t hear anything. Even my wife remarked she couldn’t hear any types of air noise and she was REALLY listening for it since we don’t drive together with the radio on. I didn’t know that she was listening for it until she told me; after all, I was so that should have been enough… right??? RIGHT???. After another few downpours we arrived at our rental house, it was still POURING so we went inside to check out the house. We chatted with family, watched some TV, rain stopped, came out to the Lexus, opened up the bag and things were again bone dry. Success! And I was still averaging 21.1 mpg… where is my celebratory beer???
Without getting into further detail let me just say this – the Roof Bag rocks. Really. It does. I would and do highly recommend folks giving this thing a shot. I’m more than happy with it.
Oh - return trip? Sunny so that's all I have to say about that
It was coming up on the Annual In-Law vacation and I knew with me, my wife and two dogs plus all the extraneous materials needed for a week’s beach house rental I needed some extra storage above and beyond what the Lexus RX 350 could handle. So in searching for some additional cargo capabilities I looked on clublexus.com (for which I am writing this review) as well as Google for a solution. Of course I ran across the numerous boxes to strap to the roof but I didn't feel like discussing with my wife where we would store it during the 51 weeks it isn't being used. I already have an over abundance of solid objects taking up garage/under deck/closet and all other types of storage space. I would not win and for all the right reasons. Ultimately I decided it would be best to try out a cargo bag vs. the cargo box. From what I read they have comparable cargo room and can fold away into a storage bag and put in a closet. Thule and Yakima caught my eye as storage bags due to brand recognition, however, after doing some checking and making some inquiries with current owners they went out the door due to initial quality issues, weather "resistance" (or lack thereof), and overall value. I then ran across RoofBag.com thanks to a friend’s recommendation. Waterproof, 11 cu. ft., made in USA (nice touch) and some great reviews. I did some research via online resources and it seemed like an OK gamble so I decided to take the plunge.
I ordered an 11 cubic foot model with the storage bag, 3 interior duffels for packing, extra straps w/ hooks if I want to attach it to a vehicle without a roof rack, side step stool for any helpers get up on the side to reach the mid-roof, a protective mat to prevent scratches on the roof and… uh… that’s it. $193 shipped to my door.
First thing I noticed after opening the incredibly well packed shipping container was the bag looked as though it was meant for rain forest battle. Heavy duty “canvas” (not canvas but a rubberized canvas) and all the seams were not only well stitched but welded and sealed. So far so good. Storage bag was more than adequate for me to roll the thing up and fit it in and the duffels reminded me of the old military style army duffels with handles on either end for carrying. The mat… well… to be frank it’s tool cabinet liner. BUT for me to get enough cabinet liner to fit the size of the bag I would have spent more than the $14 they wanted for the liner – even if I went to Harbor Freight or Wal-Mart; plus it was one piece so that made it easier.
Vacation was only two days away and I knew rain was coming. So I figured the best thing to do was to install it (sans clothes and whatever) and see what happens. After all, I didn’t know what return weather was going to be like so I needed to know if I was going to be able to put stuff up there that could get wet with no worries or if I was going to be able to put items up there that couldn’t stand a drop of water. So away we went…
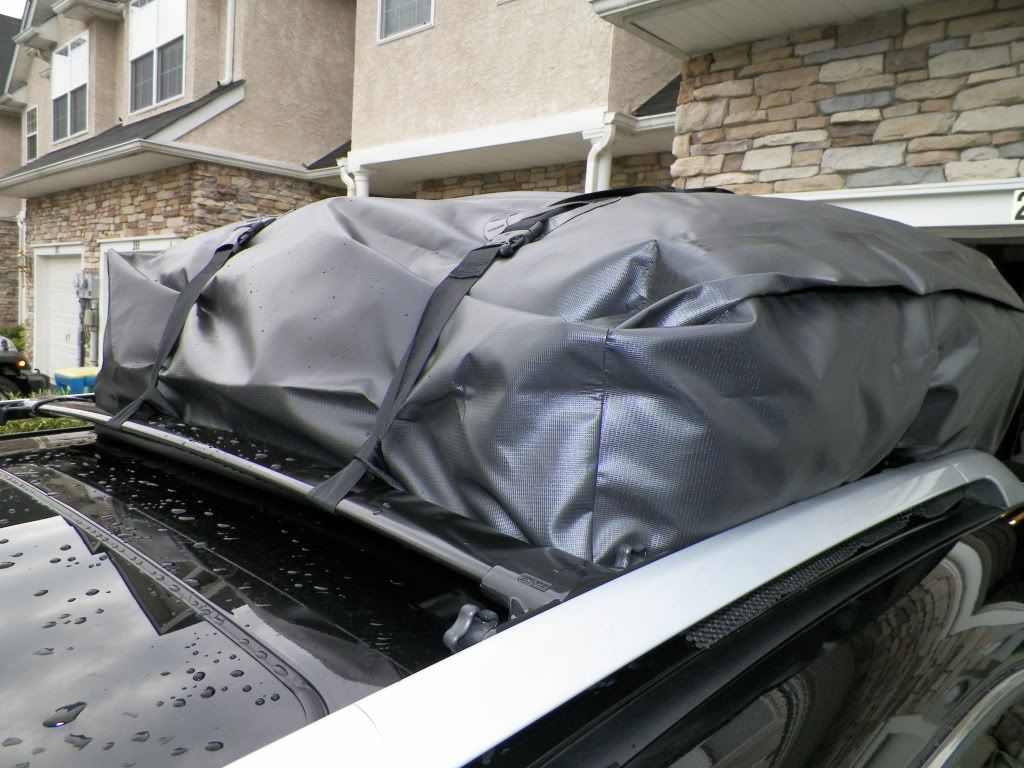
First thing is first… you do NOT want to put anything on top of your roof that is meant to protect it from scratching without first CLEANING your roof. I washed the RX, thoroughly dried it, then took some Spray Wax over the top as a protector above and beyond the clear coat and polish/wax that was already on it. OK? Do NOT put a “protector” on top of a dirty vehicle. Bad things can and will happen to your paint. Here is a pic of what the mat looks like under the cross bars…
We placed the bag on the mat and had to shift it around a little bit in order to get it to line up properly. As you can see the mat was not in the perfect spot straight away. You’ll need to take the mat and lay it over the first couple inches of the shark fin antenna to protect the fin from any rubbing that might take place. Now the bag itself DOES have a welded liner on the bottom of it and isn’t very harsh but the mat, again, was only $14 so I thought it a good investment no matter.
Next were the straps. The below pic will hopefully illustrate what I am about to describe. There are 6 straps. Two rear straps you cannot see well except for one of the buckles in the lower portion of the view. These two hidden straps along with the two front straps wrap around the cross bars via a loop on one end. You have 4 straps with a loop on their one end then you pass a military clip through the loop to wrap around the cross bar. The remaining two straps are used to secure and hold down the bag to the roof. “How do they do that?” Well… see that funky looking tattoo in the lower left of the below pic? That’s where the straps pass through (front to back). “Why are they on 45 degree angles?” is a good question. You see the bags are made for both roof rack w/ cross bars and non-cross bar/roof rack vehicles. Ones with a roof rack and cross bars, like my RX, secure front to back. Others vehicles with a rack but sans cross bars and other cars like my alternate ones without a rack secure side to side. With a rack the straps I am using in the pic work, just side to side instead of front to back. Without a rack the bag requires straps that have hooks that attach to your door frames in order to work; again side to side attachment. I know… complicated, but it makes sense if you look at their website (www.roofbag.com) Anyway, the 45 degree angle thing and “why?”. Honestly, I don’t truly know but can only guess they figured it best to keep cost down by designing the pass-thru’s to be universal fit instead of trying to guess how many they would sell for vehicles like my RX or vehicles like my C70 as an example. Short story is they work and are well constructed. So here are the straps, funky-functional pass thru’s, and top of the bag –
Yes rain was coming. Yes my original plan was to let it sit empty and see how well it held water at bay. Then in a bout of what my wife would call idiocy I decided to load 2 of the 3 duffels. It took me a couple of convincing “Let’s try it”’s to get it done along with a few tries on the step thingus that I bought to let my wife help me get the thing up onto the roof. “Once more unto the breach!!!” So barring any additional King Henry V quotes let’s just say the duffels load rather easily. Just pack them full of clothes or whatever you can lift yourself or heavier loads, as in our case, that you can lift with two people using the handles on either end OR aren’t afraid of bending in your roof. Personally I won’t be loading any gold bricks up there so I decided on two duffels packed with clothes enough for a week. 0.5 duffels for me, 1.5 duffels for my wife… I’m really not kidding on that one. She wasn’t happy I was putting that stuff up there to “test” the water proofing capabilities but she was also confident in my decision on the Roof Bag. Me? I was crossing my fingers even though initial impressions were positive. So below is my first attempt at attaching the straps and securing the 2/3 full roof bag. I am not proud of it, but it isn’t a bad first swag at the thing, really.
After a bit of finagling and a realization of having to shift the bag a bit towards the rear (maybe I should THOROUGHLY read the instructions, however, I AM a guy) I was able to tighten the straps rather well and secure the bag and contents to the point of being able to move a 3500 lb. SUV side to side without moving the bag itself. Pretty impressive.
Did I mention the zippers? I don’t think I did as I am typing this so I may as well while I am at it. Now normally I am not a fan of ANY type of zippers on a product that claims it can withstand water, driving rain, heavy rain, or even someone deciding it would be a good idea to let a car outside overnight for a water test… eh hem. Anyhow, the way this bag is designed it has heavy duty zippers easily accessible from any side of the vehicle and provides an ample flap (with welded seams) to cover the zippers to prevent water from penetrating from above, fronts, sides, back, and a good effort underneath. Neat design and much appreciated.
“Oh I love a rainy night, I love a rainy night…” I said no more Henry V… I didn’t say anything about Eddie Rabbitt. The night before our vacation it rained. A lot. I felt I didn’t need to have our irrigation timer come on for a couple of days due to the deluge that came through. I also was thinking I would be heading to the industrial Laundromat before we headed on our excursion since there couldn’t have been any way a cargo BAG could have kept out the mess which was dumped on us that night. I was wrong. My wife brought down the 3rd duffel before I could get down and check the damage and I was nervous beyond comprehension. She put the step stool on the wheel and climbed up, I stood upon the rear passenger sill and opened the zipper. DRY AS A BONE. I sighed, I thanked my lucky stars, and I praised the Roof Bag. Of course I took all the credit for this since I made the decision to purchase the bag and my wife, bless her heart, played along and stroked my ego. Yes, I am the King of Decisions and everything I do is right… for now. OK, LOAD IT UP!!! 3rd duffel put in the bag and, since I am now an expert on tightening military straps after 3 attempts, we’re ready!
I was so proud of my manly accomplishment I decided to take another pic from the back. Look how symmetrical for an organic form. Ah… to be a data geek…
There is one additional thing I did that Roof Bag didn’t recommend. The strap excess is loose and will flop around. This, to me, is asking for paint damage and if you are as loving of vehicles as I am this means nothing but bad. So I used Velcro type zip ties to wrap the straps and secure them from frolicking in the wind while at speed. Take the extra few minutes and few dollars (available at Harbor Freight, Radio Shack, etc) and secure the flopping straps; please.
We left after about 15 minutes from me taking the pic above. It was a 3+ hour drive along 35 mph roads, the onto a dreaded Pennsylvania Turnpike at 65 mph+ then onto rural NJ roads with one way totaling 150 miles and showers/rain most of the way. Mid-way we stopped at a Wawa (that’s like a Mini-mart thing on the East Coast). I checked the security of the bag when we stopped whilst allowing our two dogs to do their business and it hadn’t budged. As my wife was in grabbing some hoagies I checked my fuel consumption. I drive an SUV (or CUV if you are technically correct) and I wasn’t expecting having a large bag sitting on the top of the thing to do much good for my fuel economy on this trip. Normally I average at a 60/40 (rural/hwy) driving style 22 miles per gallon. I was expecting around 19 mpg. My fuel computer rated me at 21.2 mpg and I was shocked. And proud. To me it was an incredible accomplishment and worthy of a celebratory beer. Not so much to my passenger so I kept my excitement to myself in order to await the eventual male bonding experience with the father- and brother-in-law.
It doesn’t even make noise when it’s up there. Of course, we had all the windows closed due to heat/humidity/showers but we didn’t hear anything. Even my wife remarked she couldn’t hear any types of air noise and she was REALLY listening for it since we don’t drive together with the radio on. I didn’t know that she was listening for it until she told me; after all, I was so that should have been enough… right??? RIGHT???. After another few downpours we arrived at our rental house, it was still POURING so we went inside to check out the house. We chatted with family, watched some TV, rain stopped, came out to the Lexus, opened up the bag and things were again bone dry. Success! And I was still averaging 21.1 mpg… where is my celebratory beer???
Without getting into further detail let me just say this – the Roof Bag rocks. Really. It does. I would and do highly recommend folks giving this thing a shot. I’m more than happy with it.
Oh - return trip? Sunny so that's all I have to say about that

 08-20-12, 04:01 PM
#4

Thanks for the excellent detailed writeup, with photos, on the cargo bag. We may have to buy one eventually, especially for our travel to Florida for the winters. Already have the cross bars, but so far have squeezed everything in the 80 cubic foot trunk with the back seats folded down. Helps that our dog (4 pound Yorkie) fits between the front seats with her own carrier, whereas your 2 dogs probably are in the back seat. Good to hear the bag didn't leak, as the reviews on some bags had problems, and that your gas mileage wasn't really an issue. The bag looks larger than 11 cubic feet, but I guess it's just an illusion from the photos. Didn't know you needed a roof mat with the cross bars. We had not heard of the roof bag brand, and will keep your review for if we should need one.

Thread
Thread Starter
Forum
Replies
Last Post