RX300 Air Mode Servo removal made easy
 10-22-12, 04:58 PM
#1
Rookie
Thread Starter

Join Date: Feb 2009
Location: TX
Posts: 65
Likes: 0
Received 0 Likes
on
0 Posts
RX 300 1st gen Air Servo removal and re-assembly made easy.
After procrastinating for a few months to avoid to 100+ degrees in TX, I decided to go after my clickety clickety click servo repair. There are several previous posts that I drew from, so I can�t pin point who gave the best advice. However, I tackled the job today. The devil is in the details, not cleaning the servo, but getting it in and out. This is my experience. BTW, I am a Certified Human Factors Professional, who loves to get into these types of adventures and analyze from two perspectives, why they built it that way (the �knobology� of design) and what is the most straightforward way to fix it in spite of the design.
Removing the glove box is easy, 2 10mm bolts and 2 Philips head screws.
Since you will be in there, you might as well have a cabin air filter ready. If the filter is not that bad, a shop vac sucking in the opposite air flow direction will probably extend the life for a while.
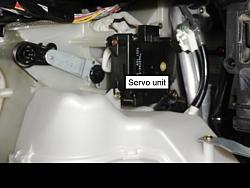
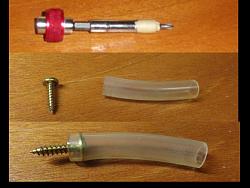
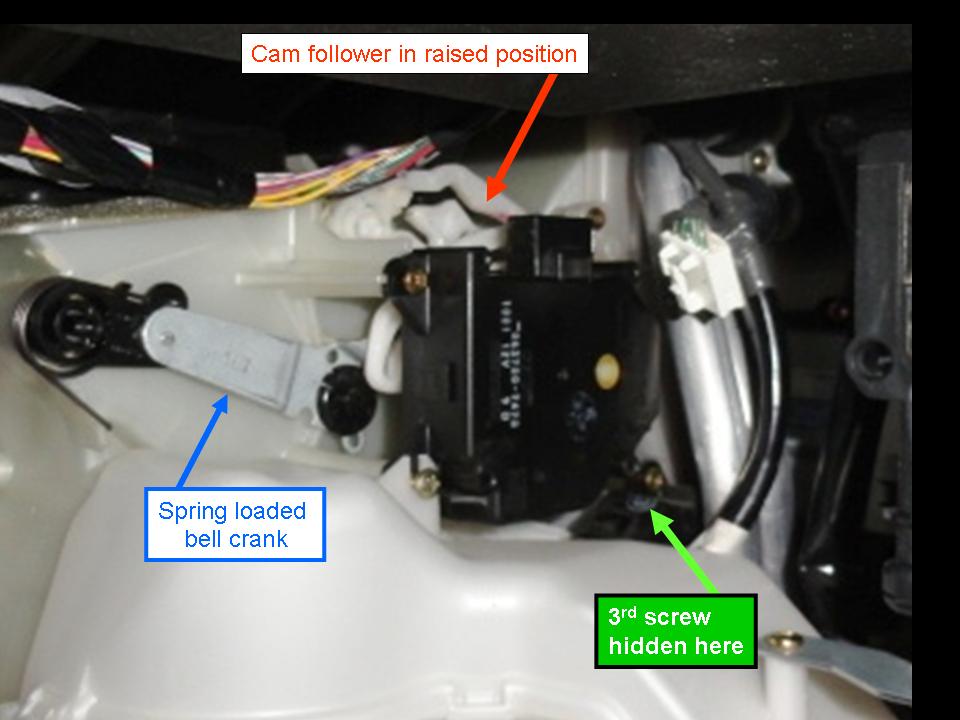
The two brass screws up front holding the servo are easy. A stubby Philips will do fine. Note the lower screw squeezes the servo in a slot in the white plastic and the upper screw does not. The third one is the kicker. You can�t see it and the stubby is too short and a regular screwdriver is too long. I had to cobble together a power drill Philips bit with a thumb wheel driver to achieve the best length (see pic). If you don�t do something similar you will be doing a lot of grunting and dropping expletives all over the floor. My friend "Murphy," known for his laws, sits on my shoulder, told me there is a possibility of losing the 3rd screw in the insulation crevices. Stuff a rag around and under the servo, just in case.
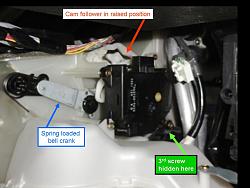
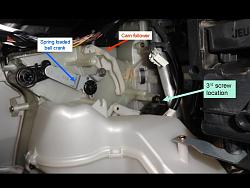
My afterthought is now a forethought. When the servo is observable, press the mode button and watch the movement of the arms. When the long white arm cam follower behind the servo is in a high position, that is when you want to remove it. Later when you reassemble the servo, it will be finger accessible.*
As soon as you remove the 3rd screw, the cam followers, the long white plastic arm behind the servo and the shorter metal bell crank in front, which is under mild spring tension, will surprise you when they pop out of their tracks. Getting all assembly points lined up under spring tension as you try to reassemble the unit will frustrate you. It can be done, just mentally prepare for the alignment task later.
When the servo is out, turn it over so the white plastic cam follower is on top. Draw a sketch of the relative position of the follower in relation to the servo case. When you open the servo, the gears disengage and the follower can move into an inaccessible* position. If you reassemble the servo with the follower in a different position*, (like I did) �Do not pass go. Do not collect $200 go directly to the bench and open the servo again and reposition the follower like you should have. It is all a matter of preparing for finger room accessibility.
A previous post suggested having the white follower on the bottom when prying the case apart. I tried that and luckily, the gears did not fall off their shafts. But the cam follower changed position.* There was enough grease to hold the gears in place. A better plan is to position the servo on its edge and slowly open it sideways like a book. This way you can see where the gears belong. Slowly open the case. Perform the cleaning task.
I used a generic high tech computer, cell phone, contact cleaner. The tiny contact points are about as fine as a moustache brush. Be careful. Mine were grungy. I cleaned up the contacts and redistributed the grease and realized I did not remember the relative position* of the cam follower. (I didn�t sketch the position). More expletives.
The third screw -- again! Since you will be working blind and there is no finger room, you need a reliable screw starter / holder. I cut about a 2 inch piece of rubber tubing about the diameter of the screw head and stuffed the 3rd screw head into it. With the front two screws started and cams aligned properly, the 3rd screw started in less time that it takes to read this paragraph. Then I finished tightening it with my thumb wheel driver and bit.
I�ll see how long my cleaning job holds. Next time around will be much shorter.
Dr. Dan
After procrastinating for a few months to avoid to 100+ degrees in TX, I decided to go after my clickety clickety click servo repair. There are several previous posts that I drew from, so I can�t pin point who gave the best advice. However, I tackled the job today. The devil is in the details, not cleaning the servo, but getting it in and out. This is my experience. BTW, I am a Certified Human Factors Professional, who loves to get into these types of adventures and analyze from two perspectives, why they built it that way (the �knobology� of design) and what is the most straightforward way to fix it in spite of the design.
Removing the glove box is easy, 2 10mm bolts and 2 Philips head screws.
Since you will be in there, you might as well have a cabin air filter ready. If the filter is not that bad, a shop vac sucking in the opposite air flow direction will probably extend the life for a while.
The two brass screws up front holding the servo are easy. A stubby Philips will do fine. Note the lower screw squeezes the servo in a slot in the white plastic and the upper screw does not. The third one is the kicker. You can�t see it and the stubby is too short and a regular screwdriver is too long. I had to cobble together a power drill Philips bit with a thumb wheel driver to achieve the best length (see pic). If you don�t do something similar you will be doing a lot of grunting and dropping expletives all over the floor. My friend "Murphy," known for his laws, sits on my shoulder, told me there is a possibility of losing the 3rd screw in the insulation crevices. Stuff a rag around and under the servo, just in case.
My afterthought is now a forethought. When the servo is observable, press the mode button and watch the movement of the arms. When the long white arm cam follower behind the servo is in a high position, that is when you want to remove it. Later when you reassemble the servo, it will be finger accessible.*
As soon as you remove the 3rd screw, the cam followers, the long white plastic arm behind the servo and the shorter metal bell crank in front, which is under mild spring tension, will surprise you when they pop out of their tracks. Getting all assembly points lined up under spring tension as you try to reassemble the unit will frustrate you. It can be done, just mentally prepare for the alignment task later.
When the servo is out, turn it over so the white plastic cam follower is on top. Draw a sketch of the relative position of the follower in relation to the servo case. When you open the servo, the gears disengage and the follower can move into an inaccessible* position. If you reassemble the servo with the follower in a different position*, (like I did) �Do not pass go. Do not collect $200 go directly to the bench and open the servo again and reposition the follower like you should have. It is all a matter of preparing for finger room accessibility.
A previous post suggested having the white follower on the bottom when prying the case apart. I tried that and luckily, the gears did not fall off their shafts. But the cam follower changed position.* There was enough grease to hold the gears in place. A better plan is to position the servo on its edge and slowly open it sideways like a book. This way you can see where the gears belong. Slowly open the case. Perform the cleaning task.
I used a generic high tech computer, cell phone, contact cleaner. The tiny contact points are about as fine as a moustache brush. Be careful. Mine were grungy. I cleaned up the contacts and redistributed the grease and realized I did not remember the relative position* of the cam follower. (I didn�t sketch the position). More expletives.
The third screw -- again! Since you will be working blind and there is no finger room, you need a reliable screw starter / holder. I cut about a 2 inch piece of rubber tubing about the diameter of the screw head and stuffed the 3rd screw head into it. With the front two screws started and cams aligned properly, the 3rd screw started in less time that it takes to read this paragraph. Then I finished tightening it with my thumb wheel driver and bit.
I�ll see how long my cleaning job holds. Next time around will be much shorter.
Dr. Dan


 10-22-12, 05:34 PM
#2
Driver School Candidate

Dr. Dan, thank you for this detailed explanation. I think I have this problem in my 2000 RX300. Two symptoms. First, after I turn the key off all of a sudden I hear this moan behind the dashboard then it shuts off. And other times I hear a clicking in the glove box which I assumed was the cd changer. So do I have Air Mix Servoitis? Or do I have two ailments?
Charlie H
Charlie H
10-23-12, 09:45 AM
#3

This is a nice write up. If you remove the plastic airflow device (easy, two screws), it makes it easier to work and you can actually see the third screw. Also, if you drop the screw, it is easy to remove the lower panel on the console that is perpendicular to the firewall - one flat head plastic screw toward the back and two easy tabs in the front.
Last edited by saudiboy; 10-23-12 at 11:31 AM.
 10-23-12, 01:05 PM
#5
Rookie
Thread Starter
Join Date: Feb 2009
Location: TX
Posts: 65
Likes: 0
Received 0 Likes
on
0 Posts
I followed someone else’s advice about turning on the heater and then the A/C to see if the clickety click stopped. It did. Then I took out the glove box and observed what was moving. I studied it for a while and then got busy. (Ref Saudiboy post) I once had to move a dresser set up to my upstairs bedroom. It had to go up a tight 90 degree doorway and staircase. Not enough room by about an inch. Take out a stair. Still no room. Take out another stair. Still no room. I finally took the top of the dresser off and had LOTS of room. Then I had stairs to replace. The gist is that I do not like to take apart more things than necessary, therefore I did not remove any other duct work. I could have, but chose not to.
It was the mode button that caused the movement, so it was the mode servo that I went after. (Reference reisjdmd’s post) I just hope it was the right choice. Based on other advice and symptoms, I went for the fix. Since the contacts were grungy dirty, the evidence was pointing in the right direction. I haven’t used the RX, so I won’t know until I drive somewhere.
Charlie H, I am not the expert here, so I cannot tell if you have one or two problems. I suspect two. Or perhaps one related to the other. What I would do is take out the glove box and listen carefully and feel for vibrations. At least then you will know which components are in play. I used to have a mechanics stethoscope (ear plugs with a long steel wand) to touch vibrating components to listen. You can use a long screw driver and put the handle end up to your ear and touch the various components and listen. This will at least point you in the right direction.
Dr.Dan
11-05-12, 07:24 PM
#6
Rookie
Thread Starter
Join Date: Feb 2009
Location: TX
Posts: 65
Likes: 0
Received 0 Likes
on
0 Posts
Followup on cleaning the servo. It has been almost 2 weeks and not a peep out of the servo. Looks like I got lucky and my wife is very pleased. It bothered her more than it did me.
DrDan
DrDan
11-06-12, 12:54 PM
#7
I replaced my air mix servo. I tried cleaning it, and it didn't seem to do the trick. The new one is working smoothly, and I look forward to not having to jack around with the third screw again (although putting it back in was pretty easy - I jammed a small flat head screw driver into the screw and worked the screw driver with a wrench).
Trending Topics
08-25-13, 01:06 PM
#8
Lead Lap
Join Date: Dec 2007
Location: Pittsburgh, PA
Posts: 427
Likes: 0
Received 0 Likes
on
0 Posts
This thread saved me a couple hundred bucks. The pics helped a ton man, Thanks
Anyway advice to anyone else that does this... that 3rd screw he talks about is really stubborn so be prepared.
Anyway advice to anyone else that does this... that 3rd screw he talks about is really stubborn so be prepared.
08-25-13, 11:16 PM
#9
Moderator

Title has been changed.
Needed superMod to do ti. Thanks Lexmex.
Salim
Needed superMod to do ti. Thanks Lexmex.
Salim


 05-21-14, 02:46 PM
#13
Rookie
Thread Starter
Join Date: Feb 2009
Location: TX
Posts: 65
Likes: 0
Received 0 Likes
on
0 Posts
Servo update with some interesting questions and observations
After several months, the noise came back, so I did the removal and cleaning routine again. This is my third time I had the servo apart. I can remove the servo out in about 15 minutes now that I have had practice.
There doesn’t appear to be anything broken, severely worn or loose inside. The vents only move when they are supposed to. They are not moving during the scratching noises. So where is the scratching noise coming from? The only other parts that can move are the motor and its driving gear.
I cleaned all of the tiny fingerlike contacts. Then I minimized the amount of lubricant on the circular driven gear. Then I uniformly shaped (slightly bent) all of the finger contacts just enough to ensure a better “wipe” as they moved.
Mechanically speaking, it is a relatively simple electro-mechanical device. Although I cleaned all contact points, my best guess is that there is some kind of feedback circuit that fails to stop the motor, so it keeps seeking. But if the motor is seeking why don’t the cams change position? So, what is happening inside to make the noises?
My first thought was that the problem might be similar to reassembling the unit with the cam follower gear “out of time” just like a timing belt being off by a tooth. But that does not explain how all of the other CL members have the same failure before the case was ever opened. My only other thought might be that the motor is somehow failing internally. I’ve had to replace 3 of my 5 door lock motors, so I am leaning in the direction of a possible failing motor. But that does not answer why the unit functions properly when it is supposed to.
Does anyone have any ideas besides buying a new one and wasting a lot of money to reward Lexus for a puzzling design? The replacement cost, whatever it is, is too high for such a simple device. I am going to take the servo apart again this weekend (if I have time) and give it a good looking over.
Dr. Dan
05-21-14, 05:53 PM
#14
Dan, Could you post a picture of the internals of that servo motor while you have it apart? My RX has started making that noise and I'm not ready yet to do this. I am thinking that the motor inside the servo is tired, like in the door locks.
05-21-14, 06:51 PM
#15
Moderator
Servo update with some interesting questions and observations
After several months, the noise came back, so I did the removal and cleaning routine again. This is my third time I had the servo apart. I can remove the servo out in about 15 minutes now that I have had practice.
There doesn’t appear to be anything broken, severely worn or loose inside. The vents only move when they are supposed to. They are not moving during the scratching noises. So where is the scratching noise coming from? The only other parts that can move are the motor and its driving gear.
I cleaned all of the tiny fingerlike contacts. Then I minimized the amount of lubricant on the circular driven gear. Then I uniformly shaped (slightly bent) all of the finger contacts just enough to ensure a better “wipe” as they moved.
Mechanically speaking, it is a relatively simple electro-mechanical device. Although I cleaned all contact points, my best guess is that there is some kind of feedback circuit that fails to stop the motor, so it keeps seeking. But if the motor is seeking why don’t the cams change position? So, what is happening inside to make the noises?
My first thought was that the problem might be similar to reassembling the unit with the cam follower gear “out of time” just like a timing belt being off by a tooth. But that does not explain how all of the other CL members have the same failure before the case was ever opened. My only other thought might be that the motor is somehow failing internally. I’ve had to replace 3 of my 5 door lock motors, so I am leaning in the direction of a possible failing motor. But that does not answer why the unit functions properly when it is supposed to.
Does anyone have any ideas besides buying a new one and wasting a lot of money to reward Lexus for a puzzling design? The replacement cost, whatever it is, is too high for such a simple device. I am going to take the servo apart again this weekend (if I have time) and give it a good looking over.
Dr. Dan
After several months, the noise came back, so I did the removal and cleaning routine again. This is my third time I had the servo apart. I can remove the servo out in about 15 minutes now that I have had practice.
There doesn’t appear to be anything broken, severely worn or loose inside. The vents only move when they are supposed to. They are not moving during the scratching noises. So where is the scratching noise coming from? The only other parts that can move are the motor and its driving gear.
I cleaned all of the tiny fingerlike contacts. Then I minimized the amount of lubricant on the circular driven gear. Then I uniformly shaped (slightly bent) all of the finger contacts just enough to ensure a better “wipe” as they moved.
Mechanically speaking, it is a relatively simple electro-mechanical device. Although I cleaned all contact points, my best guess is that there is some kind of feedback circuit that fails to stop the motor, so it keeps seeking. But if the motor is seeking why don’t the cams change position? So, what is happening inside to make the noises?
My first thought was that the problem might be similar to reassembling the unit with the cam follower gear “out of time” just like a timing belt being off by a tooth. But that does not explain how all of the other CL members have the same failure before the case was ever opened. My only other thought might be that the motor is somehow failing internally. I’ve had to replace 3 of my 5 door lock motors, so I am leaning in the direction of a possible failing motor. But that does not answer why the unit functions properly when it is supposed to.
Does anyone have any ideas besides buying a new one and wasting a lot of money to reward Lexus for a puzzling design? The replacement cost, whatever it is, is too high for such a simple device. I am going to take the servo apart again this weekend (if I have time) and give it a good looking over.
Dr. Dan
I tried to locate a replacement motor and potentially found a match, but the minimum order was 1000 units. The thread is out there. If I find it, I will add the link.
Here it is:
https://www.clublexus.com/forums/rx-...servo-fix.html
Salim
Last edited by salimshah; 05-21-14 at 07:03 PM.