VVT Solenoid (OCV) Replacement DIY
 04-28-13, 08:20 PM
#31
Moderator

How about reaching for PB Blaster or kerosine oil. If you introduce these, remember to soak with engine oil and then do a drain and fill after running for a day.
Good luck.
Salim
Good luck.
Salim
 04-28-13, 09:05 PM
#32
Driver School Candidate

salimshah,
Thanks! I thought I would add this picture just to show where I am at. I used a magnet and the plunger in the picture came right out. I hope the picture shows up OK. I tried to pry the flange of the remaining part of the OCV and that broke off too. I will try PB Blaster of Liquid Wrench and manybe I can do some tapping downward on it that will help break the bond.

Thanks! I thought I would add this picture just to show where I am at. I used a magnet and the plunger in the picture came right out. I hope the picture shows up OK. I tried to pry the flange of the remaining part of the OCV and that broke off too. I will try PB Blaster of Liquid Wrench and manybe I can do some tapping downward on it that will help break the bond.
 04-28-13, 11:01 PM
#33
Moderator
Can you get crescent locking pliers on it?
Salim
Salim
04-30-13, 05:29 PM
#34
Driver School Candidate

Join Date: Apr 2013
Location: pa
Posts: 1
Likes: 0
Received 0 Likes
on
0 Posts
salimshah,
As you suspected I did in fact remove the 10mm bolt holding down the OCV. Based on every ones suggestions and a few years of experience I proceeded to turn the OCV back and forth then was able to actually turn it completely 360 degs and more. I pulled as twisted at the same time the best I could but nothing. I did use the metal tab as a place to put my large screw driver under to pry it up (there was nothing else but the electrical connector and used that too after the tab flattened along side the OCV) but not enough yet. I graduated to a small pry bar. It started to move then the top popped off. I was really bummed. Since it is the front back side I will likely have to remove a bunch more stuff to try to remove the remaining bits. I am sure it is stuck due the the high temp oil crusting all around it for the last 14 years and the o-ring is rock solid IMHO. I will pull the filter screen next just to see what it looks like and clean it assuming I get the stupid remains of the OCV out. Not the simple afternoon job I was hoping to complete!
Thanks!
I am working on my sisters 1999 RX300, and the same thing happened to me had it all lubed up was able to spin it 360 but it would not budge. So did the same as you, tried to pry it up, only the top came off. This was the front one.
So have you had any luck getting it out?? I am at a loss. First it is tough to get to since it faces the windshield. Have sprayed the daylights out of it. and pulled the guts out of it. tried to hook the groves on the inside with a bent T-Handle and pried against the hold down nut hole, no luck.
I am ready to take a chisel to it to see if I can crack the top where the o-ring is but leery of cracking the wrong thing.
Please post your success and how you tackled it. (Hate to have to pull the head)
Thanks
JGB
04-30-13, 10:01 PM
#35
Driver School Candidate
SPJGB,
I have not tried the destructive route yet, but am instead sharing my ideas with others.
Some suggestion:
1) use some type of small bearing puller and latch onto the oil slots on OCV. I am going to try to make my own tool and see if I can Jack it out so to speak. I'm thinking of taking a long socket head cap screw and grinding down the head so it has a tooth that will fit into previously mentioned slots. Then run that through a large socket putting a washer on the bolt end along with a nut. I hope it will stay engaged in oil slot enough to get some verticle torque on it. That darn o-ring Isnot further than about .125-.187 below the top of the boss.
2) very small slide hammer. Same process just using impacts to budge it out. Unfortunately there is very little room for anything in that area.
3) get a torch and heat the head. Aluminum expands more than steel so some carefully directed heat and good flame protection and an investment in a couple of fire extinguisher might work (still thinking about this one, but still need something to grab OCV and pull out...
4)Thread inner hole using grease on a tap to prevent chips from falling into oil hole. Haven't measured hole yet but that's on my list too.
5) Use an ease out...sounds interesting but I don't like idea of deforming OCV body in hole. It also seems that then end of the OCV has flats on it so it may be sitting in a slot at bottom of hole which would prevent it from turning which maybe the reason we both snapped off the top of the OCV.
I know one of these will work and I am putting my money on the first one. I should know by Thursday for sure. I am whole heartedly not planning on pulling the head...not after a few try's. fortunately I have a second car so I don't have to make any rash decisions. Chisel is not a good idea IMHO so try to resist that urge. I know I have cussed this car more than enough and I am getting to know it a little better. I figured someone at the Lexus dealer has a special tool for this but you know you would have to take your car in (tow in my case) and they would be salivating over this one.
Last edited by wfc; 04-30-13 at 10:14 PM.
The following users liked this post:
Avogel (01-02-19)
04-30-13, 11:49 PM
#36
Moderator
I understand the temptation of applying yet a stronger force ... but it should be the last resort. ... your current predicament is due to excessive force.
You need to approach the problem based on accessibility and how you can grab the sensor. I would suggest work the sensor in and out (hopefully slightly more out at every attempt).
You can use heated oil to lubricate and heat.
Salim
You need to approach the problem based on accessibility and how you can grab the sensor. I would suggest work the sensor in and out (hopefully slightly more out at every attempt).
You can use heated oil to lubricate and heat.
Salim
05-01-13, 05:27 AM
#37
Pole Position

I seem to recall a post somewhere on the web where a mechanic was able to pull an OCV out by threading a bolt into the hole in the remaining part of the OCV and pull it out.
05-04-13, 01:26 AM
#38
Driver School Candidate

Join Date: Aug 2009
Location: MN
Posts: 44
Likes: 0
Received 0 Likes
on
0 Posts
Step 3 - Remove the VVT Solenoids - I started with the Front Bank of cylinders because it was more difficult to see. You can start with either one, it matters not.
You will need your Ratchet and a 10mm socket and, for the rear bank, your 6" extension.
1- Carefully Detach the Electrical Connection from the solenoid.
2- Loosen and remove the 10mm Retaining Bolt from the Solenoid.
3- Grasp the Solenoid and with a gentle twisting tug, pull the Solenoid loose and remove it.
4- Set the Solenoid aside.
I am stuck at step 3- "Grasp the Solenoid and with a gentle twisting tug, pull the Solenoid loose and remove it". I can turn the solenoid by different angle, but just could not pull it out. any trick to pull it?
UPDATE: just figure it out. It happens that I just have a Basin Wrench which is for faucet repair. So I use it to pull solenoid out. it works really easy. Thanks for this detailed DIY info and other members' cautious tip. now, I just need to wait to pick up my Dorman solenoid this afternoon. hopefully it will solve my P1354 code problem.
Last edited by ididit; 05-04-13 at 06:58 AM.
05-04-13, 08:13 AM
#39
Moderator
got the P1354 code, clean the iACV and still have the code. so I am changing the bank 2 OCV.
I am stuck at step 3- "Grasp the Solenoid and with a gentle twisting tug, pull the Solenoid loose and remove it". I can turn the solenoid by different angle, but just could not pull it out. any trick to pull it?
UPDATE: just figure it out. It happens that I just have a Basin Wrench which is for faucet repair. So I use it to pull solenoid out. it works really easy. Thanks for this detailed DIY info and other members' cautious tip. now, I just need to wait to pick up my Dorman solenoid this afternoon. hopefully it will solve my P1354 code problem.
IACV problems do not throw a code.
What made you choose non OEM control valve? Remember to give an update in 6months and 1 yr.
Salim
05-04-13, 08:52 AM
#40
Pole Position
got the P1354 code, clean the iACV and still have the code. so I am changing the bank 2 OCV.
I am stuck at step 3- "Grasp the Solenoid and with a gentle twisting tug, pull the Solenoid loose and remove it". I can turn the solenoid by different angle, but just could not pull it out. any trick to pull it?
UPDATE: just figure it out. It happens that I just have a Basin Wrench which is for faucet repair. So I use it to pull solenoid out. it works really easy. Thanks for this detailed DIY info and other members' cautious tip. now, I just need to wait to pick up my Dorman solenoid this afternoon. hopefully it will solve my P1354 code problem.
I am stuck at step 3- "Grasp the Solenoid and with a gentle twisting tug, pull the Solenoid loose and remove it". I can turn the solenoid by different angle, but just could not pull it out. any trick to pull it?
UPDATE: just figure it out. It happens that I just have a Basin Wrench which is for faucet repair. So I use it to pull solenoid out. it works really easy. Thanks for this detailed DIY info and other members' cautious tip. now, I just need to wait to pick up my Dorman solenoid this afternoon. hopefully it will solve my P1354 code problem.
05-04-13, 02:46 PM
#41
Driver School Candidate
Join Date: Aug 2009
Location: MN
Posts: 44
Likes: 0
Received 0 Likes
on
0 Posts


here are 4 detailed pictures of how to use basin wrench to pull solenoid.
unfortunately, after I change the solenoid, erase the code, driving for a while, P1354 code still comes back. also shows other misfire code P0300, P0302, P0304, P0306.
what else should I check? any suggestion?
UPDATE: just replace another OCV bank(front bank--close to bumper), turns out that this one is the bank 2, the previous one is bank 1. I guess that I miss the point where to view the 2 banks.
now, code P1354 is gone.
It seems that my basin wrench trick only works for BANK 1, but the bank 2 are really easy to be pull out by just using my hand.
Last edited by ididit; 05-04-13 at 08:18 PM.
05-05-13, 10:02 PM
#42
Driver School Candidate
It finally came out!!!!
Attachment 282551
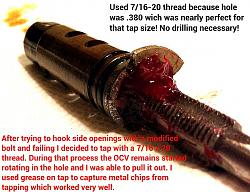
Resorted to tapping hole and durning that process the whole thing started rotating and finally came out!
Attachment 282551
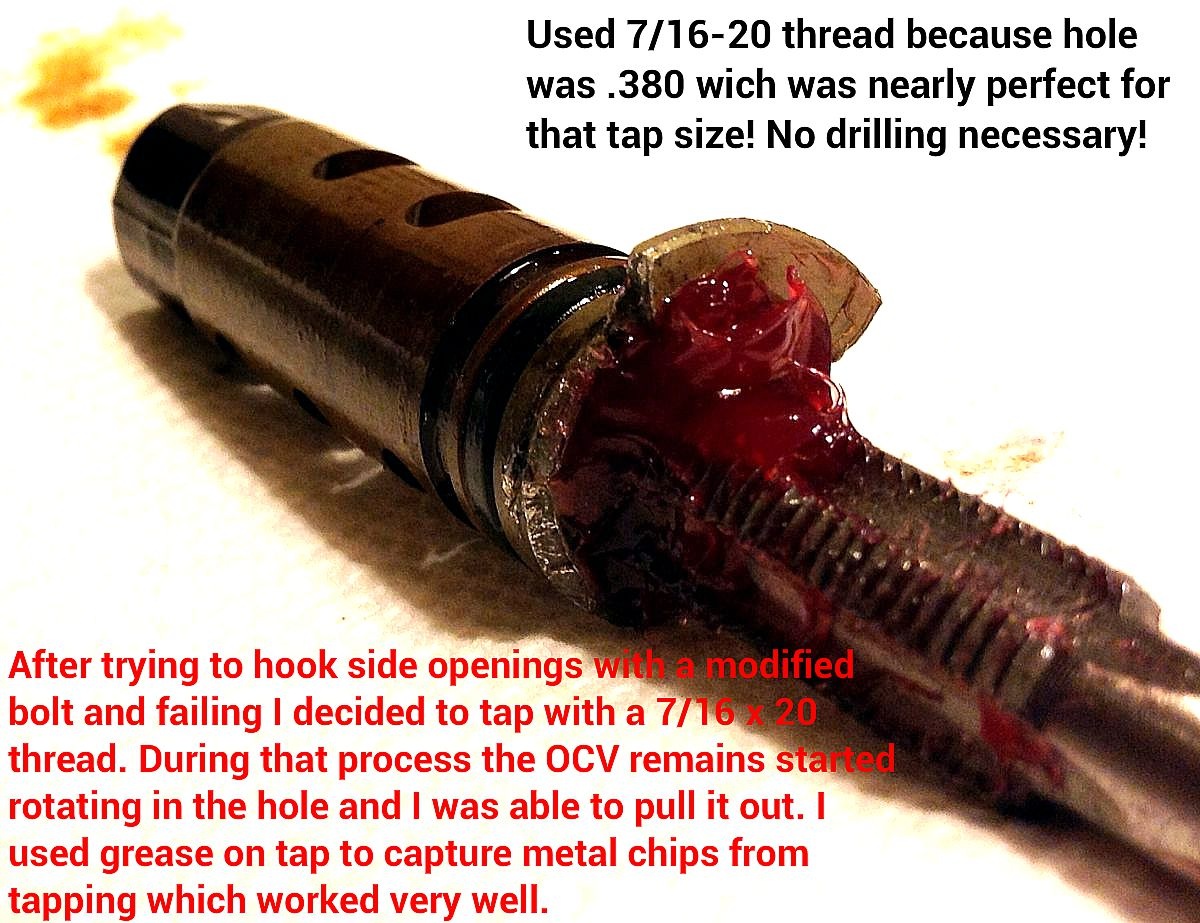
Resorted to tapping hole and durning that process the whole thing started rotating and finally came out!
Last edited by wfc; 05-05-13 at 10:21 PM. Reason: Missing pictures
The following users liked this post:
Avogel (01-02-19)
05-05-13, 10:17 PM
#43
Moderator
05-05-13, 10:28 PM
#44
Driver School Candidate
Well I am about to give up on uploading pics as I did something wrong a lost a lengthy description and have tried numerous times to add multiple pictures but only one loads...??? I am sure all user induced. But anyway it's out new one is in now for reconnecting everything and seeing if the old girl will start and run properly.
Thanks for everyone's inputs! So how many of us really had to take the darn thing out? I will also be replacing filters and O-rings front and back. I am at this time not inspired to take out the rear OCV since my error code was only a 1354 pointing to the front one.
Thanks for everyone's inputs! So how many of us really had to take the darn thing out? I will also be replacing filters and O-rings front and back. I am at this time not inspired to take out the rear OCV since my error code was only a 1354 pointing to the front one.
05-06-13, 05:00 AM
#45
Driver
Thread Starter
It's been about 8 months since I have completed my VVT Solenoid replacement. Everything pertaining to them still is working well.
I am sorry to read that several of you fine people are experiencing difficulties with this fix; perhaps I got lucky and didn't have these issues.
I will continue to give updates on the aftermarket solenoids, both good and bad (hopefully not bad!)
Have a wonderful, trouble free Summer!
BearsLexus
I am sorry to read that several of you fine people are experiencing difficulties with this fix; perhaps I got lucky and didn't have these issues.
I will continue to give updates on the aftermarket solenoids, both good and bad (hopefully not bad!)
Have a wonderful, trouble free Summer!
BearsLexus