Door Disassembly How to. Because no one else has yet apparently
 11-14-15, 01:43 PM
#1
Driver School Candidate
Thread Starter

Warning:Picture heavy post.
Long time lurker here. Using feedback from others on this site, I bit the bullet and bought an RC350 F Sport. I am a high mileage driver (2000/month) and therefore I will probably be the one to see things go wrong with this car before anyone else does. Car has 6000 miles on it now.
My first problem started when the weather started getting cold. This annoying rattle started coming from the passenger door. Every bump, "rattle rattle rattle". Sounds like a cable or wire. Took it to the dealership and as expected, they were not able to reproduce the noise, because, the weather warmed up that week and it only does it when the temp dropped below 40F. Also, when you first pull the door handle, the pull felt kinda "sticky" like there was some grease or something being pulled apart when you first pull the handle. Peering into the handle gap, you can see a rubber nub that stops the handle when you release it. Seems like the plastic from the handle sticks to it a bit.
Only way to investigate these things? Take the door apart!
Disclaimer: You do this at your own risk, I take no responsibility for anything you bugger up on your car from following these instructions. Do it at your own peril.
So here we go
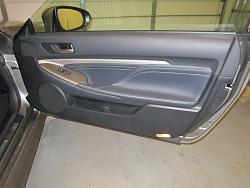
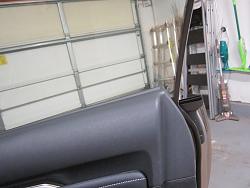
1) This is my Door. There are many like it. I'm taking this one apart.
2) All the tools I needed

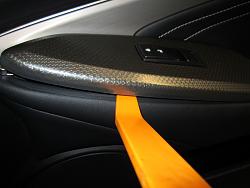
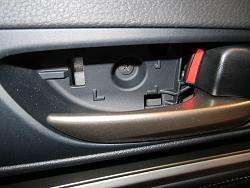
3) Start with the window control, just be gentle to not mar anything. Once you get it started, just use your fingers to pull it up. You will need to release two snaps, one on each end.
4) Peek-a-boo! There is one connector to release on the passenger door. No tools required.
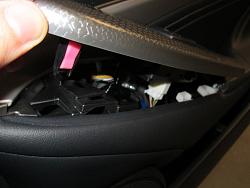
5) Disconnected
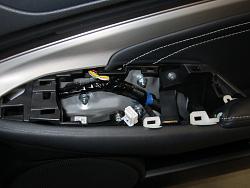
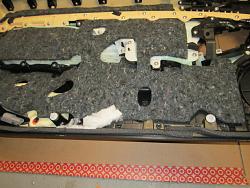
6) What you see inside!
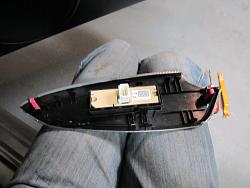
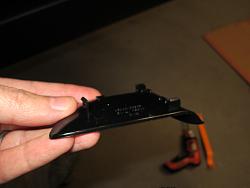
7) And the backside of the panel.
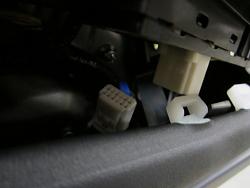
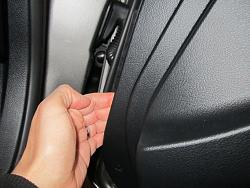
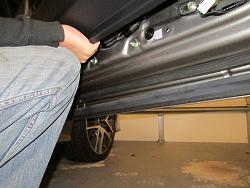
8) Now to start exposing all the hidden screws. There are 5 screws total to disassemble the door, but there are 4 that are hidden. One is very very very well hidden. Here are the first 2. Far right and far left of this photo. These are screwed into these SUPER TIGHT plastic housings. You will bust your hands if you try to do this manually.
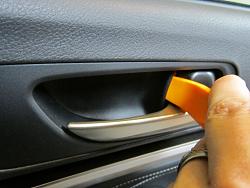
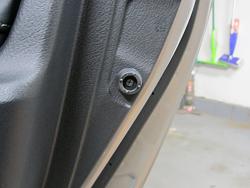
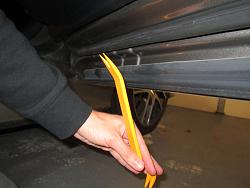
9)Another is hiding behind this hatch. Just unlock the door, pull the handle and use the tool. Gently wedge the tool in there and pry. It will pop out.

10) Screw number 3 exposed!
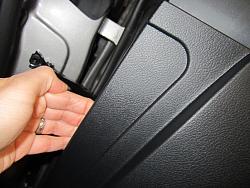
11) Back of panel so you can see how it snaps in/out.
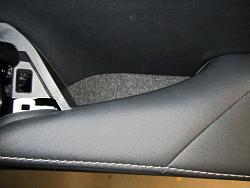
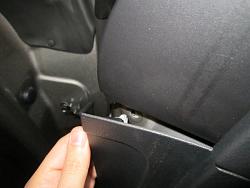
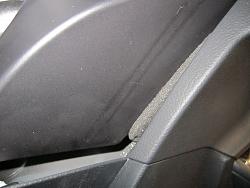
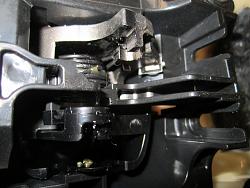
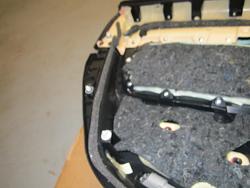
12) And winner of the sneakiest screw location! This guy!
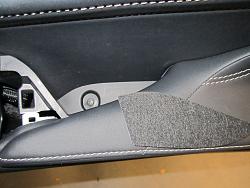
13) Yup, that piece of felt is just laying in there unfastened, and covering up a critical step in taking apart the door. Just use your fingernails to grab and pull the felt out. The elusive hidden screw number FOUR!
Part 2 coming up....The Snaps!
J
Long time lurker here. Using feedback from others on this site, I bit the bullet and bought an RC350 F Sport. I am a high mileage driver (2000/month) and therefore I will probably be the one to see things go wrong with this car before anyone else does. Car has 6000 miles on it now.
My first problem started when the weather started getting cold. This annoying rattle started coming from the passenger door. Every bump, "rattle rattle rattle". Sounds like a cable or wire. Took it to the dealership and as expected, they were not able to reproduce the noise, because, the weather warmed up that week and it only does it when the temp dropped below 40F. Also, when you first pull the door handle, the pull felt kinda "sticky" like there was some grease or something being pulled apart when you first pull the handle. Peering into the handle gap, you can see a rubber nub that stops the handle when you release it. Seems like the plastic from the handle sticks to it a bit.
Only way to investigate these things? Take the door apart!
Disclaimer: You do this at your own risk, I take no responsibility for anything you bugger up on your car from following these instructions. Do it at your own peril.
So here we go
1) This is my Door. There are many like it. I'm taking this one apart.

2) All the tools I needed

3) Start with the window control, just be gentle to not mar anything. Once you get it started, just use your fingers to pull it up. You will need to release two snaps, one on each end.

4) Peek-a-boo! There is one connector to release on the passenger door. No tools required.

5) Disconnected

6) What you see inside!

7) And the backside of the panel.

8) Now to start exposing all the hidden screws. There are 5 screws total to disassemble the door, but there are 4 that are hidden. One is very very very well hidden. Here are the first 2. Far right and far left of this photo. These are screwed into these SUPER TIGHT plastic housings. You will bust your hands if you try to do this manually.

9)Another is hiding behind this hatch. Just unlock the door, pull the handle and use the tool. Gently wedge the tool in there and pry. It will pop out.


10) Screw number 3 exposed!

11) Back of panel so you can see how it snaps in/out.

12) And winner of the sneakiest screw location! This guy!

13) Yup, that piece of felt is just laying in there unfastened, and covering up a critical step in taking apart the door. Just use your fingernails to grab and pull the felt out. The elusive hidden screw number FOUR!

Part 2 coming up....The Snaps!
J
 11-14-15, 02:11 PM
#2
Driver School Candidate
Thread Starter
Part 2...the Snaps!
This is the part most people dread. Where to pull, push, tug, grunt, whine, cry, swear, and grieve. Not to worry, this was way easier than I thought.
14) you have one more screw to remove, THIS GUY. Hope you can handle it")
15) nice small pile of screws that you should have removed.

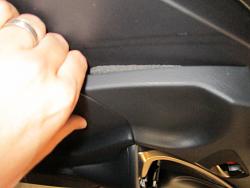
16) Snap time! Put yer hand here and Pull. A quick short jerk should make the first one pop. No tool needed.
17) move your hand up and pull again
you can look down and see the snap you just pulled
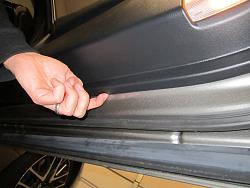
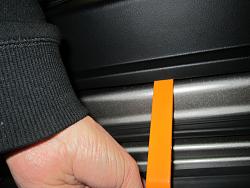
18) now you have two on the bottom. If you feel along the bottom edge of the door, there are two notches in the edge. They are very slight. These are your tool insertion locations.
19) I used this tool in this position. When inserting the tool you may hear some crunching. You are moving some sound insulation around. You can see where all the insulation is later in this post so you can adjust your tool accordingly.
20) Tool inserted into groove number one, pretty deep actually, and a quick pull!
21) Tool inserted into groove number two, and another quick pull!

22) now we are at the "don't hit my frakin' door light". By just pulling really lightly here to peek inside at the connector for the bulb, the door snaps along that side started to just pop out easy.
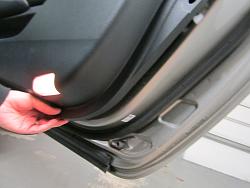
23) Peek inside, find the connector, and detach.
24) Peek inside the door trailing edge and make sure that you got them all. They pop easy and your door should be loose like this.
25) one more to go, back to the top leading edge of the door. No tool needed, just ran my fingers in there and a quick pull.
And that ends the door snaps! The rest is super easy...or is it? Stay tuned for part 3...the Unholy Rats Nest of Despair!
J
This is the part most people dread. Where to pull, push, tug, grunt, whine, cry, swear, and grieve. Not to worry, this was way easier than I thought.
14) you have one more screw to remove, THIS GUY. Hope you can handle it

15) nice small pile of screws that you should have removed.

16) Snap time! Put yer hand here and Pull. A quick short jerk should make the first one pop. No tool needed.

17) move your hand up and pull again

you can look down and see the snap you just pulled

18) now you have two on the bottom. If you feel along the bottom edge of the door, there are two notches in the edge. They are very slight. These are your tool insertion locations.


19) I used this tool in this position. When inserting the tool you may hear some crunching. You are moving some sound insulation around. You can see where all the insulation is later in this post so you can adjust your tool accordingly.

20) Tool inserted into groove number one, pretty deep actually, and a quick pull!

21) Tool inserted into groove number two, and another quick pull!

22) now we are at the "don't hit my frakin' door light". By just pulling really lightly here to peek inside at the connector for the bulb, the door snaps along that side started to just pop out easy.

23) Peek inside, find the connector, and detach.


24) Peek inside the door trailing edge and make sure that you got them all. They pop easy and your door should be loose like this.

25) one more to go, back to the top leading edge of the door. No tool needed, just ran my fingers in there and a quick pull.


And that ends the door snaps! The rest is super easy...or is it? Stay tuned for part 3...the Unholy Rats Nest of Despair!
J
The following users liked this post:
ThaPhenom (04-04-17)
11-14-15, 02:41 PM
#3
Driver School Candidate
Thread Starter
Part 3...The Unholy Rats Nest of Despair!
You still with me here? Good. OK the door is loose. Hopefully you were smart enough to lower your window before you started this whole thing, because I didn't and the window blocked me from taking good shots of the connectors you need to undo.
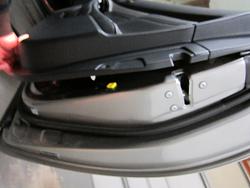
26) Lift with your knees, not with your back. Just pick up the door, it is light and lifts right off. Upsy daisy!
27) Once disconnected, you should slide the door a bit to the trailing edge to induce some slack in the cables and wires. Passenger side has one connector to detach, drivers side has two. This is for the LED ambient light.
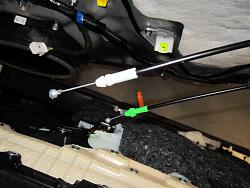
28) Now to detach the cables. They are ***** inside a pocket of the lock and handle. Just pull on the green one and the white one to unlatch them from the door frame. Once unlatched, you rotate the cable and pull the ball up out of the pocket through the grooves in the handle assembly.
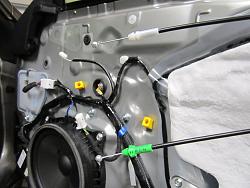
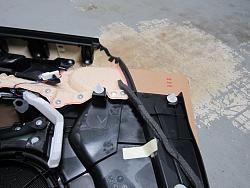
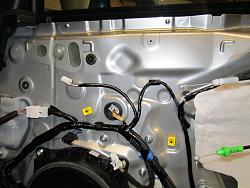
29) Door is free, I put some cardboard down since this panel is worth almost 1 grand to replace from the dealership. So here is your HOLY CRAP LOOK AT ALL THIS STUFF photos!

30) and photos of all the snaps so you can find them easier when you are feeling around.
Two in the top corner
Two in the bottom corner
Two on the bottom edge
Three on the trailing edge, blurry, sorry.
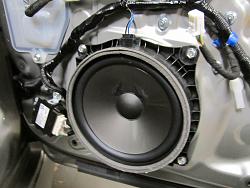
31) and some super nice door part photos!
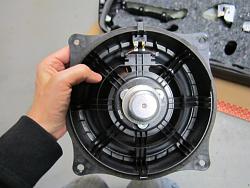
speaker
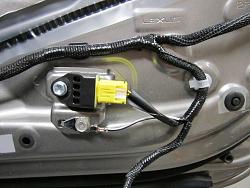
Something I am not touching because it is airbag related! Obviously a shock sensor.
Mirror Controller
No idea
Pile o' wires
Up next, trouble shooting and audiophile support
J
You still with me here? Good. OK the door is loose. Hopefully you were smart enough to lower your window before you started this whole thing, because I didn't and the window blocked me from taking good shots of the connectors you need to undo.
26) Lift with your knees, not with your back. Just pick up the door, it is light and lifts right off. Upsy daisy!


27) Once disconnected, you should slide the door a bit to the trailing edge to induce some slack in the cables and wires. Passenger side has one connector to detach, drivers side has two. This is for the LED ambient light.

28) Now to detach the cables. They are ***** inside a pocket of the lock and handle. Just pull on the green one and the white one to unlatch them from the door frame. Once unlatched, you rotate the cable and pull the ball up out of the pocket through the grooves in the handle assembly.


29) Door is free, I put some cardboard down since this panel is worth almost 1 grand to replace from the dealership. So here is your HOLY CRAP LOOK AT ALL THIS STUFF photos!


30) and photos of all the snaps so you can find them easier when you are feeling around.
Two in the top corner

Two in the bottom corner

Two on the bottom edge

Three on the trailing edge, blurry, sorry.

31) and some super nice door part photos!
speaker

Something I am not touching because it is airbag related! Obviously a shock sensor.

Mirror Controller

No idea

Pile o' wires

Up next, trouble shooting and audiophile support
J
The following users liked this post:
ThaPhenom (04-04-17)
11-14-15, 03:17 PM
#4
Driver School Candidate
Thread Starter
Final Part, trouble shooting and Audiophile support.
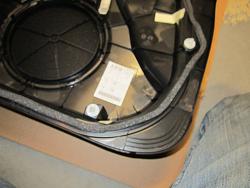
Well, hate to tell you audiophiles out there this, but these speakers look really proprietary. They are 100% molded and glued into this crazy housing. 4 bolt/screws hold it in place. I had to pry it loose as it was stuck to the door due to the seals around it. Speaker is 7.5" diameter.


Trouble shooting.
1) Rattly vibration when going over bumps, manifests only when cold outside.
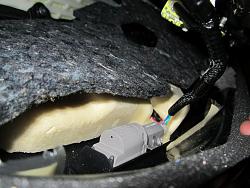
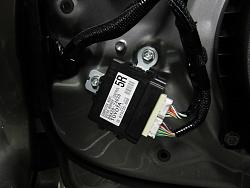
I think I found the culprit pretty quickly. This wire leads to the LED for the ambient light. The white plug is loosely connected to its black support. Also, the wire can tap around very easy in those "looms".
Problem:
Solution:
Electrical tape.
2) When pulling door handle, at first pull it feels like something is sticking inside, like grease or something is pulling apart.
Problem:
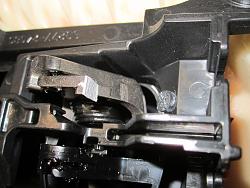
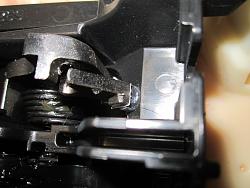
I can now actually die fulfilled that I can use the phrase, "X marks the spot". This rubber part with the black X on it is tacky, like actually sticky. Almost like the rubber is reversing. I think it is silicone or a natural rubber.

Solution:
Yep, that little grooved plastic part (a hammer) coming from the handle sticks to the rubber bumper. I took some double sided scotch tape (not the foam stuff) and taped a tiny piece of shop towel to the hammer. Sticky go bye-bye.
And so ends my first contribution to this great website. Hopefully this will help at least one of you out there and you enjoyed reading it as much as I did writing it.
Total time to take door apart.
10 minutes.
Total time to take door apart with photoshooting.
45 minutes.
Total time to put door back together.
2 minutes.
Total time to type all this up.
1.5 hours
J
Well, hate to tell you audiophiles out there this, but these speakers look really proprietary. They are 100% molded and glued into this crazy housing. 4 bolt/screws hold it in place. I had to pry it loose as it was stuck to the door due to the seals around it. Speaker is 7.5" diameter.


Trouble shooting.
1) Rattly vibration when going over bumps, manifests only when cold outside.
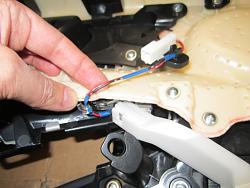
I think I found the culprit pretty quickly. This wire leads to the LED for the ambient light. The white plug is loosely connected to its black support. Also, the wire can tap around very easy in those "looms".
Problem:

Solution:
Electrical tape.

2) When pulling door handle, at first pull it feels like something is sticking inside, like grease or something is pulling apart.
Problem:
I can now actually die fulfilled that I can use the phrase, "X marks the spot". This rubber part with the black X on it is tacky, like actually sticky. Almost like the rubber is reversing. I think it is silicone or a natural rubber.

Solution:
Yep, that little grooved plastic part (a hammer) coming from the handle sticks to the rubber bumper. I took some double sided scotch tape (not the foam stuff) and taped a tiny piece of shop towel to the hammer. Sticky go bye-bye.


And so ends my first contribution to this great website. Hopefully this will help at least one of you out there and you enjoyed reading it as much as I did writing it.
Total time to take door apart.
10 minutes.
Total time to take door apart with photoshooting.
45 minutes.
Total time to put door back together.
2 minutes.
Total time to type all this up.
1.5 hours
J
11-15-15, 07:44 AM
#7
Driver School Candidate
Thread Starter
Sorry, I won't know until I drive it while it is cold outside again. Maybe Monday morning it will be in the 40's and will manifest again.
I'll be sure to report back.
Thanks.
J
I'll be sure to report back.
Thanks.
J
Trending Topics
11-16-15, 08:08 AM
#10
Driver School Candidate
Thread Starter
Also, pulling the handle while rapping that spot had no effect on the noise, so that ruled out the door handle/locking cables. More troubleshooting tonight.

ML was not available locally when I needed it. Those are the stock speakers.
11-16-15, 09:57 AM
#11
Lead Lap
My experience with door rattles is that they are only successfully stopped in under 50% of cases. When the fixes are successful, it seems like well-placed felt solved the problem. Obviously, the hardest part is to find and get to the appropriate place(s) to put the felt.
 11-17-15, 04:53 AM
#14
Driver School Candidate
Thread Starter
Got it. It was 46 degrees out this morning and not a single rattle.
I was in the right spot, just taped the wrong thing.
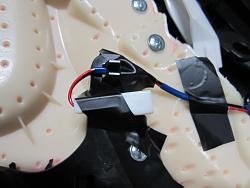
I had prior taped up this, the plug on the panel for the door led strip:

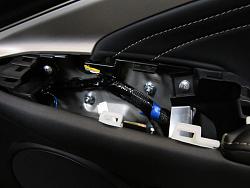
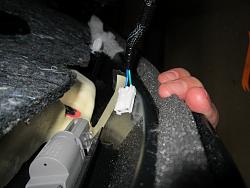
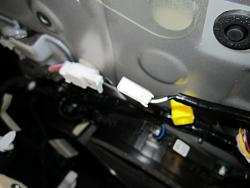
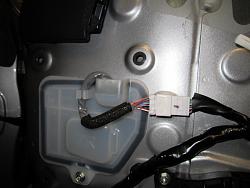
It was actually the mating plug coming from the door, not the panel. The pins rattle around in the housing pretty easy. Flicking my finger against the plug duplicated the sound. It was the plug on the right in this shot:

I just wrapped a little bit of electrical tape around the base of the plug and the two wires. It is the male plug so you can't wrap the entire thing.
Done!
At least for now...
I was in the right spot, just taped the wrong thing.
I had prior taped up this, the plug on the panel for the door led strip:
It was actually the mating plug coming from the door, not the panel. The pins rattle around in the housing pretty easy. Flicking my finger against the plug duplicated the sound. It was the plug on the right in this shot:
I just wrapped a little bit of electrical tape around the base of the plug and the two wires. It is the male plug so you can't wrap the entire thing.
Done!
At least for now...