Koyo Radiator install into SC300 5-speed
 02-23-13, 05:38 PM
#1
Hey everyone,
I know this has been written up once for an SC400 but I'll document my installation for my SC300 5-speed for any 2JZ guys doing this for the first time. I'll get some pictures up shortly. I'm not jumping into it today because I need a couple more things.
Complete parts list:
1x Koyo Radiator for 93-98 Supra Turbo M/T (P/N#R1856)
1x Koyo Radiator Cap (P/N#SKC-1)
1x OEM Supra 93-98 TT M/T fan shroud (P/N#16711-46160)
1x OEM Supra TT upper fan shroud small bracket (P/N#16715-46010)
5x Supra TT fan shroud bolts (two of the bolts are used on the small upper shroud bracket) (P/N#90119-06560)
1x OEM SC300 upper radiator hose (P/N#16571-46140)
1x OEM SC300 lower radiator hose (P/N#16572-46060)
3x jugs of Toyota 50/50 pre-diluted Super Long Life (PINK) coolant. I was advised against the red coolant since I have an aluminum radiator. And I got a good deal on them
1x MKIV Supra specific radiator coolant temperature switch/sensor (P/N#89428-24010, about $85 from Carson)
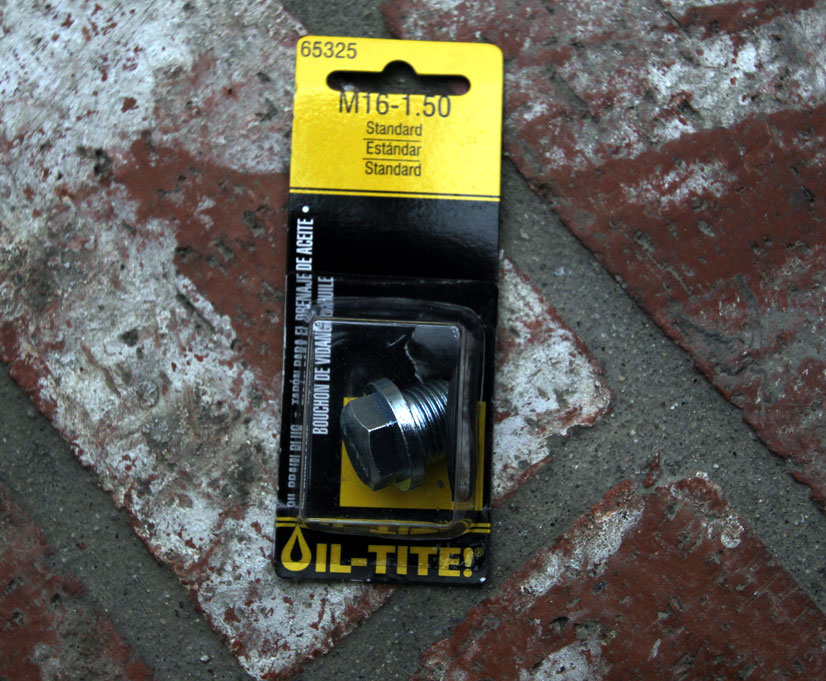
OR you can order a cheap 16mm-1.5 pitch oil/rad drain plug (see below)
2x Lowes heavy rubber pieces 2" (or very close) diameter and approximately 1" in height.
2x Lowes 5/8" diameter double-male-ended hose extension (plastic)
1x Loctite Marine epoxy
Extra tools needed for this installation:
1x 5/8th-inch drill bit (for drilling the Lowes rubber pieces to raise the radiator mounts)
1x Dremel with 90-degree angle attachment (for notching the battery tray)
EDIT: The temp sensor hole takes a size 16mm-1.5 drain bolt if you are just plugging it. This didn't appear to have been common knowledge until now so be sure to have this sorted before starting your own installation. You will have to order this online or from a specialty shop. It is not a common size. Also, be sure not to use a brass plug against your new aluminum radiator as it will promote corrosion.
As Da Coupe mentions below, two main things have to be modified to make the Supra radiator fit correctly:
--The battery tray needs to be trimmed slightly to allow for the added thickness of the Koyo and the fan shroud. I believe it is the same whether you choose to trim-fit your OEM SC shroud or use the TT Shroud.
--All Supra radiators sit an inch lower than SC radiators and so must be raised up at the rubber mount area by approximately 1".
When my last part comes in I'll get into the nitty gritty.
Edit: This writeup is for a car with a 5-speed manual transmission. If you have an automatic SC you will also need to buy a transmission cooler like the Hayden 678 because generally ALL Supra MKIV aftermarket aluminum radiators are designed without transmission cooling provisions.
I know this has been written up once for an SC400 but I'll document my installation for my SC300 5-speed for any 2JZ guys doing this for the first time. I'll get some pictures up shortly. I'm not jumping into it today because I need a couple more things.
Complete parts list:
1x Koyo Radiator for 93-98 Supra Turbo M/T (P/N#R1856)
1x Koyo Radiator Cap (P/N#SKC-1)
1x OEM Supra 93-98 TT M/T fan shroud (P/N#16711-46160)
1x OEM Supra TT upper fan shroud small bracket (P/N#16715-46010)
5x Supra TT fan shroud bolts (two of the bolts are used on the small upper shroud bracket) (P/N#90119-06560)
1x OEM SC300 upper radiator hose (P/N#16571-46140)
1x OEM SC300 lower radiator hose (P/N#16572-46060)
3x jugs of Toyota 50/50 pre-diluted Super Long Life (PINK) coolant. I was advised against the red coolant since I have an aluminum radiator. And I got a good deal on them
1x MKIV Supra specific radiator coolant temperature switch/sensor (P/N#89428-24010, about $85 from Carson)
OR you can order a cheap 16mm-1.5 pitch oil/rad drain plug (see below)
2x Lowes heavy rubber pieces 2" (or very close) diameter and approximately 1" in height.
2x Lowes 5/8" diameter double-male-ended hose extension (plastic)
1x Loctite Marine epoxy
Extra tools needed for this installation:
1x 5/8th-inch drill bit (for drilling the Lowes rubber pieces to raise the radiator mounts)
1x Dremel with 90-degree angle attachment (for notching the battery tray)
EDIT: The temp sensor hole takes a size 16mm-1.5 drain bolt if you are just plugging it. This didn't appear to have been common knowledge until now so be sure to have this sorted before starting your own installation. You will have to order this online or from a specialty shop. It is not a common size. Also, be sure not to use a brass plug against your new aluminum radiator as it will promote corrosion.
As Da Coupe mentions below, two main things have to be modified to make the Supra radiator fit correctly:
--The battery tray needs to be trimmed slightly to allow for the added thickness of the Koyo and the fan shroud. I believe it is the same whether you choose to trim-fit your OEM SC shroud or use the TT Shroud.
--All Supra radiators sit an inch lower than SC radiators and so must be raised up at the rubber mount area by approximately 1".
When my last part comes in I'll get into the nitty gritty.
Edit: This writeup is for a car with a 5-speed manual transmission. If you have an automatic SC you will also need to buy a transmission cooler like the Hayden 678 because generally ALL Supra MKIV aftermarket aluminum radiators are designed without transmission cooling provisions.
Last edited by KahnBB6; 03-05-13 at 03:17 AM. Reason: Added temp sensor plug info and part numbers

 02-23-13, 06:53 PM
#3
Thanks! I just scanned the thread but am I correct in that it is covering the temp sensor on the cylinder head? I'm trying to figure out if I have an alternative to buying a useless temp sensor for the radiator since this is a Supra TT spec Koyo and to my knowledge I won't be hooking it up to anything-- just plugging the hole.
EDIT: Again, figured this out with a second look. Thanks again for that info, however! I may have to replace the head temp sensor in the future!
EDIT: Again, figured this out with a second look. Thanks again for that info, however! I may have to replace the head temp sensor in the future!
Last edited by KahnBB6; 02-23-13 at 11:10 PM.
02-26-13, 12:11 AM
#4
A bit of backtracking here. I take it back about the temp sensor question.
Based on this thread on Supraforums: http://www.supraforums.com/forum/sho...photo-tutorial
And this photo from the same thread:

I mixed up the two lower left areas. The "blank" is the drain plug Koyo provided-- NOT a temp sensor blank. It's the white ended thing in the image above. The larger hole, as I suspected at first, apparently is for the Supra temp sensor.
Is my only solution to this to just buy the cheapest temp sensor for a Supra TT that I can find? Do SC400's or any other Toyota use an identical sensor? It won't be doing anything, just plugging the hole.
Based on this thread on Supraforums: http://www.supraforums.com/forum/sho...photo-tutorial
And this photo from the same thread:
I mixed up the two lower left areas. The "blank" is the drain plug Koyo provided-- NOT a temp sensor blank. It's the white ended thing in the image above. The larger hole, as I suspected at first, apparently is for the Supra temp sensor.
Is my only solution to this to just buy the cheapest temp sensor for a Supra TT that I can find? Do SC400's or any other Toyota use an identical sensor? It won't be doing anything, just plugging the hole.
Last edited by KahnBB6; 02-26-13 at 12:14 AM.
 02-26-13, 12:59 PM
#6
^^ That's what I did yesterday after finding a random thread on SF that addressed the issue and actually said WHAT the thread size was. I'll list it here so that other folks can be informed. I just figured this was common knowledge by now which is why I asked. The other Koyo writeup for an SC400 didn't mention a word of it.
Bolt size for the temp sensor area is 16mm-1.5. Upon the recommendation of another thread I am going to try Carquest to get an oil drain plug to fit. Top post is updated with this as well for people's future reference.
Bolt size for the temp sensor area is 16mm-1.5. Upon the recommendation of another thread I am going to try Carquest to get an oil drain plug to fit. Top post is updated with this as well for people's future reference.
Last edited by KahnBB6; 02-26-13 at 01:06 PM.
The following users liked this post:
4rcedfed (07-05-19)
02-26-13, 04:42 PM
#7
So I attempted to find a 16mm-1.5 drain plug at all the usual suspects: Pep Boys, Autozone, Carquest and a few other small auto parts stores. No one has such an odd size.
I tried a 16mm-1.33 that one place had and of course it didn't work so I ordered the "correct" size from their catalog. I should have it tomorrow to try.
Alternatives were buying a BWD sensor for $80 on special order or paying a local Toyota dealer.... wait for it... $103 plus tax for the factory sensor.... which is also special order. I know it's possible to find that part cheaper but not if you're in a hurry.
In short, if you're planning on installing a Koyo into your SC300 or 400 you really need to find the correct plug for this well in advance of your project day. You probably won't find it short of ordering online and waiting a few days.
Something I'd like to find out is if the 7MGTE Supra radiators took the same sensor. If so, it would make it a hell of a lot cheaper to find one in a junkyard.
^^ I just checked into this and the 1986-92 and 1993-98 sensors do not cross reference.
I will try the actual 16mm-1.5 plug tomorrow and confirm that it actually works.
Last edited by KahnBB6; 02-26-13 at 04:58 PM.
Trending Topics
02-26-13, 07:45 PM
#8
Driver
iTrader: (7)
Join Date: Jan 2006
Location: LA/OC California
Posts: 187
Likes: 0
Received 0 Likes
on
0 Posts
Hey whats up Craig? I just installed a mishimoto in my 400 and was pissed because I threw out the old radiator with that temp sensor. I thought it was something just for the auto trans. But apparently its a temp sensor for the hydraulic fan. So I had to order one from carson toyota which was around $70ish. The local auto stores wanted the same or even more. So it was a no brainer to go oem. Also the mishimoto is so thick that I couldn't use my oem battery tray and battery. So I took some measurements and bought a smaller battery and will have to fab up a new tray. Also I used TT lower radiator mounts which set the radiator too low to use my upper radiator mounts. So that will have to be made as well. The top of the radiator sits flush with the plastic tray which looks nice though. Just some things to consider. Good luck with the install 
02-26-13, 09:37 PM
#10
Moss! Good to hear from you! Thank you for the part number. I may just order it tomorrow morning first thing and be done with it so I can get the installation underway. The battery tray trimming I knew about an I bought a right angle adapter for my Dremel to take care of that. The radiator height I am going to take care of with a fix outlined on the SF thread I listed above by using some near 2" diameter and 1" high hard rubber pieces with a middle section that will go into the OEM SC radiator mounts.
How is your car running now? That GS rear final drive you sold me has worked out great.
How is your car running now? That GS rear final drive you sold me has worked out great.
02-27-13, 10:11 PM
#11
Driver
iTrader: (7)
Join Date: Jan 2006
Location: LA/OC California
Posts: 187
Likes: 0
Received 0 Likes
on
0 Posts
Glad to hear you're enjoying the final drive. Well after much procrastination I finally got the car running. Not the exact build I wanted but it'll do for now. Once the car gets re-registered you're free to check it out. I know you have had much interest in this swap.
03-04-13, 01:17 AM
#14
Sorry this has been delayed in getting posted. As soon as I got the car together I had a lot of packing to do for my move.
This was by far one of the least complicated things I've done to my car, although it would have been a pain without a few things sorted beforehand. Please note: my writeup concerns a 5-speed manual transmission car. If you have an automatic you will need to purchase an external transmission cooler because the Koyo and nearly all Supra aftermarket radiators are intended for manual transmission cars.
So to begin with, here's the stock radiator:

And, here's the Supra MKIV Koyo radiator:
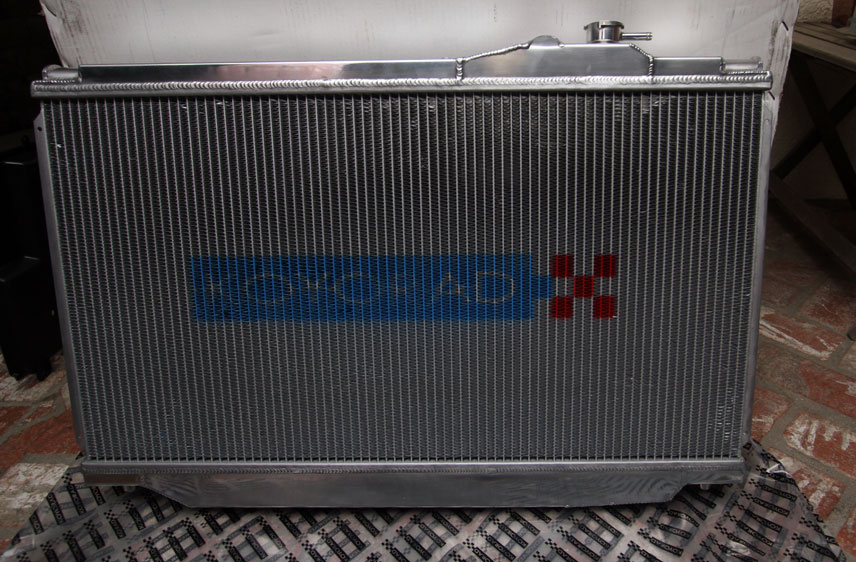

Do note that large open hole next to the drain plug. That's for the Supra electric fan temp sensor. For this installation I did not have the Supra factory electric auxiliary fan assembly so this area has to be plugged for the radiator to hold coolant.
Next, some of the accumulated small parts and a set of SC300 upper and lower radiator hoses. Contrary to what you may have heard, there is no need to trim either hose due to the added thickness of the Koyo over stock.

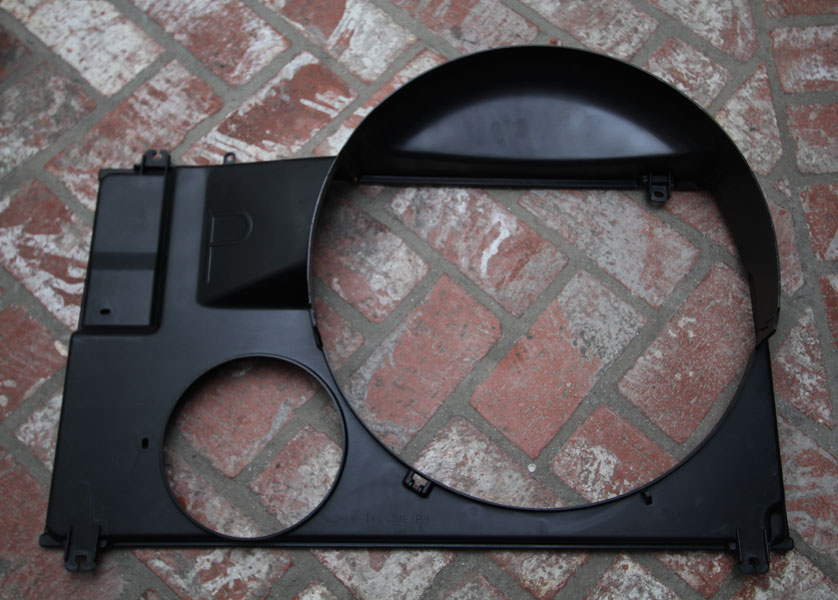
And this is the OEM Supra TT fan shroud, minus the lower section (...which is identical to the one on the SC300 so you do not have to order a Supra, specific part to fully surround the fan with this shroud. My car did not have the original part as it turns out but you do not need it. In fact, the reason the shroud only covers the fan only partially on both the Supra and SC300/Soarer is so that the radiator and shroud can be lifted in and out of the engine bay as one piece). The small round area is for the auxiliary electric fan that Supra NA's and TT's came with.
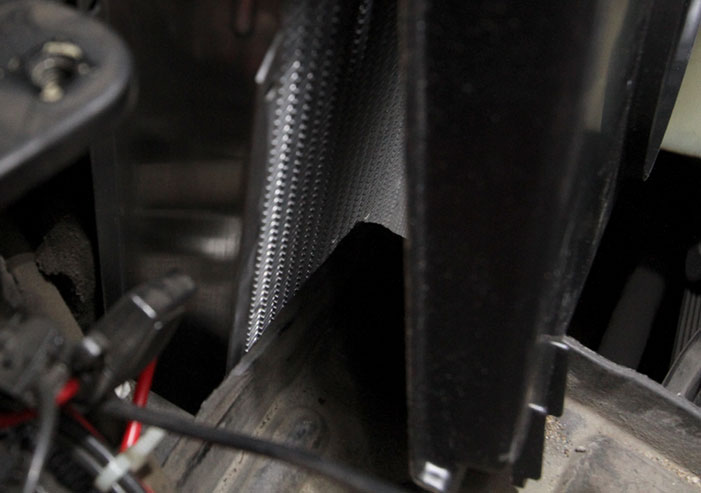
So first you need to address the battery tray clearance. You have to cut it with a Dremel in order to allow the TT (or the SC shroud) to clear with the added thickness of this big radiator.
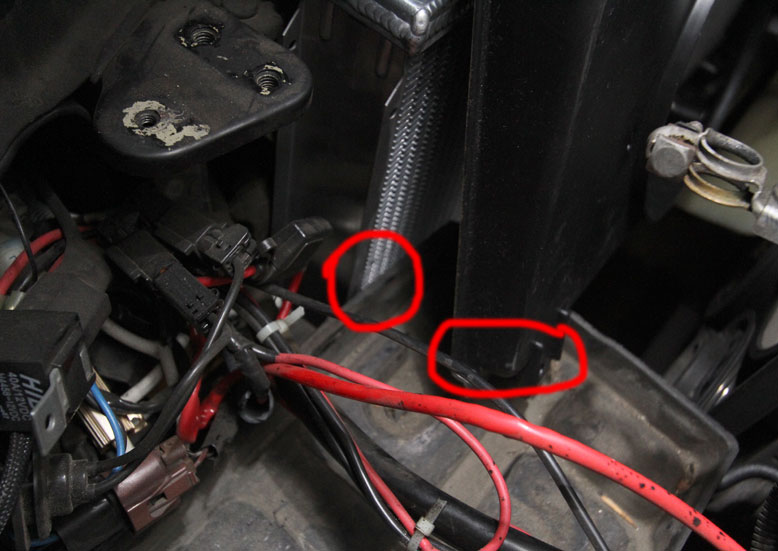
Here I have carefully (watch those fins!!!) lowered the bare Koyo without the shroud attached just to test clearance. As you can see, it's pretty tight.
Best thing is to take a light color or white grease pencil and eyeball the shroud clearance depth and width so that you have a drawn guide on the battery tray to cut with.
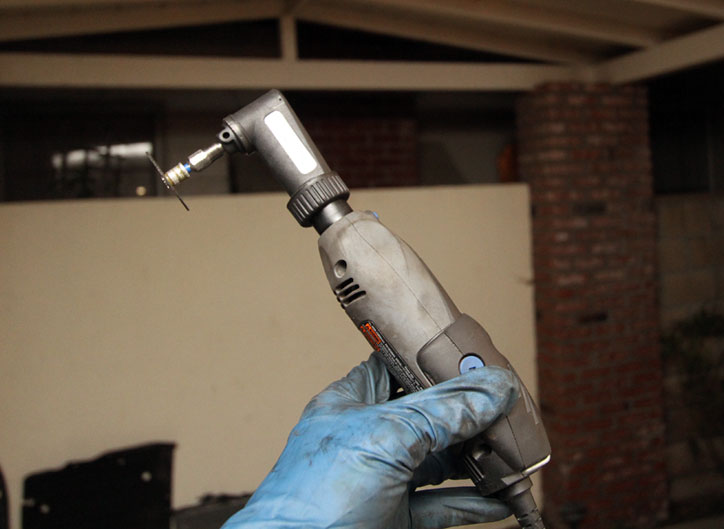
The right angle attachment with a cutting wheel on a Dremel is exactly what you need to get a nice, clean trim. It is an essential accessory if you own one of these.
Double-check and cut away what you need to fit the radiator in with the shroud already attached.
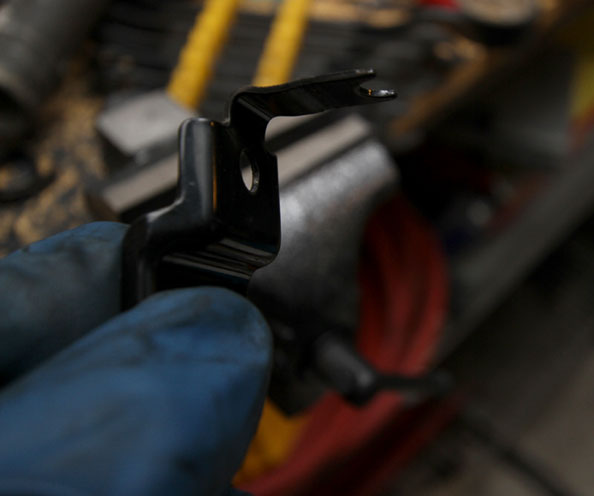
Now you have to modify this small bracket that you'll need to secure one top side of the OEM TT shroud to the radiator. I can't understand why Toyota designed this but it's a $6 part and makes things a lot cleaner and easier. Before you can install it, however, you'll need to bend out this small hooked area or clip it off in order to get it to fit with the flat top of the Koyo.
I used a $20 workbench vise to make the piece a nice, flat ninety degrees.


Now you can put the TT shroud on cleanly:

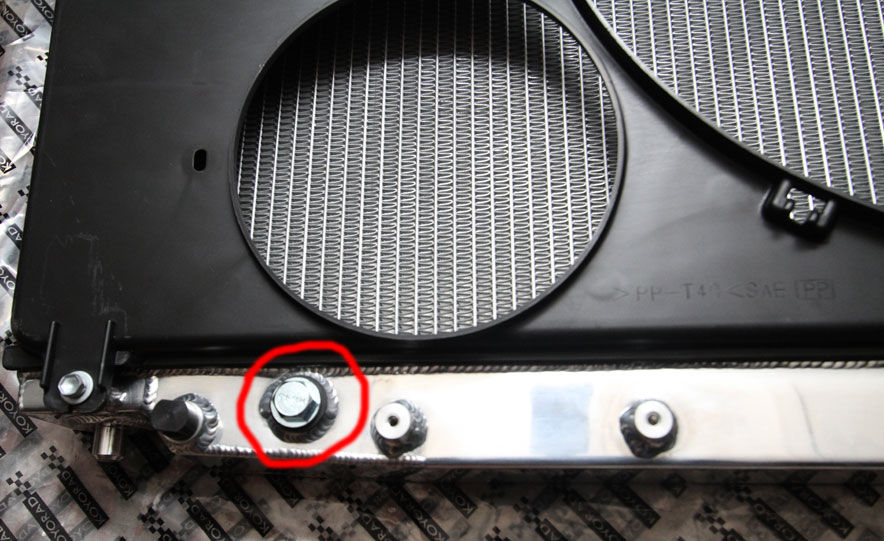
Next, let's focus in on that Supra temp sensor location. I've already addressed it in these photos but you will need a 16mm-1.5 pitch drain plug, preferably with a gasket. You likely will not find this anywhere locally so ORDER it in advance. It is a good idea to put a little blue thread locker on the drain plug when putting in. I don't know how many ft-lbs the Toyota sensor requires but being on aluminum threads I just made it reasonably tight but not tremendously tight with a regular socket wrench. I believe it takes a 17mm, 19mm or 21mm socket. Apologies, I can't remember which.
Now you CAN just get an MKIV TT radiator temp sensor instead but these are expensive-- at least $85 if not $110 in most cases. And the part does not cross reference with any other Toyota. It's a Supra MKIV specific sensor. An oil/drain drain plug costs less than $5. Either will work to block this hole to the coolant. The actual drain plug is just to the left of this plug in my pictures, just like the SC radiator.
Important note: be sure not to get a BRASS plug!!! Using brass on aluminum WILL cause corrosion! Other alloys are fine, but avoid brass.
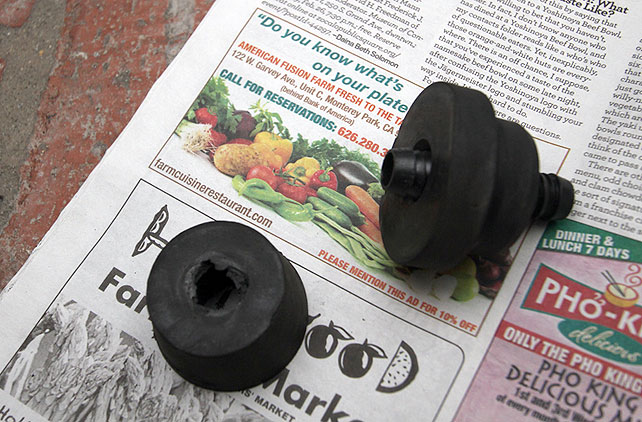
Next, you need to address the radiator mounts themselves. You will be reusing the SC radiator mounts for this-- there will be no need to order new ones. You do need to raise the mounting location approximately 1" to make the Koyo fit correctly.
You'll need two hard rubber feet/plugs from the nuts and bolts or plumbing section of your local hardware store. You want these things in approximately 1" height and as close to 2" diameter as possible.
Next, make sure you have a 5/8-inch drill bit. NOT a masonry bit just in case anyone questions the price of a $20 bit. You need a regular tip to make this work. 5/8-inch is the exact diameter of the mounting pegs on the SC300 OEM radiator and the Koyo.
You will need to drill into the very center of the larger flared end of each rubber piece. Try clamping in position for drilling with a workbench vise. Drill out the center as cleanly as possible so that you go completely through.
Then you will need to put the 5/8" double-ended plastic piece through your drilled rubber pieces.
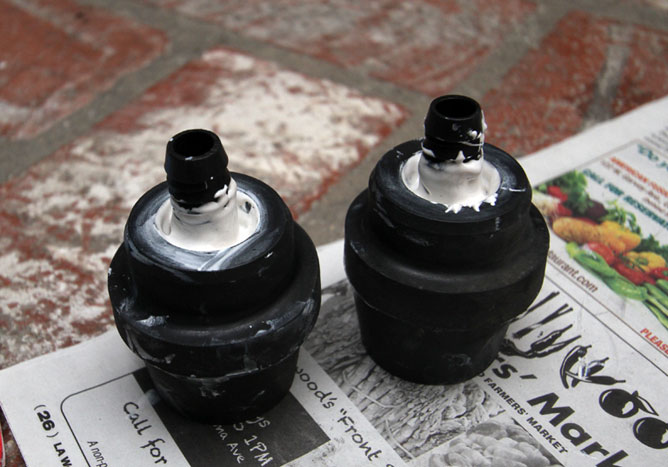
Now that you have this done, you'll want to insert the SC radiator mount onto these as shown below. The object is to allow the radiator to insert its pegs into your drilled mount and allow the plastic pegs to hold the extension rubber into the OEM radiator mounts which will sit back into the chassis crossmember in their original position.
You should test-fit this first to make sure you haven't made your plastic pegs sit too high and thus block the Koyo pegs from seating properly.
Using some heavy duty marine adhesive is a messy but ultimately effective way to fuse your modified radiator mounts with their plastic pegs in position. I spread the adhesive on the rubber extension lower (flared) ends and the top ends of the OEM SC mounts so that when dried they become permanently fused.
This sets initially in 30min but takes a good 24 hours to cure properly so you can wait to install them as long as you have the things perfectly centered or wait until the initial set and install them into the car and allow the epoxy to continue curing for hours overnight with the radiator in the car. Once they're in and the top brackets are affixed to the radiator, there isn't any movement but it is still a good idea not to drive the car until the epoxy is fully cured.

As pictured these are actually upside-down. Having the excess peg stick out is OK. It doesn't hinder mounting in the crossmember or get in the way of the factory under-diffuser panel.
Finally, you can lower in the radiator and shroud. Again, be careful not to harm the fins!
Have a friend guide the radiator into the mount position so that you can check to see if your mount modification is lined up correctly. Everything should just fit into place like a glove.
Hook up your upper and lower radiator hoses (heavy clamps so use a pair of slip-joint pliers for this).
With your mounts raised, the OEM upper radiator clamp-downs should need zero modification or shifting from their original mounting locations to fit.
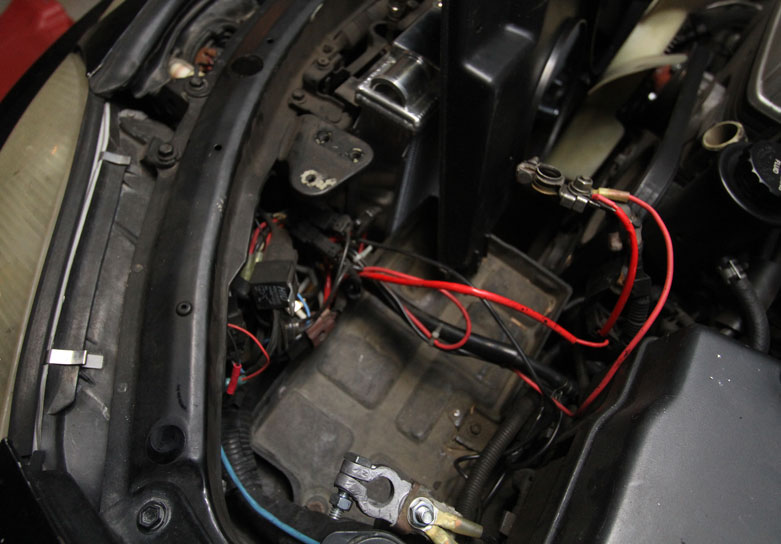
Reinstall your battery and all the other little bits you moved around to install the radiator and get ready to put new coolant in the car.
Now, you really do need to make sure air bubbles are not in the system after you do this and if you are changing coolant types you will want to flush out the old coolant either yourself by following correct procedure or by getting enough bubble pockets out after refilling with new 50/50 predistilled coolant so that the car idles correctly and then taking it to a shop or oil change facility so that they can remove and replace your coolant with a vacuum system (most effective but also the most expensive, including the coolant you just put in to get the car running and drive to them.
I won't go into these methods or tell you which is better other than that you MUST make sure you have removed air from the coolant system before you are done with this installation. I have read that SC/MKIV's may require jacking up in the front to allow bubbles to fully escape the system. Again, I filled my system, did my best and limped my car to a local shop to have the coolant sucked and refilled with a vacuum system. Which option you are most comfortable with is up to you.
Some of you may not need to hear too much detail on this but novices will want to know.
Also, don't forget to order Koyo's radiator cap because the Toyota/Lexus cap won't work. I recall a thread where 300ZX caps might work but I cannot confirm this-- please research first before trying that! I am only mentioning that as an aside.
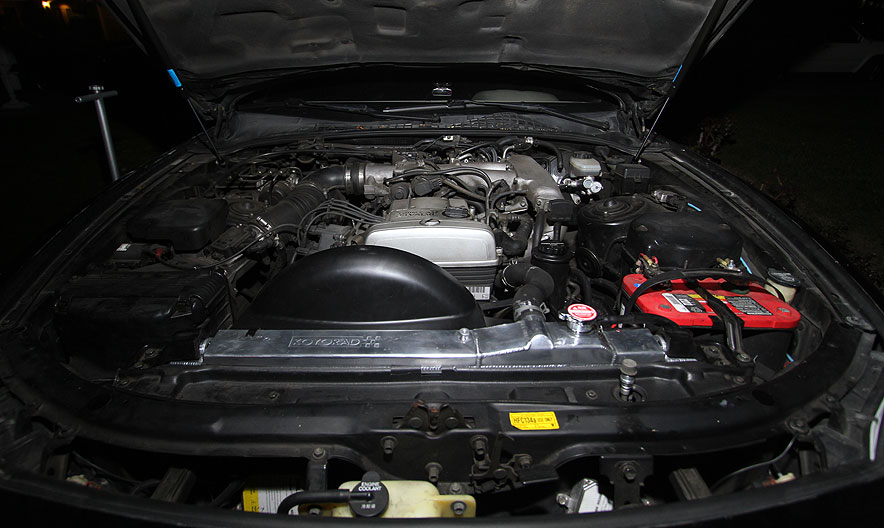
And your final result should look like this picture below. I was actually surprised that my car ran a bit stronger once I'd put this thing in and had the coolant replaced on a shop's vacuum system. My stock radiator had some nasty sludge and had clearly seen better days.
Easily one of my favorite modifications to my SC. Down the road I think I will find a used Supra MKIV electric fan and bracket and set that up like OEM but for now this is already leaps and bounds beyond my original cooling system.
This was by far one of the least complicated things I've done to my car, although it would have been a pain without a few things sorted beforehand. Please note: my writeup concerns a 5-speed manual transmission car. If you have an automatic you will need to purchase an external transmission cooler because the Koyo and nearly all Supra aftermarket radiators are intended for manual transmission cars.
So to begin with, here's the stock radiator:
And, here's the Supra MKIV Koyo radiator:
Do note that large open hole next to the drain plug. That's for the Supra electric fan temp sensor. For this installation I did not have the Supra factory electric auxiliary fan assembly so this area has to be plugged for the radiator to hold coolant.
Next, some of the accumulated small parts and a set of SC300 upper and lower radiator hoses. Contrary to what you may have heard, there is no need to trim either hose due to the added thickness of the Koyo over stock.
And this is the OEM Supra TT fan shroud, minus the lower section (...which is identical to the one on the SC300 so you do not have to order a Supra, specific part to fully surround the fan with this shroud. My car did not have the original part as it turns out but you do not need it. In fact, the reason the shroud only covers the fan only partially on both the Supra and SC300/Soarer is so that the radiator and shroud can be lifted in and out of the engine bay as one piece). The small round area is for the auxiliary electric fan that Supra NA's and TT's came with.
So first you need to address the battery tray clearance. You have to cut it with a Dremel in order to allow the TT (or the SC shroud) to clear with the added thickness of this big radiator.
Here I have carefully (watch those fins!!!) lowered the bare Koyo without the shroud attached just to test clearance. As you can see, it's pretty tight.
Best thing is to take a light color or white grease pencil and eyeball the shroud clearance depth and width so that you have a drawn guide on the battery tray to cut with.
The right angle attachment with a cutting wheel on a Dremel is exactly what you need to get a nice, clean trim. It is an essential accessory if you own one of these.
Double-check and cut away what you need to fit the radiator in with the shroud already attached.
Now you have to modify this small bracket that you'll need to secure one top side of the OEM TT shroud to the radiator. I can't understand why Toyota designed this but it's a $6 part and makes things a lot cleaner and easier. Before you can install it, however, you'll need to bend out this small hooked area or clip it off in order to get it to fit with the flat top of the Koyo.
I used a $20 workbench vise to make the piece a nice, flat ninety degrees.
Now you can put the TT shroud on cleanly:
Next, let's focus in on that Supra temp sensor location. I've already addressed it in these photos but you will need a 16mm-1.5 pitch drain plug, preferably with a gasket. You likely will not find this anywhere locally so ORDER it in advance. It is a good idea to put a little blue thread locker on the drain plug when putting in. I don't know how many ft-lbs the Toyota sensor requires but being on aluminum threads I just made it reasonably tight but not tremendously tight with a regular socket wrench. I believe it takes a 17mm, 19mm or 21mm socket. Apologies, I can't remember which.
Now you CAN just get an MKIV TT radiator temp sensor instead but these are expensive-- at least $85 if not $110 in most cases. And the part does not cross reference with any other Toyota. It's a Supra MKIV specific sensor. An oil/drain drain plug costs less than $5. Either will work to block this hole to the coolant. The actual drain plug is just to the left of this plug in my pictures, just like the SC radiator.
Important note: be sure not to get a BRASS plug!!! Using brass on aluminum WILL cause corrosion! Other alloys are fine, but avoid brass.
Next, you need to address the radiator mounts themselves. You will be reusing the SC radiator mounts for this-- there will be no need to order new ones. You do need to raise the mounting location approximately 1" to make the Koyo fit correctly.
You'll need two hard rubber feet/plugs from the nuts and bolts or plumbing section of your local hardware store. You want these things in approximately 1" height and as close to 2" diameter as possible.
Next, make sure you have a 5/8-inch drill bit. NOT a masonry bit just in case anyone questions the price of a $20 bit. You need a regular tip to make this work. 5/8-inch is the exact diameter of the mounting pegs on the SC300 OEM radiator and the Koyo.
You will need to drill into the very center of the larger flared end of each rubber piece. Try clamping in position for drilling with a workbench vise. Drill out the center as cleanly as possible so that you go completely through.
Then you will need to put the 5/8" double-ended plastic piece through your drilled rubber pieces.
Now that you have this done, you'll want to insert the SC radiator mount onto these as shown below. The object is to allow the radiator to insert its pegs into your drilled mount and allow the plastic pegs to hold the extension rubber into the OEM radiator mounts which will sit back into the chassis crossmember in their original position.
You should test-fit this first to make sure you haven't made your plastic pegs sit too high and thus block the Koyo pegs from seating properly.
Using some heavy duty marine adhesive is a messy but ultimately effective way to fuse your modified radiator mounts with their plastic pegs in position. I spread the adhesive on the rubber extension lower (flared) ends and the top ends of the OEM SC mounts so that when dried they become permanently fused.
This sets initially in 30min but takes a good 24 hours to cure properly so you can wait to install them as long as you have the things perfectly centered or wait until the initial set and install them into the car and allow the epoxy to continue curing for hours overnight with the radiator in the car. Once they're in and the top brackets are affixed to the radiator, there isn't any movement but it is still a good idea not to drive the car until the epoxy is fully cured.
As pictured these are actually upside-down. Having the excess peg stick out is OK. It doesn't hinder mounting in the crossmember or get in the way of the factory under-diffuser panel.
Finally, you can lower in the radiator and shroud. Again, be careful not to harm the fins!
Have a friend guide the radiator into the mount position so that you can check to see if your mount modification is lined up correctly. Everything should just fit into place like a glove.
Hook up your upper and lower radiator hoses (heavy clamps so use a pair of slip-joint pliers for this).
With your mounts raised, the OEM upper radiator clamp-downs should need zero modification or shifting from their original mounting locations to fit.
Reinstall your battery and all the other little bits you moved around to install the radiator and get ready to put new coolant in the car.
Now, you really do need to make sure air bubbles are not in the system after you do this and if you are changing coolant types you will want to flush out the old coolant either yourself by following correct procedure or by getting enough bubble pockets out after refilling with new 50/50 predistilled coolant so that the car idles correctly and then taking it to a shop or oil change facility so that they can remove and replace your coolant with a vacuum system (most effective but also the most expensive, including the coolant you just put in to get the car running and drive to them.
I won't go into these methods or tell you which is better other than that you MUST make sure you have removed air from the coolant system before you are done with this installation. I have read that SC/MKIV's may require jacking up in the front to allow bubbles to fully escape the system. Again, I filled my system, did my best and limped my car to a local shop to have the coolant sucked and refilled with a vacuum system. Which option you are most comfortable with is up to you.
Some of you may not need to hear too much detail on this but novices will want to know.
Also, don't forget to order Koyo's radiator cap because the Toyota/Lexus cap won't work. I recall a thread where 300ZX caps might work but I cannot confirm this-- please research first before trying that! I am only mentioning that as an aside.
And your final result should look like this picture below. I was actually surprised that my car ran a bit stronger once I'd put this thing in and had the coolant replaced on a shop's vacuum system. My stock radiator had some nasty sludge and had clearly seen better days.
Easily one of my favorite modifications to my SC. Down the road I think I will find a used Supra MKIV electric fan and bracket and set that up like OEM but for now this is already leaps and bounds beyond my original cooling system.
Last edited by KahnBB6; 05-23-14 at 03:23 AM. Reason: Small clarification update
The following users liked this post:
4rcedfed (07-05-19)
04-11-13, 11:48 AM
#15
So here's a question for you guys:
I have the 93-98 Supra TT radiator coolant temp sensor installed in my Koyo in place of the aforementioned M16-1.5 plug because I had to fix a freeze plug leak. I figured it might as well go in there while I had the coolant changed again. Now I'm looking into buying the OEM electric auxiliary fan assembly soon. This thing on the radiator in the picture here:
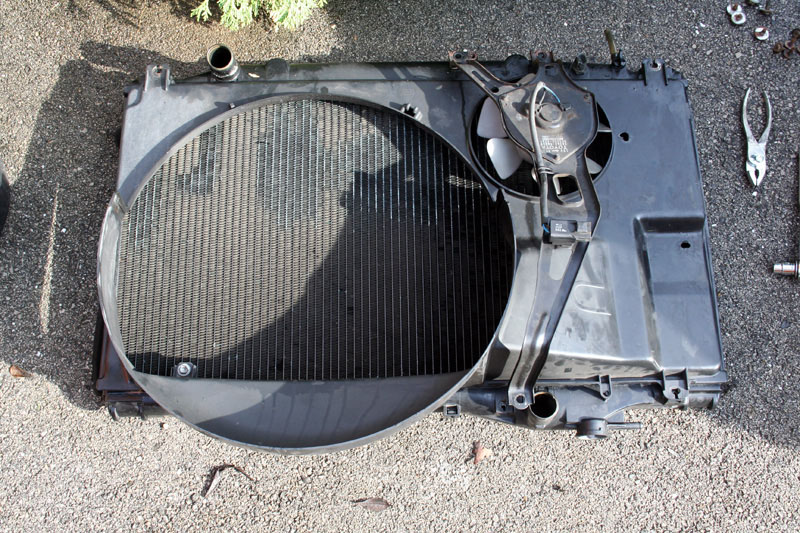
I just checked into the cable needed to hook that fan to the temp sensor and my parts guy tells me that it's part of the main engine harness for Supra TT's and not separate.
So now I'm wondering if any of you guys have come up with a custom wiring solution to run this small OEM TT fan in your SC's. Does anyone know which connectors these take? Is this as simple as creating a relay circuit that gets tripped by the radiator sensor or is that sensor meant to be wired merely as a 12V power interrupt until it hits a certain temperature? Or does that sensor just put out an electronic and not analogue signal, suggesting I can only use it with the GTE ECU?
May 2014 Update: I just obtained one of these 1993-1996 TT A/C helper fans and bolted it right onto the Koyo. I haven't hooked it up to a non-turbo ECU harness yet but it's a simple +12V and ground connection.
If you do the same, you will need three of these bolts from Toyota: P/N 90119-06560
For the record, my fan shroud swap uses the 93-96 TT A/C electric fan opening. 97-98 Supra TT's used a different shroud to accommodate a twin electric A/C helper fan setup.
I have the 93-98 Supra TT radiator coolant temp sensor installed in my Koyo in place of the aforementioned M16-1.5 plug because I had to fix a freeze plug leak. I figured it might as well go in there while I had the coolant changed again. Now I'm looking into buying the OEM electric auxiliary fan assembly soon. This thing on the radiator in the picture here:
I just checked into the cable needed to hook that fan to the temp sensor and my parts guy tells me that it's part of the main engine harness for Supra TT's and not separate.
So now I'm wondering if any of you guys have come up with a custom wiring solution to run this small OEM TT fan in your SC's. Does anyone know which connectors these take? Is this as simple as creating a relay circuit that gets tripped by the radiator sensor or is that sensor meant to be wired merely as a 12V power interrupt until it hits a certain temperature? Or does that sensor just put out an electronic and not analogue signal, suggesting I can only use it with the GTE ECU?
May 2014 Update: I just obtained one of these 1993-1996 TT A/C helper fans and bolted it right onto the Koyo. I haven't hooked it up to a non-turbo ECU harness yet but it's a simple +12V and ground connection.
If you do the same, you will need three of these bolts from Toyota: P/N 90119-06560
For the record, my fan shroud swap uses the 93-96 TT A/C electric fan opening. 97-98 Supra TT's used a different shroud to accommodate a twin electric A/C helper fan setup.
Last edited by KahnBB6; 05-22-14 at 02:38 PM. Reason: Updated info
The following users liked this post:
4rcedfed (07-05-19)