
How to: Trunk Lift Support w/ pics...


Driver School Candidate
Joined: Jul 2005
Posts: 13
Likes: 0
From: MD
Thanks to howiedoit, I no longer have to use my shoulder to hold open the trunk. No more rushing to load the it before the lid comes crashing down.
I used the $19 StrongArm supports from Advanced Auto. As instructed, I used the 12mm to get the stock struts off. No heat, just elbow grease. I used an 11mm to cinch down the new ball joints.
GREAT THREAD!
I used the $19 StrongArm supports from Advanced Auto. As instructed, I used the 12mm to get the stock struts off. No heat, just elbow grease. I used an 11mm to cinch down the new ball joints.
GREAT THREAD!
Lead Lap
Joined: Jun 2008
Posts: 765
Likes: 0
From: Texas
You probably don't have to, but I bought the more expensive trunk struts. They are $50+
Original Part No: 60D03 W321
New: W0133-1628624
* Remove Back Trunk Panel
A. Pull Panel away from metal friction clips on top, then sides.
B. Remove 2 plastic friction screws, 1 on bottom left side, other is on bottom right side.
C. Complete, now remove panel from trunk.
* Remove Old Trunk Struts
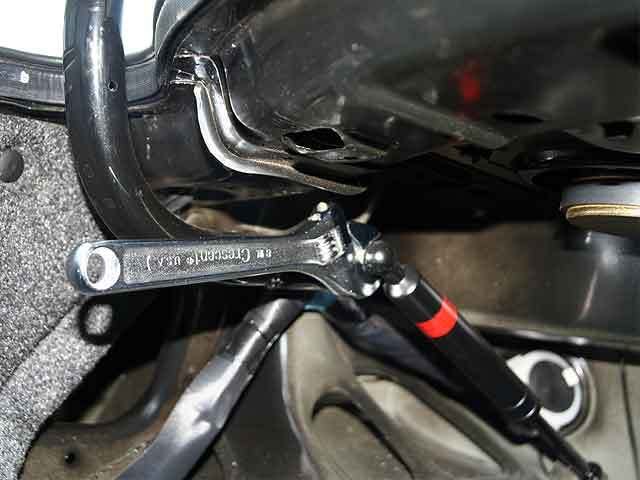
A. First Remove ball-joint bolt that is near you. Do not worry about nut on other side, it is welded and will not turn.
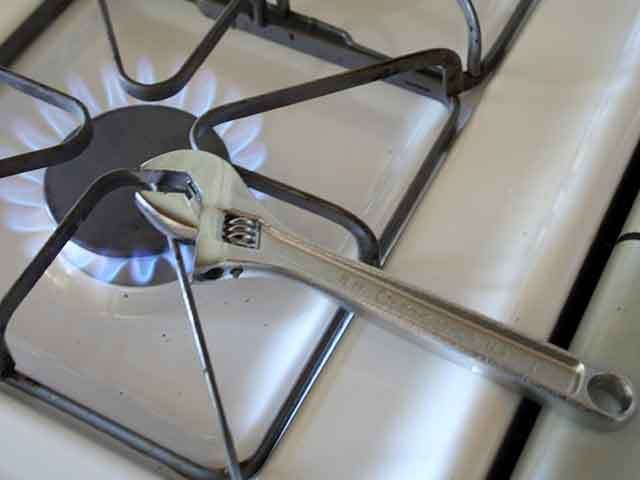
Tip: Use adjustable wrench, is wider and has better grip.
(Important) Heat wrench on stove, you will strip the ball-joint bolt if it's not heated. Is more safe then having open flame next to your gas-tank.
Tip. Loosen: For driver side; turn wrench down. For passenger side; turn wrench up.
Tip: Keep turning the wrench until the ball-joint bolt is removed, is a tight fit & will take a few minutes.
C. Use flat head screw driver and bend retainer clip. Strut will slide off.
Tip: You only need to bend one retainer clip, not both.
(Important) Install your new strut after you remove the first, trunk door becomes heavy!
*Installing New Trunk Strut
A. Place washer/spacer onto ball-joint bolt.
B. Screw ball-joint bolt with washer into trunk door. Use wrench, no heat this time.
Tip. Tighten: For driver side; turn wrench up. For passenger side; turn wrench down.
Tip: If you're having trouble with the threading; use a socket wrench.
C. Install fare end of strut first. Slide onto bolt past the retainer clips.
D. Install near end of stut into ball-joint bolt.
Tip: Add grease to new ball joint if you want.
Tip: You may need to open trunk all the way, or push down on the strut. You need to be strong, or find someone who is. Be careful, dont let hand slip.
Install trunk panel, clean up.
Original Part No: 60D03 W321
New: W0133-1628624
* Remove Back Trunk Panel
A. Pull Panel away from metal friction clips on top, then sides.
B. Remove 2 plastic friction screws, 1 on bottom left side, other is on bottom right side.
C. Complete, now remove panel from trunk.
* Remove Old Trunk Struts
A. First Remove ball-joint bolt that is near you. Do not worry about nut on other side, it is welded and will not turn.
Tip: Use adjustable wrench, is wider and has better grip.
(Important) Heat wrench on stove, you will strip the ball-joint bolt if it's not heated. Is more safe then having open flame next to your gas-tank.
Tip. Loosen: For driver side; turn wrench down. For passenger side; turn wrench up.
Tip: Keep turning the wrench until the ball-joint bolt is removed, is a tight fit & will take a few minutes.
C. Use flat head screw driver and bend retainer clip. Strut will slide off.
Tip: You only need to bend one retainer clip, not both.
(Important) Install your new strut after you remove the first, trunk door becomes heavy!
*Installing New Trunk Strut
A. Place washer/spacer onto ball-joint bolt.
B. Screw ball-joint bolt with washer into trunk door. Use wrench, no heat this time.
Tip. Tighten: For driver side; turn wrench up. For passenger side; turn wrench down.
Tip: If you're having trouble with the threading; use a socket wrench.
C. Install fare end of strut first. Slide onto bolt past the retainer clips.
D. Install near end of stut into ball-joint bolt.
Tip: Add grease to new ball joint if you want.
Tip: You may need to open trunk all the way, or push down on the strut. You need to be strong, or find someone who is. Be careful, dont let hand slip.
Install trunk panel, clean up.
Last edited by dAng_bAy; Jul 28, 2008 at 05:47 PM.


Lead Lap
Joined: Sep 2006
Posts: 691
Likes: 1
From: ca
Hey Howie I did the same thing ... the right trunk lift support bolt is stripped and I can't get it off  How did you go about getting your bolt off after your stripped it? Any sort of tricks? Dam thing is so tight, I wish I didn't strip it . If anyone has any sudgestion please post... need help bad.
How did you go about getting your bolt off after your stripped it? Any sort of tricks? Dam thing is so tight, I wish I didn't strip it . If anyone has any sudgestion please post... need help bad.n't do that um your gonna have to fabricate something


Newb question, but I want to make sure I'm attacking the correct bolt (in the red box, it's very stubborn):
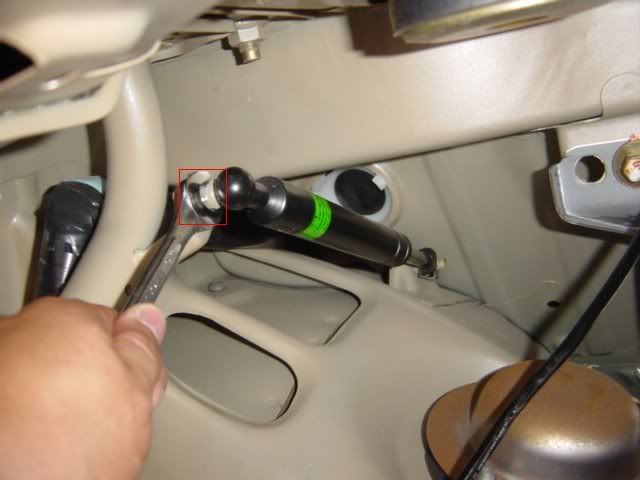
(Picture credit goes to howiedoit)
(Picture credit goes to howiedoit)
Last edited by felixsc300; Dec 11, 2008 at 11:27 PM.
I still can't get it off. I tried attaching a wrench and hammering it, heated the bolt for 1-2 minutes using a lighter, and sprayed WD-40. > Any other suggestions before I go mad? Does the cold have anything to do with the tightness of the bolt?
Any other suggestions before I go mad? Does the cold have anything to do with the tightness of the bolt?
[edit] looked at pic and yes, downwards is counter-clock if you look at it at the bracket's perspective instead of the shock. I remember when I did this I just followed everything to a T and all went well.
Last edited by mr2tosc4; Dec 13, 2008 at 05:36 AM.
 I'm glad I didn't strip it.
I'll go out and give it (turning upwards for driver's side) a try.
Yea if they are the factory shocks then there is some loctite on there that should be heated up. Maybe the cold weather makes it longer for it to soften.
As for which direction to turn the wrench, you should be pushing the handle of the wrench downwards (counter clockwise) if referring to the pic on post #188. Try to get some more leverage out of it by attaching a pipe to the end of the wrench. Hope you are using a non-adjustable wrench.
srighter provided the correct information.
Last edited by TheMole; Dec 13, 2008 at 01:12 AM.
Yea if they are the factory shocks then there is some loctite on there that should be heated up. Maybe the cold weather makes it longer for it to soften.
As for which direction to turn the wrench, you should be pushing the handle of the wrench downwards (counter clockwise) if referring to the pic on post #188.
srighter provided the correct information.
As for which direction to turn the wrench, you should be pushing the handle of the wrench downwards (counter clockwise) if referring to the pic on post #188.
srighter provided the correct information.
Thanks for verification of the info and also for your help!