


How to: Trunk Lift Support w/ pics...
 01-30-08, 01:58 PM
#166


Are you serious? PERRYinLA took the time to take pics and write down a step by step how-to and this is what he gets in return? It is YOUR responsibility for how you use information and for what you do to your own car. If he was getting paid to fix your trunk supports then fine you can complain all you want, but that's not the case as he is using his own time to help other forum members. I used these pics and steps with no issues, but it didn't tell me I had to "open my trunk" or "walk to my car" to change them so I was stuck for a while.

 01-30-08, 02:05 PM
#167
Lexus Champion

woooow did your mom teach you to thank people like that?


 01-30-08, 09:31 PM
#169
Driver School Candidate

Join Date: Jan 2008
Location: Ca
Posts: 3
Likes: 0
Received 0 Likes
on
0 Posts
Replacing 1992 SC400 Trunk Struts
You probably don't have to, but I bought the more expensive trunk struts. They are $50+
Original Part No: 60D03 W321
New: W0133-1628624
* Remove Back Trunk Panel
A. Pull Panel away from metal friction clips on top, then sides.
B. Remove 2 plastic friction screws, 1 on bottom left side, other is on bottom right side.
C. Complete, now remove panel from trunk.
* Remove Old Trunk Struts
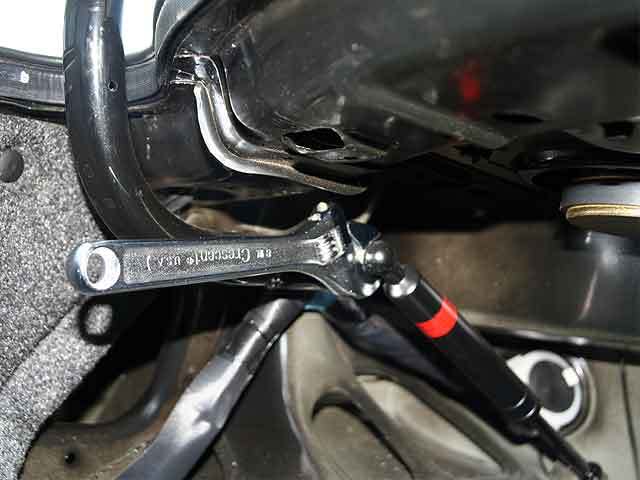
A. First Remove ball-joint bolt that is near you. Do not worry about nut on other side, it is welded and will not turn.
Tip: Use adjustable wrench, is wider and has better grip.
(Important) Heat wrench on stove, you will strip the ball-joint bolt if it's not heated. Is more safe then having open flame next to your gas-tank.
Tip. Loosen: For driver side; turn wrench down. For passenger side; turn wrench up.
Tip: Keep turning the wrench until the ball-joint bolt is removed, is a tight fit & will take a few minutes.
C. Use flat head screw driver and bend retainer clip. Strut will slide off.
Tip: You only need to bend one retainer clip, not both.
(Important) Install your new strut after you remove the first, trunk door becomes heavy!
*Installing New Trunk Strut
A. Place washer/spacer onto ball-joint bolt.
B. Screw ball-joint bolt with washer into trunk door. Use wrench, no heat this time.
Tip. Tighten: For driver side; turn wrench up. For passenger side; turn wrench down.
Tip: If you're having trouble with the threading; use a socket wrench.
C. Install fare end of strut first. Slide onto bolt past the retainer clips.
D. Install near end of stut into ball-joint bolt.
Tip: Add grease to new ball joint if you want.
Tip: You may need to open trunk all the way, or push down on the strut. You need to be strong, or find someone who is. Be careful, dont let hand slip.
Install trunk panel, clean up.

Original Part No: 60D03 W321
New: W0133-1628624
* Remove Back Trunk Panel
A. Pull Panel away from metal friction clips on top, then sides.
B. Remove 2 plastic friction screws, 1 on bottom left side, other is on bottom right side.
C. Complete, now remove panel from trunk.
* Remove Old Trunk Struts
A. First Remove ball-joint bolt that is near you. Do not worry about nut on other side, it is welded and will not turn.
Tip: Use adjustable wrench, is wider and has better grip.
(Important) Heat wrench on stove, you will strip the ball-joint bolt if it's not heated. Is more safe then having open flame next to your gas-tank.
Tip. Loosen: For driver side; turn wrench down. For passenger side; turn wrench up.
Tip: Keep turning the wrench until the ball-joint bolt is removed, is a tight fit & will take a few minutes.
C. Use flat head screw driver and bend retainer clip. Strut will slide off.
Tip: You only need to bend one retainer clip, not both.
(Important) Install your new strut after you remove the first, trunk door becomes heavy!
*Installing New Trunk Strut
A. Place washer/spacer onto ball-joint bolt.
B. Screw ball-joint bolt with washer into trunk door. Use wrench, no heat this time.
Tip. Tighten: For driver side; turn wrench up. For passenger side; turn wrench down.
Tip: If you're having trouble with the threading; use a socket wrench.
C. Install fare end of strut first. Slide onto bolt past the retainer clips.
D. Install near end of stut into ball-joint bolt.
Tip: Add grease to new ball joint if you want.
Tip: You may need to open trunk all the way, or push down on the strut. You need to be strong, or find someone who is. Be careful, dont let hand slip.
Install trunk panel, clean up.
Last edited by srighter; 01-31-08 at 12:25 AM.
01-30-08, 09:44 PM
#170
Racer


 02-09-08, 06:35 PM
#172
Driver School Candidate

Join Date: Dec 2007
Location: CA
Posts: 41
Likes: 0
Received 0 Likes
on
0 Posts
Nice
Ok. Well I have had my car for over 2 years now and i finally decided i was going to fix the trunk supports. So i went to Star Auto and picked up a pair of "STRONGARM Gas Charged Lift Supports" P/N 4508.
Here is a picture of the product with the part number.

I put them in and this is what i got.
http://www.youtube.com/watch?v=mlGGfnFeFBY



Here is a picture of the product with the part number.
I put them in and this is what i got.
http://www.youtube.com/watch?v=mlGGfnFeFBY
Last edited by Markae86; 02-09-08 at 06:41 PM.
02-11-08, 10:47 AM
#174
Rookie

Join Date: Oct 2007
Location: Ontario, Canada
Posts: 91
Likes: 0
Received 0 Likes
on
0 Posts
I did mine this past weekend using Stabilus ones ordered from the eBay vendor previously mentioned. They worked great.
To answer someone else's question from a few posts ago here, the reason to remove the ball sockets from the trunk arm is probably out of necessity. My trunk struts looked to be factory ones, and the ball sockets were not removable from the end of the strut. The replacements I installed, however, did allow the new ball sockets to snap into place. I am guessing if you had ball sockets that were not permanently built-into the strut itself (eg. snap-ins), then someone had already replaced them on your car at least once in the past.
My 1997 SC400 trunk lid won't fly up automatically by itself when the trunk release is popped, but once you open it part-way with your hand, it sure shoots itself open for the remaining half of the travel.
I would recommend holding a zippo (or similar) lighter on those bolt-heads for ten seconds and then use steady force to try and move them with the wrench. Mine were definitely solidly fixed in place with that LocTite; I was almost convinced I must have been turning them in the wrong direction. After ten seconds of heat, both sides started moving very easily.
I also figured out what the rubber bumpers being discussed here were -- they are on the trunk arm itself, up near the lip of the trunk opening (away from where the struts are). Someone above said they didn't have them on their car -- I would look for a pair if I were you -- it looks as though the trunk struts (or maybe even a gust of wind) could open the trunk too far someday without those in place.
To answer someone else's question from a few posts ago here, the reason to remove the ball sockets from the trunk arm is probably out of necessity. My trunk struts looked to be factory ones, and the ball sockets were not removable from the end of the strut. The replacements I installed, however, did allow the new ball sockets to snap into place. I am guessing if you had ball sockets that were not permanently built-into the strut itself (eg. snap-ins), then someone had already replaced them on your car at least once in the past.
My 1997 SC400 trunk lid won't fly up automatically by itself when the trunk release is popped, but once you open it part-way with your hand, it sure shoots itself open for the remaining half of the travel.
I would recommend holding a zippo (or similar) lighter on those bolt-heads for ten seconds and then use steady force to try and move them with the wrench. Mine were definitely solidly fixed in place with that LocTite; I was almost convinced I must have been turning them in the wrong direction. After ten seconds of heat, both sides started moving very easily.
I also figured out what the rubber bumpers being discussed here were -- they are on the trunk arm itself, up near the lip of the trunk opening (away from where the struts are). Someone above said they didn't have them on their car -- I would look for a pair if I were you -- it looks as though the trunk struts (or maybe even a gust of wind) could open the trunk too far someday without those in place.
02-18-08, 08:32 PM
#175
Driver School Candidate

Join Date: Feb 2008
Location: GA
Posts: 19
Likes: 0
Received 0 Likes
on
0 Posts
Picked up the Monroe Mighty Lifts from RockAuto last week. Everything was cool until I realized there were no ball-joint bolt things! Went to Autozone, and they didn't sell loose ball-joints, but they did sell Mighty Lift branded Mighty Lifts (didn't have the SC400 ones in stock, though). The guy looked in some of their packaging to see if they came with ball-joints, and they did! :-(
Luckily, he took pity on me, and handed me the ball-joints he found in his packaging. "Here buddy, just take them." Cool!
They screwed in fine, and worked like a charm! My SC400 trunk doesn't pop up completely, without getting the trunk started, anyway. They do squeak a little, though. Any ideas?
-Z
Luckily, he took pity on me, and handed me the ball-joints he found in his packaging. "Here buddy, just take them." Cool!
They screwed in fine, and worked like a charm! My SC400 trunk doesn't pop up completely, without getting the trunk started, anyway. They do squeak a little, though. Any ideas?
-Z
 02-19-08, 07:21 AM
#177
Rookie
Join Date: Oct 2007
Location: Ontario, Canada
Posts: 91
Likes: 0
Received 0 Likes
on
0 Posts
I really think the only people who will see the trunk open itself upon being popped using struts are the people using the struts meant for the trunk lid with spoiler on their non-spoiler lid.
Hooking in some actuators to open it upon being popped may be a fun project for someone?
Hooking in some actuators to open it upon being popped may be a fun project for someone?
02-29-08, 07:19 PM
#178

great write up! took me about 20 min to install... i'm one of those people who don't like how the trunk pops open when you use the trunk release so i ordered only one trunk strut meant for trunk w/ spoiler only replace one strut and work great! thanks again!
 04-07-08, 05:16 PM
#180
Pole Position

Join Date: Feb 2008
Location: Fl
Posts: 389
Likes: 0
Received 0 Likes
on
0 Posts
I replaced my supports today ... and this tutorial helped a LOT. Thank you ..
I purchased part #4508 (x2) at my local Advanceauto store for $17 each. Total cost of this project (with tax) was about $36.50. The old supports came out pretty easily BUT the hardest part of this project is removing the old ball-joints. The passenger side was a breeze while I thought I would have to cut out the driver's side. Luckily I finally got the ball joint to loosen ... without having to heat the joint.
Total time to complete project = about 30 minutes (give yourself extra time if the old ball joints are tough to loosen).
Total cost = about $36
Project complexity = 1.5 out of 5
After replacement of the Strongarm supports from Advanceauto my trunk lid rises automatically once the lid release lever is pulled. The cool factor alone is worth the $36 I spent on the project.
I HIGHLY recommend this project especially if you have had your trunk lid fall on your head ... at least once.
Good luck ...
I purchased part #4508 (x2) at my local Advanceauto store for $17 each. Total cost of this project (with tax) was about $36.50. The old supports came out pretty easily BUT the hardest part of this project is removing the old ball-joints. The passenger side was a breeze while I thought I would have to cut out the driver's side. Luckily I finally got the ball joint to loosen ... without having to heat the joint.
Total time to complete project = about 30 minutes (give yourself extra time if the old ball joints are tough to loosen).
Total cost = about $36
Project complexity = 1.5 out of 5
After replacement of the Strongarm supports from Advanceauto my trunk lid rises automatically once the lid release lever is pulled. The cool factor alone is worth the $36 I spent on the project.
I HIGHLY recommend this project especially if you have had your trunk lid fall on your head ... at least once.
Good luck ...