HOW TO: LS460/460L Serpentine belt replacement with pics
 12-21-12, 09:24 PM
#1
Pit Crew
Thread Starter

My LS460L has developed an annoying squeak once it warms up, directly related to RPM and before I start using the warranty for tensioner issues, I figured I would try the belt first.
60,000 miles of being encased under the hood of a car with even more plastic panels does not bode well for rubber and plastic pieces.
Tools needed:
Dental Pick, Trim Fork, Flat head (for the clips)
Phillips Head Screwdriver
Ratchet
10 mm socket or wrench
14 mm socket with a cheater bar or a serpentine belt tool
New belt (I purchased a Bando brand unit)
Air Filters since its a convenient time
I hold no responsibility to this write up, proceed at your own risk.
1. Open the Hood
2. Use your flatheads, picks, etc to remove the plastic retainer clips that are on the front of the beauty cover. There should be five. Next, Remove the Large silver 'beauty cover' including the oil filler door. This pulls straight up.

3. Use a 10 mm wrench to loosen the bolts on each side of the "snorkel"


4. The assembly is now loose, you should be able to pick up on it. (I have not yet removed the beauty cover).

5. At each airbox, the snorkel has a rubber connection that clips on with a tab thats part of the box. Lift up on each side of the engine and the snorkel slides off.


Heres the snorkel removed. Note the tube that goes from each airbox to the throttle body in the middle. On the driver side of the tube, is a wire loom that clips onto the Tube. You can use a screwdriver or trim fork to remove the clip because we will be removing this tube.

6. Using a phillips head, loosen each clamp at the airbox, and the clamp going to the throttle body.


7. Now remove the two breather hoses that go into the Throttle body hose assembly. The clamps are easy to compress. Just press them in and then you can easily wiggle the hose off. No need to disconnect them from the engine side, just at the tube.

8. Gently wiggle the whole "Y" assembly towards the radiator and then straight up once the tubes have disconnected. Then you will see this. Note to the right of the harmonic balancer the hole with the grommet. This is where the "Y" tube will sit when you reinstall it.
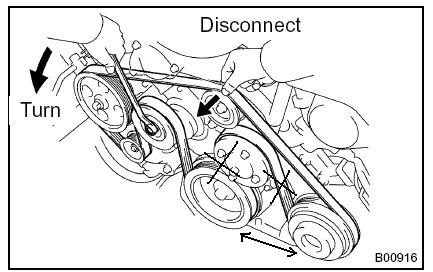
The lower left pulley in this photo is the tensioner. You will need a 14mm socket with a long "cheater bar" to replace the belt. The tensioner removes slack by turning the 14mm bolt COUNTER clockwise. Below the tensioner, is a slot you keep the tensioner "locked" during belt installation. If you dont lock it, you will need a friend to keep tension while you install the the belt, because the tensioner will rotate all the way up against the water pump pulley, and you wont even be able to slip the belt over the pulley.

belt Routing:
9. Once the new belt is routed, get the screwdriver out of the slot to apply tension onto the belt, checking that all the areas are in the groove and not kinked. Re-install the "Y" pipe assembly, remembering to line up that bottom hole first. Then including the two breather hoses


At this point, you can inspect your air filters, and replace if necessary. I started my car at this point to make sure the routing was correct and the tensioner was working properly.
Once you have verified every thing is cool, you can put the snorkel back on too.
Dont forget the rubber has to slip over the tabs of the airbox.

10. Engine cover and intake pieces all reinstalled.

Cost: 26 dollars for the bando betl.
Time: 35 minutes.
No belt noise: priceless
60,000 miles of being encased under the hood of a car with even more plastic panels does not bode well for rubber and plastic pieces.
Tools needed:
Dental Pick, Trim Fork, Flat head (for the clips)
Phillips Head Screwdriver
Ratchet
10 mm socket or wrench
14 mm socket with a cheater bar or a serpentine belt tool
New belt (I purchased a Bando brand unit)
Air Filters since its a convenient time
I hold no responsibility to this write up, proceed at your own risk.
1. Open the Hood
2. Use your flatheads, picks, etc to remove the plastic retainer clips that are on the front of the beauty cover. There should be five. Next, Remove the Large silver 'beauty cover' including the oil filler door. This pulls straight up.
3. Use a 10 mm wrench to loosen the bolts on each side of the "snorkel"
4. The assembly is now loose, you should be able to pick up on it. (I have not yet removed the beauty cover).
5. At each airbox, the snorkel has a rubber connection that clips on with a tab thats part of the box. Lift up on each side of the engine and the snorkel slides off.
Heres the snorkel removed. Note the tube that goes from each airbox to the throttle body in the middle. On the driver side of the tube, is a wire loom that clips onto the Tube. You can use a screwdriver or trim fork to remove the clip because we will be removing this tube.
6. Using a phillips head, loosen each clamp at the airbox, and the clamp going to the throttle body.
7. Now remove the two breather hoses that go into the Throttle body hose assembly. The clamps are easy to compress. Just press them in and then you can easily wiggle the hose off. No need to disconnect them from the engine side, just at the tube.
8. Gently wiggle the whole "Y" assembly towards the radiator and then straight up once the tubes have disconnected. Then you will see this. Note to the right of the harmonic balancer the hole with the grommet. This is where the "Y" tube will sit when you reinstall it.
The lower left pulley in this photo is the tensioner. You will need a 14mm socket with a long "cheater bar" to replace the belt. The tensioner removes slack by turning the 14mm bolt COUNTER clockwise. Below the tensioner, is a slot you keep the tensioner "locked" during belt installation. If you dont lock it, you will need a friend to keep tension while you install the the belt, because the tensioner will rotate all the way up against the water pump pulley, and you wont even be able to slip the belt over the pulley.
belt Routing:
9. Once the new belt is routed, get the screwdriver out of the slot to apply tension onto the belt, checking that all the areas are in the groove and not kinked. Re-install the "Y" pipe assembly, remembering to line up that bottom hole first. Then including the two breather hoses
At this point, you can inspect your air filters, and replace if necessary. I started my car at this point to make sure the routing was correct and the tensioner was working properly.
Once you have verified every thing is cool, you can put the snorkel back on too.
Dont forget the rubber has to slip over the tabs of the airbox.
10. Engine cover and intake pieces all reinstalled.
Cost: 26 dollars for the bando betl.
Time: 35 minutes.
No belt noise: priceless
Last edited by wchain; 12-22-12 at 05:16 AM.

The following 3 users liked this post by wchain:
 12-22-12, 05:13 AM
#4
Pit Crew
Thread Starter
Thank you sir!
You're absolutely correct, let me fix that! Thanks for the catch. I was thinking in terms of the right side of the car. Ha!
You're absolutely correct, let me fix that! Thanks for the catch. I was thinking in terms of the right side of the car. Ha!

Trending Topics

 01-03-13, 05:11 AM
#11
Moderator
.....great writeup!!! Or..you can have the dealer accidentally spill oil on your belt during an oil change and they will replace it for free lol...true story on my old LS460. That worked out great since I was due for a replacement anyway haha
 01-14-13, 06:09 PM
#13
Lead Lap

Incredibly well thought-out, documented and necessary HOW TO.
Many thanks for taking the time to post this.
Many Blessed Wishes your way ...........
Mikey Lulejian - Lake Oconee, GA
Many thanks for taking the time to post this.
Many Blessed Wishes your way ...........
Mikey Lulejian - Lake Oconee, GA


