
LS600hL Oil Change Procedure w/pics
 03-24-09, 03:01 PM
#16


 03-25-09, 02:23 PM
#20
 03-25-09, 04:26 PM
#21
Lexus Champion
Now that you mention it, I have not lifted the hood on the IS-F either... Not even for a quick pic.  I suppose if I had more time I would enjoy doing a bit on the car myself, but as it stands my dealer does everything. I am even lucky enough for the dealer to come to my place of business and service the car while I work and then bring it back at the end of the day.
I suppose if I had more time I would enjoy doing a bit on the car myself, but as it stands my dealer does everything. I am even lucky enough for the dealer to come to my place of business and service the car while I work and then bring it back at the end of the day.
03-26-09, 05:56 AM
#22
Lead Lap
Join Date: Mar 2004
Location: Florida
Posts: 602
Likes: 0
Received 0 Likes
on
0 Posts
Nice Burnaby. Glad I have someone else do this, but now I'm worried about them doing a good job.
It's why I let nobody detail my cars and learned to do it myself.
I'm shocked you're not holding out for AIG rates.
It's why I let nobody detail my cars and learned to do it myself.
I'm shocked you're not holding out for AIG rates.
03-30-09, 10:31 AM
#23
Driver School Candidate

Burnaby,
Great job, several technical questions for further clarification:
1) You mention using the "supplied" plastic drain tube. Does the tube and the end connector come with the filter and the 2 O-rings?
If not, where did to acquire them?
2) When you undo the small end cap, does oil immediately flow out or not until you fully insert the drain tubing?
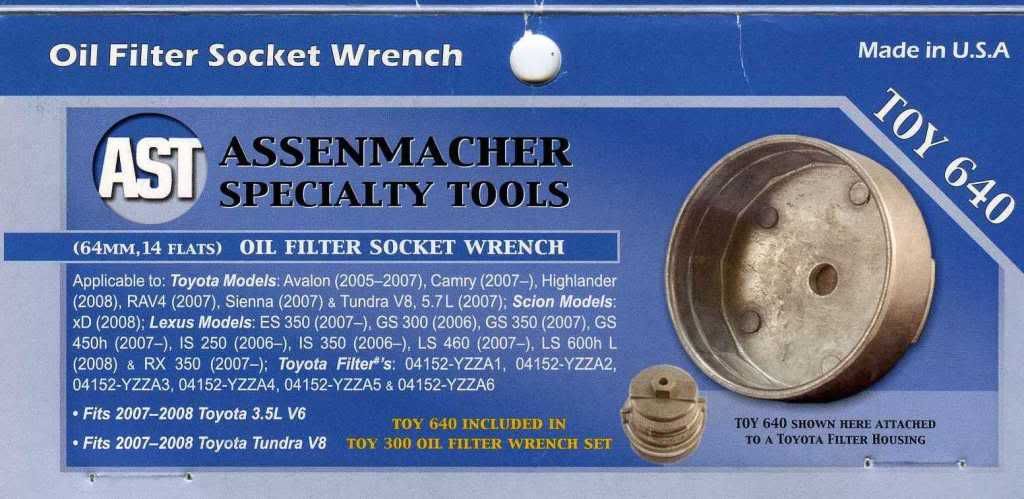
3) When you reference the oil filter socket and a web source, you say 65mm while the tool source says its 64mm - regardless, just to be sure, is this the very same one you are using?
4) Finally, how difficult is it to get a torque bar up in there? Is it really necessary to be that exact or is something like "hand tight, then another quarter turn" good enough?
thanks
Great job, several technical questions for further clarification:
1) You mention using the "supplied" plastic drain tube. Does the tube and the end connector come with the filter and the 2 O-rings?
If not, where did to acquire them?
2) When you undo the small end cap, does oil immediately flow out or not until you fully insert the drain tubing?
3) When you reference the oil filter socket and a web source, you say 65mm while the tool source says its 64mm - regardless, just to be sure, is this the very same one you are using?
4) Finally, how difficult is it to get a torque bar up in there? Is it really necessary to be that exact or is something like "hand tight, then another quarter turn" good enough?
thanks
03-30-09, 01:49 PM
#24
Pole Position
Thread Starter
Burnaby,
Great job, several technical questions for further clarification:
1) You mention using the "supplied" plastic drain tube. Does the tube and the end connector come with the filter and the 2 O-rings?
If not, where did to acquire them?
2) When you undo the small end cap, does oil immediately flow out or not until you fully insert the drain tubing?
3) When you reference the oil filter socket and a web source, you say 65mm while the tool source says its 64mm - regardless, just to be sure, is this the very same one you are using?
4) Finally, how difficult is it to get a torque bar up in there? Is it really necessary to be that exact or is something like "hand tight, then another quarter turn" good enough?
thanks
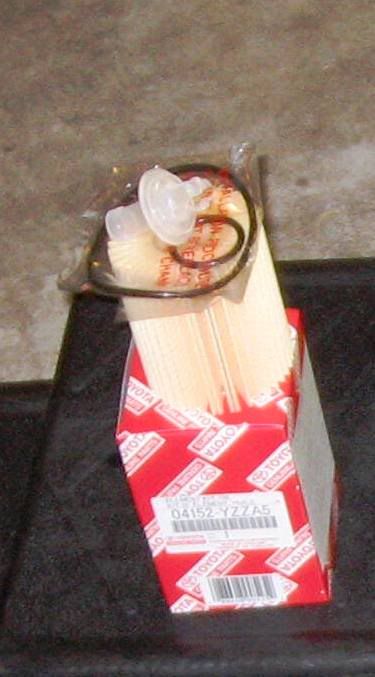
2) No, the small cover bolt merely exposes the filter housing drain valve which traps the oil and this valve is forced open with the aforementioned drain pipe.
3) You are correct, this socket is 64mm not 65mm.
4) My torque wrench is about 20" long and there is enough room to swing it about a quarter turn. I would use my instinct under normal circumstances to tighten the cap and the bolt, but the cap itself is made of a plastic material. Both the engine side flange and the bolt are metal, so to avoid cracking the cap using excessive force, it is prudent to calibrate the torque used as per Lexus (Toyota) specs. (Bold terms = Toyota terminology)
 03-30-09, 04:50 PM
#25
Driver School Candidate
Burnaby,
thanks for the additional details, which now made me think of a few more questions - sorry.
1) I see now the plastic drain pipe/valve. The usage instructions appear to have a tube attached to the bottom of the valve (guess it would be less mess and easier to direct the flow). Did you attach any additional tubing down to your pan?
2) Now that I have re-studied the installation pictures:
a) Do you torque the plastic filter housing back on the engine using the oil filter socket? What is the lb-ft spec for the housing alone? I dont see any listing for this.
b) Do you then replace the end plug/bolt and torque that to the specs above - 9.5 lb-ft (give or take 2 lb-ft)?
c) OR do you put the whole thing back together - filter in housing, housing O-ring, end plug/bolt O-ring, plug/bolt into housing, spin assembly onto the engine and then torque the whole assembly to 9.5 lb-ft? With torque wrench into the plug/bolt?
(This option doesnt make a lot of sense to me, but then I dont see any separate housing torque specs).
thanks again.
03-30-09, 06:18 PM
#26
Pole Position
Thread Starter
No problem...
1) I didn't attach any tubing (a one foot length of old 1/2" garden does the trick), but one could. However, if you drain the oil pan first, then the oil remaining in the filter housing is fairly minimal, and the flow rate would also be quite low. By this time you would have placed the oil pan under there, so it would catch this residue without any fuss. If one started there first though, it could be more messy.
2) The torque recommended by Toyota/Lexus is in Newton.meters which is easily converted to pound-feet. The torque recommended for the cap is on the filter kit box, and it reads thus:

Checking my LS600's cap, I found 25 N.m. I cannot verify the LS460, but another poster in another related thread indicated it was the same:
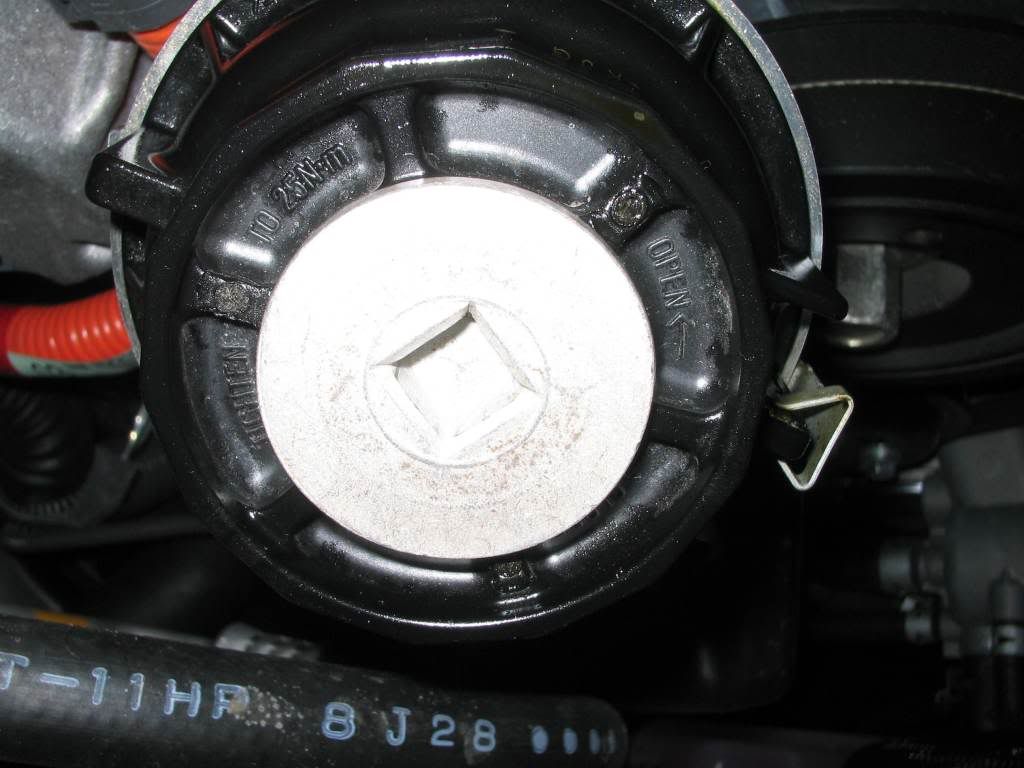
Converting the from N.m, the cap is just under 20 lb-ft, and the nut just under 10 lb-ft. This suggest to me that the intended sequence is to remove the nut first, followed by the cap with the larger torque, and vice versa when re-assembling.
I hope that answers your questions.
Best Regards!
1) I didn't attach any tubing (a one foot length of old 1/2" garden does the trick), but one could. However, if you drain the oil pan first, then the oil remaining in the filter housing is fairly minimal, and the flow rate would also be quite low. By this time you would have placed the oil pan under there, so it would catch this residue without any fuss. If one started there first though, it could be more messy.
2) The torque recommended by Toyota/Lexus is in Newton.meters which is easily converted to pound-feet. The torque recommended for the cap is on the filter kit box, and it reads thus:
Checking my LS600's cap, I found 25 N.m. I cannot verify the LS460, but another poster in another related thread indicated it was the same:
Converting the from N.m, the cap is just under 20 lb-ft, and the nut just under 10 lb-ft. This suggest to me that the intended sequence is to remove the nut first, followed by the cap with the larger torque, and vice versa when re-assembling.
I hope that answers your questions.
Best Regards!
Last edited by Johnny; 12-23-09 at 01:40 AM.
03-31-09, 07:08 AM
#27
Driver School Candidate
Burnaby,
Thanks for clarifying all that. I agree with your thoughts on the sequence since the nut is 1/2 the torque of the filter cap.
FYI here are the exact Newton Meter to Foot Lbs conversions:
25Nm = 18.4390 FtLbs
12.5Nm = 9.2195 FtLbs
2.5Nm = 1.8439 FtLbs
Thanks for clarifying all that. I agree with your thoughts on the sequence since the nut is 1/2 the torque of the filter cap.
FYI here are the exact Newton Meter to Foot Lbs conversions:
25Nm = 18.4390 FtLbs
12.5Nm = 9.2195 FtLbs
2.5Nm = 1.8439 FtLbs
03-31-09, 02:54 PM
#28
Kudos to you Burnaby. You have really provided a service and you are a great resource to this forum. 
I have just one question. If Newton were to use his Foot to kick a 3 LB. ball, how many Meters would it travel?
I have just one question. If Newton were to use his Foot to kick a 3 LB. ball, how many Meters would it travel?
12-22-09, 09:48 PM
#30

The filter that I put in has the ends of the element sealed, the one I took out had the ends open. Maybe a different manufacturer, but I wanted to check to see if that impacted anything. I can see how the open element allows the oil to shoot into the middle and then out through the paper and then up between the fins, but the I am curious how the sealed elements would work, there must be a gap between the filter element and the inside of the housing?
The part number I have is 04152-31060A, I have been told its the same element for this application, but the ends are sealed in resin, and not open like the one I see here.
Mine looks similar to this
http://www.power-21.com/FramPower21i...b=F&pn=CH10158
Thanks
CMasten
The part number I have is 04152-31060A, I have been told its the same element for this application, but the ends are sealed in resin, and not open like the one I see here.
Mine looks similar to this
http://www.power-21.com/FramPower21i...b=F&pn=CH10158
Thanks
CMasten
Last edited by cmasten; 12-22-09 at 09:55 PM.