98-05 GS300 Aftermarket Radio Replacement
 04-28-17, 10:57 PM
#1
Driver School Candidate
Thread Starter

hey guys i have a 2001 gs300 and i bought it about 5 months ago. i would have kept the stock radio but the cassette player didnt work so i couldnt use the aux cassette tape so i just decided to replace the radio. the aftermarket radio i bought is made by sony. it took me a while to try to find a wiring harness and i found that one doesnt exist so i had to rewire the radio myself. i will add steps and pics to help you guys out on DIY because i saved $120 by doing it myself. i also did not change out my speakers because i dont want to cause any attention to my car (in the area i live in lexus drivers are always getting harrassed by police) plus my speakers work perfectly fine to me. also i am not sure if this works for double-din units because i havent tried but im pretty sure it would be the same.
things you will need: 10mm bolt remover, screw driver, cloth (to protect your wood grain from scratches), about 30 - 50 ft of speaker wire (choose a color for positive and only use that color for positive and do the same for negative), wire cutter, electrical tape or soldering iron and solder, scissors and ofcourse an aftermarket single-din radio bezel.
step 1: place your car in nuetral but do not have engine running
step 2: remove negative side of battery (under the hood)
step 3: remove ashtray and unconnect the connector in the back.
step 4: remove air vents from the top of the radio and unconnect them.
step 5: unscrew 4 10mm bolts from radio 2 at the top and 2 on the bottom (my car had 2 plastic clips at the bottom next to the 2 10mm bolts you will need to remove them aswell)
step 6: place a cloth over your gear shifter and slowly remove the radio because it will come out fast then unconnect the connectors.
step 7: unscrew the screws on both sides of the radio to seperate the climate controls from the radio
step 8: put the aftermarket radio bezel together with the climate control unit and use aftermarket side holdings to screw them back together.
step 9: your after market radio should have came with a wiring harness and color scheme. write down and label the wires according to these specific wires only 1. battery wire 2. accessory wire 3. ground wire 4. left front speaker (+) 5. left front speaker (-) 6. right front speaker (+) 7. right front speaker (-) 8. left rear speaker (+) 9. left rear speaker (-) 10. right rear speaker (+) 11. right rear speaker (-)
� lexus wiring colors
blue yellow - battery
gray - accessory
pink - left front (+)
purple - left front (-)
light green - right front (+)
blue - right front (-)
black - left rear (+)
yellow - left rear (-)
red - right rear (+)
white - right rear (-)
step 10: 1 of the the 2 white connectors you unplugged from the back of the stock radio will be the connector where you will cut the wires. 1 connecter has only the battery and accessory wires snip the 2 wires about an inch away from the connector (in case you want to reinstall the stock radio later on) connect the 2 wires to your aftermarket radio wiring harness battery and accessory wires by using electrical tape or you can use a soldering iron and solder them.
step 11: you will then need to attatch the speaker wire you purchased to your aftermarket radio wiring harness according to 1 color for positive and the other color for negative speaker wires using electrical tape or a solder.
step 12: remove your glove box
step 13: connect your ground wire from the aftermarket radio wiring harness to a nut behind your glovebox. (i used the nut next to the the stock CD changer)
step 14: your amplifier will be to the right behind your glove box and the only 2 connectors you will need to cut are the 2 connectors located underneath the orange connector. use the same color scheme to cut the speaker wires according to the ones you needed to cut to attach the speaker wires to the aftermarket radio wiring harness. DO NOT I REPEAT DO NOT cut the battery and accessory wires you only need to cut the speaker wires. DO NOT attach the speaker wires you bought to the connector you will not have sound attach the to the other end and leave the connectors out of the amplifier.
step 15: before you put everything back together reconnect your car battery and turn the key you should have power and sound to your new radio. if you have power with no sound you connected the speaker wires under the glove box to the wrong end of the connector that you cut. (i know because i made this mistake) after everything is finished you can remount your glove box, new radio with bezel, air vents, and ashtray.
if you have any questions feel free to private message me and ill provide you with my personal email to which i will send you a video on how to do this whole process.
Last edited by cblowkey; 04-28-17 at 11:47 PM. Reason: did not finish

The following 4 users liked this post by cblowkey:
04-29-17, 11:22 AM
#3
Driver School Candidate
Thread Starter
thats a very good question i wondered why i lost function with mine aswell but my new sony radio has one built in with an advanced sound engine. i dont really mind that mines doesnt work because its still loud as hell without it and i still get better bass. ill play around with it and figure out how to retain the function for you and let you know. it might be because i didnt connect the 2 connectors back into the factory amp. after i bypassed the speakers
Last edited by cblowkey; 04-29-17 at 11:26 AM.
05-01-17, 05:11 PM
#4
I hate you break it to you but no, your radio doesn't have a subwoofer built in. That's just marketing BS for low end frequency boosting or some such audio processing. The factory system rolls the frequency range of the woofers off at about 100hz, and the subwoofer does the rest. Since you wired your head unit directly to the signal wires of the speakers, any audio processing is left up to the new head unit and the speakers will play whatever it sends. I'm curious what happened to your tweeters, I don't know if they have their own high pass filter.
I also noticed that you mention electrical tape in your DIY. To anybody else reading this: DO NOT USE ELECTRICAL TAPE TO HOLD CONNECTIONS TOGETHER. Properly solder and heatshrink your connections.
I also noticed that you mention electrical tape in your DIY. To anybody else reading this: DO NOT USE ELECTRICAL TAPE TO HOLD CONNECTIONS TOGETHER. Properly solder and heatshrink your connections.
Last edited by firelizard; 05-01-17 at 05:18 PM.
The following users liked this post:
Showdown88 (12-09-19)
05-02-17, 09:09 PM
#5

thats a very good question i wondered why i lost function with mine aswell but my new sony radio has one built in with an advanced sound engine. i dont really mind that mines doesnt work because its still loud as hell without it and i still get better bass. ill play around with it and figure out how to retain the function for you and let you know. it might be because i didnt connect the 2 connectors back into the factory amp. after i bypassed the speakers
05-02-17, 11:42 PM
#6
Driver School Candidate

When I have a moment I'll post up the harness that I made for my GS300's aftermarket head unit install. It's a 97% no cut harness, I only had to tap into one wire for constant power but that's about it. I also managed to find a replacement amplifier the size of the original stock amplifier and I've been using that to run the stock subwoofer.
Edit : Picture of said amplifier compared to the stock amplifier

Edit : Picture of said amplifier compared to the stock amplifier
Last edited by Pynoxim; 05-02-17 at 11:50 PM.
The following users liked this post:
firelizard (05-03-17)
05-27-17, 02:05 PM
#7
Driver School Candidate
Alright, time to deliver on that promise of mine
First part of the harness goes from Lexus to ISO with an additional wire for constant power (Which I'll show you where I got mine from in another image)
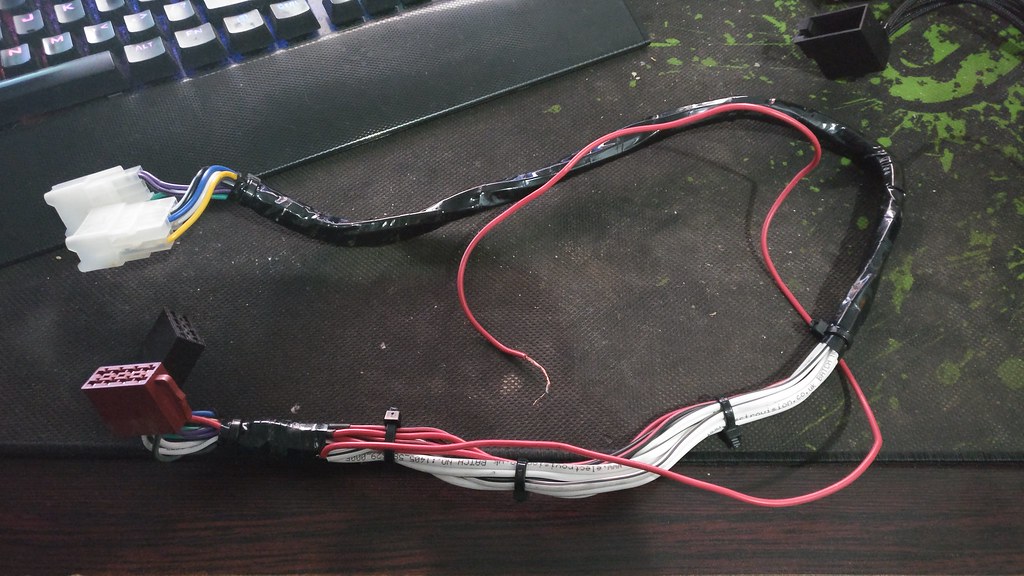
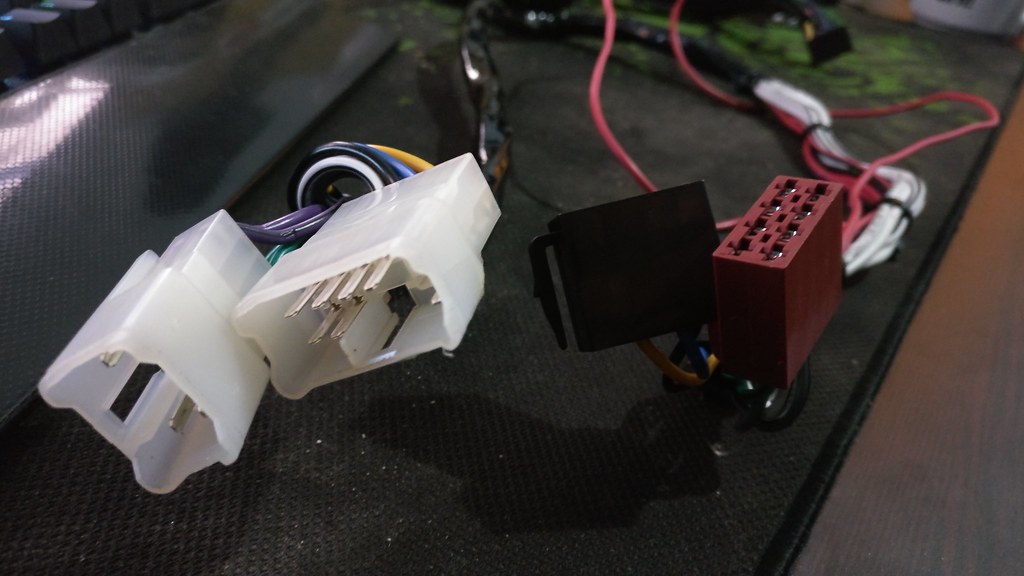
Second part of the harness is an ISO to Kenwood Adapter
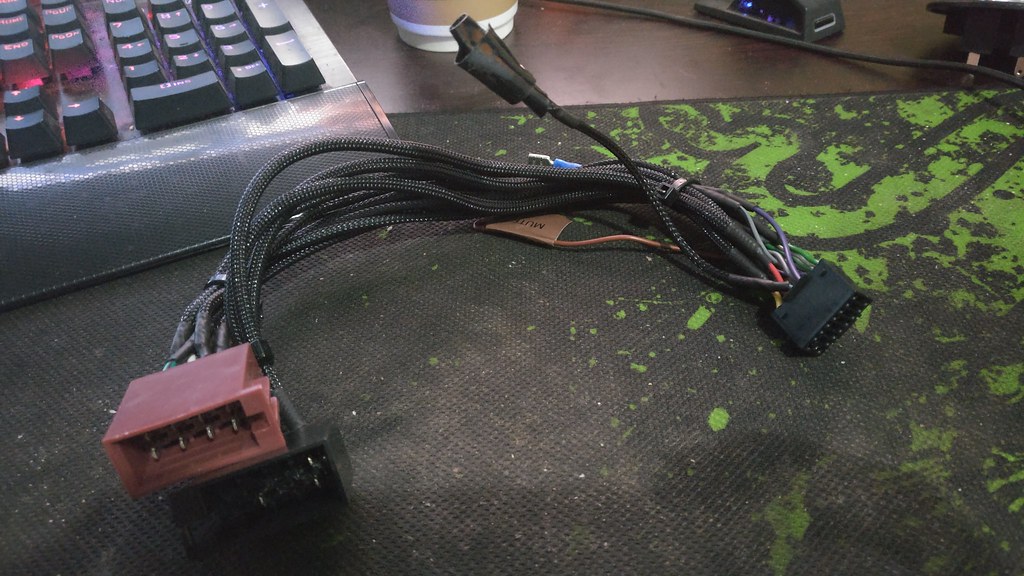
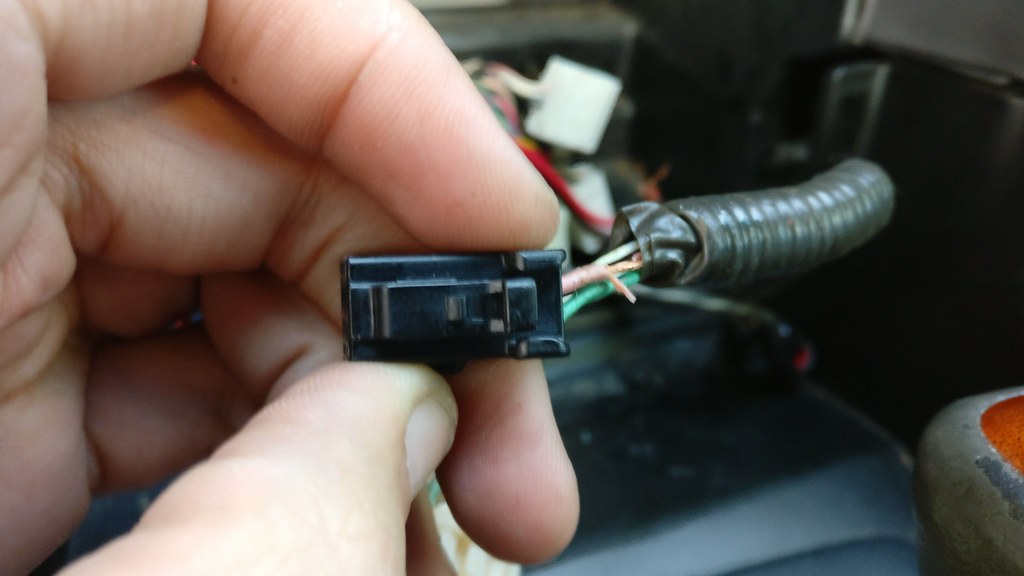
And lastly, I got constant power from the pink wire on the lighter socket power connector
First part of the harness goes from Lexus to ISO with an additional wire for constant power (Which I'll show you where I got mine from in another image)
Second part of the harness is an ISO to Kenwood Adapter
And lastly, I got constant power from the pink wire on the lighter socket power connector
Trending Topics
07-28-17, 09:19 AM
#8
Driver School Candidate

Join Date: Jul 2007
Location: MD
Posts: 4
Likes: 0
Received 0 Likes
on
0 Posts
Hello,
I am trying to extend the life of my 2004 GS300 for a few more years and would like to install the GROM BT-3 to get Bluetooth functionality. My car has the factory Navigation and Mark Levinson audio and CD Changer. I installed the GROM BT3 unit and it worked intermittently, so I talked to a GROM representative and he informed me that I would have to disconnect my CD changer in order for all to work properly.
Does anyone refer me to a post that can show me how to remove the glove compartment and disconnect the CD changer? Or provide some simple step-by-step directions with pictures?
07-28-17, 10:34 AM
#9
Driver School Candidate
Removing the glove compartment is pretty easy
Under the glove compartment is a cover, pull down on it and it will unclip.
On either end of the now exposed underside of the glove compartment will be 2 x 10mm Bolts, undo those
Open the glove compartment and look at the uppermost front section (Where the catch for the latch is), there are 3 phillips head screws, remove those
The glove compartment will now drop with a bit of a forward tug
Unplug the glove compartment light wiring harness and unclip the airbag harness to get that out of the way
You now have access to the CD changer, which is held in place by 3 * 10mm Nuts, Undo those and the CD changer can now be pulled forward
Unplug the wiring harness off the back and that's all she wrote
Put the CD Changer back and bolt it back in (With the wiring harness left unplugged) so that you don't have a huge hole in the glove compartment
Reassembly is the reverse of disassembly
07-31-17, 12:43 AM
#10
Driver School Candidate

Alright, time to deliver on that promise of mine
First part of the harness goes from Lexus to ISO with an additional wire for constant power (Which I'll show you where I got mine from in another image)
Second part of the harness is an ISO to Kenwood Adapter
And lastly, I got constant power from the pink wire on the lighter socket power connector
First part of the harness goes from Lexus to ISO with an additional wire for constant power (Which I'll show you where I got mine from in another image)
Second part of the harness is an ISO to Kenwood Adapter
And lastly, I got constant power from the pink wire on the lighter socket power connector
 07-31-17, 10:37 AM
#12
Driver School Candidate
Thread Starter
does anyone else's radio cut on and off every couple days for long periods of time ? mine has been doing this since before i changed out my headunit.
07-31-17, 11:27 AM
#13
Driver School Candidate
My antenna does work with my aftermarket radio, if I could remember correctly, with the antenna plug facing you with the clip on top, the left most wire (Brown or black, can't remember) is ground, and the middle and right are to signal the antenna to rise. I wired my amp remote wire to the middle/right wire. Just to be sure, use a multi meter to find the ground wire first, once you find that, you can wire your amp remote to either of the other 2 wires (Or the power antenna wire if your aftermarket head unit has one of those wires)
And no, I have no radio cutting out issues whatsoever. I've since gone back to a stock headunit with the Aux mod for now.
07-31-17, 04:49 PM
#14
Driver School Candidate
05-03-19, 05:06 AM
#15
Driver School Candidate

I�m new to the forum. Just bought a 2003 gs300 this week and wanted to upgrade the navigation system. I know I will need another amp to retain the subwoofer and I�m ok with that. There is one thing that I was hoping to be possible. Every install I�ve seen has the navigation at the bottom and the climate control at the top. Is there a way to install the climate control below the navigation? You seem to be very knowledgeable about this topic.
hey guys i have a 2001 gs300 and i bought it about 5 months ago. i would have kept the stock radio but the cassette player didnt work so i couldnt use the aux cassette tape so i just decided to replace the radio. the aftermarket radio i bought is made by sony. it took me a while to try to find a wiring harness and i found that one doesnt exist so i had to rewire the radio myself. i will add steps and pics to help you guys out on DIY because i saved $120 by doing it myself. i also did not change out my speakers because i dont want to cause any attention to my car (in the area i live in lexus drivers are always getting harrassed by police) plus my speakers work perfectly fine to me. also i am not sure if this works for double-din units because i havent tried but im pretty sure it would be the same.
things you will need: 10mm bolt remover, screw driver, cloth (to protect your wood grain from scratches), about 30 - 50 ft of speaker wire (choose a color for positive and only use that color for positive and do the same for negative), wire cutter, electrical tape or soldering iron and solder, scissors and ofcourse an aftermarket single-din radio bezel.
step 1: place your car in nuetral but do not have engine running
step 2: remove negative side of battery (under the hood)
step 3: remove ashtray and unconnect the connector in the back.
step 4: remove air vents from the top of the radio and unconnect them.
step 5: unscrew 4 10mm bolts from radio 2 at the top and 2 on the bottom (my car had 2 plastic clips at the bottom next to the 2 10mm bolts you will need to remove them aswell)
step 6: place a cloth over your gear shifter and slowly remove the radio because it will come out fast then unconnect the connectors.
step 7: unscrew the screws on both sides of the radio to seperate the climate controls from the radio
step 8: put the aftermarket radio bezel together with the climate control unit and use aftermarket side holdings to screw them back together.
step 9: your after market radio should have came with a wiring harness and color scheme. write down and label the wires according to these specific wires only 1. battery wire 2. accessory wire 3. ground wire 4. left front speaker (+) 5. left front speaker (-) 6. right front speaker (+) 7. right front speaker (-) 8. left rear speaker (+) 9. left rear speaker (-) 10. right rear speaker (+) 11. right rear speaker (-)
� lexus wiring colors
blue yellow - battery
gray - accessory
pink - left front (+)
purple - left front (-)
light green - right front (+)
blue - right front (-)
black - left rear (+)
yellow - left rear (-)
red - right rear (+)
white - right rear (-)
step 10: 1 of the the 2 white connectors you unplugged from the back of the stock radio will be the connector where you will cut the wires. 1 connecter has only the battery and accessory wires snip the 2 wires about an inch away from the connector (in case you want to reinstall the stock radio later on) connect the 2 wires to your aftermarket radio wiring harness battery and accessory wires by using electrical tape or you can use a soldering iron and solder them.
step 11: you will then need to attatch the speaker wire you purchased to your aftermarket radio wiring harness according to 1 color for positive and the other color for negative speaker wires using electrical tape or a solder.
step 12: remove your glove box
step 13: connect your ground wire from the aftermarket radio wiring harness to a nut behind your glovebox. (i used the nut next to the the stock CD changer)
step 14: your amplifier will be to the right behind your glove box and the only 2 connectors you will need to cut are the 2 connectors located underneath the orange connector. use the same color scheme to cut the speaker wires according to the ones you needed to cut to attach the speaker wires to the aftermarket radio wiring harness. DO NOT I REPEAT DO NOT cut the battery and accessory wires you only need to cut the speaker wires. DO NOT attach the speaker wires you bought to the connector you will not have sound attach the to the other end and leave the connectors out of the amplifier.
step 15: before you put everything back together reconnect your car battery and turn the key you should have power and sound to your new radio. if you have power with no sound you connected the speaker wires under the glove box to the wrong end of the connector that you cut. (i know because i made this mistake) after everything is finished you can remount your glove box, new radio with bezel, air vents, and ashtray.
if you have any questions feel free to private message me and ill provide you with my personal email to which i will send you a video on how to do this whole process.
things you will need: 10mm bolt remover, screw driver, cloth (to protect your wood grain from scratches), about 30 - 50 ft of speaker wire (choose a color for positive and only use that color for positive and do the same for negative), wire cutter, electrical tape or soldering iron and solder, scissors and ofcourse an aftermarket single-din radio bezel.
step 1: place your car in nuetral but do not have engine running
step 2: remove negative side of battery (under the hood)
step 3: remove ashtray and unconnect the connector in the back.
step 4: remove air vents from the top of the radio and unconnect them.
step 5: unscrew 4 10mm bolts from radio 2 at the top and 2 on the bottom (my car had 2 plastic clips at the bottom next to the 2 10mm bolts you will need to remove them aswell)
step 6: place a cloth over your gear shifter and slowly remove the radio because it will come out fast then unconnect the connectors.
step 7: unscrew the screws on both sides of the radio to seperate the climate controls from the radio
step 8: put the aftermarket radio bezel together with the climate control unit and use aftermarket side holdings to screw them back together.
step 9: your after market radio should have came with a wiring harness and color scheme. write down and label the wires according to these specific wires only 1. battery wire 2. accessory wire 3. ground wire 4. left front speaker (+) 5. left front speaker (-) 6. right front speaker (+) 7. right front speaker (-) 8. left rear speaker (+) 9. left rear speaker (-) 10. right rear speaker (+) 11. right rear speaker (-)
� lexus wiring colors
blue yellow - battery
gray - accessory
pink - left front (+)
purple - left front (-)
light green - right front (+)
blue - right front (-)
black - left rear (+)
yellow - left rear (-)
red - right rear (+)
white - right rear (-)
step 10: 1 of the the 2 white connectors you unplugged from the back of the stock radio will be the connector where you will cut the wires. 1 connecter has only the battery and accessory wires snip the 2 wires about an inch away from the connector (in case you want to reinstall the stock radio later on) connect the 2 wires to your aftermarket radio wiring harness battery and accessory wires by using electrical tape or you can use a soldering iron and solder them.
step 11: you will then need to attatch the speaker wire you purchased to your aftermarket radio wiring harness according to 1 color for positive and the other color for negative speaker wires using electrical tape or a solder.
step 12: remove your glove box
step 13: connect your ground wire from the aftermarket radio wiring harness to a nut behind your glovebox. (i used the nut next to the the stock CD changer)
step 14: your amplifier will be to the right behind your glove box and the only 2 connectors you will need to cut are the 2 connectors located underneath the orange connector. use the same color scheme to cut the speaker wires according to the ones you needed to cut to attach the speaker wires to the aftermarket radio wiring harness. DO NOT I REPEAT DO NOT cut the battery and accessory wires you only need to cut the speaker wires. DO NOT attach the speaker wires you bought to the connector you will not have sound attach the to the other end and leave the connectors out of the amplifier.
step 15: before you put everything back together reconnect your car battery and turn the key you should have power and sound to your new radio. if you have power with no sound you connected the speaker wires under the glove box to the wrong end of the connector that you cut. (i know because i made this mistake) after everything is finished you can remount your glove box, new radio with bezel, air vents, and ashtray.
if you have any questions feel free to private message me and ill provide you with my personal email to which i will send you a video on how to do this whole process.