Speakers Installed...PROPERLY (Official 2GS Install Speaker thread)
 12-09-03, 03:54 PM
#1
Lexus Champion
Thread Starter
I recently posted photos of my speaker install using the speaker cabinets used for the stock, 4" Nakamichi speakers.

It worked but the midrange was hollow, it would resonate at certain frequencies (bassy female voices, like Sade or Fiona Apple), and the mid-bass was WEAK.
It drove me crazy trying to level the sound. I don't have an EQ, just the Crossovers, Hi-Lo Pass on the amp, and the basic controls on the head unit. After hearing the speakers bottom out and thinking they were blown, I concluded that it was the cabinet.
So I made my own and the sound is very close to EXCELLENT....Now THIS is what I paid for. So I recommend that anyone even thinking about replacing their door speakers do it this way:
Supplies:
1. Spray Glue..................................$4.99 - I got mine from a fabric store
2. 1/4" Auto Headliner (foam)......$5.00?....Same fabric store. Or you could use Dynamat if you have some leftover.
3. 1/4" MDF from Home Depot....$5.99....I had to pay for the whole slab so I asked them to cut it into 14x11 inch pieces.
4. 2- 6 3/4" XTC Foam Baffles.....$15.00 Shipped from Crutchfield.
5. Some sort of wood cutting tool. I used a drill with a wood cutting bit.
Step One.
Unscrew the stock speaker cabinet from the door. Anyone who needs help just PM me. Unscrew all of the screws and disassemble the speaker cabinet.

Step Two.
Place the Top of the speaker cabinet on your 14x11 inch MDF and trace it with a pencil. Be sure to trace the screw holes.
NOTE: The piece shown in the photo is the BOTTOM of the cabinet. (My Mistake)
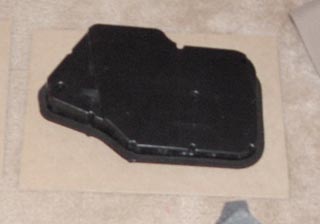
Use the speaker template that came with your speakers to trace the new speaker hole onto the MDF. I didn't have mine so I just used scissors and cut a piece of paper until it was the "TOP MOUNT" speaker size.
Step Three.
Cut the MDF to the shape you just traced. This is the long and boring part.
Cut the foam Headliner into 14x11 inch pieces.

Step Four.
Glue the 14x11 inch piece of headliner to the new MDF shape. Make sure the material side is the side glued to the MDF.
Step Five.
After the glue dries, use scissors to shape the outside edge of the headliner to match the MDF. Cut slices into the headliner where the HOLE IN THE MDF IS LOCATED. Just punch through.
Step Six.
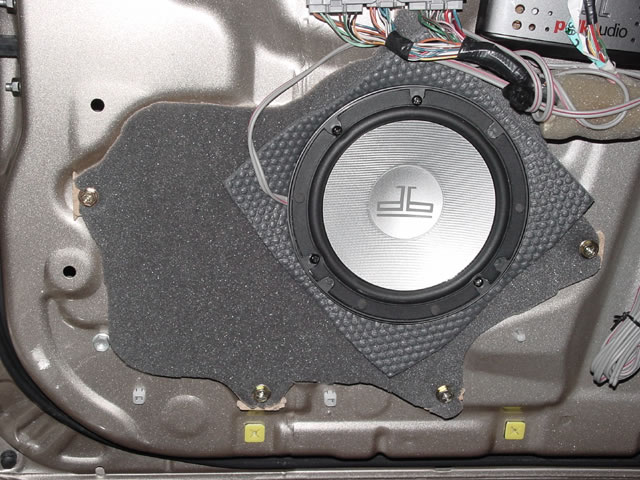
Push the XTC Foam baffle through the hole so that it is snug.

Step Seven.
Connect the wire to your speaker and screw the speaker down tight. The foam baffle will be air tight. Once it is screwed into place, press the baffle and you'll see woofer excursion. Depending on your woofer, you may want to cut a hole in the back/bottom of the baffle for air to move. I like the sound the way it is.

That's all there is. Screw it back on the door and connect it to your crossover.
Result:
Voices sound like voices and not horns, bass is much tighter.
With the sub disconnected, the kick drum "Kicks", bass guitar plucks "Pluck" and electronic bass "Humms".
No vibration and no rattling. Also, there is about 1/4" more clearence from the speaker to the door so no more rub on excursion.
Hope this helps someone with their install... CL has helped me A LOT, here's my contribution
It worked but the midrange was hollow, it would resonate at certain frequencies (bassy female voices, like Sade or Fiona Apple), and the mid-bass was WEAK.
It drove me crazy trying to level the sound. I don't have an EQ, just the Crossovers, Hi-Lo Pass on the amp, and the basic controls on the head unit. After hearing the speakers bottom out and thinking they were blown, I concluded that it was the cabinet.
So I made my own and the sound is very close to EXCELLENT....Now THIS is what I paid for. So I recommend that anyone even thinking about replacing their door speakers do it this way:
Supplies:
1. Spray Glue..................................$4.99 - I got mine from a fabric store
2. 1/4" Auto Headliner (foam)......$5.00?....Same fabric store. Or you could use Dynamat if you have some leftover.
3. 1/4" MDF from Home Depot....$5.99....I had to pay for the whole slab so I asked them to cut it into 14x11 inch pieces.
4. 2- 6 3/4" XTC Foam Baffles.....$15.00 Shipped from Crutchfield.
5. Some sort of wood cutting tool. I used a drill with a wood cutting bit.
Step One.
Unscrew the stock speaker cabinet from the door. Anyone who needs help just PM me. Unscrew all of the screws and disassemble the speaker cabinet.
Step Two.
Place the Top of the speaker cabinet on your 14x11 inch MDF and trace it with a pencil. Be sure to trace the screw holes.
NOTE: The piece shown in the photo is the BOTTOM of the cabinet. (My Mistake)
Use the speaker template that came with your speakers to trace the new speaker hole onto the MDF. I didn't have mine so I just used scissors and cut a piece of paper until it was the "TOP MOUNT" speaker size.
Step Three.
Cut the MDF to the shape you just traced. This is the long and boring part.
Cut the foam Headliner into 14x11 inch pieces.
Step Four.
Glue the 14x11 inch piece of headliner to the new MDF shape. Make sure the material side is the side glued to the MDF.
Step Five.
After the glue dries, use scissors to shape the outside edge of the headliner to match the MDF. Cut slices into the headliner where the HOLE IN THE MDF IS LOCATED. Just punch through.
Step Six.
Push the XTC Foam baffle through the hole so that it is snug.
Step Seven.
Connect the wire to your speaker and screw the speaker down tight. The foam baffle will be air tight. Once it is screwed into place, press the baffle and you'll see woofer excursion. Depending on your woofer, you may want to cut a hole in the back/bottom of the baffle for air to move. I like the sound the way it is.
That's all there is. Screw it back on the door and connect it to your crossover.
Result:
Voices sound like voices and not horns, bass is much tighter.
With the sub disconnected, the kick drum "Kicks", bass guitar plucks "Pluck" and electronic bass "Humms".
No vibration and no rattling. Also, there is about 1/4" more clearence from the speaker to the door so no more rub on excursion.
Hope this helps someone with their install... CL has helped me A LOT, here's my contribution
Last edited by TwentyTen; 12-10-03 at 05:44 AM.

The following users liked this post:
Gs300soul (08-20-20)
12-10-03, 01:43 PM
#5

Nice writeup, good work. This is an alternate way to do what many of us have done, especially using the XTC foam baffles. I do recommend that 1/2" MDF be used instead of 1/4", this will minimize any vibrations/resonance of the panel.
Those factory enclosures are real honkers, aren't they?!!!
Those factory enclosures are real honkers, aren't they?!!!
Last edited by engin_ear; 12-10-03 at 01:43 PM.
12-10-03, 05:54 PM
#6
Lexus Champion
Thread Starter
Originally posted by engin_ear
Nice writeup, good work. This is an alternate way to do what many of us have done, especially using the XTC foam baffles. I do recommend that 1/2" MDF be used instead of 1/4", this will minimize any vibrations/resonance of the panel.
Those factory enclosures are real honkers, aren't they?!!!
Nice writeup, good work. This is an alternate way to do what many of us have done, especially using the XTC foam baffles. I do recommend that 1/2" MDF be used instead of 1/4", this will minimize any vibrations/resonance of the panel.
Those factory enclosures are real honkers, aren't they?!!!
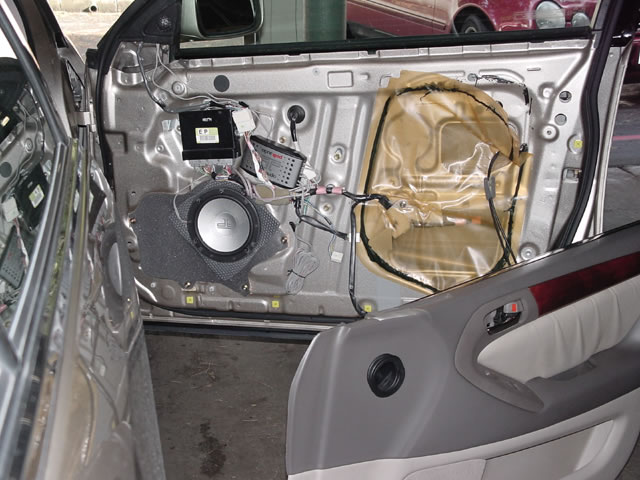
You said it perfect - every voice turn into a horn. I kept thinking, what the heck is wrong here? I took photos of what it looks like installed and will post them later on tonight.
How did you install yours? What size speakers?
***UPDATE***
The fit:


Last edited by TwentyTen; 12-10-03 at 09:01 PM.
12-11-03, 08:04 AM
#7
Nice pics.
I used the smaller Dynaudio mids in that location, they're about 5 1/4", on 1/2 MDF, and then I used some dense foam around the circumference of the speaker (between the speaker and the door panel) to eliminate any vibrations and prevent sound pressure from going sideways. Pics are in the gallery if interested.
One thing to check is whether your speaker is firing directly thru the hole in the door panel. (I can't remember the position that's required offhand....) If not, you may find that the door panel resonates excessively when you turn it up. Just something to watch out for.
Trending Topics
12-11-03, 08:15 AM
#8
Forum Administrator

iTrader: (2)
Great writeup Darius, thanks! Nice clean install too.
I had some similar pics (not as good/detailed as yours) from my Dynaudio install back in 2001 (click here) (geez, has it been that long?)
Yours looks better & cleaner, like the foam baffles a lot. Nice job
I had some similar pics (not as good/detailed as yours) from my Dynaudio install back in 2001 (click here) (geez, has it been that long?)
Yours looks better & cleaner, like the foam baffles a lot. Nice job
Last edited by DaveGS4; 12-11-03 at 08:16 AM.
12-11-03, 10:36 AM
#9
Lexus Champion
Thread Starter
Originally posted by engin_ear
Nice pics.
I used the smaller Dynaudio mids in that location, they're about 5 1/4", on 1/2 MDF, and then I used some dense foam around the circumference of the speaker (between the speaker and the door panel) to eliminate any vibrations and prevent sound pressure from going sideways. Pics are in the gallery if interested.
One thing to check is whether your speaker is firing directly thru the hole in the door panel. (I can't remember the position that's required offhand....) If not, you may find that the door panel resonates excessively when you turn it up. Just something to watch out for.
I'll do a search un the gallery later. I checked the window depth yesterday and it's clear. The door is actually PRETTY DEEP. Especially since we are surface mouting.. . I also listened for the foam to crinkle when rolling down the window and nada
As far as the door panel, there is a small corner of the panel that blocks the sound but it's only about a centimenter. It is audible as high volumes though  The speaker is bigger than the door panel so I don't think there's a way around it.
 Thanks again for the compliments
PS - Foam was a great invention!
12-11-03, 10:41 AM
#10
Lexus Champion
Thread Starter
Originally posted by DaveGS4
Great writeup Darius, thanks! Nice clean install too.
I had some similar pics (not as good/detailed as yours) from my Dynaudio install back in 2001 (click here) (geez, has it been that long?)
Yours looks better & cleaner, like the foam baffles a lot. Nice job
Great writeup Darius, thanks! Nice clean install too.
I had some similar pics (not as good/detailed as yours) from my Dynaudio install back in 2001 (click here) (geez, has it been that long?)
Yours looks better & cleaner, like the foam baffles a lot. Nice job
We have almost the exact same install!!
 But with your MDF being thicker, you don't need the foam. Nice, thanks for the link. I wish I had one of those saws!!!! The "Tim-The-Tool-Guy" part of me is drooling right now!
Last edited by TwentyTen; 12-13-03 at 11:42 AM.
12-11-03, 11:38 AM
#11
" I also listened for the foam to crinkle when rolling down the window and nada"
You're not likely to hear that kind of foam crinkling inside the door panel, esp with the window motor making its noise. But even if it is getting squashed, it probably won't make any difference - as long as it doesn't break open. All it needs to do is isolate the rear of the speaker from the volume inside the rest of the door. An irregular shape is actually better than a regular one for sound, so if it's squashed, don't worry about it. If it squashes and returns to original shape over and over, it may eventually break open, and then I'd be concerned, but unless you open the door panel again, you may never know it.
You're not likely to hear that kind of foam crinkling inside the door panel, esp with the window motor making its noise. But even if it is getting squashed, it probably won't make any difference - as long as it doesn't break open. All it needs to do is isolate the rear of the speaker from the volume inside the rest of the door. An irregular shape is actually better than a regular one for sound, so if it's squashed, don't worry about it. If it squashes and returns to original shape over and over, it may eventually break open, and then I'd be concerned, but unless you open the door panel again, you may never know it.
Last edited by engin_ear; 12-11-03 at 11:38 AM.
08-21-04, 08:24 AM
#12
Lexus Champion
Thread Starter
***UPDATE***
Since the install, a few things have changed.
I could not decide on keeping the baffles closed or cutting them open. This took a long time to find the answer to and I eventually ended up cutting them open. This is why; Polk designed its door speakers to utilize the free space inside the door. By placing the speakers in a baffle I am modifying the environment in which they were designed to perform their best. I started out with full baffles that were too big and crinkled. Then I cut a small slit/port in the baffle which improved the bass (deeper). The I installed shorter, closed baffles and wasn't as happy. Did a little more homework and went back to the deep baffles but cut them down to about 2" deep. So now the back of the speaker looks like a horn. The baffle extends from the back about 2" but is completely open. This is the best option; it keeps the back of the speaker protected against moisture but doesn't change the sound. If you are following this DIY for your install, check with the speaker manufacturer first to find the best/recommended enclosure size. some speakers work best sealed in speaker pods or baffles, in this case, mine were not.
Dynamat XTREME. I LOVE THIS STUFF. I don't have photos yet but the front doors, rear doors, and trunk are covered in Dynamat XTREME. I recommended it 100%. Get the XTREME instead of the standard and buy it in Bulk.
Excerpts from Dynamic Control:
I'll post photos when I get them. Thanks to everyone that gave comments and info, thanks for the PMs. 
Since the install, a few things have changed.
I could not decide on keeping the baffles closed or cutting them open. This took a long time to find the answer to and I eventually ended up cutting them open. This is why; Polk designed its door speakers to utilize the free space inside the door. By placing the speakers in a baffle I am modifying the environment in which they were designed to perform their best. I started out with full baffles that were too big and crinkled. Then I cut a small slit/port in the baffle which improved the bass (deeper). The I installed shorter, closed baffles and wasn't as happy. Did a little more homework and went back to the deep baffles but cut them down to about 2" deep. So now the back of the speaker looks like a horn. The baffle extends from the back about 2" but is completely open. This is the best option; it keeps the back of the speaker protected against moisture but doesn't change the sound. If you are following this DIY for your install, check with the speaker manufacturer first to find the best/recommended enclosure size. some speakers work best sealed in speaker pods or baffles, in this case, mine were not.
Dynamat XTREME. I LOVE THIS STUFF. I don't have photos yet but the front doors, rear doors, and trunk are covered in Dynamat XTREME. I recommended it 100%. Get the XTREME instead of the standard and buy it in Bulk.
Excerpts from Dynamic Control:
WITHOUT DYNAMAT
The waterfall plot (Time Energy Frequency or TEF) illustrates the distortion of the speaker panel from 100 hertz to 20 kilohertz in 4 millisecond intervals. Since this was the reference measurement, the peak reading was set to the top of the graph. The vibration at the 250 hertz test tone is referred to as sympathetic distortion. Vibrations at other frequencies are harmonic distortion. In this graph, the peak speaker panel distortion was observed at 250 hertz (sympathetic) and at 500 hertz (harmonic).
WITHOUT DYNAMAT

ORIGINAL DYNAMAT
A 10" x 10" sheet of Dynamat Original from a Dynamat Original Speaker Kit was applied to the mounting surface of the test enclosure. The panel distortion test was then repeated.
The Dynamat Original resulted in a massive reduction in speaker panel distortion. Sympathetic distortion was reduced by nearly 10 dB, while most harmonic distortion was greatly reduced. A 10 dB decrease in speaker panel distortion is a 50% audible reduction.
ORIGINAL DYNAMAT

XTREME DYNAMAT
After removing the Original material, a 10" x 10" sheet of Dynamat Xtreme from a Dynamat Xtreme Speaker Kit was applied to the speaker area, and the panel distortion test was repeated. The results were even more dramatic. Harmonic distortion was almost completely eliminated. Dynamat Xtreme eliminated 75% of sympathetic speaker panel distortion, a reduction of nearly 20 dB.
XTREME DYNAMAT

The waterfall plot (Time Energy Frequency or TEF) illustrates the distortion of the speaker panel from 100 hertz to 20 kilohertz in 4 millisecond intervals. Since this was the reference measurement, the peak reading was set to the top of the graph. The vibration at the 250 hertz test tone is referred to as sympathetic distortion. Vibrations at other frequencies are harmonic distortion. In this graph, the peak speaker panel distortion was observed at 250 hertz (sympathetic) and at 500 hertz (harmonic).
WITHOUT DYNAMAT
ORIGINAL DYNAMAT
A 10" x 10" sheet of Dynamat Original from a Dynamat Original Speaker Kit was applied to the mounting surface of the test enclosure. The panel distortion test was then repeated.
The Dynamat Original resulted in a massive reduction in speaker panel distortion. Sympathetic distortion was reduced by nearly 10 dB, while most harmonic distortion was greatly reduced. A 10 dB decrease in speaker panel distortion is a 50% audible reduction.
ORIGINAL DYNAMAT
XTREME DYNAMAT
After removing the Original material, a 10" x 10" sheet of Dynamat Xtreme from a Dynamat Xtreme Speaker Kit was applied to the speaker area, and the panel distortion test was repeated. The results were even more dramatic. Harmonic distortion was almost completely eliminated. Dynamat Xtreme eliminated 75% of sympathetic speaker panel distortion, a reduction of nearly 20 dB.
XTREME DYNAMAT
08-23-04, 11:42 AM
#13
Search Function Inc.
Cool writeup. Thanks for that. I have a couple of questions about the install.
How thick is the MDF baffle? Is it really MDF since I can't tell from pictures. Also, did you secure the speakers to mdf or do the speaker screws go through the metal of the door?
How thick is the MDF baffle? Is it really MDF since I can't tell from pictures. Also, did you secure the speakers to mdf or do the speaker screws go through the metal of the door?
08-23-04, 02:17 PM
#14
Lexus Champion
Thread Starter
Originally posted by retrodrive
Cool writeup. Thanks for that. I have a couple of questions about the install.
How thick is the MDF baffle? Is it really MDF since I can't tell from pictures. Also, did you secure the speakers to mdf or do the speaker screws go through the metal of the door?
Cool writeup. Thanks for that. I have a couple of questions about the install.
How thick is the MDF baffle? Is it really MDF since I can't tell from pictures. Also, did you secure the speakers to mdf or do the speaker screws go through the metal of the door?
The MDF is only 1/4". That project was before I had a toolbox of tools, a jigsaw, and a dremel so the edges are a little rough.
The speaker is screwed into the MDF, through the foam and headliner (BLACK screws). The MDF is mounted to the steel door panel with the GOLD screws. The door is covered in Dynamat except for the holes. I folded the Dynamat behind the holes to prevent any sort of resonace. So on every hole, there is a layer on the front suyrface and that over hang is folded onto back surfave about 1 inch.
The holes I am referring to are the big 6" holes behind the orange layer of plastic:
Last edited by TwentyTen; 08-23-04 at 02:20 PM.

