IS F (2008-2014) Discussion topics related to the IS F model

Step by step DIY pics RR Racing Tuned intake install

Thread Tools
 
Search this Thread
 
Old 09-07-17, 10:33 PM
  #1  
Weapon F
Moderator
Thread Starter
 
Weapon F's Avatar
 
Join Date: Jan 2009
Location: NY
Posts: 1,664
Received 249 Likes on 135 Posts
Default Step by step DIY pics RR Racing Tuned intake install

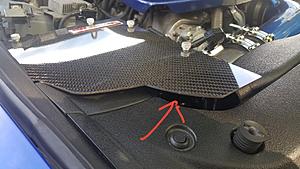
Did the install a few months ago, figured I'd post up the pictures now. This install took about an hour and a half taking my time.
What really took some time was customizing the side panels where the new carbon fiber air filter cover is located. That process took me a few days trying to figure out how I was going to do with trial and error. Check second page for pics
Side note if anyone can tell me how to make these pictures bigger, I tried several different ways nothing worked. If someone can do it for me even better lol.

Last edited by Weapon F; 09-07-17 at 11:08 PM.
The following users liked this post:
RRRacing (09-08-17)
Old 09-07-17, 11:01 PM
  #2  
isfvss
Racer
 
isfvss's Avatar
 
Join Date: Aug 2016
Location: New South Wales
Posts: 1,345
Received 139 Likes on 110 Posts
Default

Sorry No pics.
Old 09-07-17, 11:12 PM
  #3  
Weapon F
Moderator
Thread Starter
 
Weapon F's Avatar
 
Join Date: Jan 2009
Location: NY
Posts: 1,664
Received 249 Likes on 135 Posts
Default

Step by step DIY pics RR Racing Tuned intake install-20170428_140703-450x800.jpgStep by step DIY pics RR Racing Tuned intake install-20170428_141306-450x800.jpgStep by step DIY pics RR Racing Tuned intake install-20170428_145230-450x800.jpgStep by step DIY pics RR Racing Tuned intake install-20170428_161852-450x800.jpgStep by step DIY pics RR Racing Tuned intake install-20170428_161910-800x450.jpg
Old 09-07-17, 11:18 PM
  #4  
Weapon F
Moderator
Thread Starter
 
Weapon F's Avatar
 
Join Date: Jan 2009
Location: NY
Posts: 1,664
Received 249 Likes on 135 Posts
Default

You can see how panels sit on top of RR racing carbon fiber cover looks horrible that way also there's a big gap towards the back of it as well
Step by step DIY pics RR Racing Tuned intake install-20170428_172511-800x450.jpgStep by step DIY pics RR Racing Tuned intake install-20170428_173606-800x450.jpgStep by step DIY pics RR Racing Tuned intake install-20170428_184303-800x450.jpgStep by step DIY pics RR Racing Tuned intake install-20170428_195320-800x450.jpgStep by step DIY pics RR Racing Tuned intake install-20170428_195242-450x800.jpg
Old 09-07-17, 11:22 PM
  #5  
Weapon F
Moderator
Thread Starter
 
Weapon F's Avatar
 
Join Date: Jan 2009
Location: NY
Posts: 1,664
Received 249 Likes on 135 Posts
Default

Better view of panels, they're just laying on top of the carbon fiber piece plus like I said the previous page you see those big gaps
Step by step DIY pics RR Racing Tuned intake install-20170428_195313-800x450.jpgStep by step DIY pics RR Racing Tuned intake install-20170428_195320-800x450.jpgStep by step DIY pics RR Racing Tuned intake install-20170428_193523-800x450.jpg
Old 09-07-17, 11:29 PM
  #6  
Weapon F
Moderator
Thread Starter
 
Weapon F's Avatar
 
Join Date: Jan 2009
Location: NY
Posts: 1,664
Received 249 Likes on 135 Posts
Default

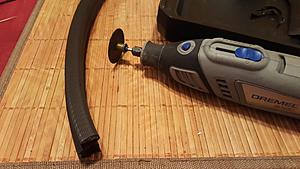
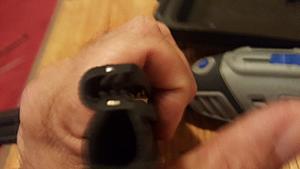
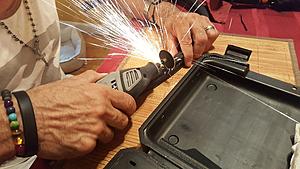
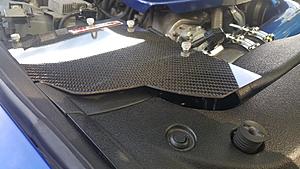
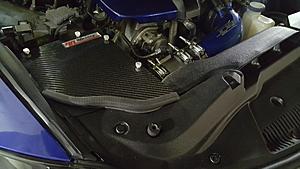
Broke out the Dremel and started doing some cutting as well as using some epoxy to reform some of the old plastic panels and reshaping them. That's smaller section I cut to fit in the front portion of the panel still using the original melting point
Step by step DIY pics RR Racing Tuned intake install-20170519_185218-800x450.jpgStep by step DIY pics RR Racing Tuned intake install-20170428_185846-800x450.jpgStep by step DIY pics RR Racing Tuned intake install-20170502_123418-450x800.jpgStep by step DIY pics RR Racing Tuned intake install-20170502_123447-450x800.jpg
Old 09-07-17, 11:45 PM
  #7  
Weapon F
Moderator
Thread Starter
 
Weapon F's Avatar
 
Join Date: Jan 2009
Location: NY
Posts: 1,664
Received 249 Likes on 135 Posts
Default

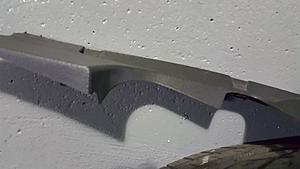
Next problem was getting rid of these massive gaps. I used portions of the plastic panel that I cut before heated them up to reshape them, once cooled off I used epoxy to apply them.
Step by step DIY pics RR Racing Tuned intake install-20170908_023645.jpgStep by step DIY pics RR Racing Tuned intake install-20170908_024137.jpg
Old 09-07-17, 11:56 PM
  #8  
Weapon F
Moderator
Thread Starter
 
Weapon F's Avatar
 
Join Date: Jan 2009
Location: NY
Posts: 1,664
Received 249 Likes on 135 Posts
Default

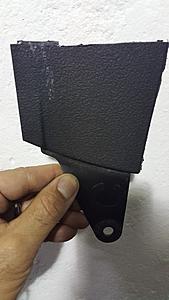
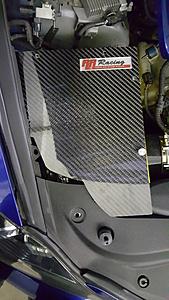
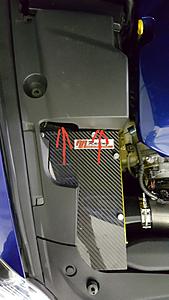
Check several different hardware and auto parts store looking for the right type of molding for the proper thickness and shape. Couldn't find anything that worked then one day at work looking around in one of the workshops I found the perfect molding it had metal strips running through it which was great because it allowed it to take different shapes. I was able to form it into the perfect shape of a carbon fiber panal as well as one of the plastic piece that I cut earlier. Here s before and after shot of carbon fiber panel
Step by step DIY pics RR Racing Tuned intake install-20170519_185218-800x450.jpgStep by step DIY pics RR Racing Tuned intake install-20170519_185258-800x450.jpgStep by step DIY pics RR Racing Tuned intake install-20170519_185627-800x450.jpgStep by step DIY pics RR Racing Tuned intake install-20170510_164011-800x450.jpgStep by step DIY pics RR Racing Tuned intake install-20170510_185638-800x450.jpg
Old 09-08-17, 12:06 AM
  #9  
Weapon F
Moderator
Thread Starter
 
Weapon F's Avatar
 
Join Date: Jan 2009
Location: NY
Posts: 1,664
Received 249 Likes on 135 Posts
Default

Everything completed some before and after shots.
Step by step DIY pics RR Racing Tuned intake install-20170428_184254-800x450.jpgStep by step DIY pics RR Racing Tuned intake install-20170602_134634-800x450.jpgStep by step DIY pics RR Racing Tuned intake install-20170428_195242-450x800.jpgStep by step DIY pics RR Racing Tuned intake install-20170602_134428-800x450.jpgStep by step DIY pics RR Racing Tuned intake install-20170428_195313-800x450.jpgStep by step DIY pics RR Racing Tuned intake install-20170602_134613-800x450.jpgStep by step DIY pics RR Racing Tuned intake install-20170602_134053-800x450.jpg
Old 09-08-17, 04:33 AM
  #10  
2011ISFNY
Rookie
 
2011ISFNY's Avatar
 
Join Date: Mar 2011
Location: NY
Posts: 66
Received 24 Likes on 8 Posts
Default

Nice pics Dave - looks like the mod bug bit you again . Haven't seen your car since you helped me arrange the header install. Need to catch up soon
Old 09-08-17, 05:04 AM
  #11  
mikersoft
Lexus Test Driver
iTrader: (1)
 
mikersoft's Avatar
 
Join Date: Dec 2013
Location: VA
Posts: 1,135
Received 79 Likes on 57 Posts
Default

Nice work on the custom trimming/molding. I did some plastic trimming as well, but there are still improvements to be made, so mine's still a work in progress.

-Mike
Old 09-08-17, 06:30 AM
  #12  
Weapon F
Moderator
Thread Starter
 
Weapon F's Avatar
 
Join Date: Jan 2009
Location: NY
Posts: 1,664
Received 249 Likes on 135 Posts
Default

More finish trimming pics.
Step by step DIY pics RR Racing Tuned intake install-20170615_192825-800x450-1280x720.jpgStep by step DIY pics RR Racing Tuned intake install-20170615_192941-800x450-1280x720.jpgStep by step DIY pics RR Racing Tuned intake install-20170615_192743-1024x1830-1280x2287.jpgStep by step DIY pics RR Racing Tuned intake install-20170602_134428-800x450-1280x720.jpgStep by step DIY pics RR Racing Tuned intake install-20170519_192407-800x450-1280x720.jpgStep by step DIY pics RR Racing Tuned intake install-20170615_192855-1280x720-1280x720.jpg
Old 09-08-17, 06:51 AM
  #13  
Weapon F
Moderator
Thread Starter
 
Weapon F's Avatar
 
Join Date: Jan 2009
Location: NY
Posts: 1,664
Received 249 Likes on 135 Posts
Default

Originally Posted by 2011ISFNY
Nice pics Dave - looks like the mod bug bit you again . Haven't seen your car since you helped me arrange the header install. Need to catch up soon
Definitely need to catch up brother hopefully you and the family are doing well it's been a while. When I installed the RR Racing Tuned intake back in May I also did the RR racing LCA as well as the air-fuel ratios sensors I was throwing cells, so it was time to swap them out since I was doing the LCA and already had to go underneath car might as well just change A/R sensors at the same time.
Step by step DIY pics RR Racing Tuned intake install-20170511_090427-1024x1820.jpgStep by step DIY pics RR Racing Tuned intake install-20170511_090433-1820x1024.jpgStep by step DIY pics RR Racing Tuned intake install-20170511_090439-1820x1024.jpgStep by step DIY pics RR Racing Tuned intake install-20170511_090446-1820x1024.jpg
Old 09-08-17, 06:55 AM
  #14  
Weapon F
Moderator
Thread Starter
 
Weapon F's Avatar
 
Join Date: Jan 2009
Location: NY
Posts: 1,664
Received 249 Likes on 135 Posts
Default

Originally Posted by mikersoft
Nice work on the custom trimming/molding. I did some plastic trimming as well, but there are still improvements to be made, so mine's still a work in progress.

-Mike
Thanks Mike, I've been watching your progress with your car great job. If you have any questions just hit me up.
Old 09-08-17, 12:35 PM
  #15  
JPxMODz
Lead Lap
iTrader: (3)
 
JPxMODz's Avatar
 
Join Date: Dec 2016
Location: SK Canada
Posts: 570
Received 111 Likes on 70 Posts
Default

I hope the performance gains reflect on the extra mods to fit this intake box nicely, especially considering the cost of the RR Racing intake and time invested. Would love to see a side by side dyno of this intake verses stock with an upgraded intake elbow and hi-flow filter

Looks great! Nice Job


Quick Reply: Step by step DIY pics RR Racing Tuned intake install


All times are GMT -7. The time now is 03:06 PM.