
 12-16-14, 11:37 AM
Last edit by: IB Advertising
See related guides and technical advice from our community experts:
Browse all: Lexus IS Lighting Guides
- Lexus: How to Replace Footwell lights
Step by step instructions for do-it-yourself repairs
Browse all: Lexus IS Lighting Guides

DIY - Replace OEM led footwell Lights with after-market LEDS
12-30-10, 03:44 PM
#1
Hey CL :
Was very bored this winter break so i decided to write a small DIY guide so that you can replace the single oem footwell led to a much brighter, better looking LED strip.
First off i would like to Thank our fellow member CCM03. He explained to me how to take apart the dash and how to get to get to the bulbs. CCM03 Replaced his footwell lights with another style of LEDS. Theoretically any LED with a Negative and Positive wire will work.
*** THE LED LIGHTS WILL DIM WHEN THE CAR IS SHIFTED FROM PARK TO DRIVE . FROM DRIVE TO PARK THE LED LIGHTS BRIGHTEN UP 2X AS BRIGHT. THE LIGHTS WILL NOT BOTHER YOU WHEN YOU ARE DRIVING, BUT WILL AMAZE YOUR PASSENGER ***
Tools / Parts :
- Screw Driver (For driver side)
- Wire splicer, or Knife
- Electrical tape or a solder
- 9V battery (As tester for strip)
- 2x TOTAL LED Strip, 6" Works best. Got mine fromV-LEDS (Links below)
VLED COLOR: 5000k, 6000K, Red, Blue, Green..etc
Remember QTY 1 for LED Strip, QTY 1 now provides 2 pcs total of LED Strip
-------------------------------------------------------------------
First we will Start with the Passenger side as there are no screws and is easier to work with.
Step 1 : Move the seat all the way back so you have room to work with ^_^
Step 2: Remove your car mats
Step 3 : Pull the bottom part of the dash apart. The bottom dash is held by just clips, get a grip from the back and just pull downwards, the dash should pop out halfway.

Step 4: Push the oem Light up into the hole

Step 5 : Push the white plastic piece up, and retrieve the oem light through the plastic parts hole.


Step 6 : Disconnect the OEM led wire, its connected by an oem connector (just like how the side door markers are)
Step 7 : attach your LED strip wire ends to the 9v battery to test to see if all the lights work. Also remember which end is positive and which end is negative as the casing over the wires are both black Once done splice off the ends to the wires
Step 8 : Splice off the OEM connector, and or cut off a piece of the casing over the wire (Positive and Negative are color coded here. Negative is RED)
Step 9 : Solder, use a connector, or twist the ends of the negative connection from the car to the negative connection on the led strip. Repeat the same proccess witht he positive connection. Once done, the Lights should light up.
Step 10 : use an alchol wipe to wipe the bottom area of the dash. Once dry, peel back the adhesive on the back end of the strip. Place firmly under dash. For best fitments, use a tape measure to center the led strip, and also sit in the seat to make sure you cant see the LEDS when you look down, so the LEDS are hidden.
Step 11 : Pop the bottom dash back into place, tuck the wire back up through the white plasitc pieces hole
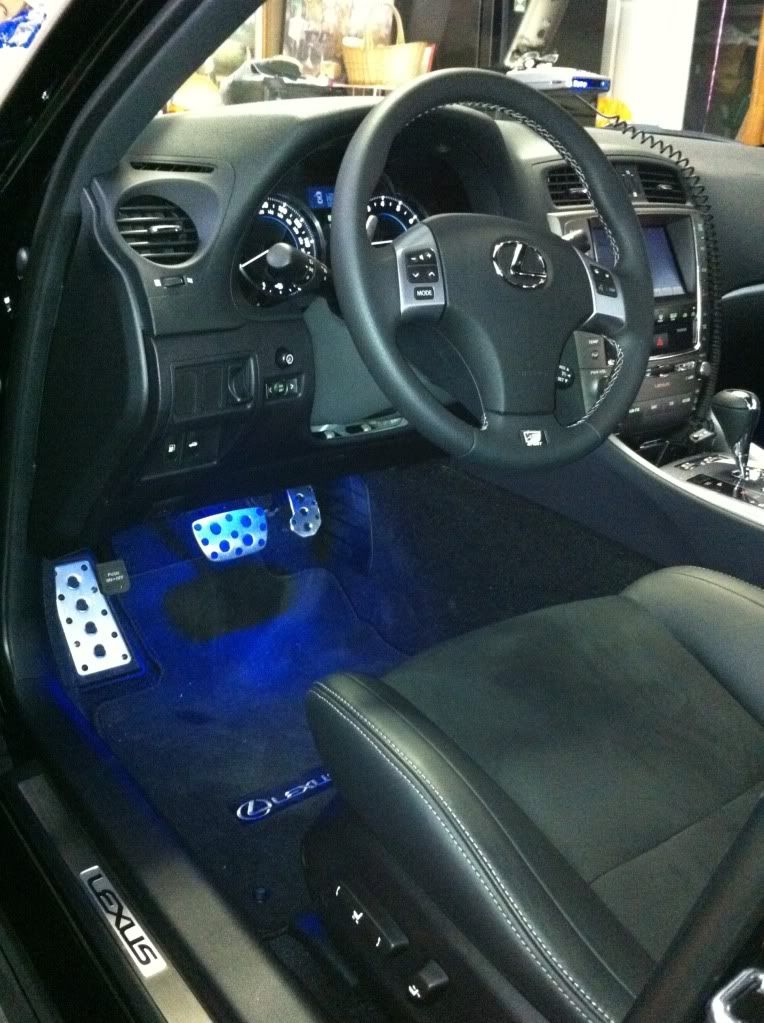
Step 12: Put your car mat back in, adjust your seat and admire the new brighter and or different color light

Now For the Drive Side:
The driver side is a bit more tricky. There are 2 Screws which you need to unscew.
Step 1 : follow steps 1 - 2 Above
Step 2 : Locate the two screws and Unscrew them.

Step 3 : Follow steps 3 - 12 Above
Step 4 : Enjoy!

Was very bored this winter break so i decided to write a small DIY guide so that you can replace the single oem footwell led to a much brighter, better looking LED strip.
First off i would like to Thank our fellow member CCM03. He explained to me how to take apart the dash and how to get to get to the bulbs. CCM03 Replaced his footwell lights with another style of LEDS. Theoretically any LED with a Negative and Positive wire will work.
*** THE LED LIGHTS WILL DIM WHEN THE CAR IS SHIFTED FROM PARK TO DRIVE
. FROM DRIVE TO PARK THE LED LIGHTS BRIGHTEN UP 2X AS BRIGHT. THE LIGHTS WILL NOT BOTHER YOU WHEN YOU ARE DRIVING, BUT WILL AMAZE YOUR PASSENGER *** Tools / Parts :
- Screw Driver (For driver side)
- Wire splicer, or Knife
- Electrical tape or a solder
- 9V battery (As tester for strip)
- 2x TOTAL LED Strip, 6" Works best. Got mine fromV-LEDS (Links below)
VLED COLOR: 5000k, 6000K, Red, Blue, Green..etc
Remember QTY 1 for LED Strip, QTY 1 now provides 2 pcs total of LED Strip
-------------------------------------------------------------------
First we will Start with the Passenger side as there are no screws and is easier to work with.
Step 1 : Move the seat all the way back so you have room to work with ^_^
Step 2: Remove your car mats
Step 3 : Pull the bottom part of the dash apart. The bottom dash is held by just clips, get a grip from the back and just pull downwards, the dash should pop out halfway.
Step 4: Push the oem Light up into the hole
Step 5 : Push the white plastic piece up, and retrieve the oem light through the plastic parts hole.
Step 6 : Disconnect the OEM led wire, its connected by an oem connector (just like how the side door markers are)
Step 7 : attach your LED strip wire ends to the 9v battery to test to see if all the lights work. Also remember which end is positive and which end is negative as the casing over the wires are both black Once done splice off the ends to the wires
Step 8 : Splice off the OEM connector, and or cut off a piece of the casing over the wire (Positive and Negative are color coded here
. Negative is RED)Step 9 : Solder, use a connector, or twist the ends of the negative connection from the car to the negative connection on the led strip. Repeat the same proccess witht he positive connection. Once done, the Lights should light up.
Step 10 : use an alchol wipe to wipe the bottom area of the dash. Once dry, peel back the adhesive on the back end of the strip. Place firmly under dash. For best fitments, use a tape measure to center the led strip, and also sit in the seat to make sure you cant see the LEDS when you look down, so the LEDS are hidden.
Step 11 : Pop the bottom dash back into place, tuck the wire back up through the white plasitc pieces hole
Step 12: Put your car mat back in, adjust your seat and admire the new brighter and or different color light
Now For the Drive Side:
The driver side is a bit more tricky. There are 2 Screws which you need to unscew.
Step 1 : follow steps 1 - 2 Above
Step 2 : Locate the two screws and Unscrew them.
Step 3 : Follow steps 3 - 12 Above
Step 4 : Enjoy!
Last edited by JoshIS408; 01-30-14 at 06:37 PM.


 12-30-10, 08:36 PM
#7
In 2008 Ford added the interior ambient lighting package, on specially equipped Mustangs, which offers the option of illuminating the front and rear footwells and front cupholders with any one of seven colors. The driver or front passenger can choose from red, orange, blue, indigo, violet, green and yellow.


ten-characters
The following users liked this post:
sNotM3 (01-20-23)
Trending Topics
 .
.


The following users liked this post:
sNotM3 (01-20-23)