DIY Sport Pedals IS350 IS250 w/ Pictures!
 04-29-17, 03:19 PM
#166
Just got done with mine I had these sitting for a few years waiting for the right time to do it.
A few tips:
1) 10 mm socket with wobble joint adapter, use 1/4" socket and tools to help with the little space you have to work with.
2) The nuts to remove on the gas pedal which by the way are a pain in the a$$ are the black ones (one on the bottom lower left the other on top
3) When you remove the gas pedal use a bench vise and make sure to have a 4 mm punch or a 5/32" punch trust me it will make the job so much easier punching that pin out.
After getting this job done I feal like 10 guys tried to beat me to death! There is not one inch of my back that does not hurts hahaha.
Good luck
 04-29-17, 09:31 PM
#167

I am still beat. I finally got the gas pedal out. I had to take 2 nuts out and 1 bolt. unlike what has been talked about and in the video, is it because mine is an 06?
04-29-17, 09:32 PM
#168
I am not kidding I am really sore! The video I saw is not the right one to follow.
05-01-17, 10:32 AM
#170
No kidding, I am bruised. I wish that somebody did a detailed instruction on the proper way to replace the pedal pad. Now it could be that the later models, had a slightly different configuration that allowed access with a little more space to work with.
Toyota not thinking about this makes sense, they do not consider replacing gas pedals a real NEED.
I have my SC sport pedals and I wanted them on my IS as well. For that matter, I want them on my RX, too.
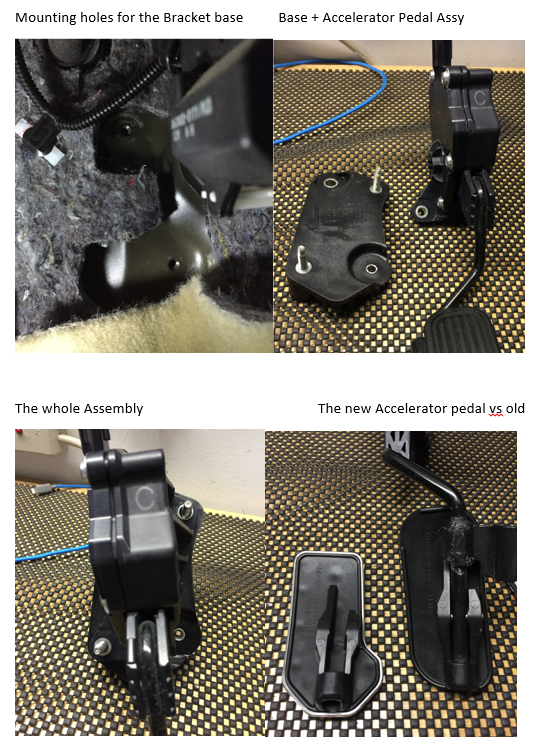
I will post a set of pictures showing the details of the assembly, hoping that the people who decide on this DIY learn enough to minimize the bruising effect. I need pain killers. Side on my stomach and my right arm hurt.
Toyota not thinking about this makes sense, they do not consider replacing gas pedals a real NEED.
I have my SC sport pedals and I wanted them on my IS as well. For that matter, I want them on my RX, too.
I will post a set of pictures showing the details of the assembly, hoping that the people who decide on this DIY learn enough to minimize the bruising effect. I need pain killers. Side on my stomach and my right arm hurt.
05-02-17, 05:29 AM
#171
Reference:
 05-02-17, 08:44 AM
#172
You are actually doing more than necessarily. All you need to remove is the two bolts from accelerator pedal assembly ( one lower left and one upper right). The one upper right, you need to use the wobble joint adapter. To remove the pin, just use a nail that is just a little smaller than the hole. I found out this method is the easiest without damaging the accelerator pedal because I didn't use that method to remove the old accelerator pedal. Once I removed the old accelerator pedal out I decided to use the nail instead. I found one nail that is a bit smaller than the hole. Since the pin has a hole also, the tip of the nail actually line up perfectly for you to hammer it into the new sport pedal. Not only that it didn't damage the new sport pedal since the nail never touch the sides of the hole but it also take less time and effort to do so.
05-02-17, 09:21 AM
#173
You are probably right, however since I have an 06, the clearances were tighter(is my assumption). Regardless, there was no way I can get my wobble extension in there. After being bruised (physically and mentally) I went the longer way. Lesson learned. I can do it better on my next one...in 1 hour tops (includes the drinking of 2 beers).
05-02-17, 10:04 AM
#174

For further reference, this has been posted before, but here's a vid for those looking to tackle this one day. I went by this install method. But I don't have a vise grip so I placed it on a solid flat ground and did the hammer and nail method to get the pin out. If you're looking to go this route, I would suggest placing the electronic side of the accelerator pedal assembly on a pillow or some kind of cushioning as to not potentially damage the electronics from excessive vibration during hammering.
05-02-17, 02:45 PM
#175
Ok, I agree. The technique is to use the flexible light (with somebody else is holding it) to take off the 1 nut. It will require some kind of contortion and expect some bruising.
I know there's a bunch of members who have done it, sorry I was not one of them.
If I were to take it down again, I have my lessons learned list.
I like the F sport pedals though.
And am looking for a replacement for the parking brake...
I know there's a bunch of members who have done it, sorry I was not one of them.
If I were to take it down again, I have my lessons learned list.
I like the F sport pedals though.
And am looking for a replacement for the parking brake...
05-02-17, 03:15 PM
#176
Here is the post euroimage did that look really nice. Hope he can chime in the part number or what vehicle was that clutch from.
https://www.clublexus.com/forums/is-...ake-pedal.html
https://www.clublexus.com/forums/is-...ake-pedal.html
11-26-17, 06:59 AM
#177

Old thead but anyway I was just shoping in eBay and saw a oem sport pedal set for manual car. Price with shipping and taxes 212 USD.
Not going to happen.
Then I started looking around elsewhere, not much luck.
Finally found a japanise site. They have warehause in UAE and 4 pedals with the shipping was just 98 USD.
As far for install there was no way I could remove the accelerator pedal. The upper nut was unreachable. Maybe its more difficult on manual/diesel car.
Ended up using small screw clamp with some custom fittings to push the pin out. Took me about 20 min to remove the old and install the new + another 15 before to make fittings for clamp.
Other three took less than 5 min.
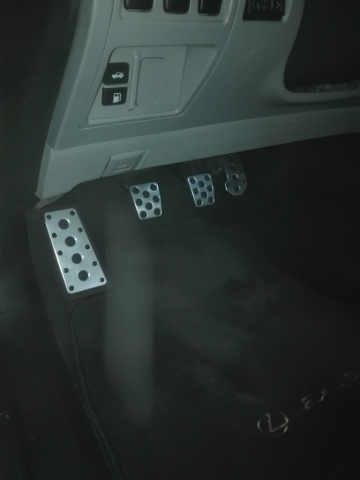
Very happy with the result, well worth it!
bad phone pic
Not going to happen.
Then I started looking around elsewhere, not much luck.
Finally found a japanise site. They have warehause in UAE and 4 pedals with the shipping was just 98 USD.
As far for install there was no way I could remove the accelerator pedal. The upper nut was unreachable. Maybe its more difficult on manual/diesel car.
Ended up using small screw clamp with some custom fittings to push the pin out. Took me about 20 min to remove the old and install the new + another 15 before to make fittings for clamp.
Other three took less than 5 min.
Very happy with the result, well worth it!
bad phone pic
Last edited by Allan1; 11-26-17 at 08:53 AM.
11-20-18, 08:22 PM
#178
Driver School Candidate


Finally! Took me about 10mins and BRUISES to reach and take the upper nut out then 2 hrs to take the pin out from the old gas pedal. Actually I ended up melting the old assembly with a heat gun. 2 hours of banging only took out 1/4 of the pin.
11-21-18, 05:11 AM
#179
Well worth the upgrade!


