DIY Front Wheel Bearings
 11-11-12, 05:00 PM
#1
Driver School Candidate
Thread Starter

Join Date: Oct 2009
Location: NC
Posts: 8
Likes: 0
Received 0 Likes
on
0 Posts
This is for a 2006 GX. Not sure how others differ. When faced with an expensive wheel bearing replacement I decided to do it myself. I found little help online and ended up purchasing the alldata online workshop manual wich was moderately helpful.
First I purchased the parts from Sewell Lexus using the club discount. Thanks guys.
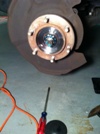
1- Remove brake pads as if replacing pads
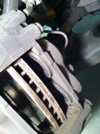
Remove brake line holder bolt
Remove Brake Disk bolts
Hang brake caliper from strut
Remove metal cover to access axel nut
First I purchased the parts from Sewell Lexus using the club discount. Thanks guys.
1- Remove brake pads as if replacing pads
Remove brake line holder bolt
Remove Brake Disk bolts
Hang brake caliper from strut
Remove metal cover to access axel nut
 11-11-12, 05:06 PM
#2
Driver School Candidate
Thread Starter
Join Date: Oct 2009
Location: NC
Posts: 8
Likes: 0
Received 0 Likes
on
0 Posts
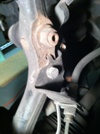
Remove cotter pin and axel nut cover
Remove axel nut
soak 4 bolts with blaster to make removal easier
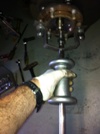
This was the hardest part. I had to make a puller attachement as the one from O'Reily was to narrow or would not fit over the lip.

Soak for some time with Blaster then pull on hammer. Diver side came out easy. Passenger side took 45 minutes of slide hammering
Remove axel nut
soak 4 bolts with blaster to make removal easier
This was the hardest part. I had to make a puller attachement as the one from O'Reily was to narrow or would not fit over the lip.
Soak for some time with Blaster then pull on hammer. Diver side came out easy. Passenger side took 45 minutes of slide hammering
11-11-12, 05:15 PM
#3
Driver School Candidate
Thread Starter
Join Date: Oct 2009
Location: NC
Posts: 8
Likes: 0
Received 0 Likes
on
0 Posts
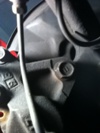
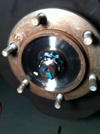
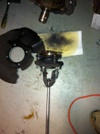
Removed
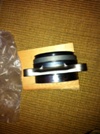
New parts from sewell

Attached wheel bearing and dust cover. This took a little effort. I used a piece of copper pipe and hammer to hammer onto wheel bearing
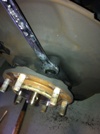
Back from machine shop, $5 later
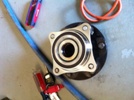
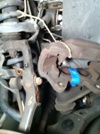
Bolted back into place
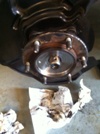
The axel nut torque is 175lbs, this was more difficult than other wheel bearings I have done but not too difficult. After hearing prices of over $1,000 at the local dealer this was a good job. Less than $300 with machine shop included.
New parts from sewell
Attached wheel bearing and dust cover. This took a little effort. I used a piece of copper pipe and hammer to hammer onto wheel bearing
Back from machine shop, $5 later
Bolted back into place
The axel nut torque is 175lbs, this was more difficult than other wheel bearings I have done but not too difficult. After hearing prices of over $1,000 at the local dealer this was a good job. Less than $300 with machine shop included.
11-12-12, 11:23 AM
#4
Instructor
Could you describe the issue you were having that led you to replace both wheel bearings?
 11-15-12, 06:55 PM
#6
Driver School Candidate
Thread Starter
Join Date: Oct 2009
Location: NC
Posts: 8
Likes: 0
Received 0 Likes
on
0 Posts
The wheel bearings showed signes of wear in two ways. I have 75,000 miles on the car. The driver side wheel started making a roaring noise on rotation. It would subside when the stearing wheel was turned to the right. When I took off the tire and pushed on the hub I could notice the movement was signifiacntly more than the passanger side. There should be no play in the hub.
11-19-12, 05:22 PM
#7
Driver School Candidate

Join Date: Mar 2009
Location: Mi
Posts: 7
Likes: 0
Received 0 Likes
on
0 Posts
Great write up.
I undertook the same job, but had a lot more headaches than you.
There was no way the sledge slider puller was going to budge the hub from the bearing. I had a shop press them apart.
I still have not reassembled them yet as I am waiting for parts.
I also found a bad knuckle to axle seal on the driver side.
You mention the axle nut torque is 175 ft/lbs? That seems high? Where did you get this?
I just want to make sure I use the right value.
Also, how did the old hub fit into the new bearing? I assume since it was hard to separate, its going to be similar to re asseble with a new bearing? Did you assemble them on the bench first? With a big hammer?
Thanks for your advise... I need help
Trending Topics
12-02-12, 03:58 PM
#8
Driver School Candidate
Thread Starter
Join Date: Oct 2009
Location: NC
Posts: 8
Likes: 0
Received 0 Likes
on
0 Posts
You are correct, what I pulled was axel and hub, then machine shop pulled them apart and pressed the new one together.
the 175 ft/lbs came from the ALLDATA web site. Had to pay for that.
I had the machine shop press them back together after I replaced the rubber grease seal.
the 175 ft/lbs came from the ALLDATA web site. Had to pay for that.
I had the machine shop press them back together after I replaced the rubber grease seal.

Thread
Thread Starter
Forum
Replies
Last Post
grandamliz
Suspension and Brakes
109
06-18-17 11:00 AM