DIY: How to take apart headlights for installation of accesories and removal of parts
 12-26-12, 11:19 PM
#1
Driver School Candidate
Thread Starter

This is a DIY for removing your headlights. You will also learn to change any parts that may have gone bad (ballast, motor head for AFS, Etc.) I pretty much take apart every component of the headlight in this DIY. You will also know how to smoke out your headlights if you don't want the silver reflector, and to add accessories such as Halos, LED strips, etc. You can also change the lens of the HID. I am not liable for any damage done to your car while performing this mod!
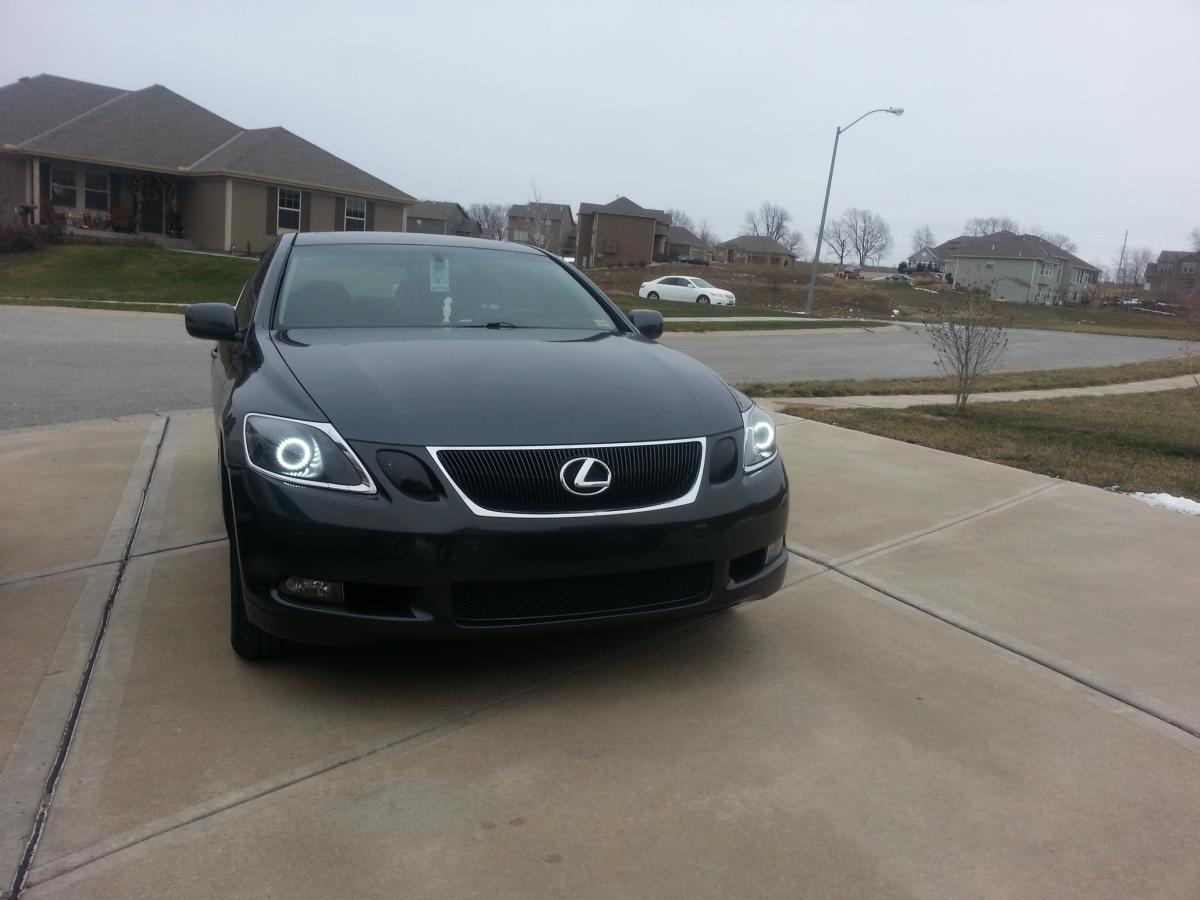
This is the way I wanted mine to end up looking, I wanted to add halos, remove the ugly yellow reflector on the side, and made the headlight reflectors black.

There are two methods for disassembling headlights, I say disassemble because you have to remove the plastic casing of the headlight from the back. You cant simply remove screws to do this, you have to heat up the headlight either with a heat gun or using an oven. This will soften the glue and allow you to undo your headlights. I read up on other forums that the heat gun method is easier because you don't have to remove all the accessories, but its actually very dangerous. Heat guns are very HOT and if you accidently leave it in a spot for a few seconds longer, you can damage your headlight and not be able to fix it. The oven method is MUCH safer because its distributed heat at a lower temperature, so there is virtually no way to damage your headlight, that is unless you forget about it, haha.
Well anyways heres how you do it!
Let me start with a couple of general things...
- Always use the proper socket, screwdriver, etc. you don't want to end up with no head on a screw.
- Don't force things, be patient, and do the job right.
- Be careful throughout the whole process to place your headlights on a couple of soft towels, this will prevent them from being scratched...
- Any time your doing any electrical work or messing with wires, always unhook your (-) end on the battery terminal. Always safer to do that before you start.
-There will be MANY screws and clips you will undo, just so you don't misplace them, I would take a piece of paper(s), and write down where you removed them from, and set the removed parts as you remove them next to the corresponding writing. It makes it 10X easier when you go back to reinstall.
Step 1.
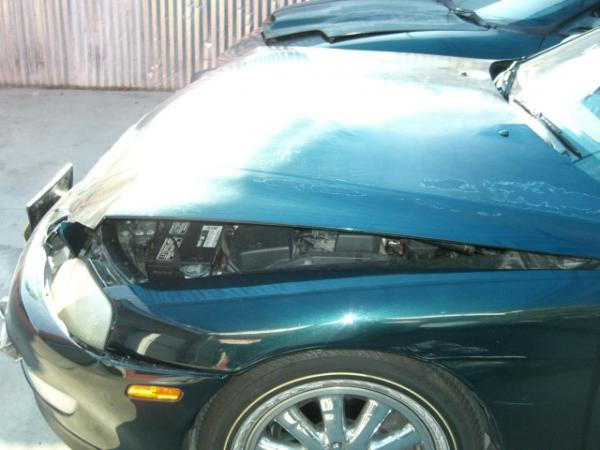
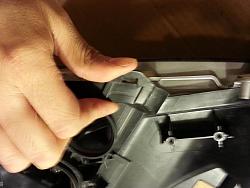
With your (-) battery terminal removed, start by removing the covers under the hood...These are all held on by a pushbutton type fastener. Simply push each one and put them in a safe place. Next remove your front bumper, here is the link off of the 3GS FAQ FORUM https://www.clublexus.com/forums/gs-...ls-in-led.html courtesy of ING.
Step 2.
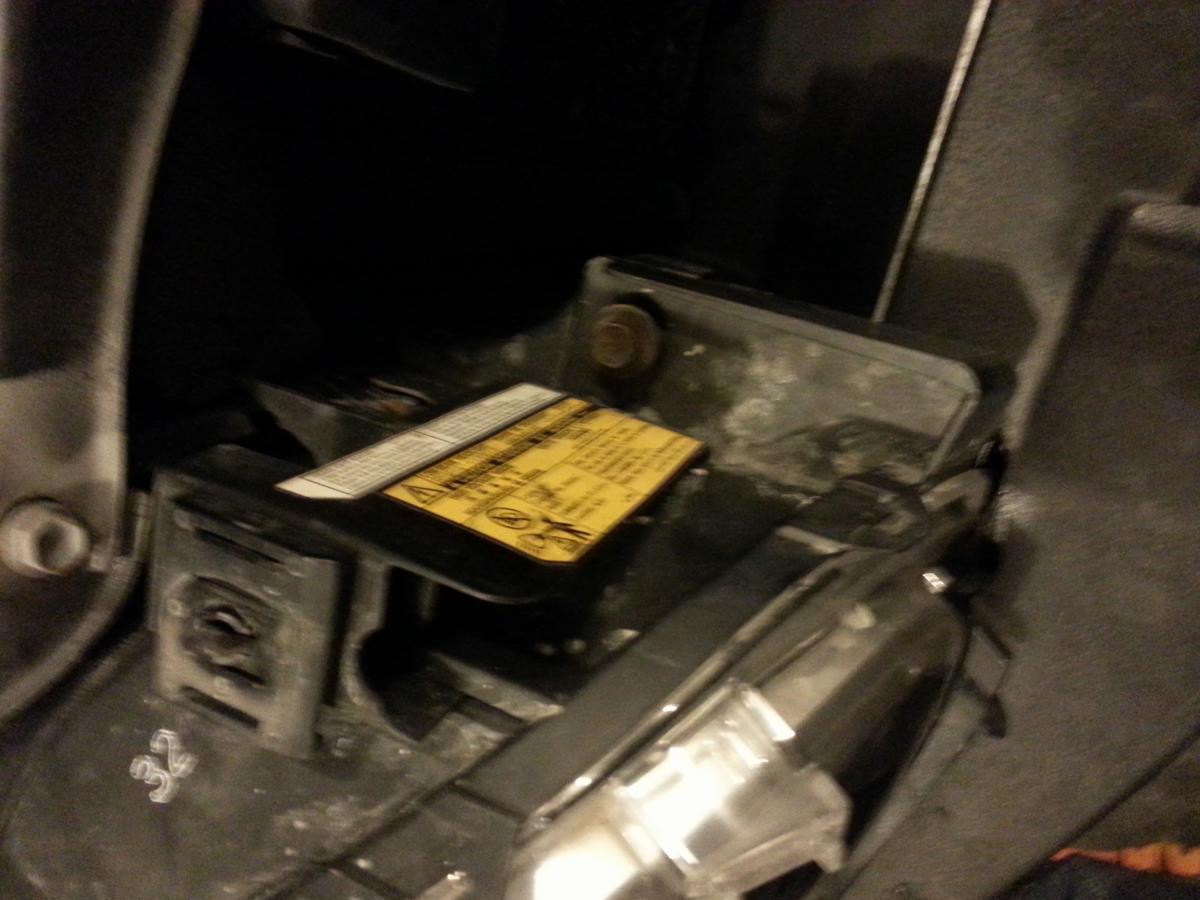
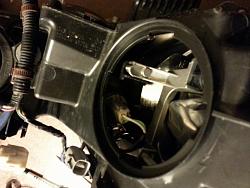
Remove the headlights. There were 3 bolts you have to remove to do this. The first is right by a yellow sticker, next to where the existing grill was...
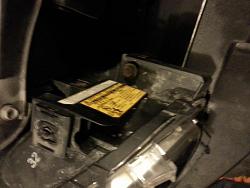
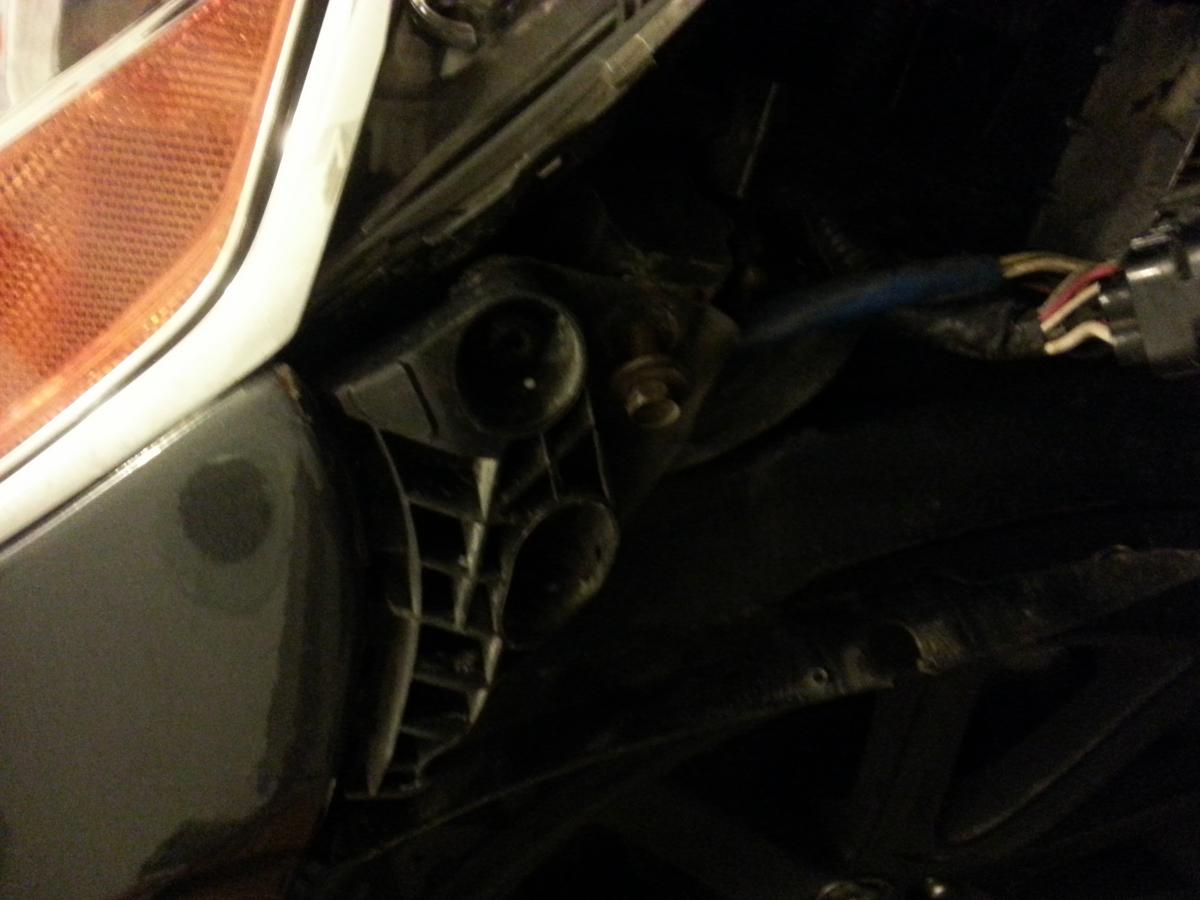
second one is a bit harder to see, you have to remove the hood trim by sliding it to the left to access the bolt behind it.
and the last one is besides the tire. the one you can see that's already coming out in the picture.

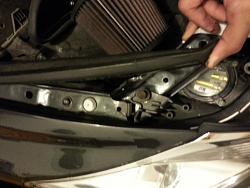
Also undo the main harness that's attached to the headlights...to do this push the middle tab on the white lever and lift the opposite way. It will automatically pull apart the connection and all you have to do then is pull the two ends apart.
Make sure you hold the connectors and pull not just yank on the wires, and risk losing a connection.
This is the way I wanted mine to end up looking, I wanted to add halos, remove the ugly yellow reflector on the side, and made the headlight reflectors black.
There are two methods for disassembling headlights, I say disassemble because you have to remove the plastic casing of the headlight from the back. You cant simply remove screws to do this, you have to heat up the headlight either with a heat gun or using an oven. This will soften the glue and allow you to undo your headlights. I read up on other forums that the heat gun method is easier because you don't have to remove all the accessories, but its actually very dangerous. Heat guns are very HOT and if you accidently leave it in a spot for a few seconds longer, you can damage your headlight and not be able to fix it. The oven method is MUCH safer because its distributed heat at a lower temperature, so there is virtually no way to damage your headlight, that is unless you forget about it, haha.
Well anyways heres how you do it!
Let me start with a couple of general things...
- Always use the proper socket, screwdriver, etc. you don't want to end up with no head on a screw.
- Don't force things, be patient, and do the job right.
- Be careful throughout the whole process to place your headlights on a couple of soft towels, this will prevent them from being scratched...
- Any time your doing any electrical work or messing with wires, always unhook your (-) end on the battery terminal. Always safer to do that before you start.
-There will be MANY screws and clips you will undo, just so you don't misplace them, I would take a piece of paper(s), and write down where you removed them from, and set the removed parts as you remove them next to the corresponding writing. It makes it 10X easier when you go back to reinstall.
Step 1.
With your (-) battery terminal removed, start by removing the covers under the hood...These are all held on by a pushbutton type fastener. Simply push each one and put them in a safe place. Next remove your front bumper, here is the link off of the 3GS FAQ FORUM https://www.clublexus.com/forums/gs-...ls-in-led.html courtesy of ING.
Step 2.
Remove the headlights. There were 3 bolts you have to remove to do this. The first is right by a yellow sticker, next to where the existing grill was...
second one is a bit harder to see, you have to remove the hood trim by sliding it to the left to access the bolt behind it.

and the last one is besides the tire. the one you can see that's already coming out in the picture.
Also undo the main harness that's attached to the headlights...to do this push the middle tab on the white lever and lift the opposite way. It will automatically pull apart the connection and all you have to do then is pull the two ends apart.

Make sure you hold the connectors and pull not just yank on the wires, and risk losing a connection.
Last edited by d100patel; 12-27-12 at 03:18 AM.

The following users liked this post:
skur (06-16-23)
12-26-12, 11:55 PM
#2
Driver School Candidate
Thread Starter
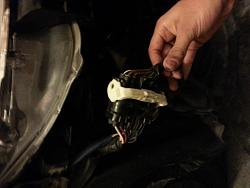
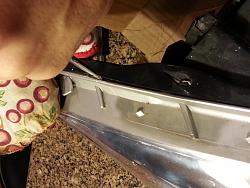
The last connection you have to undo is the headlight washer, its a simple push and turn to remove connection...push the two tabs and turn while pulling apart. 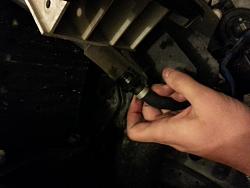
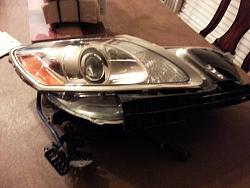
Once you have done all that, your headlight will just pull right out. Again make sure you set your headlight somewhere safe where it wont get scratched (the bottom of a garage floor itself is not ideal, use towels, or go inside). Also rmbr to not lose your screws and bolts (use that paper!)...
Step 3: With the headlight apart its time to start removing the parts so that you can put it in the oven. Start with the headlight trim, be careful and remove everything slowly, you don't want to snap the trim! There will be multiple screws alongside the trim except the top. Once you remove all the screws (don't lose them!) carefully lift up on the tabs at the top of the trim, it should come off. The only piece left should be the headlight washer. To remove this, just pull on it and it should just pop off.

Next I would take off the plastic part used to help secure the headlight to the bumper. If you flip the headlight to its back, there will be three screws holding it in place. Remove those and set it aside. There will be plenty more screws that will come off, be sure not to mix them up.
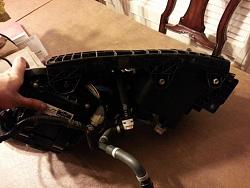
Once you remove that, the next thing to remove would be the headlight washer assembly. There are two screws that hold this in place...

Once you have done all that, your headlight will just pull right out. Again make sure you set your headlight somewhere safe where it wont get scratched (the bottom of a garage floor itself is not ideal, use towels, or go inside). Also rmbr to not lose your screws and bolts (use that paper!)...

Step 3: With the headlight apart its time to start removing the parts so that you can put it in the oven. Start with the headlight trim, be careful and remove everything slowly, you don't want to snap the trim! There will be multiple screws alongside the trim except the top. Once you remove all the screws (don't lose them!) carefully lift up on the tabs at the top of the trim, it should come off. The only piece left should be the headlight washer. To remove this, just pull on it and it should just pop off.

Next I would take off the plastic part used to help secure the headlight to the bumper. If you flip the headlight to its back, there will be three screws holding it in place. Remove those and set it aside. There will be plenty more screws that will come off, be sure not to mix them up.

Once you remove that, the next thing to remove would be the headlight washer assembly. There are two screws that hold this in place...
 12-27-12, 12:29 AM
#3
Driver School Candidate
Thread Starter
Step 4:
Its time to start removing the electronic components, I am not quite sure I had to do this step, but I figured if I was going to put the headlight in the oven at 225 degrees for 15 minutes, I should remove the wiring and bulbs just incase.
Start by undoing all connections to bulbs...for those of you that have never done this...
Unclip the hi/low beam connector by pushing in the tab, and pulling down. (highlighted in RED)

Next twist the DRL TAB and pull to open (took some pulling, don't worry as long as your pulling on the tab, you wont damage anything!) There are two of these, one next to your high beams and another where your side marker is. Remove both.
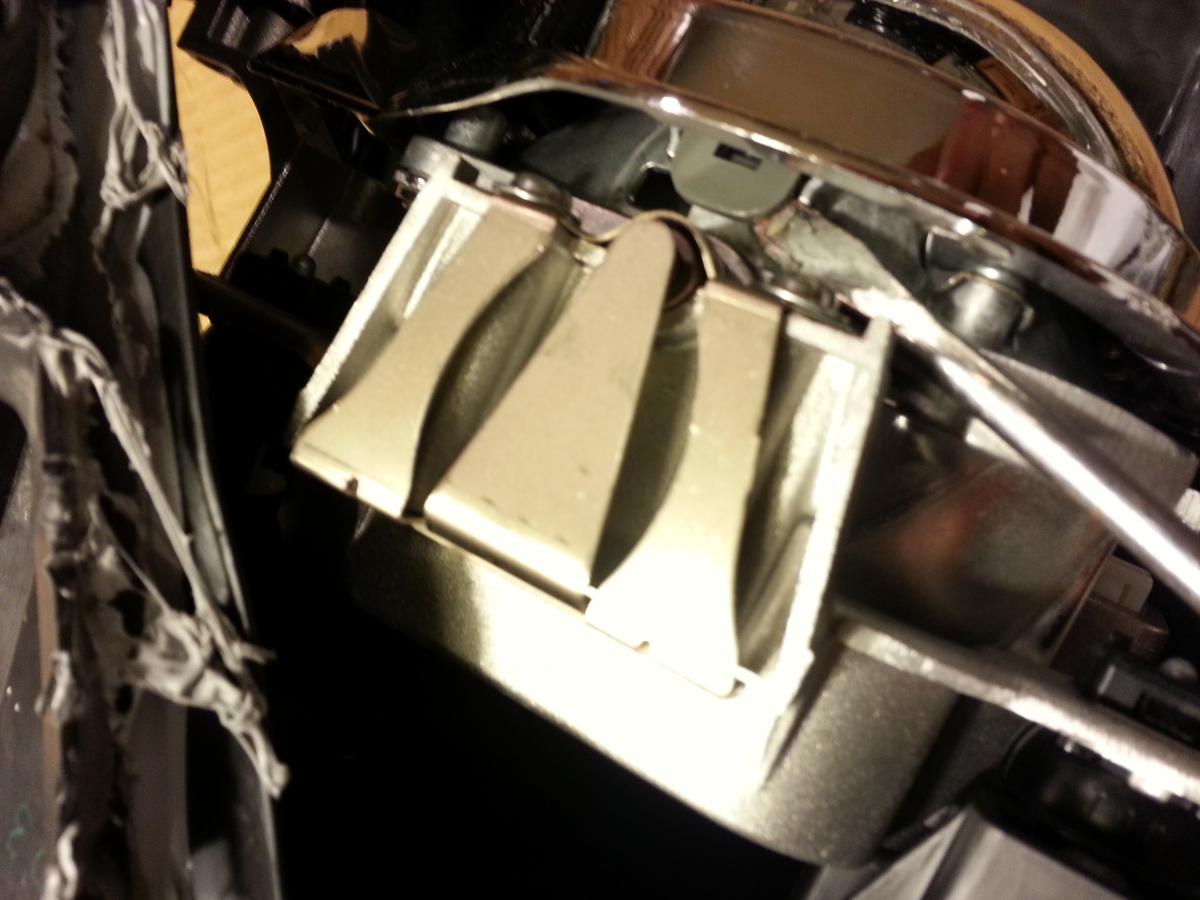
Next undo the motor head harness that's responsible for your AFS (AUTO FOCUSING SYSTEM) this is also another push the tab down and pull kind of connection.
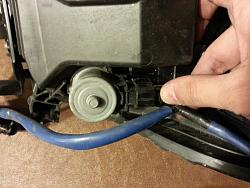
Along the way there will be two brown fasteners holding down the harness, use a flat head and push from underneath while gently pulling up on the harness to undo the fasters.

Next thing to do is to access your driving lights, and your turn signal bulb. to do this you have twist open the plastic piece. Just do a quarter turn to open, its written on the plastic which way unlock/lock is.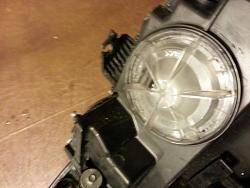
 12-27-12, 12:57 AM
#4
Driver School Candidate
Thread Starter
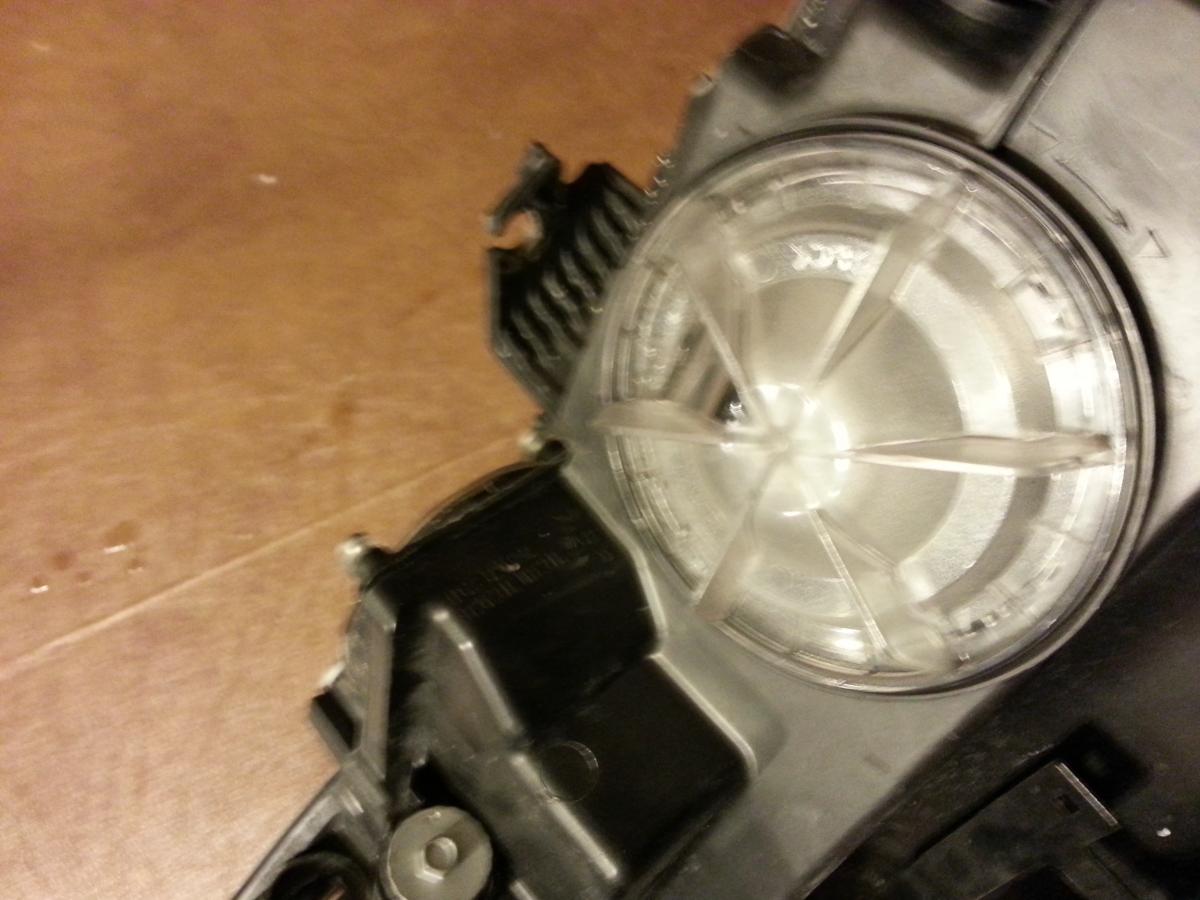
Once you remove the plastic cover, you will see a connector for your HID bulb. you need to twist and pull to remove the connector (should come off pretty easily)
Then remove the xenon bulb are two clips that you have to pushdown and to the center. squeeze both ends and lift up. Slowly life up the bulb and set it somewhere safe, do not touch the bulb itself.

Once you remove that, remove the harness for the turn signal bulb. This is another push the tab down and pull kind of connection. To remove the bulb & holder (keep together no need to remove bulb from holder) twist the gray holder to the left and pull. (Its a big orange bulb, be careful not to break it)
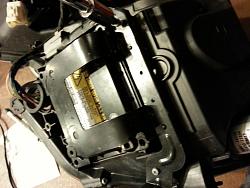
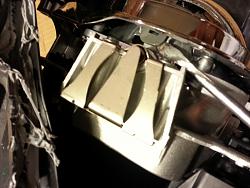
Next remove the piece that is on top of the ballast. It has a couple of screws. Once you remove that there will be 4 more screws to remove for the ballast.
Then remove the xenon bulb are two clips that you have to pushdown and to the center. squeeze both ends and lift up. Slowly life up the bulb and set it somewhere safe, do not touch the bulb itself.
Once you remove that, remove the harness for the turn signal bulb. This is another push the tab down and pull kind of connection. To remove the bulb & holder (keep together no need to remove bulb from holder) twist the gray holder to the left and pull. (Its a big orange bulb, be careful not to break it)
Next remove the piece that is on top of the ballast. It has a couple of screws. Once you remove that there will be 4 more screws to remove for the ballast.
 12-27-12, 01:27 AM
#5
Driver School Candidate
Thread Starter
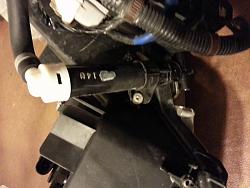
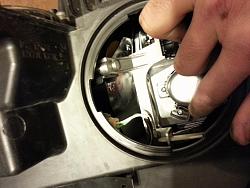
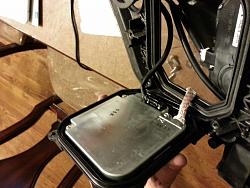
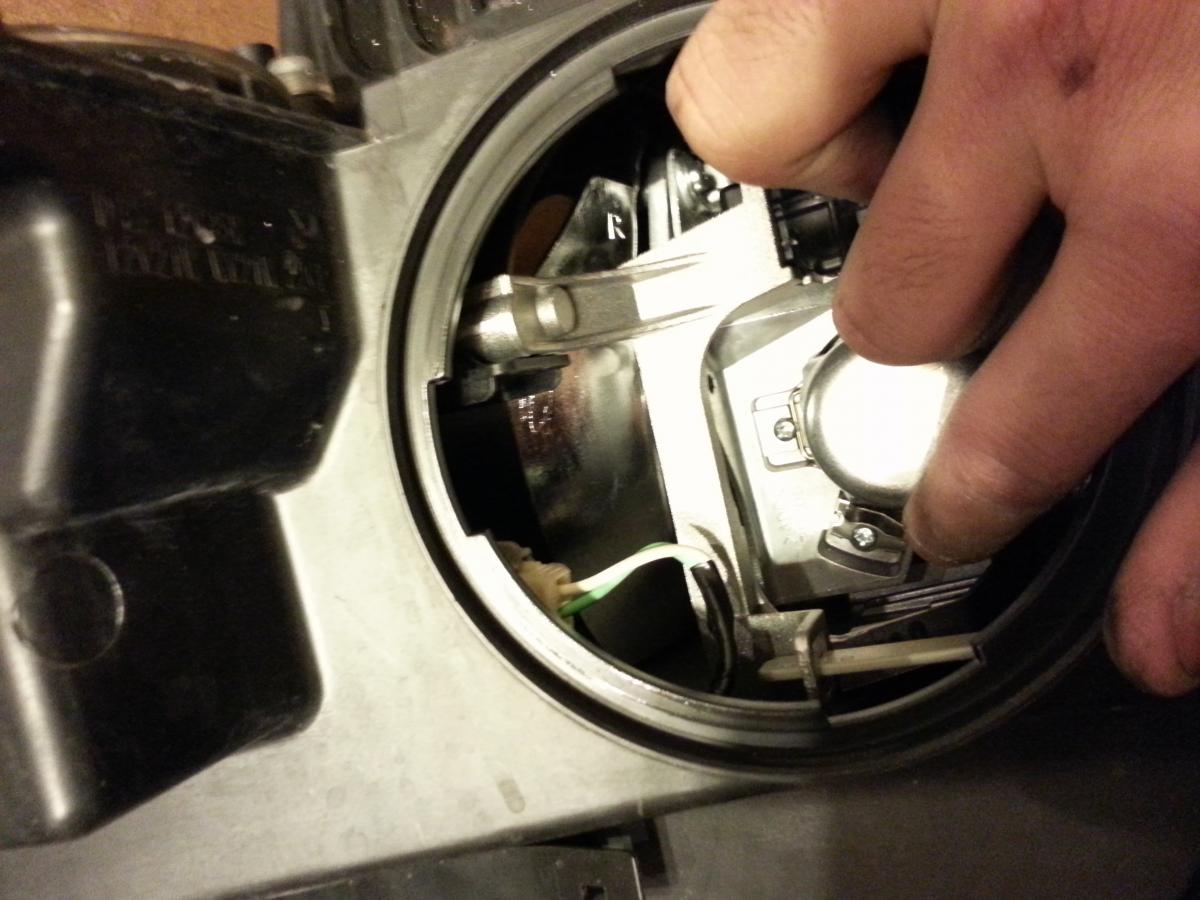
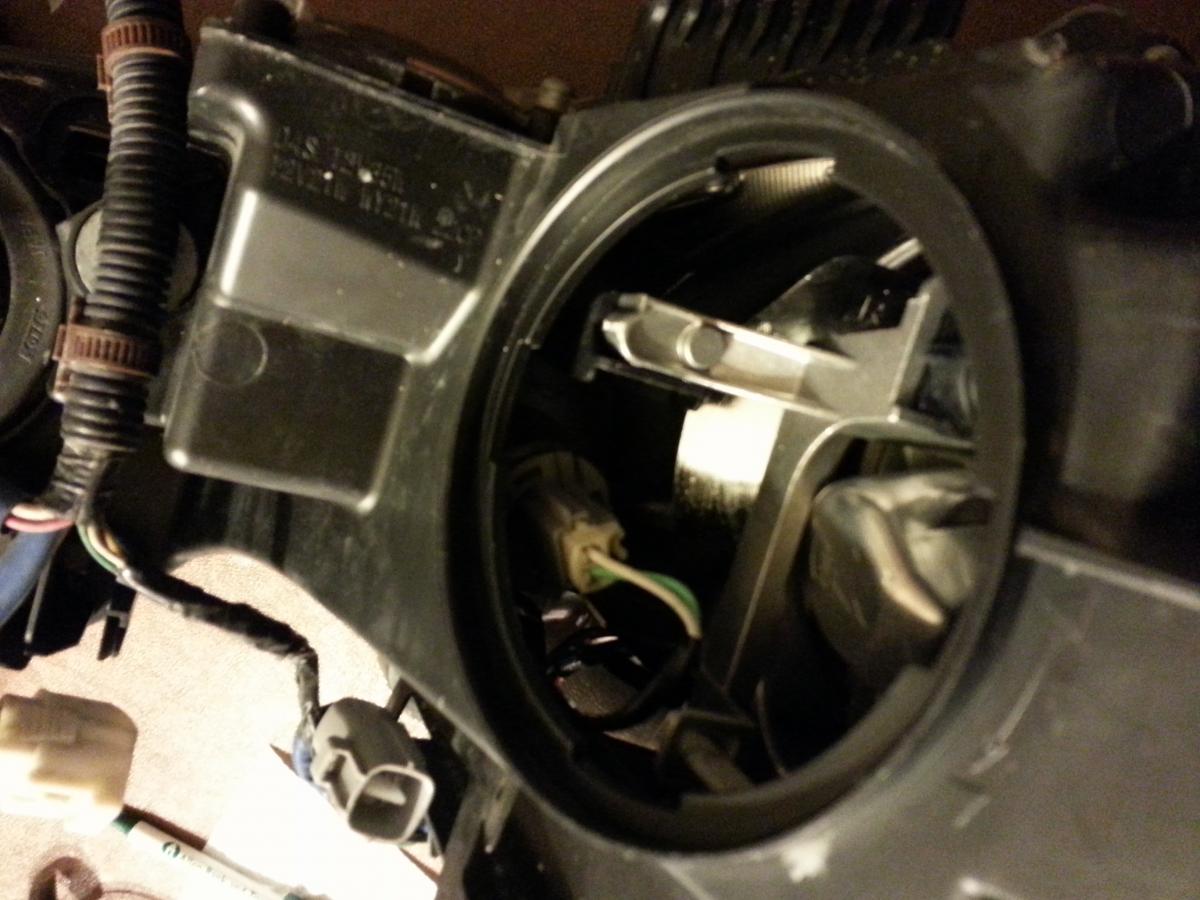
With the ballast exposed, remove the black connector leading into the ballast. This is another push tab and pull type of connector.
The next part is perhaps the most confusing/ hardest. In order to remove the harness from the ballast (the silver lead that connects to your HID xenon bulb) you have to do a couple of things.
First, disassemble the motor head that we unplugged a couple steps ago...to do this twist the connector to the left and pull , you will see the whole headlight move...Don't worry, you wont break it! Just pull a bit harder while tilting the piece to pop out of the socket. At the end of the motor head you will see a ball joint. Its easier than it sounds.

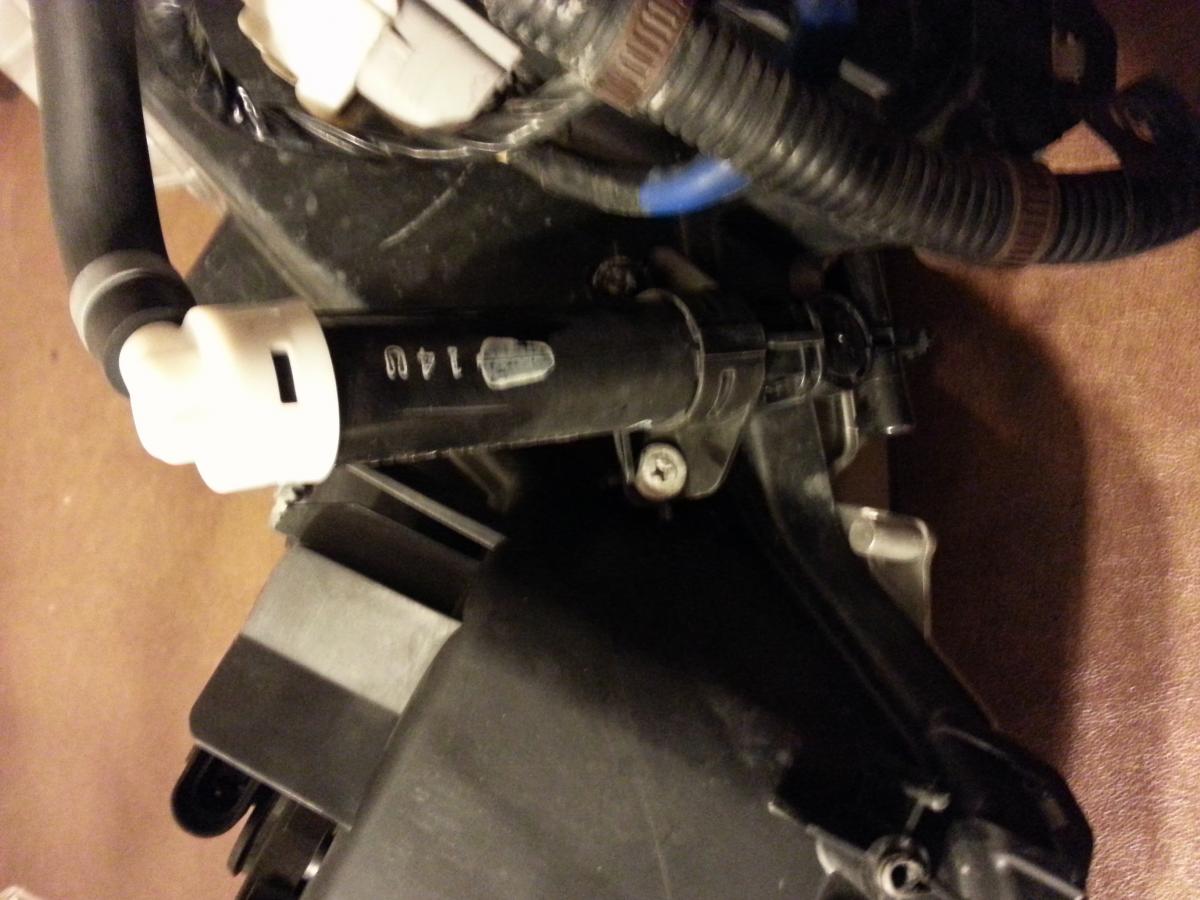
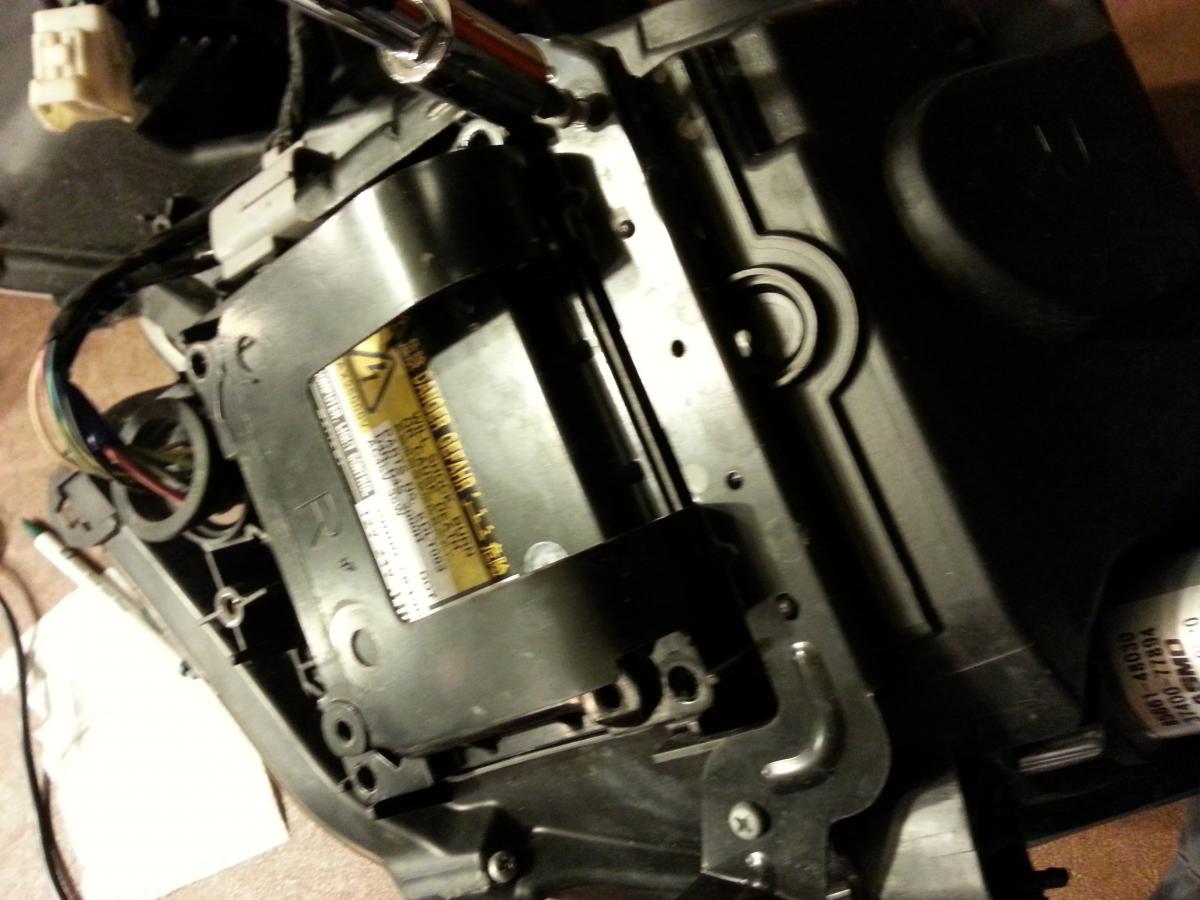
Second, you need to push on the headlight assembly (will freely rotate now that the motors not in place) so that you can remove the tab from the center. (look at picture) Were doing all of this just so we can remove that silver harness leading to the ballast!

should end up looking like this...
Once you have done this just pass the harness lead between the gap of the two pieces. Try to be careful and not break that tab with Left and Right levels shown on them. Once you pass it through, you will be able to remove the ballast and the harness!


The next part is perhaps the most confusing/ hardest. In order to remove the harness from the ballast (the silver lead that connects to your HID xenon bulb) you have to do a couple of things.
First, disassemble the motor head that we unplugged a couple steps ago...to do this twist the connector to the left and pull , you will see the whole headlight move...Don't worry, you wont break it! Just pull a bit harder while tilting the piece to pop out of the socket. At the end of the motor head you will see a ball joint. Its easier than it sounds.
Second, you need to push on the headlight assembly (will freely rotate now that the motors not in place) so that you can remove the tab from the center. (look at picture) Were doing all of this just so we can remove that silver harness leading to the ballast!

should end up looking like this...

Once you have done this just pass the harness lead between the gap of the two pieces. Try to be careful and not break that tab with Left and Right levels shown on them. Once you pass it through, you will be able to remove the ballast and the harness!
 12-27-12, 02:02 AM
#6
Driver School Candidate
Thread Starter
Once you remove the HID and harness, you only have a couple more things to remove. You will see two connectors, both the push pin and pull type that you will need to remove.
Once you remove those, you will see a plastic piece, that will pop out if you just tug on the wire coming out of it...You should have disconnected everything and it should pop out just fine.
By now you will have no bulbs and harnesses left on/in the headlight!

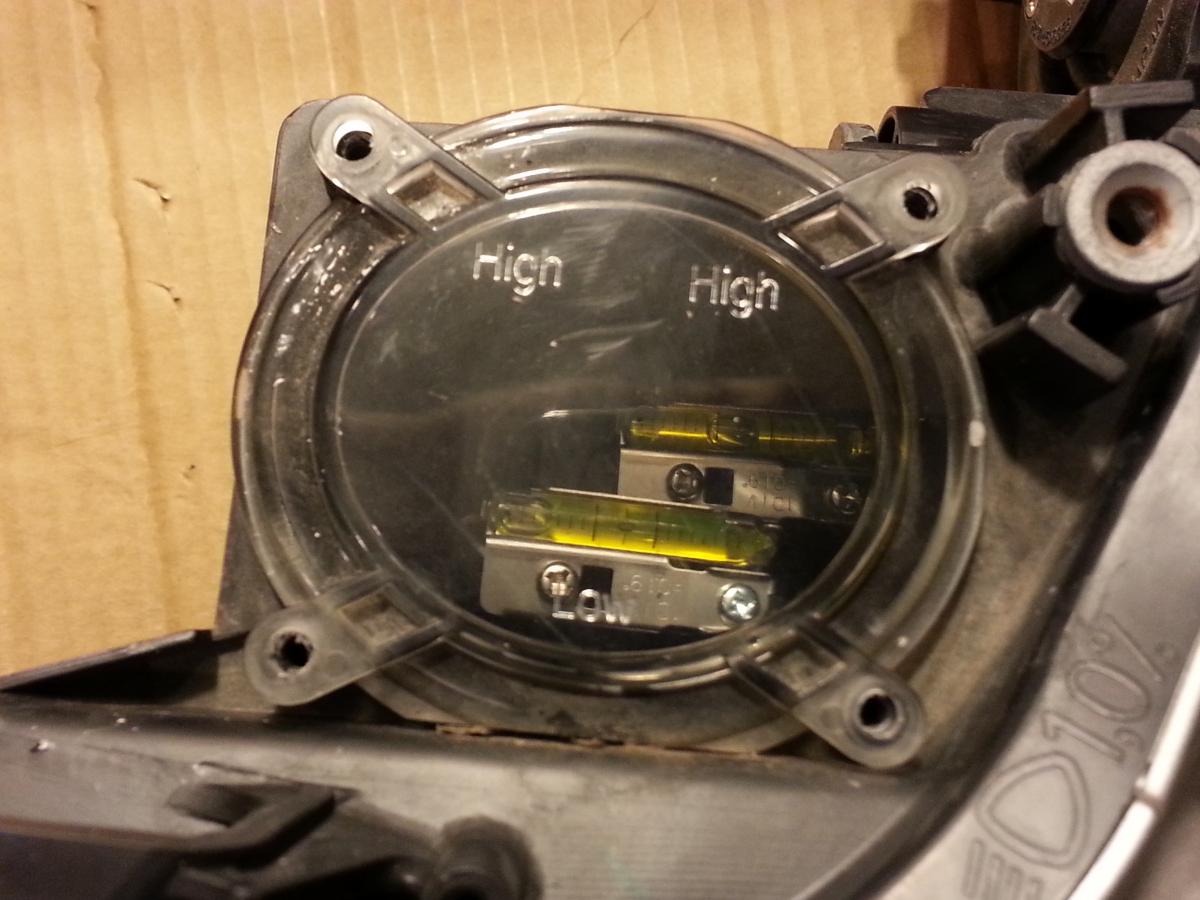
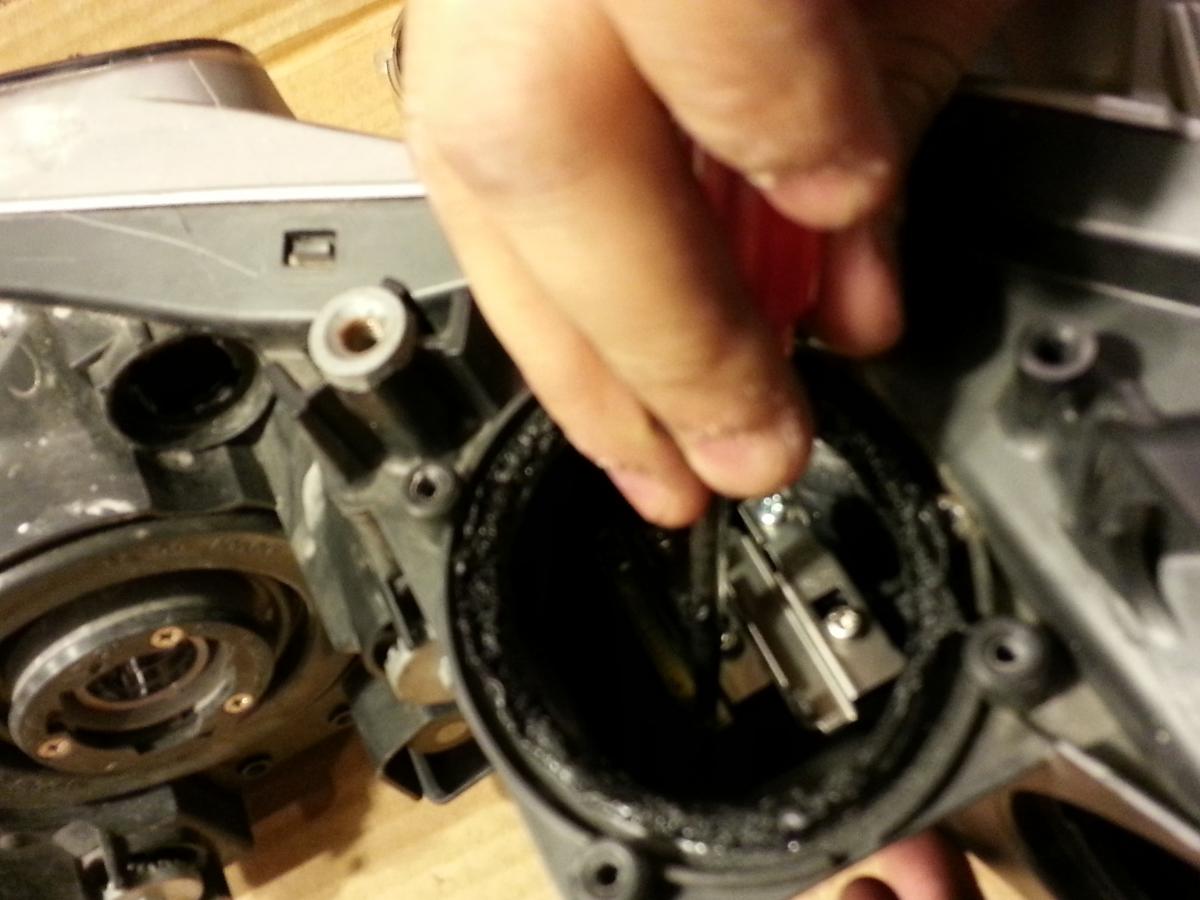
The next thing to do is to remove two screws connecting a while piece (indicator) (If you haven't by now taken my advice on keeping screws in a safe place and naming the location, it might be a bit confusing to put back)
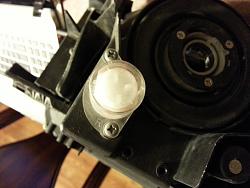
The last step before heating the headlight up in the oven, is to remove the level indicators. (Again I'm not sure you have to do all this, but putting glass in an oven with liquid inside didn't seem like such a good idea) To remove this, remove the 4 screws holding the plastic display piece. This will be held together by glue as well, so you will have to pull hard, don't worry it wont break! (Nows a good time to know this ahead of time, be careful with the glue that your remove, its strong stuff, and will be hard to get off your headlight if it accidently touches it)

Once you remove the plastic cover, CAREFULLY remove the levels using a flat head, you can pry it lose by slowing pulling apart the clips.

Preheat your oven to 225 degrees!

Once you remove those, you will see a plastic piece, that will pop out if you just tug on the wire coming out of it...You should have disconnected everything and it should pop out just fine.

By now you will have no bulbs and harnesses left on/in the headlight!
The next thing to do is to remove two screws connecting a while piece (indicator) (If you haven't by now taken my advice on keeping screws in a safe place and naming the location, it might be a bit confusing to put back)

The last step before heating the headlight up in the oven, is to remove the level indicators. (Again I'm not sure you have to do all this, but putting glass in an oven with liquid inside didn't seem like such a good idea) To remove this, remove the 4 screws holding the plastic display piece. This will be held together by glue as well, so you will have to pull hard, don't worry it wont break! (Nows a good time to know this ahead of time, be careful with the glue that your remove, its strong stuff, and will be hard to get off your headlight if it accidently touches it)
Once you remove the plastic cover, CAREFULLY remove the levels using a flat head, you can pry it lose by slowing pulling apart the clips.
Preheat your oven to 225 degrees!
12-27-12, 02:26 AM
#7
Driver School Candidate
Thread Starter
Step 5: Heating headlamp to remove the epoxy that holds the lights together.
Before you put your headlamp in the oven, you need to remove all the screws holding it together, I believe there were only 3 or 4 little ones...

Next line your oven with either cardboard or you can use 2x4s, either way use something so that the grill metal lining of your shelf doesn't burn through to your headlights. Cardboard worked fine for me (does smell a little at first)

Put your light in the oven that should be preheated to 225 degrees. Do not go any hotter, and Use the bake setting, NOT the broil on your oven! Insert the headlight so that it does not touch any sides (anything that's metal), close the door and wait 10-15 minutes. Will be hot, so be careful!

Once its heated, check to see if its ready, I would check every 3 minutes after I hit the 10 min. mark...To know if its ready try to bend a tab and see if its a little flexible, not hard! (If you pull too hard and not be patient, the tab will break) If you break a Tab its not the end of the world, the glue and screws will do the job just fine.
If you believe the tabs are soft enough to be pulled apart (not so soft that it bends easily) then go ahead and insert a flat head to try and pry apart.
Before you put your headlamp in the oven, you need to remove all the screws holding it together, I believe there were only 3 or 4 little ones...

Next line your oven with either cardboard or you can use 2x4s, either way use something so that the grill metal lining of your shelf doesn't burn through to your headlights. Cardboard worked fine for me (does smell a little at first)

Put your light in the oven that should be preheated to 225 degrees. Do not go any hotter, and Use the bake setting, NOT the broil on your oven! Insert the headlight so that it does not touch any sides (anything that's metal), close the door and wait 10-15 minutes. Will be hot, so be careful!

Once its heated, check to see if its ready, I would check every 3 minutes after I hit the 10 min. mark...To know if its ready try to bend a tab and see if its a little flexible, not hard! (If you pull too hard and not be patient, the tab will break) If you break a Tab its not the end of the world, the glue and screws will do the job just fine.

If you believe the tabs are soft enough to be pulled apart (not so soft that it bends easily) then go ahead and insert a flat head to try and pry apart.

Trending Topics
12-27-12, 02:48 AM
#8
Driver School Candidate
Thread Starter
Once you start pulling it apart, it will take a lot of hands to pull the glue off...It gets messy so be sure not to get any on the headlight cover itself! I found it easier to go around and find a soft spot and start from there...be patient!

Once it gets going, its not too hard, just make sure to watch the warm rubber glue from getting on any parts.

After that, just take out the reflector piece with a screwdriver.

In order to remove the reflector from around the lens, you need a flat head and very gently pull up on the tab. there are two tabs...one on top and bottom (the bottom one is a bit tricky) use a heatgun if needed to loosen these tabs!
To paint the reflectors, I used a high heat paint such as rim paint or brake paint that are meant to hold up against heat. You can plastidip it first, but mine did just fine, especially since it wont be exposed to outdoors or water once your done. I know a lot of people also like doing the Carbon Fiber (CF) wrap the inside as well...


Once it gets going, its not too hard, just make sure to watch the warm rubber glue from getting on any parts.
After that, just take out the reflector piece with a screwdriver.

In order to remove the reflector from around the lens, you need a flat head and very gently pull up on the tab. there are two tabs...one on top and bottom (the bottom one is a bit tricky) use a heatgun if needed to loosen these tabs!
To paint the reflectors, I used a high heat paint such as rim paint or brake paint that are meant to hold up against heat. You can plastidip it first, but mine did just fine, especially since it wont be exposed to outdoors or water once your done. I know a lot of people also like doing the Carbon Fiber (CF) wrap the inside as well...
 12-27-12, 03:17 AM
#9
Driver School Candidate
Thread Starter
Step 6: Install of Halo Rings...
I brought mine from http://www.diodedynamics.com/store/index.php/ You can get them anywhere, I believe the size for the GS is 80 mm.

Start by using a small drill bit (Dremels work really well) and make a hole at the bottom, where no one will be able to see it.

Once you have drilled the hole, feed the wiring through there and superglue the ring to the outer circle...(Use lots of glue, the last thing you want is the ring to fall after hitting a speed bump and do this all over)

Once that is done, super glue the wiring on the other side against the wall of the reflector, run It besides the tab, not over it!
Attach everything back the way it was in reverse order (heat the clear piece of the headlight back in to melt the glue, use a heat gun for the other part. Once the two pieces are back together into a headlight, make a small hole next to the plastic protector (see in picture) for the halo wiring to come out of. fill that hole with super glue or silicon(you don't want any moisture to get in and cause condensation to your headlights).
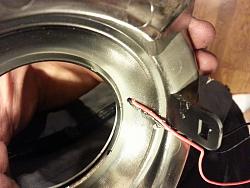
I got my power for the halos through the side marker light which I didn't want to use anymore...All you have to do is splice the wire off of it and connect it to the halos wiring...make sure you use electrical tape and make a strong connection! (see picture)

That's really all there is to it...it seems like a pain to do, but it really wasn't that bad, and I loved the way they turned out, had LED strips before and it just seemed to cheesy and ricey...These new halos make the car seem very clean, and looks professional. There even very bright during the day!
Hope this helped someone out there trying to do this, let me know if you have any questions! Thanks!
I brought mine from http://www.diodedynamics.com/store/index.php/ You can get them anywhere, I believe the size for the GS is 80 mm.

Start by using a small drill bit (Dremels work really well) and make a hole at the bottom, where no one will be able to see it.

Once you have drilled the hole, feed the wiring through there and superglue the ring to the outer circle...(Use lots of glue, the last thing you want is the ring to fall after hitting a speed bump and do this all over)

Once that is done, super glue the wiring on the other side against the wall of the reflector, run It besides the tab, not over it!

Attach everything back the way it was in reverse order (heat the clear piece of the headlight back in to melt the glue, use a heat gun for the other part. Once the two pieces are back together into a headlight, make a small hole next to the plastic protector (see in picture) for the halo wiring to come out of. fill that hole with super glue or silicon(you don't want any moisture to get in and cause condensation to your headlights).
I got my power for the halos through the side marker light which I didn't want to use anymore...All you have to do is splice the wire off of it and connect it to the halos wiring...make sure you use electrical tape and make a strong connection! (see picture)

That's really all there is to it...it seems like a pain to do, but it really wasn't that bad, and I loved the way they turned out, had LED strips before and it just seemed to cheesy and ricey...These new halos make the car seem very clean, and looks professional. There even very bright during the day!
Hope this helped someone out there trying to do this, let me know if you have any questions! Thanks!
Last edited by d100patel; 12-27-12 at 03:22 AM.
The following users liked this post:
Oceans13 (08-15-23)
 12-27-12, 05:31 AM
#11
Lexus Champion

your first time doing this? how long did it take for everything?
did you have to reheat when put back the clear fron't plastic?
awesome write up buddy.
did you get a chance to look at the crystal focus the HID light? i want to replace that crystal with one that don't have the frosted pattern.
did you have to reheat when put back the clear fron't plastic?
awesome write up buddy.
did you get a chance to look at the crystal focus the HID light? i want to replace that crystal with one that don't have the frosted pattern.
12-27-12, 01:22 PM
#12
Driver School Candidate
Thread Starter
your first time doing this? how long did it take for everything?
did you have to reheat when put back the clear fron't plastic?
awesome write up buddy.
did you get a chance to look at the crystal focus the HID light? i want to replace that crystal with one that don't have the frosted pattern.
did you have to reheat when put back the clear fron't plastic?
awesome write up buddy.
did you get a chance to look at the crystal focus the HID light? i want to replace that crystal with one that don't have the frosted pattern.
12-27-12, 01:47 PM
#13
Lexus Champion
Yes it was...it took a while because there was no previous forum for the 3gs headlight...I kind of just guessed and went with it...After I figured out how to do it the other one only took me about 2 hours to do...I would say u need 5 hours to do the whole project. Also I did have to reheat the glue, but I only reheated the clear lens, not the other part. The melted glue off just one piece was warm enough to melt the other piece as well when put together. and no actually thats the first time Ive heard of that...could you post a link please.