GS 430 Nitrogen Accumulator Replacement
 10-02-17, 07:19 AM
#16

You can remove it with the MC in place as long as you have the tool to do it. Its a Toyota 4 wheel drive service tool.
You have to bleed the hydraulic accumulator in a particular order and you'll need a vinyl tube with a glass jar. First you bleed the bleeder on the right side of the hydraulic unit (left side if you're looking at the MC from the front). You bleed it by opening the valve with a 10mm flare end wrench and turning the ignition key to on. The pump will run continuously and pump out fluid. Wait until new, clear fluid runs out (through your tube into the glass container) and there are no bubbles. Then close the valve and turn off the ignition. Next move to the left side of the hydraulic unit (right side if you're facing the master cylinder from the front of the car). Crack that bleeder with the same spanner. Its hard to find so you might have to loosen the heat shield. Its down low and on the very back. Loosen that one and turn on the ignition again. The pump should start pumping fluid out again. If it doesn't, touch the brake pedal slightly until the pump begins pumping. Wait until the fluid is clear with no air bubbles in the line.
Finally, move to the bleeder on the front of the MC. Do this one with the ignition off. Its important that the other end of the tube is submerged in brake fluid so you don't suck air bubbles back in. Crack the bleeder and slowly push the pedal to the floor. I believe you can actually leave the bleeder cracked when you return the pedal to the top but I'm not 100% sure. You might want to start off leaving it cracked and then move to closing it between strokes to push out the old fluid.
After this, you'll have to bleed each line starting with the line furthest from the master cylinder (passenger rear). Just use the normal bleeding procedure.
 10-05-17, 07:08 AM
#17
Driver School Candidate

if you just replace theNitrogen Accumulator
why do you have to bleed the brake lines? they are 2 different systems
btw here's a useful link: http://soarercentral.com/sc-forum/me...39/166885.html
why do you have to bleed the brake lines? they are 2 different systems
btw here's a useful link: http://soarercentral.com/sc-forum/me...39/166885.html
Last edited by Sean628; 10-05-17 at 07:12 AM.
10-05-17, 08:40 AM
#18
You're right, I guess you wouldn't have to bleed the brake lines. I rebuilt my master cylinder at the same time so I had to bleed those. You should be able to just change the nitrogen accumulator and bleed that system though.
 10-09-17, 07:46 PM
#20
Well tonight mine decided to run every fourth press of the pedal. It definitely didn't run that often a few months ago.
How hard is this thing to disassemble myself? If that one guy did rebuilds, why can't I? I hear a motorcycle suspension shop should be able to recharge it once the seals are replaced.
EDIT: I missed the part where a schrader valve has to be installed in the top of the unit. I don't have the equipment to pull that off.
Last edited by eicca; 10-09-17 at 08:02 PM.
10-10-17, 11:26 AM
#22
The other hard part is getting the canister open. You have to mill the old lip off with a lathe. Once thats done, it screws apart.
10-13-17, 06:28 AM
#24
Well I don't have one either. You have to take it to a machine shop to get the lip milled off. I wish I had a lathe but there's only so many machines you can fit in a residential garage. It took 5 minutes and cost me $10.
10-14-17, 10:56 AM
#25
heck that's not bad at all. They could probably install the shrader valve for me too for not much more. I assume it's pretty easy after that? Unscrew can, remove plunger, replace seals, reassemble, and recharge the nitrogen at an HVAC shop?
10-27-17, 01:48 PM
#26
Pole Position
Thread Starter
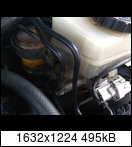
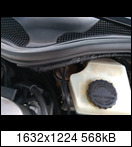
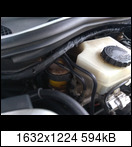
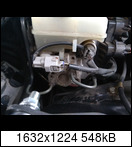
So I took some pictures...which lines will I need to bleed once I changed the reservoir out? And will the clearance be sufficient?

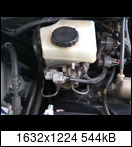
and another source


and another source
Last edited by brainsurge; 10-30-17 at 12:11 PM.
10-28-17, 04:23 AM
#27
Pole Position
Just curious....How many hours labor is it to replace the MC & brake booster?
10-30-17, 12:25 PM
#29
Pole Position
Thread Starter