When you click on links to various merchants on this site and make a purchase, this can result in this site earning a commission. Affiliate programs and affiliations include, but are not limited to, the eBay Partner Network.
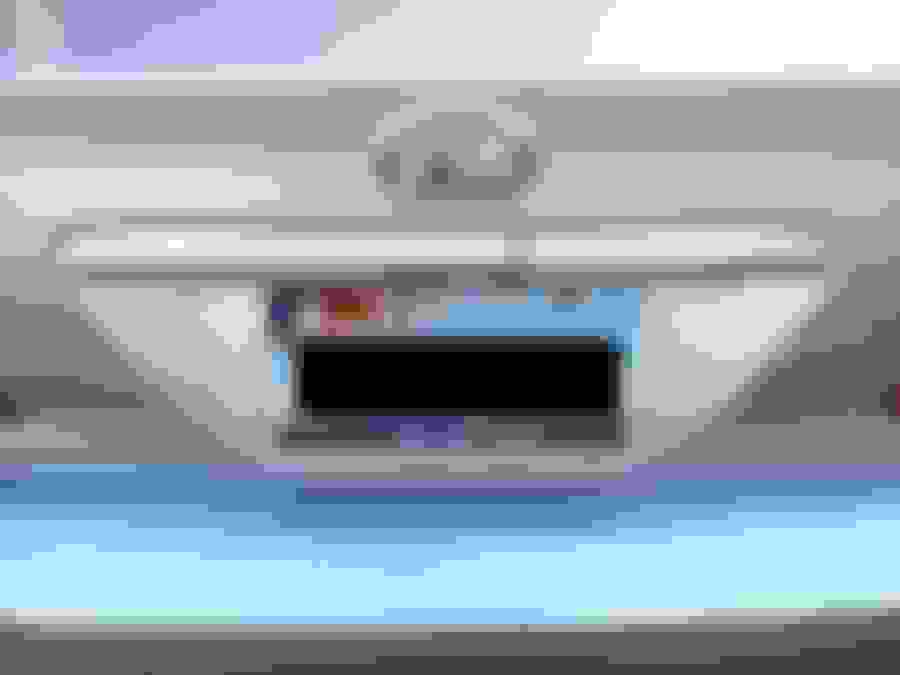
I need some help with the technical name of the rear molding piece that's below the emblem and above the license plate. After some searching, I've seen similar parts referred to by several different names. Trunk lid lift? Rear compartment door garnish? Trunk molding? Trunk lift handle?
Does anyone know how Lexus officially refers to this part? Or a part number?
There is a large piece of paint chipped off and quite a bit of abrasion on this one, and I'd like to consider replacing it. Just not sure what the best "term" to use in searching for a matching part.
[QUOTE=varuscelli;9143937]I need some help with the technical name of the rear molding piece that's below the emblem and above the license plate. After some searching, I've seen similar parts referred to by several different names. Trunk lid lift? Rear compartment door garnish? Trunk molding? Trunk lift handle?
Does anyone know how Lexus officially refers to this part? Or a part number?
There is a large piece of paint chipped off and quite a bit of abrasion on this one, and I'd like to consider replacing it. Just not sure what the best "term" to use in searching for a matching part.
Thanks in advance for any help.
==========================================
I am not sure if it would help with part number. Here is what I did this morning with my car (2005 ES330) that had bee peeling the trunk lid of over a year. I bought one from ebay and it is not fit and different color (ask the seller who said it fit). I scraped off the paint. Clay bar, polish, and wax. Refer to pictures below: Now it looks brand new chrome for both pieces.
I am not sure if it would help with part number. Here is what I did this morning with my car (2005 ES330) that had bee peeling the trunk lid of over a year. I bought one from ebay and it is not fit and different color (ask the seller who said it fit). I scraped off the paint. Clay bar, polish, and wax. Refer to pictures below: Now it looks brand new chrome for both pieces.
Thanks very much for that suggestion and excellent examples!
Seeing that section of chromed plastic (or whatever the right term is) under that rather large chip in mine made me wonder about how easy it might be to remove the remaining paint and leave just a chromed piece as I've seen on various other vehicles.
Toward the right end of the piece on my vehicle the paint is slightly buckling in any case, so the paint seems to be trying to separate itself as it is. You've provided a great example of what is beneath and how it might be fully revealed.
If I may ask, when you mentioned that you scraped off the paint, what method did you use? I'm wondering what the best and easiest way to remove the existing paint might be to leave the chromed part below as untouched/undamaged as possible.
Hey, thanks again. Great suggestion.
All the tools that I used show in the last picture -- start from left to right. I used the blade to scrap off, level almost to 180 degree and slide/scrap off the paint. The knife was used for the line between two pieces, since the blade was too sharp. It peels off very easy in my case, and whole think take less one hour. Original idea, I want to remove and spray paint with similar color and put it back. Looked around to see how easy to remove, then I gave up and came up with the idea to remove the paint instead of. You may use plastic paint scrapper to scrap off that may prevent the scratches to the trunk lid piece.
I'm thinking of trying something along the lines of a gel paint stripper to remove the paint from the chrome plastic. Worst case is that if the stripper mars the chrome plastic, I might have to buy the part that I was originally thinking about buying. But if some kind of stripper would help to remove the old paint and leave the chrome plastic unharmed, that would work just fine for me. (And, of course, I mean to remove the piece from the trunk lid -- if that's reasonably easily done -- before trying any kind of paint stripper, if I go that route.)
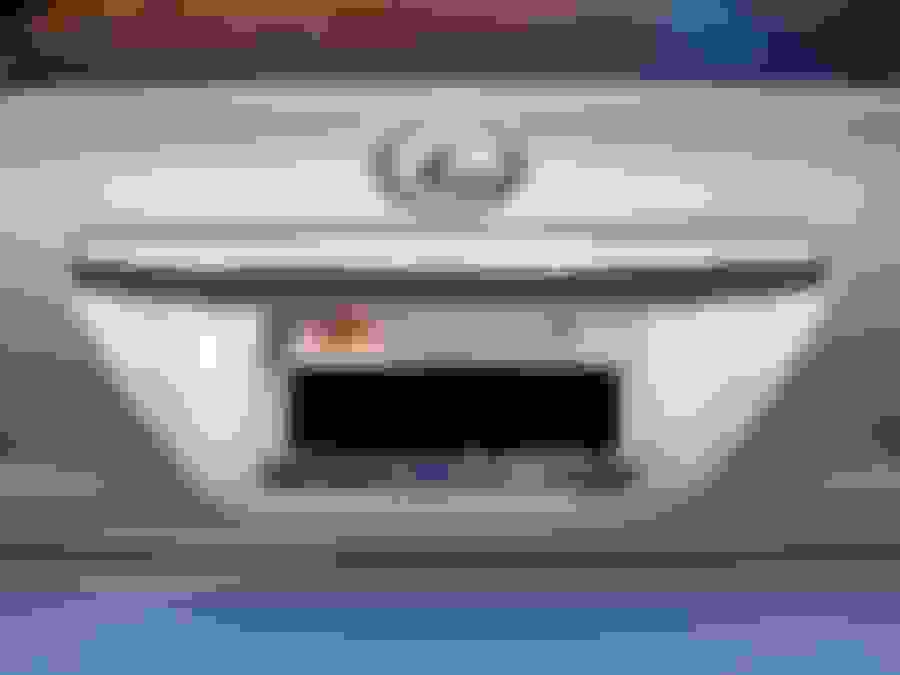
OK, I removed the trunk lift (GARNISH SUB-ASSY, LUGGAGE COMPARTMENT DOOR, OUTSIDE) and despite a bit of uneasiness I went ahead and scraped the old paint off with a Xacto blade. The process of using a blade did leave some micro scratches in a few places, but it was not nearly as bad as I thought it would be. I'll post something of the finished job tomorrow, but in the interim, here is what my start looked like. These pics showing the knife are just the result of scraping, no cleaning or polishing. The end product looks a lot better than these interim pics.
TOLex168, thanks for your recommendation and going over what you did when faced with the same situation I was in.
Original pic of the flaking paint on the trunk lift that was bothering me.
Start of scraping process, after removing the trunk lift trim from the trunk lid.
Here are the before and after pics for comparison The light is a bit different (different times of day), but these should give a pretty good idea what the removal of the old paint revealed.
 08-09-15, 08:08 PM