diy: PICS replacing 97 radio bulb and references
 11-14-08, 11:08 AM
#1

i have a few of the bulbs that are soldered onto the circuit board out and cannot see the buttons at night time.
ok, well, after about having the stereo apart and finding the bulb number, today i just received better information regarding the factory stereo.
the bulbs are incandescent and not l.e.d. type bulbs. they are approximately 2mm base and height about 3/4mm. there are two part number, all the bulbs(location number start with IL9xx above the soldered bulb) are partnumber cel1464 at $9.95 each. the other 3(IL908, IL909, IL910) are partnumber cel1492 at $9.50. there are a total of 12 bulbs, 3 of which stated above cel1492 and the rest of the 9 are cel1464. but thats just too expensive to justify paying $10 to ship and $10 a bulb, so i got the circuit board number cwm4320 for $76.50 and it comes complete with all 12 bulbs soldered in. and its just plug and play since all the bulbs are soldered in.
and for those trying cel1222, it does not work. they actually light up a different shade of green and do not fit well once the unit is put back together. maybe someone can find another bulb in the mean time, the
cel1222 is 8v 60ma(doesnt work)
cel1464 is 80v 60ma( is 80v possible? when the car runs off 12-14v)per pioneer dealer reps.
i will not be held responsible for anybody trying this.
should have some pics up in a little.
here is the new board for OEM pioneer model KEX-M8066ZT, board part# CWM4320 ~$76.xx
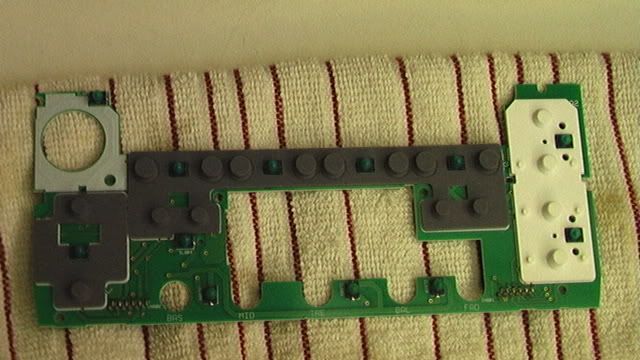
bulb location numbers that need to be referenced when replacing a single bulb. starts with IL9XX
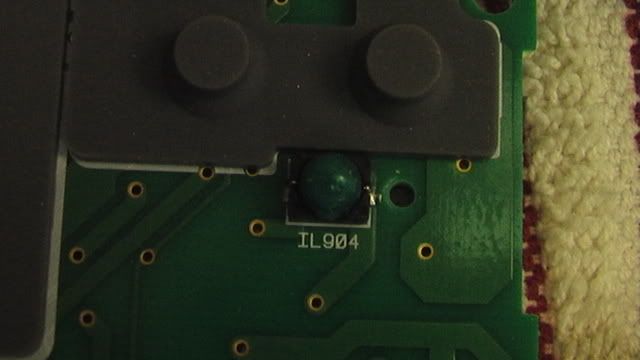
this is the correct bulb for the unit stated above of part# CEL1464

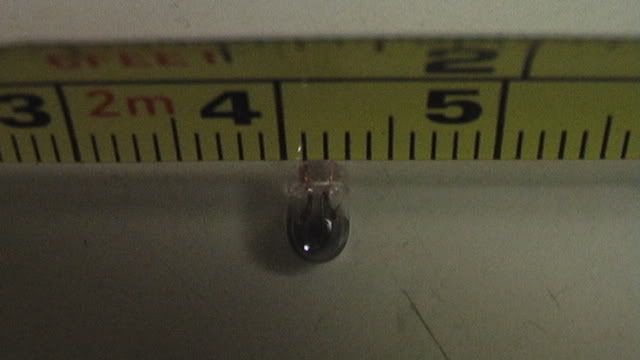
base shot of CEL1464
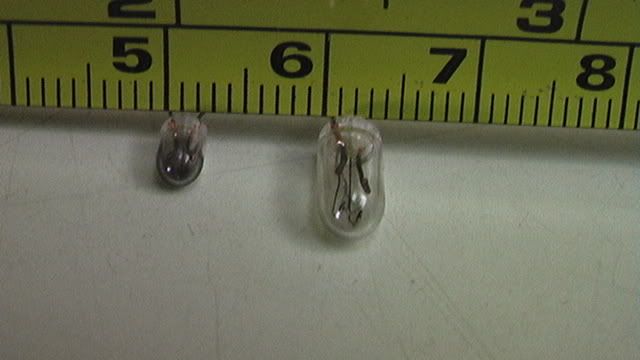
length comparo of CEL1464(L) and CEL1222(R)(CEL1222 is pulled from my 93ES300, which doesnt fit correctly due to size and ratings)
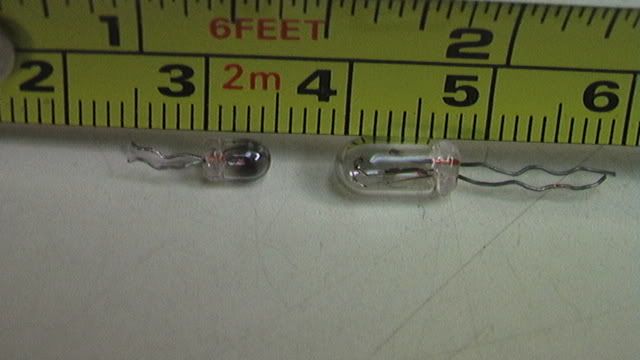
base comparo of CEL1464(L) and CEL1222(R)
once again, another for CL. enjoy
Charley
ok, well, after about having the stereo apart and finding the bulb number, today i just received better information regarding the factory stereo.
the bulbs are incandescent and not l.e.d. type bulbs. they are approximately 2mm base and height about 3/4mm. there are two part number, all the bulbs(location number start with IL9xx above the soldered bulb) are partnumber cel1464 at $9.95 each. the other 3(IL908, IL909, IL910) are partnumber cel1492 at $9.50. there are a total of 12 bulbs, 3 of which stated above cel1492 and the rest of the 9 are cel1464. but thats just too expensive to justify paying $10 to ship and $10 a bulb, so i got the circuit board number cwm4320 for $76.50 and it comes complete with all 12 bulbs soldered in. and its just plug and play since all the bulbs are soldered in.
and for those trying cel1222, it does not work. they actually light up a different shade of green and do not fit well once the unit is put back together. maybe someone can find another bulb in the mean time, the
cel1222 is 8v 60ma(doesnt work)
cel1464 is 80v 60ma( is 80v possible? when the car runs off 12-14v)per pioneer dealer reps.
i will not be held responsible for anybody trying this.
should have some pics up in a little.
here is the new board for OEM pioneer model KEX-M8066ZT, board part# CWM4320 ~$76.xx
bulb location numbers that need to be referenced when replacing a single bulb. starts with IL9XX
this is the correct bulb for the unit stated above of part# CEL1464
base shot of CEL1464
length comparo of CEL1464(L) and CEL1222(R)(CEL1222 is pulled from my 93ES300, which doesnt fit correctly due to size and ratings)
base comparo of CEL1464(L) and CEL1222(R)
once again, another for CL. enjoy
Charley


 12-07-11, 08:36 PM
#6
Rookie

Join Date: Oct 2010
Location: Idaho
Posts: 64
Likes: 0
Received 0 Likes
on
0 Posts

Trending Topics
02-20-12, 05:31 AM
#9
Rookie
Join Date: Oct 2010
Location: Idaho
Posts: 64
Likes: 0
Received 0 Likes
on
0 Posts
You have to desolder the bulb from the board, then remove socket and old bulb, install new bulb in socket, install socket and new bulb back in board, then solder each side of bulb back to board. After you remove one socket and bulb, it will make sense. Notice the length of the bulb wires on the one you remove, will have to trim the new bulb wires to length after you install new bulb in socket.

Thread
Thread Starter
Forum
Replies
Last Post
FinanceGuy
IS - 2nd Gen (2006-2013)
3
11-30-07 04:16 PM