
Updated my CT200h headlights from halogen to modern 6000k HID
 05-29-12, 01:20 PM
#1

When we bought our CT200h, we deliberated all the packages on the car and wasn’t sure if we wanted the LED headlights. Both cars come with projector lenses thankfully so we decided to an upgrade to HID using a high quality premium kit from OptiksHID systems.
It’s still debatable which system (OEM LED vs. HID) is brighter so I’m going to test my theory by comparing the two systems later. My friend has a SE with the LED headlamps so hopefully we can get some side-by-side comparisons!
Now onto the installation….we bought the optional CAN-BUS adapters not sure if the Lexus headlights had this requirement. A lot of German cars like the new E92 M3 and Audi cars need the CAN-BUS to filter the voltage so it can communicate with the factory computer. Otherwise the HID lights won’t fire consistently.
One some Lexus vehicles you have to remove the OEM Intake box or other parts just to gain access to the wiring and bulbs. On the CT, it can be done if you have nimble hands that can work in tight spaces. We opted to remove the stock intake system on the passenger side for easier access.
TOOLS REQUIRED: Wire strippers, electrical tape, soldering gun and solder plus some tie wraps and basic sockets/tools.
Step 1 is to unplug the stock bulb by just twisting it and releasing it from the socket. Do not touch the glass portion of the bulbs!!!
Step 2 is to lay out the OptiksHID kit out so you have all the parts needed and removing the bulb to plug into the headlight. Be sure to test the polarity of the OEM socket so you know which wire is positive and which one is negative. You can use crimps but we opted to solder the connections for a more solid and reliable connection. You want the red wire to go to positive on the OEM wiring harness and the black wire to the negative side.
Step 3 is to plug in the ballast/igniter system and find a good place to tuck both units away. I tie-wrapped it and secured it away from any heat or moving parts.
Now just put back all the OEM plastic inserts and snap the clips in place. I found the aim and position to be nearly perfect from the factory but you may need to adjust the levels if you lowered your car.
The light output is amazing – there is simply no comparison! I don’t know why Lexus didn’t want to do HID’s (maybe to keep the cost down?)
My wife drives this car at night frequently and the upgrade is a MUST if you value safety and bright light! We love the OptiksHID kit as it’s a reliable kit.
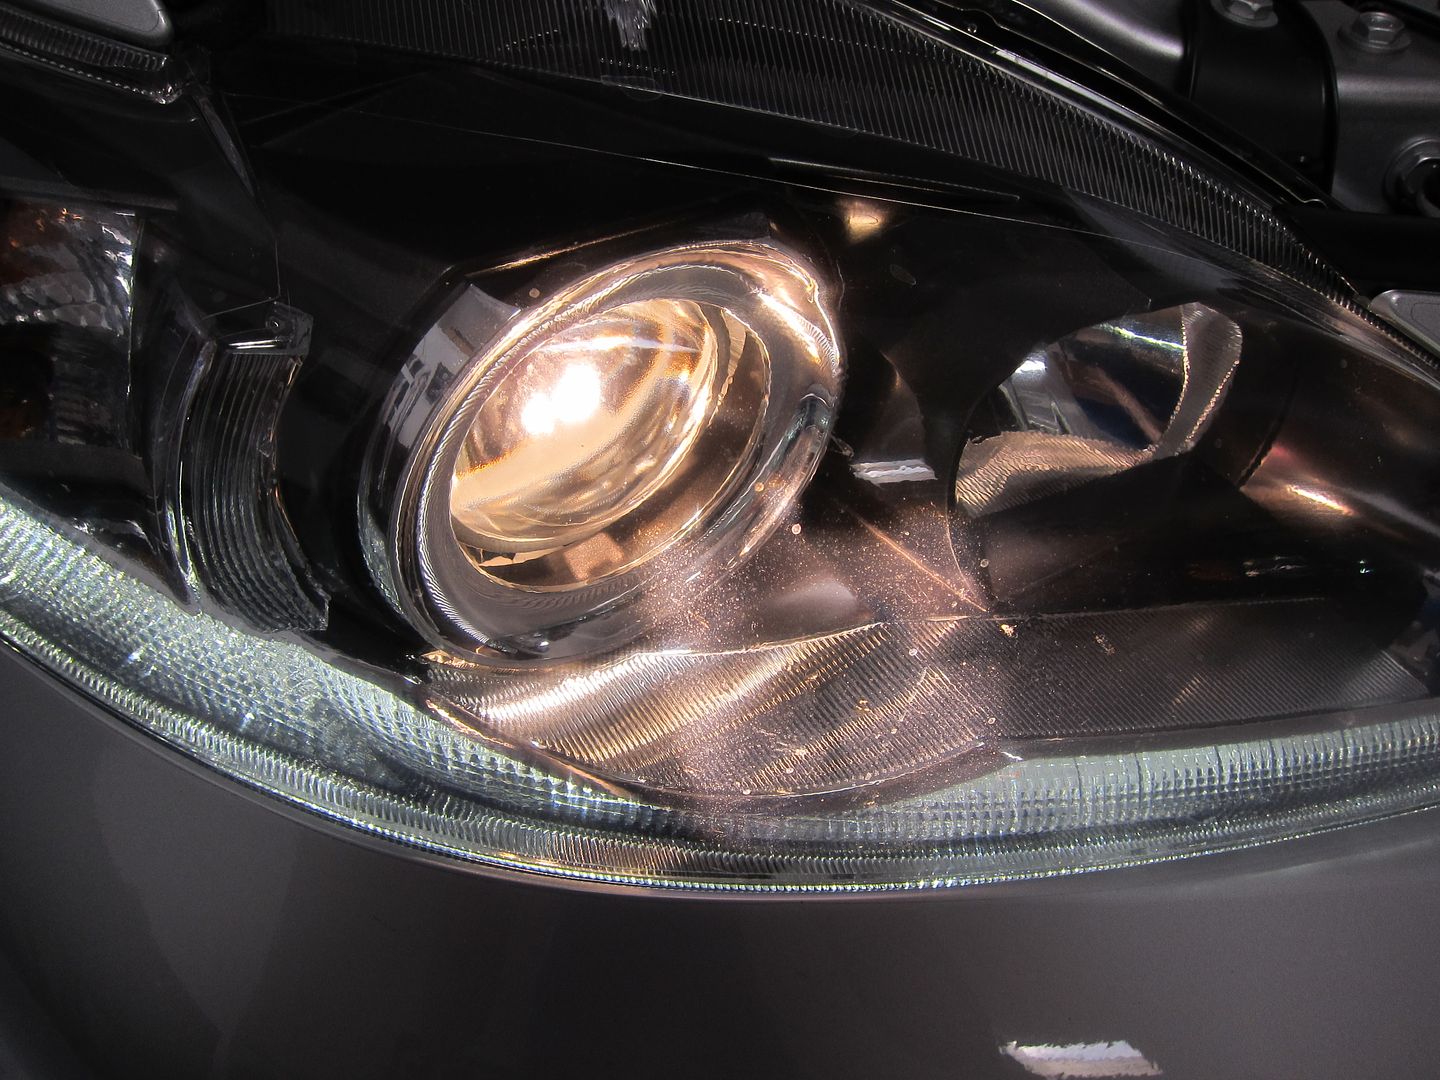
BEFORE:

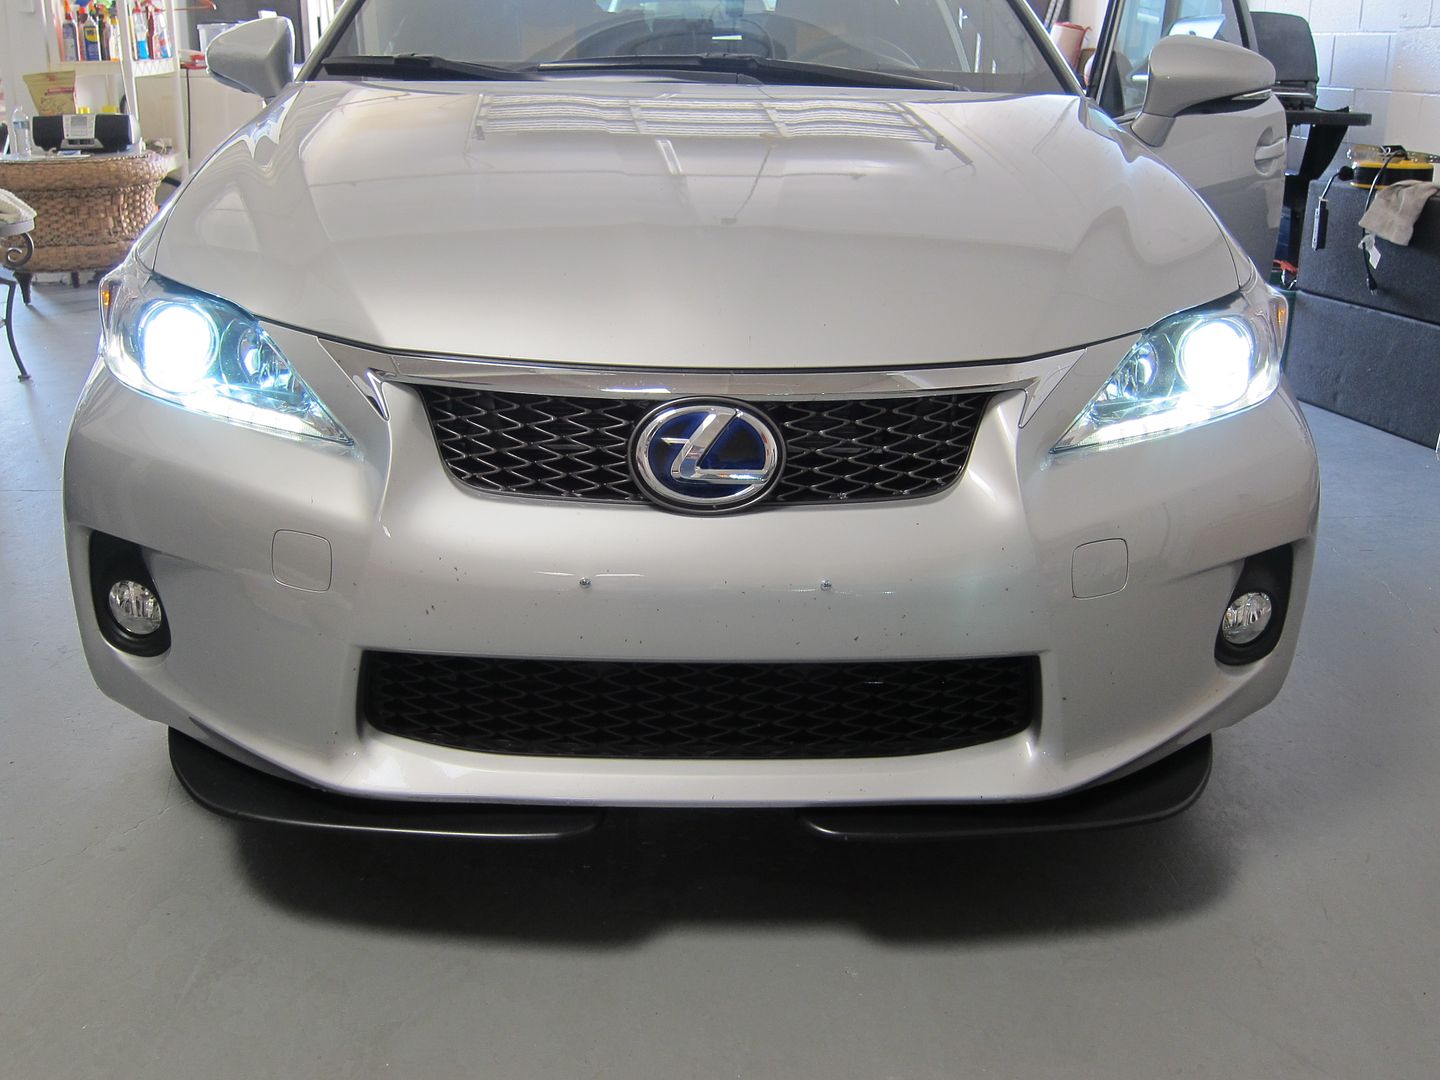
Side by Side comparison:
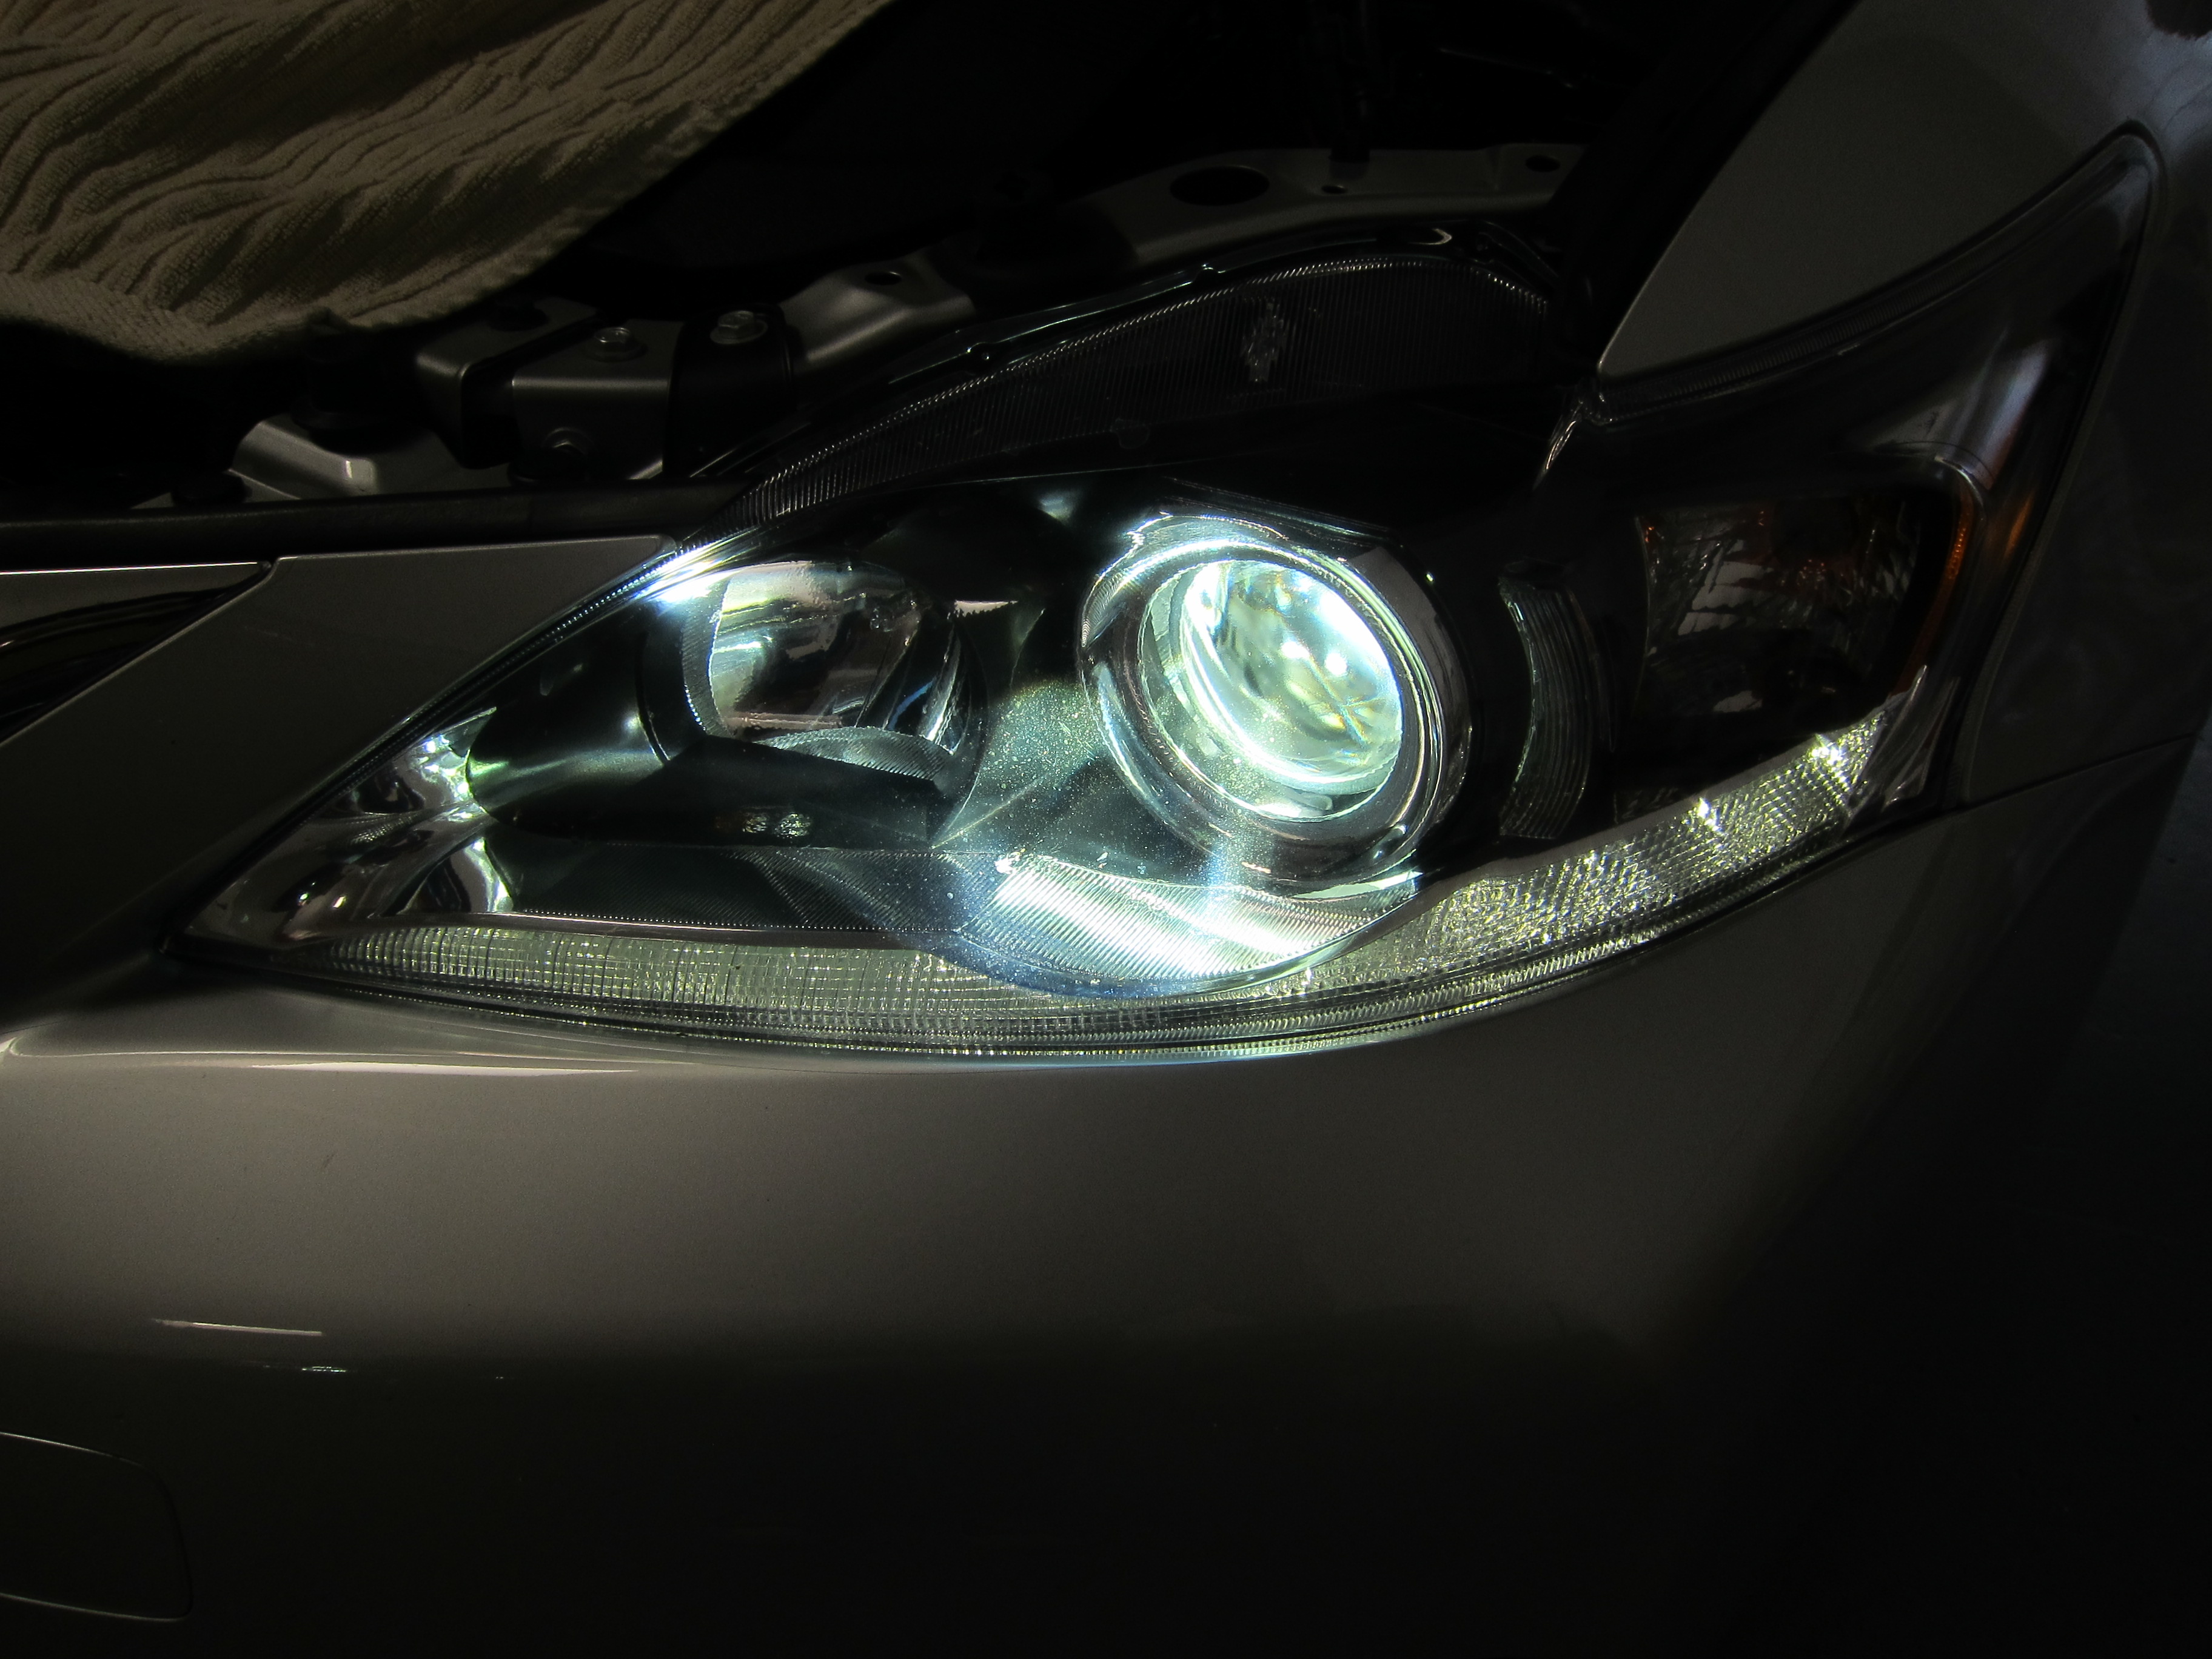
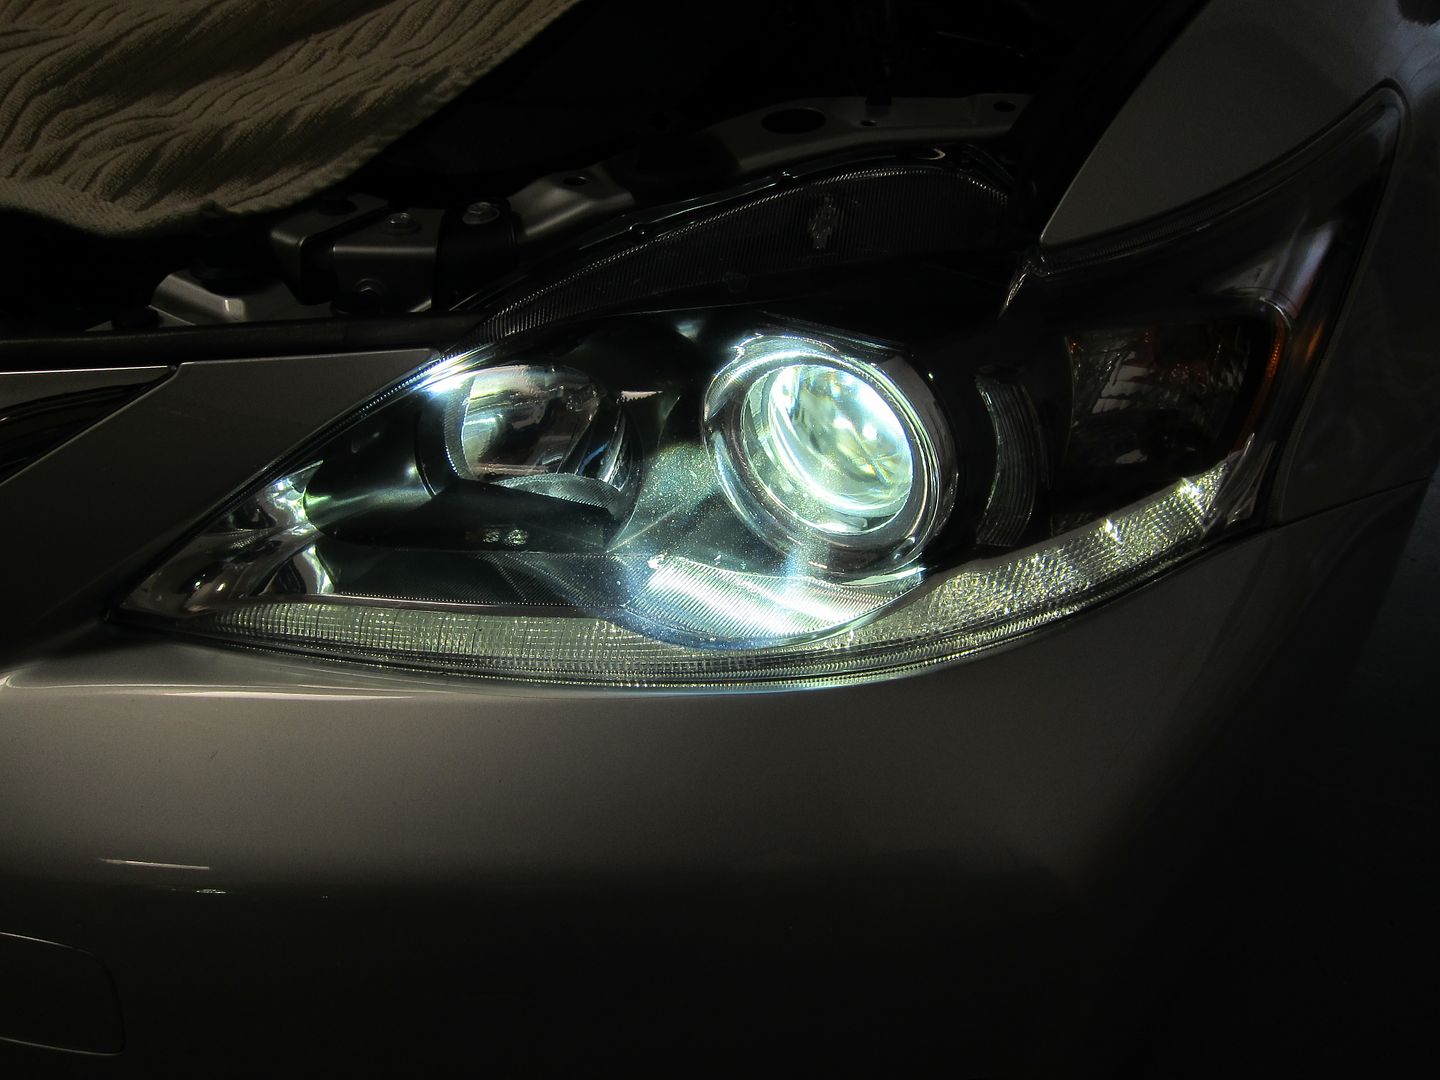
Closeup of HID:
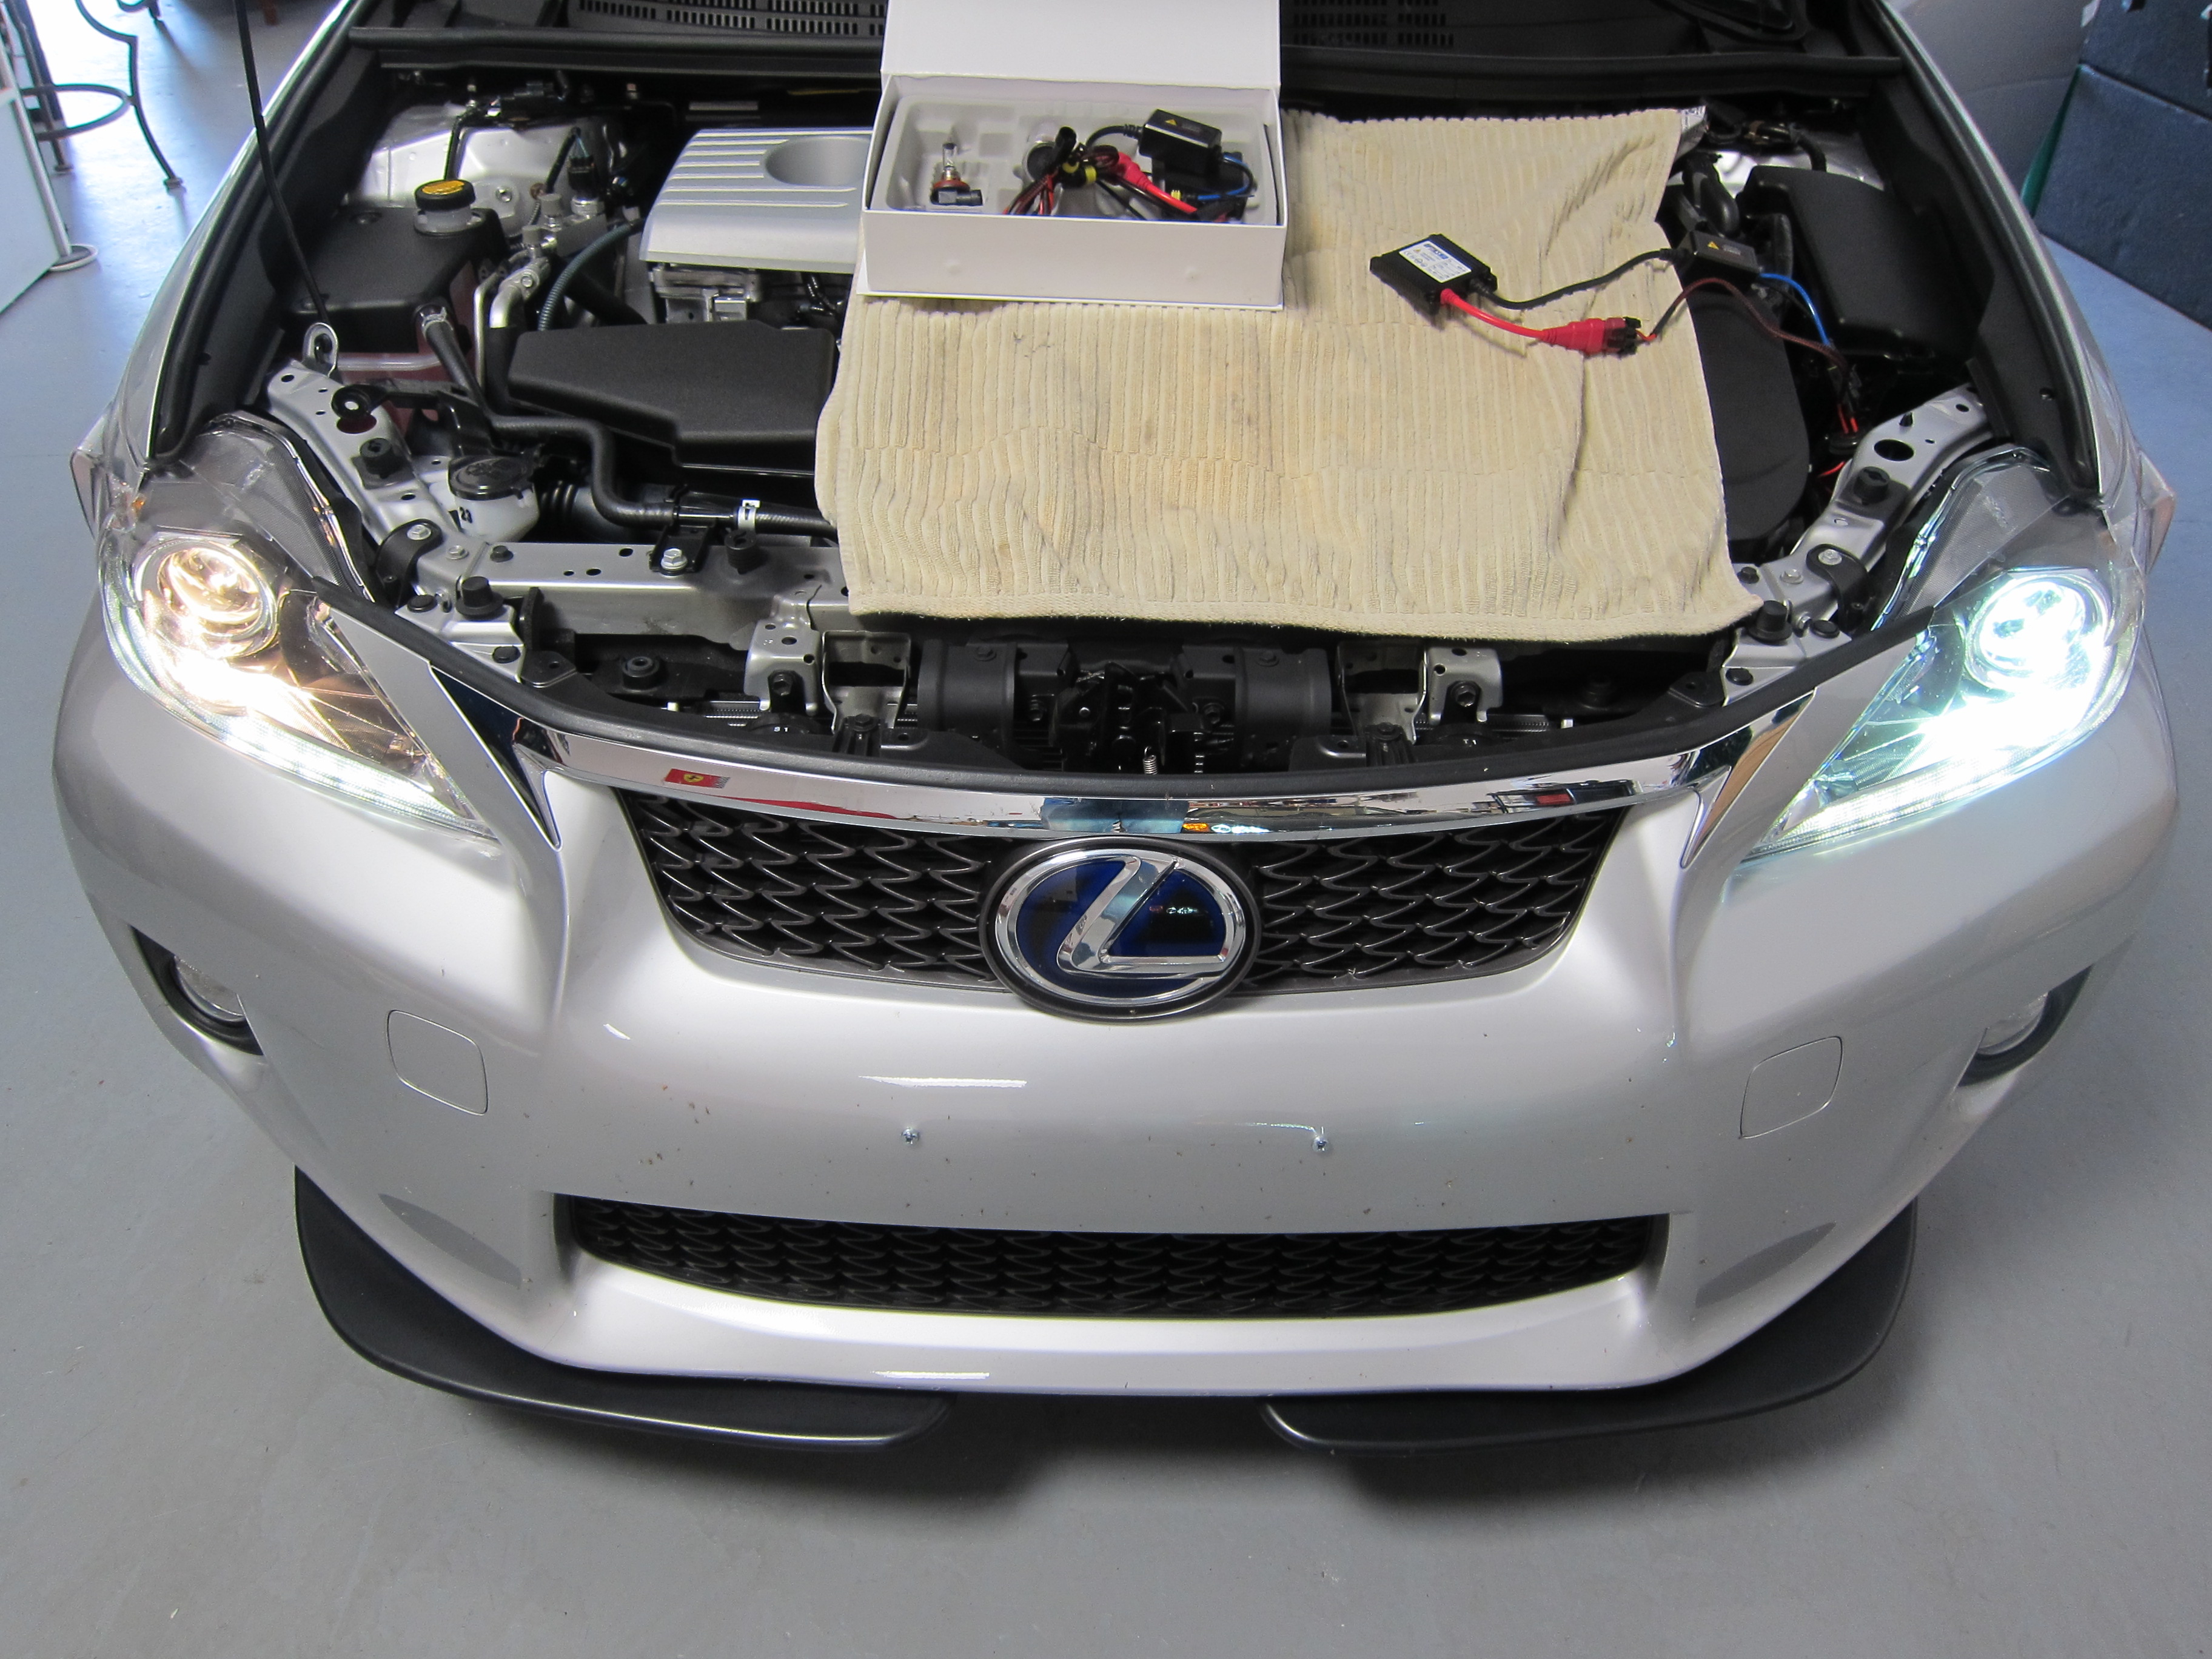
OptiksHID Kit we used:

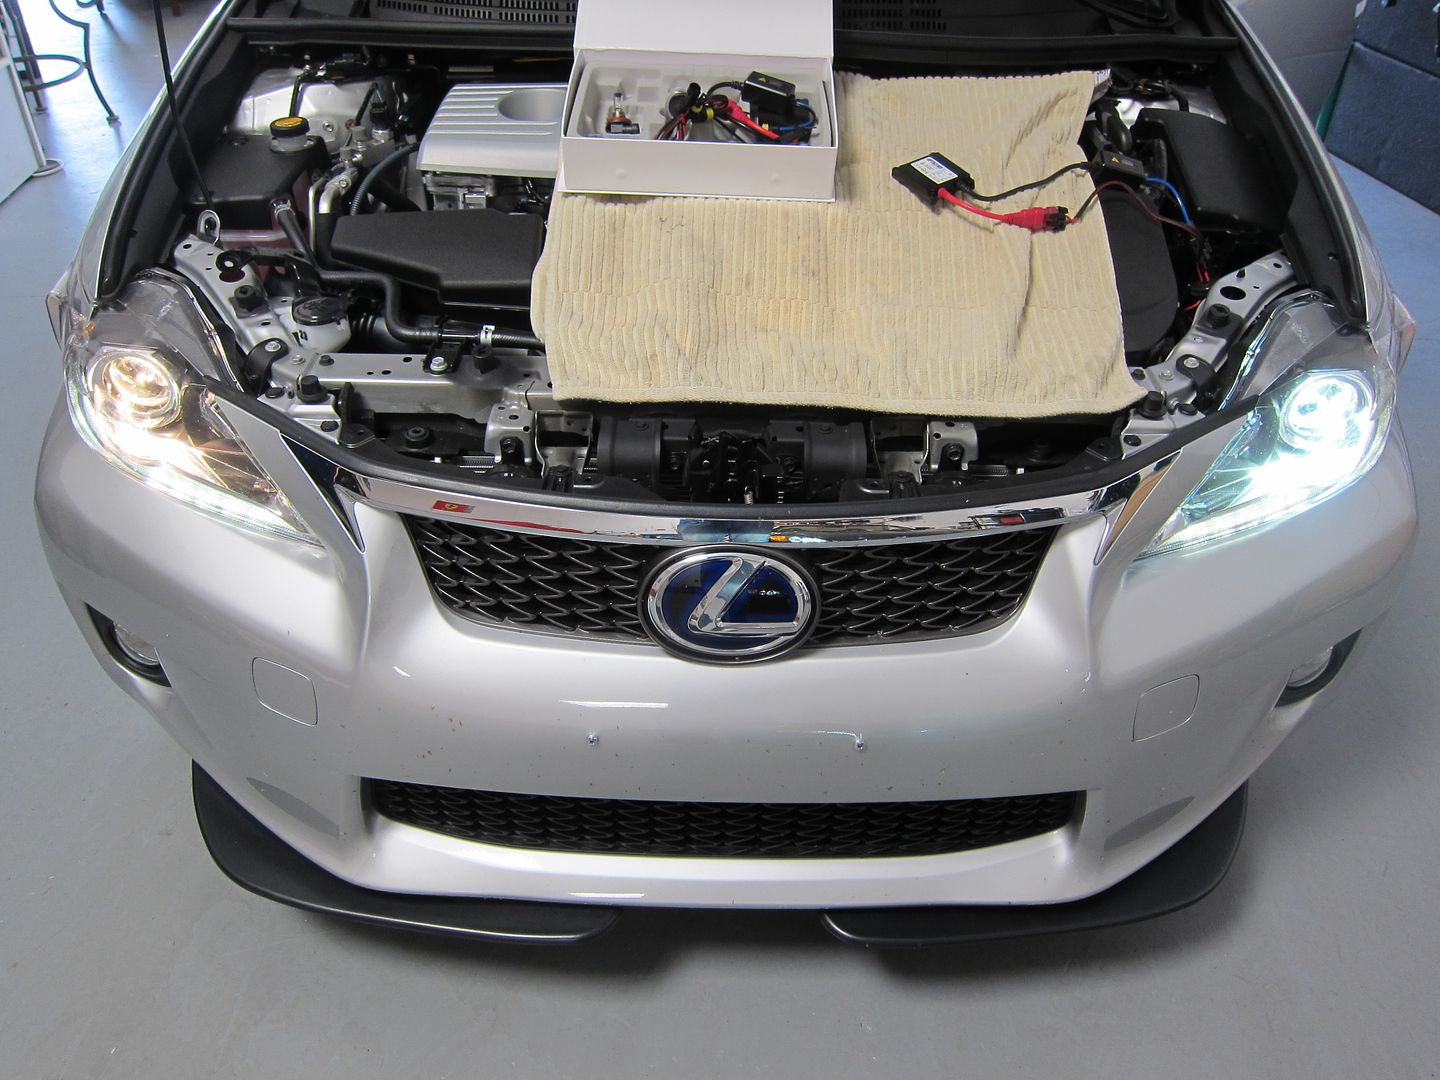
All done, looking sharp:

It’s still debatable which system (OEM LED vs. HID) is brighter so I’m going to test my theory by comparing the two systems later. My friend has a SE with the LED headlamps so hopefully we can get some side-by-side comparisons!
Now onto the installation….we bought the optional CAN-BUS adapters not sure if the Lexus headlights had this requirement. A lot of German cars like the new E92 M3 and Audi cars need the CAN-BUS to filter the voltage so it can communicate with the factory computer. Otherwise the HID lights won’t fire consistently.
One some Lexus vehicles you have to remove the OEM Intake box or other parts just to gain access to the wiring and bulbs. On the CT, it can be done if you have nimble hands that can work in tight spaces. We opted to remove the stock intake system on the passenger side for easier access.
TOOLS REQUIRED: Wire strippers, electrical tape, soldering gun and solder plus some tie wraps and basic sockets/tools.
Step 1 is to unplug the stock bulb by just twisting it and releasing it from the socket. Do not touch the glass portion of the bulbs!!!
Step 2 is to lay out the OptiksHID kit out so you have all the parts needed and removing the bulb to plug into the headlight. Be sure to test the polarity of the OEM socket so you know which wire is positive and which one is negative. You can use crimps but we opted to solder the connections for a more solid and reliable connection. You want the red wire to go to positive on the OEM wiring harness and the black wire to the negative side.
Step 3 is to plug in the ballast/igniter system and find a good place to tuck both units away. I tie-wrapped it and secured it away from any heat or moving parts.
Now just put back all the OEM plastic inserts and snap the clips in place. I found the aim and position to be nearly perfect from the factory but you may need to adjust the levels if you lowered your car.
The light output is amazing – there is simply no comparison! I don’t know why Lexus didn’t want to do HID’s (maybe to keep the cost down?)
My wife drives this car at night frequently and the upgrade is a MUST if you value safety and bright light! We love the OptiksHID kit as it’s a reliable kit.
BEFORE:
Side by Side comparison:
Closeup of HID:
OptiksHID Kit we used:
All done, looking sharp:
Last edited by s4play; 05-31-12 at 11:36 AM. Reason: Edited name
 05-29-12, 01:38 PM
#2
Like you, I'm a big fan of the HID's. I have them on my 450h. I stopped by the dealer yesterday, they had a cookout for their customers and asked about options on the 2013 CT. They don't expect the HID's to be a factory option yet but can not be sure. What a shame.
Obviously you know what you're doing with your installation. Great write up.
Obviously you know what you're doing with your installation. Great write up.
Last edited by Cruiter; 05-29-12 at 01:39 PM. Reason: Correction


 05-30-12, 07:30 AM
#7

What a world of a difference right? I love HIDs. I installed so many on my relatives' and cousins' older cars. I used McCulloch HID kits 6K (bi-xenon and 3k or 6k for their fog lights too) because they are a clear bright white not a blue or purple tinge.
Any plans on installing HIDs in your fog lights? Other CT200h owners would do double takes...lol
HID and a CT200h it's win-win!!!
Any plans on installing HIDs in your fog lights? Other CT200h owners would do double takes...lol
HID and a CT200h it's win-win!!!
Trending Topics
 05-30-12, 04:09 PM
#10
What a world of a difference right? I love HIDs. I installed so many on my relatives' and cousins' older cars. I used McCulloch HID kits 6K (bi-xenon and 3k or 6k for their fog lights too) because they are a clear bright white not a blue or purple tinge.
Any plans on installing HIDs in your fog lights? Other CT200h owners would do double takes...lol
HID and a CT200h it's win-win!!!
Any plans on installing HIDs in your fog lights? Other CT200h owners would do double takes...lol
HID and a CT200h it's win-win!!!
Yes I have 3000k HID fogs going in later this week along with my custom trademark LED DRL system that I had installed on my IS-F before

Yes tonight is first time my wife will be driving at night with them and I'm sure she will love it!
No misfires, I found the trick is installing with a solid connection by soldering and using a quality brand like what I have right now. Don't get that Ebay crap! Headlights must be 100% reliable and any issues is un-acceptable IMO.
06-17-12, 09:41 AM
#12
Driver School Candidate

Join Date: May 2012
Location: CA
Posts: 2
Likes: 0
Received 0 Likes
on
0 Posts
Hi there,
I installed hid system bought from Steve, light output was very good except the low beam seem aiming slope high, do you have this problem?
http://www.kbcarstuff.com/Xtreme-Dig...-p/xtp-hid.htm
I installed hid system bought from Steve, light output was very good except the low beam seem aiming slope high, do you have this problem?
http://www.kbcarstuff.com/Xtreme-Dig...-p/xtp-hid.htm
When we bought our CT200h, we deliberated all the packages on the car and wasn�t sure if we wanted the LED headlights. Both cars come with projector lenses thankfully so we decided to an upgrade to HID using a high quality premium kit from OptiksHID systems.
It�s still debatable which system (OEM LED vs. HID) is brighter so I�m going to test my theory by comparing the two systems later. My friend has a SE with the LED headlamps so hopefully we can get some side-by-side comparisons!
Now onto the installation�.we bought the optional CAN-BUS adapters not sure if the Lexus headlights had this requirement. A lot of German cars like the new E92 M3 and Audi cars need the CAN-BUS to filter the voltage so it can communicate with the factory computer. Otherwise the HID lights won�t fire consistently.
One some Lexus vehicles you have to remove the OEM Intake box or other parts just to gain access to the wiring and bulbs. On the CT, it can be done if you have nimble hands that can work in tight spaces. We opted to remove the stock intake system on the passenger side for easier access.
TOOLS REQUIRED: Wire strippers, electrical tape, soldering gun and solder plus some tie wraps and basic sockets/tools.
Step 1 is to unplug the stock bulb by just twisting it and releasing it from the socket. Do not touch the glass portion of the bulbs!!!
Step 2 is to lay out the OptiksHID kit out so you have all the parts needed and removing the bulb to plug into the headlight. Be sure to test the polarity of the OEM socket so you know which wire is positive and which one is negative. You can use crimps but we opted to solder the connections for a more solid and reliable connection. You want the red wire to go to positive on the OEM wiring harness and the black wire to the negative side.
Step 3 is to plug in the ballast/igniter system and find a good place to tuck both units away. I tie-wrapped it and secured it away from any heat or moving parts.
Now just put back all the OEM plastic inserts and snap the clips in place. I found the aim and position to be nearly perfect from the factory but you may need to adjust the levels if you lowered your car.
The light output is amazing � there is simply no comparison! I don�t know why Lexus didn�t want to do HID�s (maybe to keep the cost down?)
My wife drives this car at night frequently and the upgrade is a MUST if you value safety and bright light! We love the OptiksHID kit as it�s a reliable kit.
BEFORE:
Side by Side comparison:
Closeup of HID:
OptiksHID Kit we used:

All done, looking sharp:
It�s still debatable which system (OEM LED vs. HID) is brighter so I�m going to test my theory by comparing the two systems later. My friend has a SE with the LED headlamps so hopefully we can get some side-by-side comparisons!
Now onto the installation�.we bought the optional CAN-BUS adapters not sure if the Lexus headlights had this requirement. A lot of German cars like the new E92 M3 and Audi cars need the CAN-BUS to filter the voltage so it can communicate with the factory computer. Otherwise the HID lights won�t fire consistently.
One some Lexus vehicles you have to remove the OEM Intake box or other parts just to gain access to the wiring and bulbs. On the CT, it can be done if you have nimble hands that can work in tight spaces. We opted to remove the stock intake system on the passenger side for easier access.
TOOLS REQUIRED: Wire strippers, electrical tape, soldering gun and solder plus some tie wraps and basic sockets/tools.
Step 1 is to unplug the stock bulb by just twisting it and releasing it from the socket. Do not touch the glass portion of the bulbs!!!
Step 2 is to lay out the OptiksHID kit out so you have all the parts needed and removing the bulb to plug into the headlight. Be sure to test the polarity of the OEM socket so you know which wire is positive and which one is negative. You can use crimps but we opted to solder the connections for a more solid and reliable connection. You want the red wire to go to positive on the OEM wiring harness and the black wire to the negative side.
Step 3 is to plug in the ballast/igniter system and find a good place to tuck both units away. I tie-wrapped it and secured it away from any heat or moving parts.
Now just put back all the OEM plastic inserts and snap the clips in place. I found the aim and position to be nearly perfect from the factory but you may need to adjust the levels if you lowered your car.
The light output is amazing � there is simply no comparison! I don�t know why Lexus didn�t want to do HID�s (maybe to keep the cost down?)
My wife drives this car at night frequently and the upgrade is a MUST if you value safety and bright light! We love the OptiksHID kit as it�s a reliable kit.
BEFORE:
Side by Side comparison:
Closeup of HID:
OptiksHID Kit we used:
All done, looking sharp:
