My indecisive 98 SC300 build
 11-05-18, 07:20 AM
#331
Car passed 195k miles over the weekend. I didn't realize it until I got home or I would have tried to take a picture at exactly 195,000. Hopefully it hits 200k by the end of 2019.

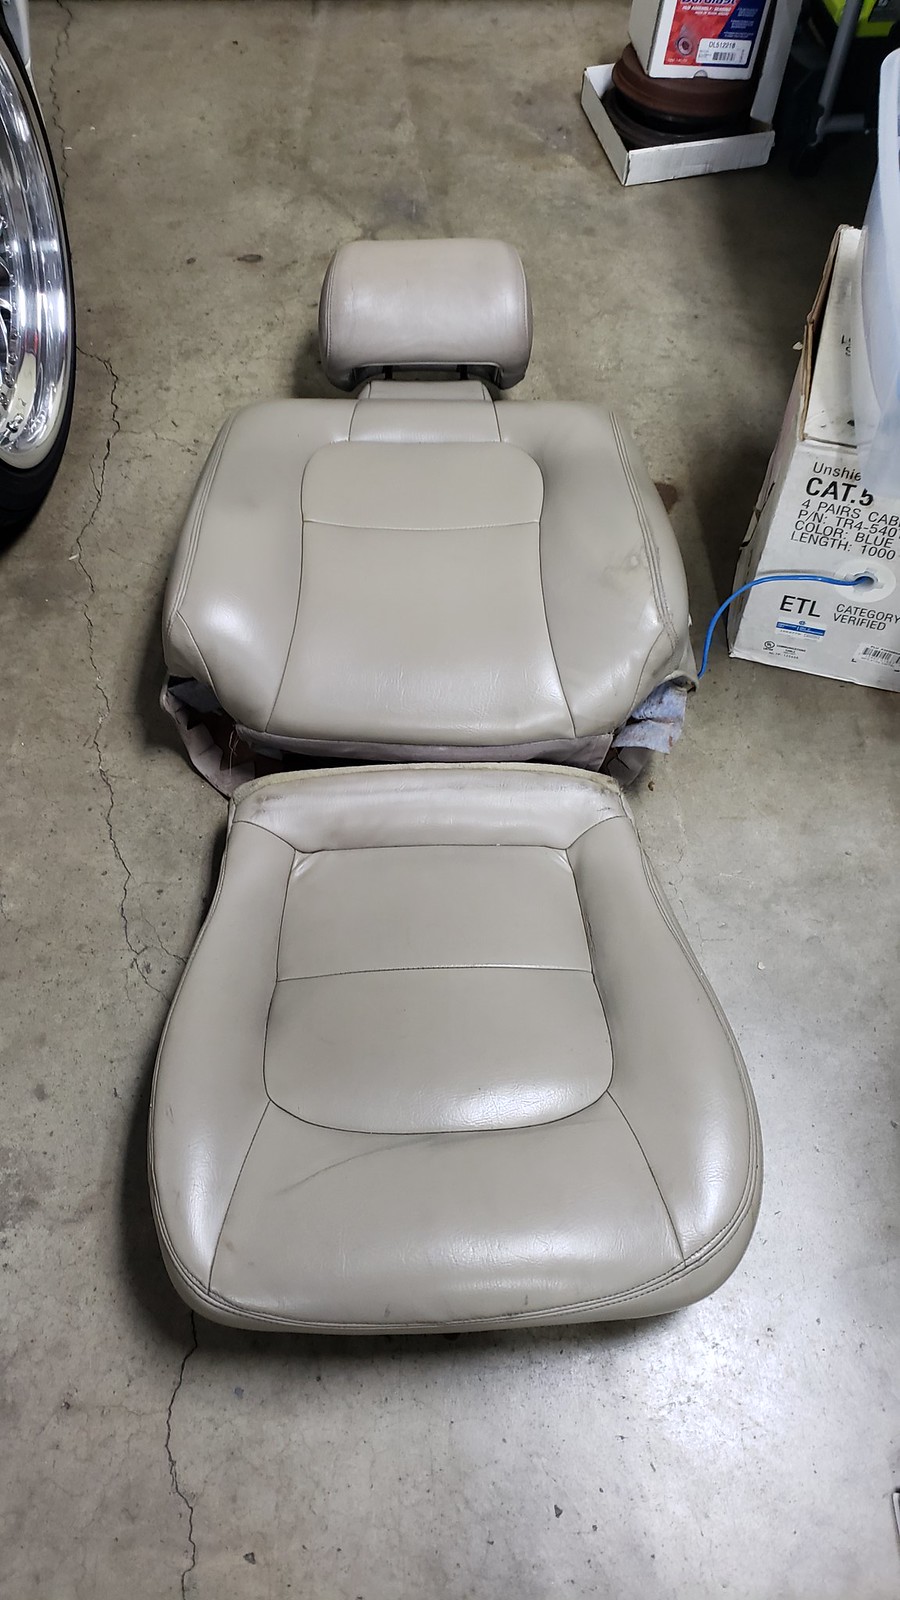
Thanks, I'm still trying to get the seats to work properly. Currently, it's like sitting on a yo-yo every time I brake with the broken gear. It also throws off my perception of the car's braking and grip. There are times where it feels like the car is about to slide, but I'm not going fast enough for that to happen. It's just the seat shifting. I ordered a different replacement gear a couple of weeks ago. The new one is a solid 1 piece brass gear which replaces the existing metal gear + the plastic gear. It's supposed to arrive some time in the next 2 weeks. Once the seat can move properly like stock, then I'll put in my order for the leather skin. It's still a wait and see game, so most likely won't have a finished product until early 2019.
Thanks, I'm still trying to get the seats to work properly. Currently, it's like sitting on a yo-yo every time I brake with the broken gear. It also throws off my perception of the car's braking and grip. There are times where it feels like the car is about to slide, but I'm not going fast enough for that to happen. It's just the seat shifting. I ordered a different replacement gear a couple of weeks ago. The new one is a solid 1 piece brass gear which replaces the existing metal gear + the plastic gear. It's supposed to arrive some time in the next 2 weeks. Once the seat can move properly like stock, then I'll put in my order for the leather skin. It's still a wait and see game, so most likely won't have a finished product until early 2019.
 11-13-18, 08:20 AM
#333
It looks like the main album for my photos has ran into issues and isn't showing pictures anymore.  I was having issues with it since September, so I started hosting on my Flickr account, but I'm almost at my cap for that.
My metal gear for the supra seats finally arrived. I'm going to try installing it some time this week.
The metal gear removes the plastic pieces I stripped before and should remove the slop in the seat which makes it feel like a yo-yo when I brake. I've heard it makes the seat louder when moving, but I rarely move the seat.
I was having issues with it since September, so I started hosting on my Flickr account, but I'm almost at my cap for that.My metal gear for the supra seats finally arrived. I'm going to try installing it some time this week.
The metal gear removes the plastic pieces I stripped before and should remove the slop in the seat which makes it feel like a yo-yo when I brake. I've heard it makes the seat louder when moving, but I rarely move the seat.
11-13-18, 08:24 AM
#334
The flip key is only guaranteed to work on 98-00 models, but there is also one for the 96-97 models that needs to be tested. It's a cool novelty item, but I don't use it every day.
11-20-18, 07:46 PM
#335
A little trick I did on my TT seat to stop the rocking/sliding -- I disconnected the left and right rails and put the seat at a slight angle by running the sliding motor on the left rail until it starts to bog (because of the misalignment). Voila! No more sliding on braking and the seat maybe facing inboard/outboard by a few degrees. You can try this to help before rebuilding the gear. 
11-23-18, 02:53 PM
#336
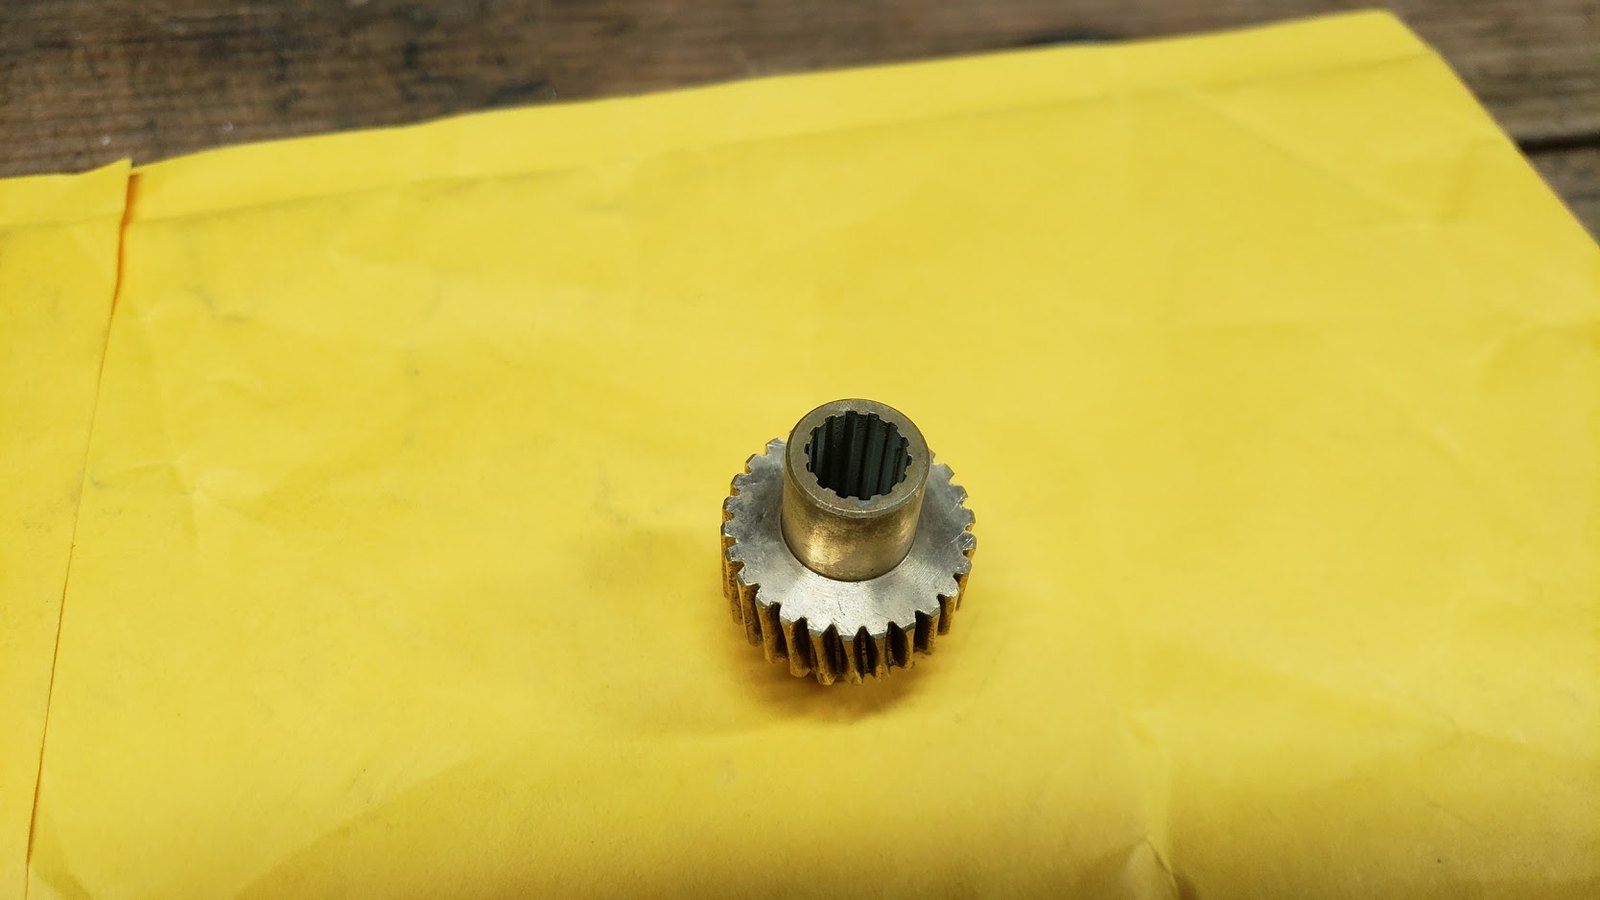
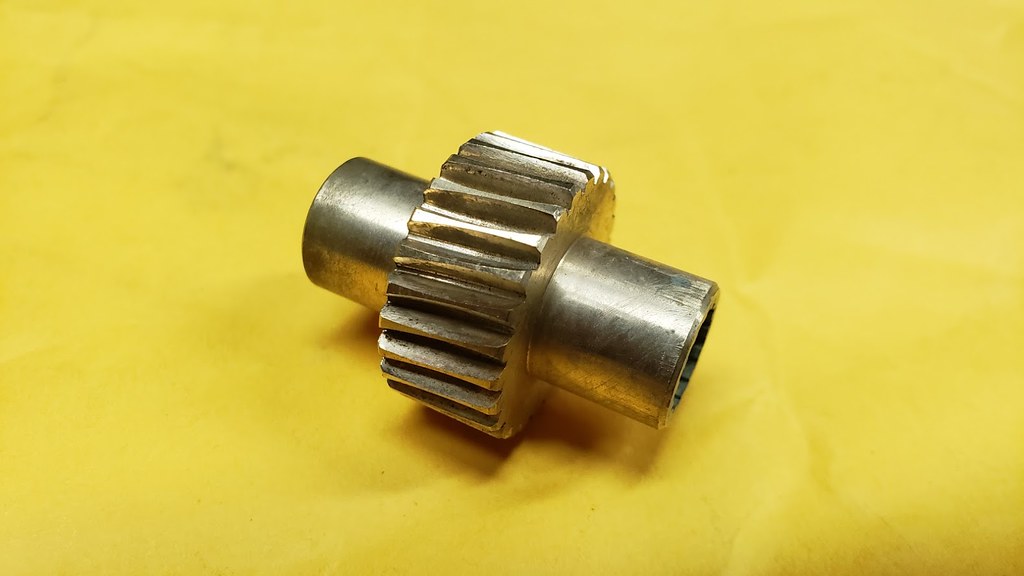
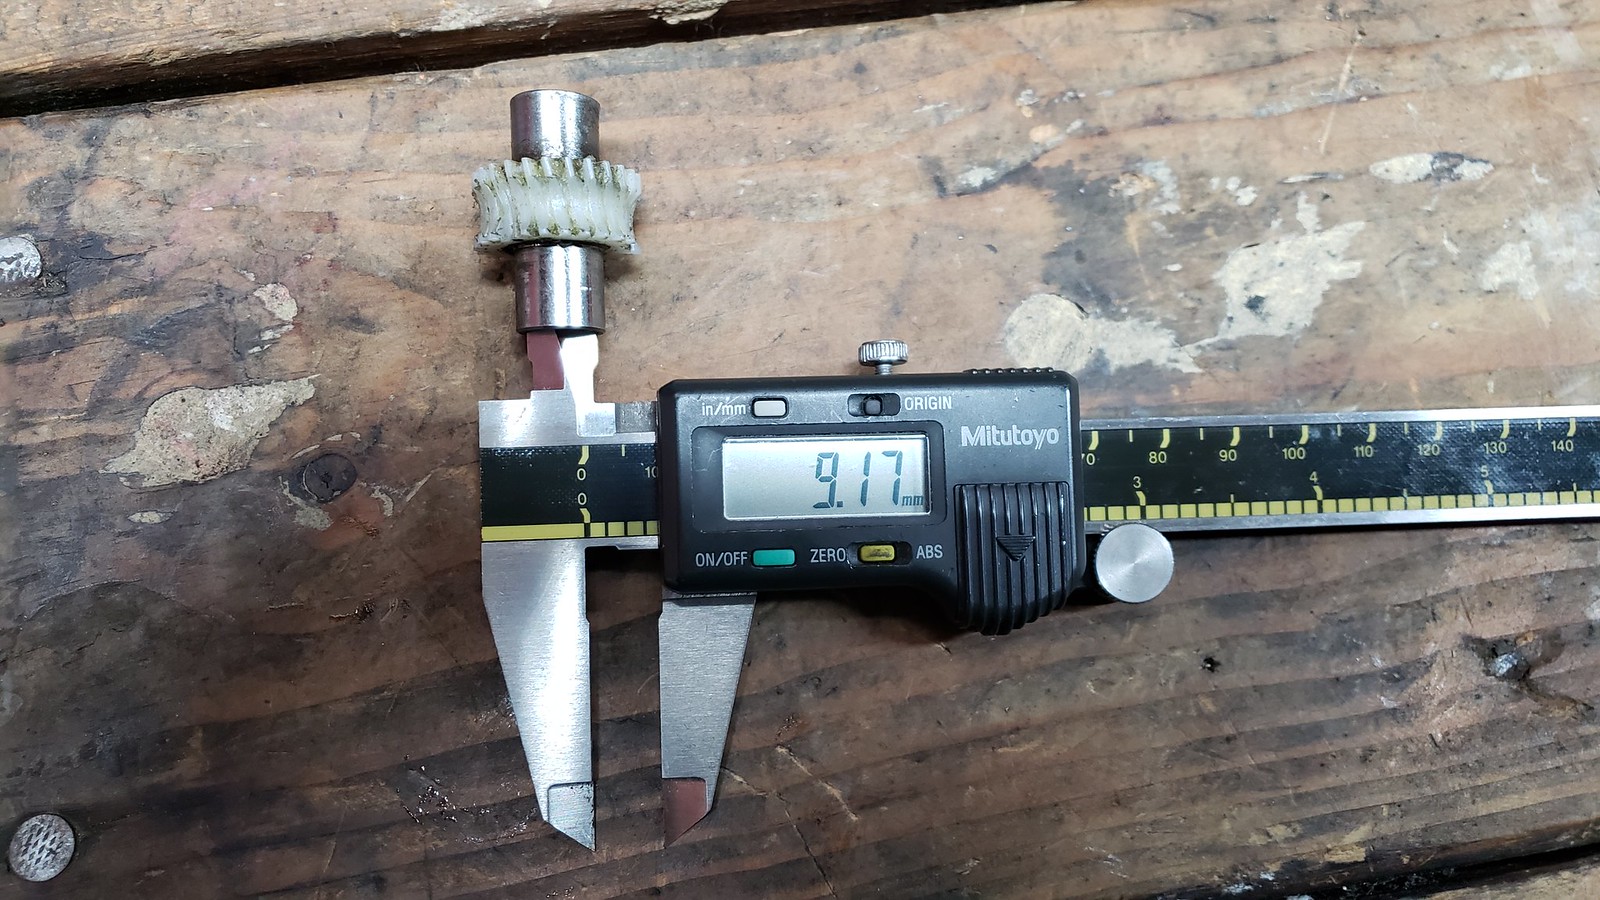
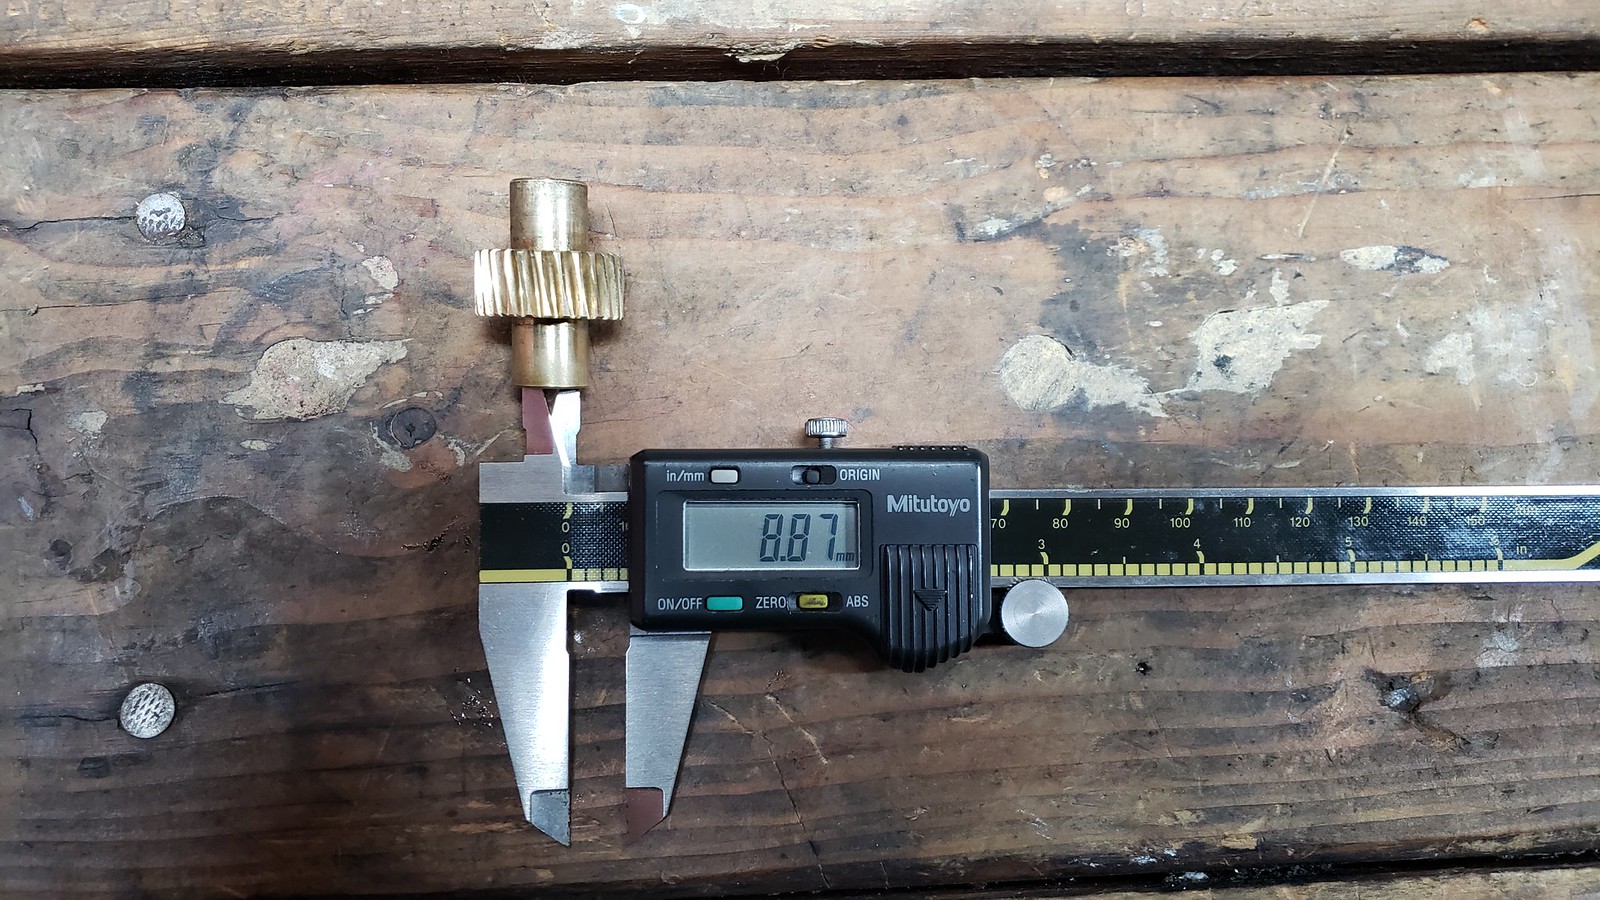
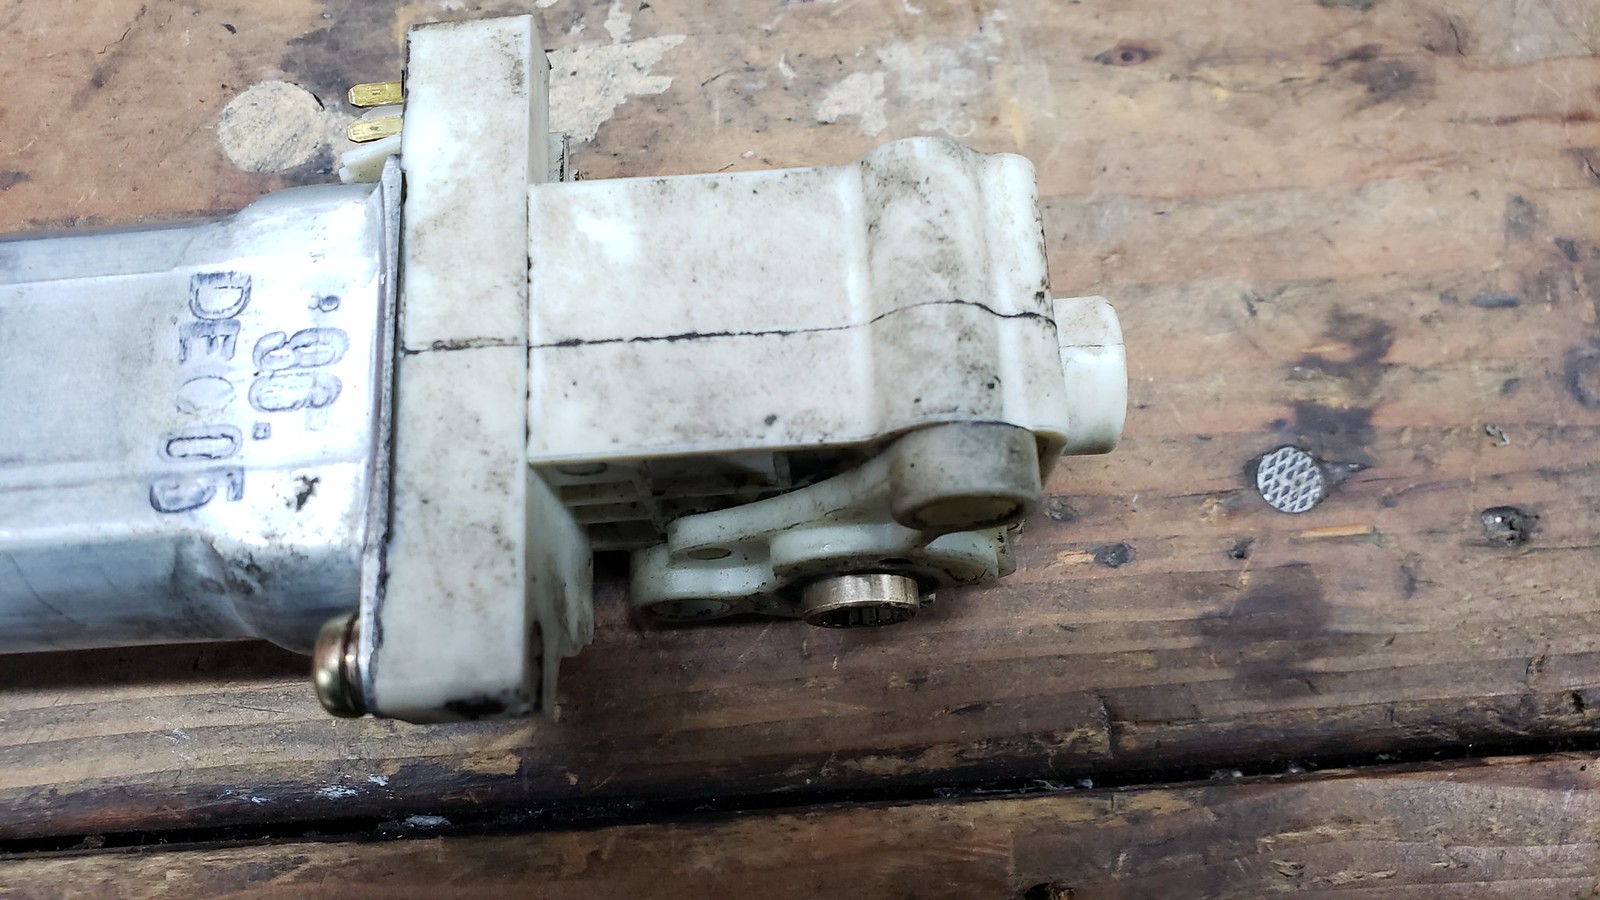
The brass seat gear from a land cruiser didn't work out. The internal diameter that goes on the seat rail was too small.
Stock Gear
Brass Land Cruiser Gear
I was able to fix the rocking by shimming the motor with a M12 washer.
The gear installed has enough room to slide forwards and backward causing the seat to rock. Gear all the way forward.
Went to home depot and got a M12 washer for $48 cents
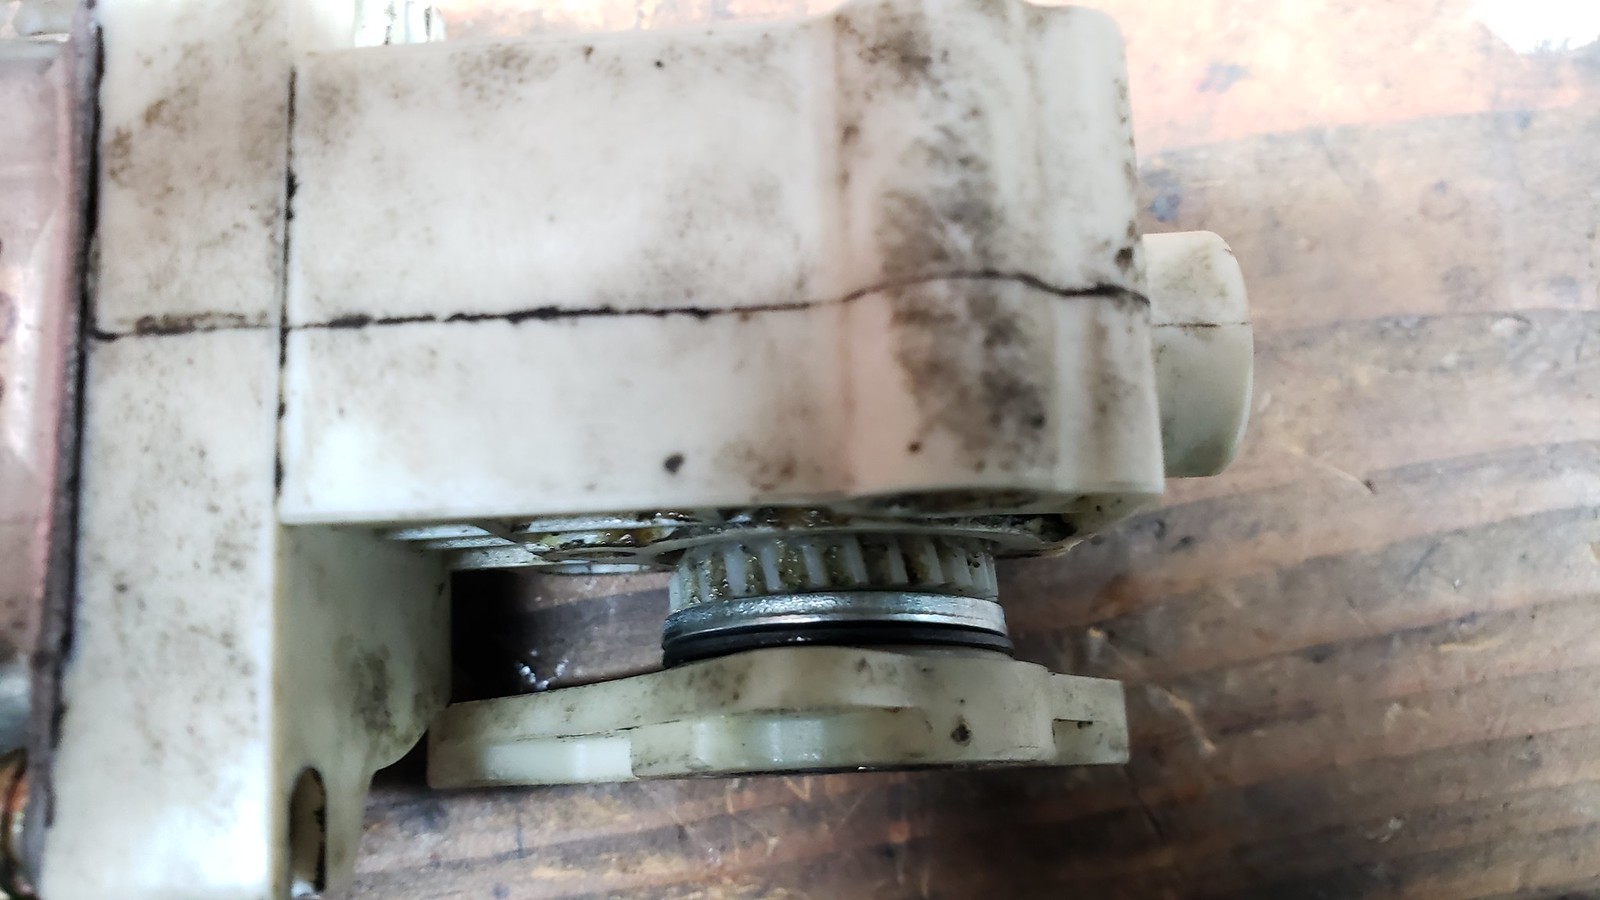
After installing the washer, the gear no longer moves forward
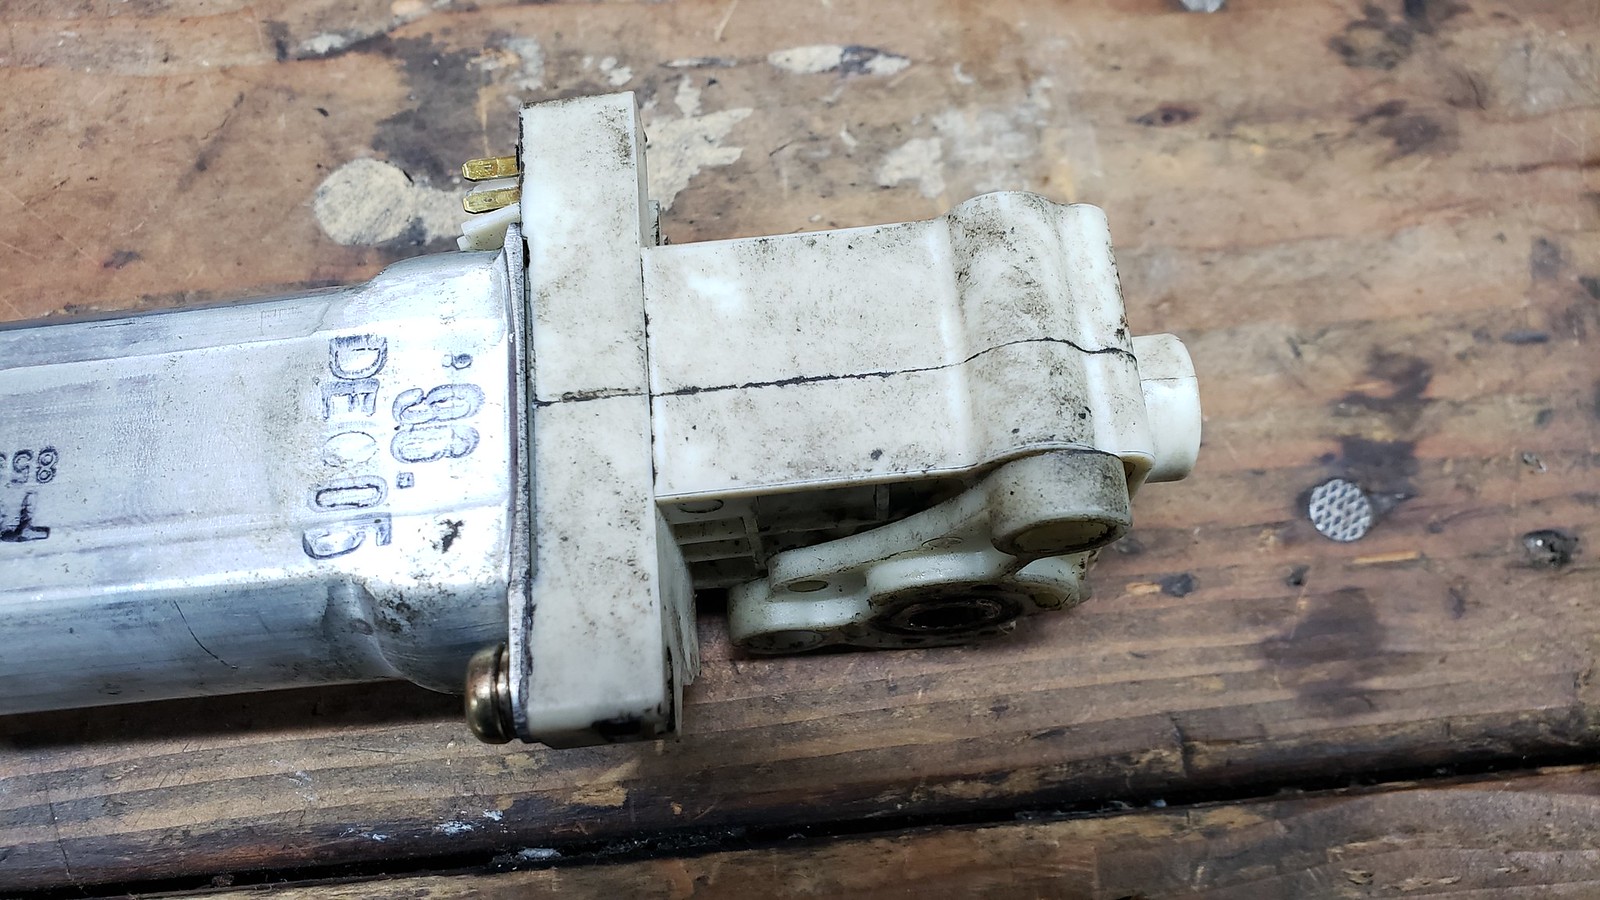
I also accidentally finished off the motor by breaking part of it, so this seat is kind of a lost cause right now and is stuck in a fixed position with no hope of moving under electrical power.
Stock Gear
Brass Land Cruiser Gear
A little trick I did on my TT seat to stop the rocking/sliding -- I disconnected the left and right rails and put the seat at a slight angle by running the sliding motor on the left rail until it starts to bog (because of the misalignment). Voila! No more sliding on braking and the seat maybe facing inboard/outboard by a few degrees. You can try this to help before rebuilding the gear.
The gear installed has enough room to slide forwards and backward causing the seat to rock. Gear all the way forward.
Went to home depot and got a M12 washer for $48 cents
After installing the washer, the gear no longer moves forward
I also accidentally finished off the motor by breaking part of it, so this seat is kind of a lost cause right now and is stuck in a fixed position with no hope of moving under electrical power.
12-10-18, 05:05 PM
#337
Threw in the passenger supra TT seat
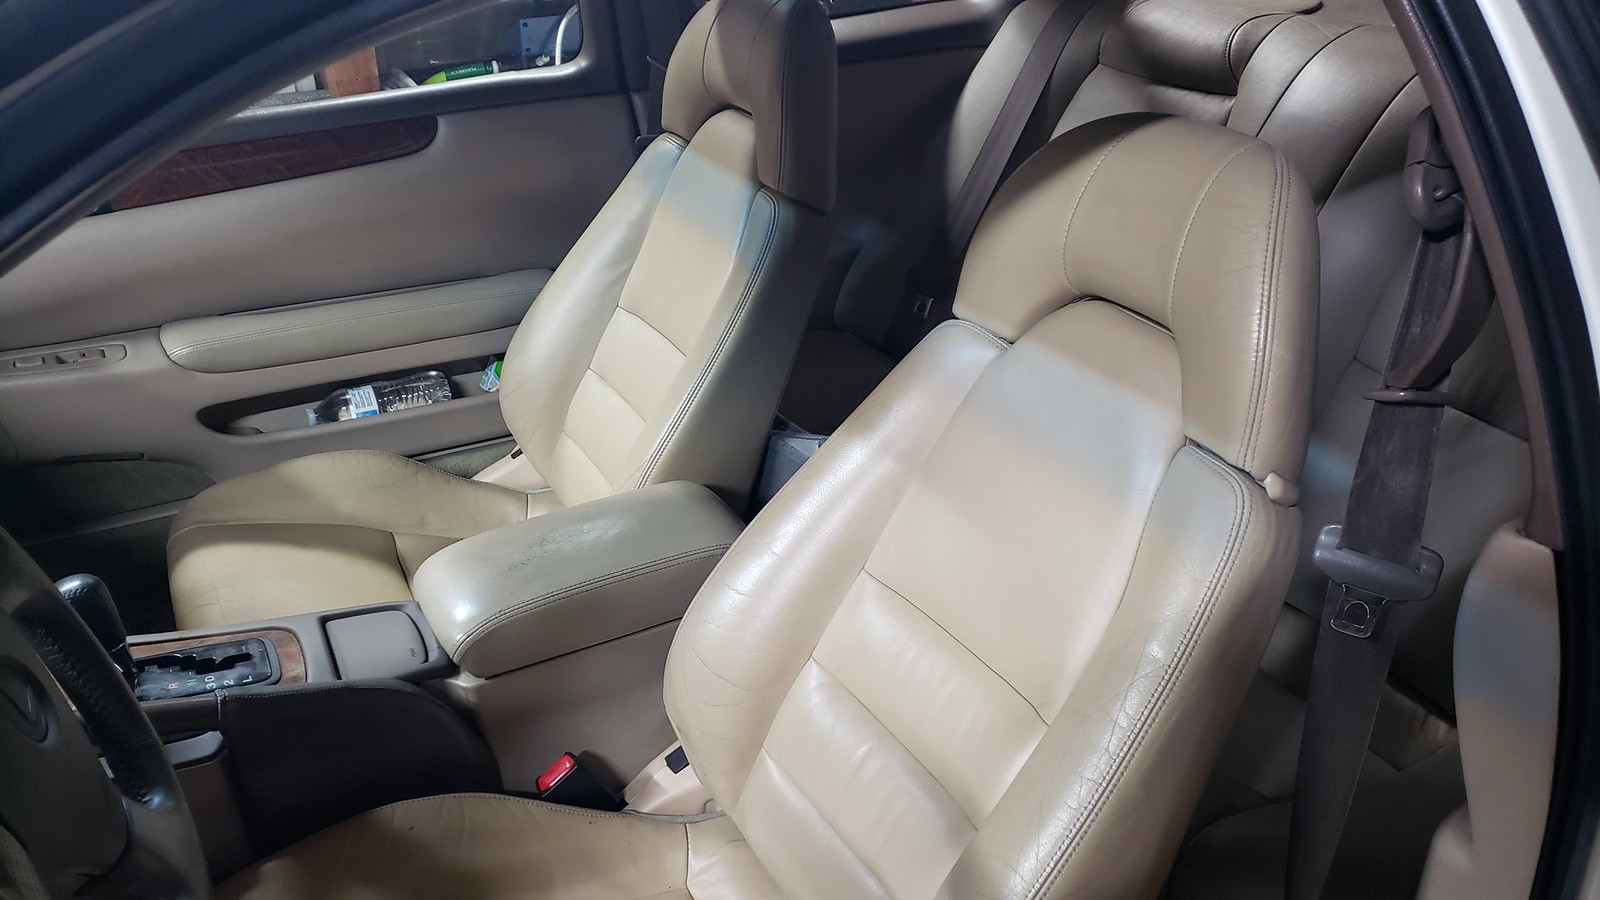
I chopped up the stock seats and trashed the frame/motors. I kept the factory leather and cushions.
An FYI for anyone that needs to remove the cushions on a dead seat to access all 4 bolts, these C clips can be removed on both sides to manually move the seat up and down.

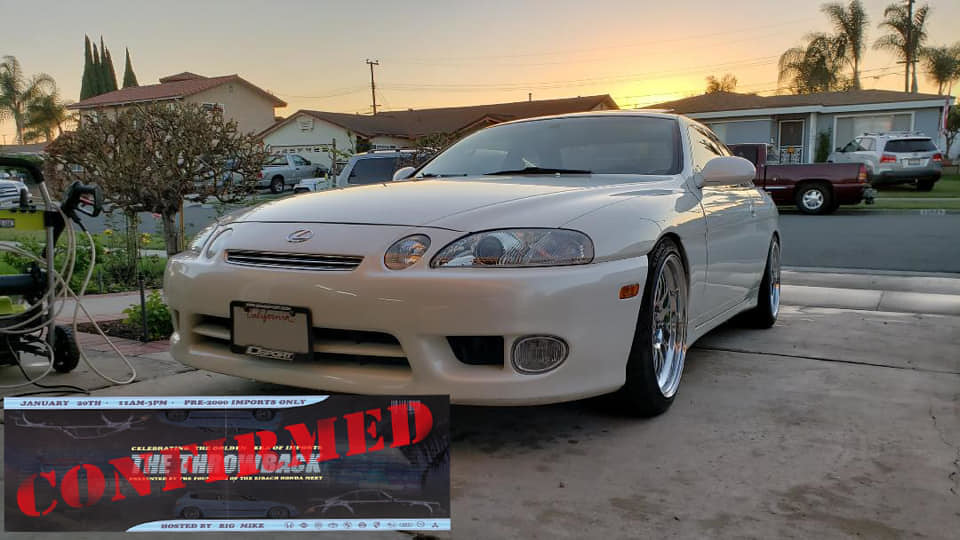
I registered the car for the Eibach Throwback/ 90's era meet. Going to be representing with at least 3 other SC's
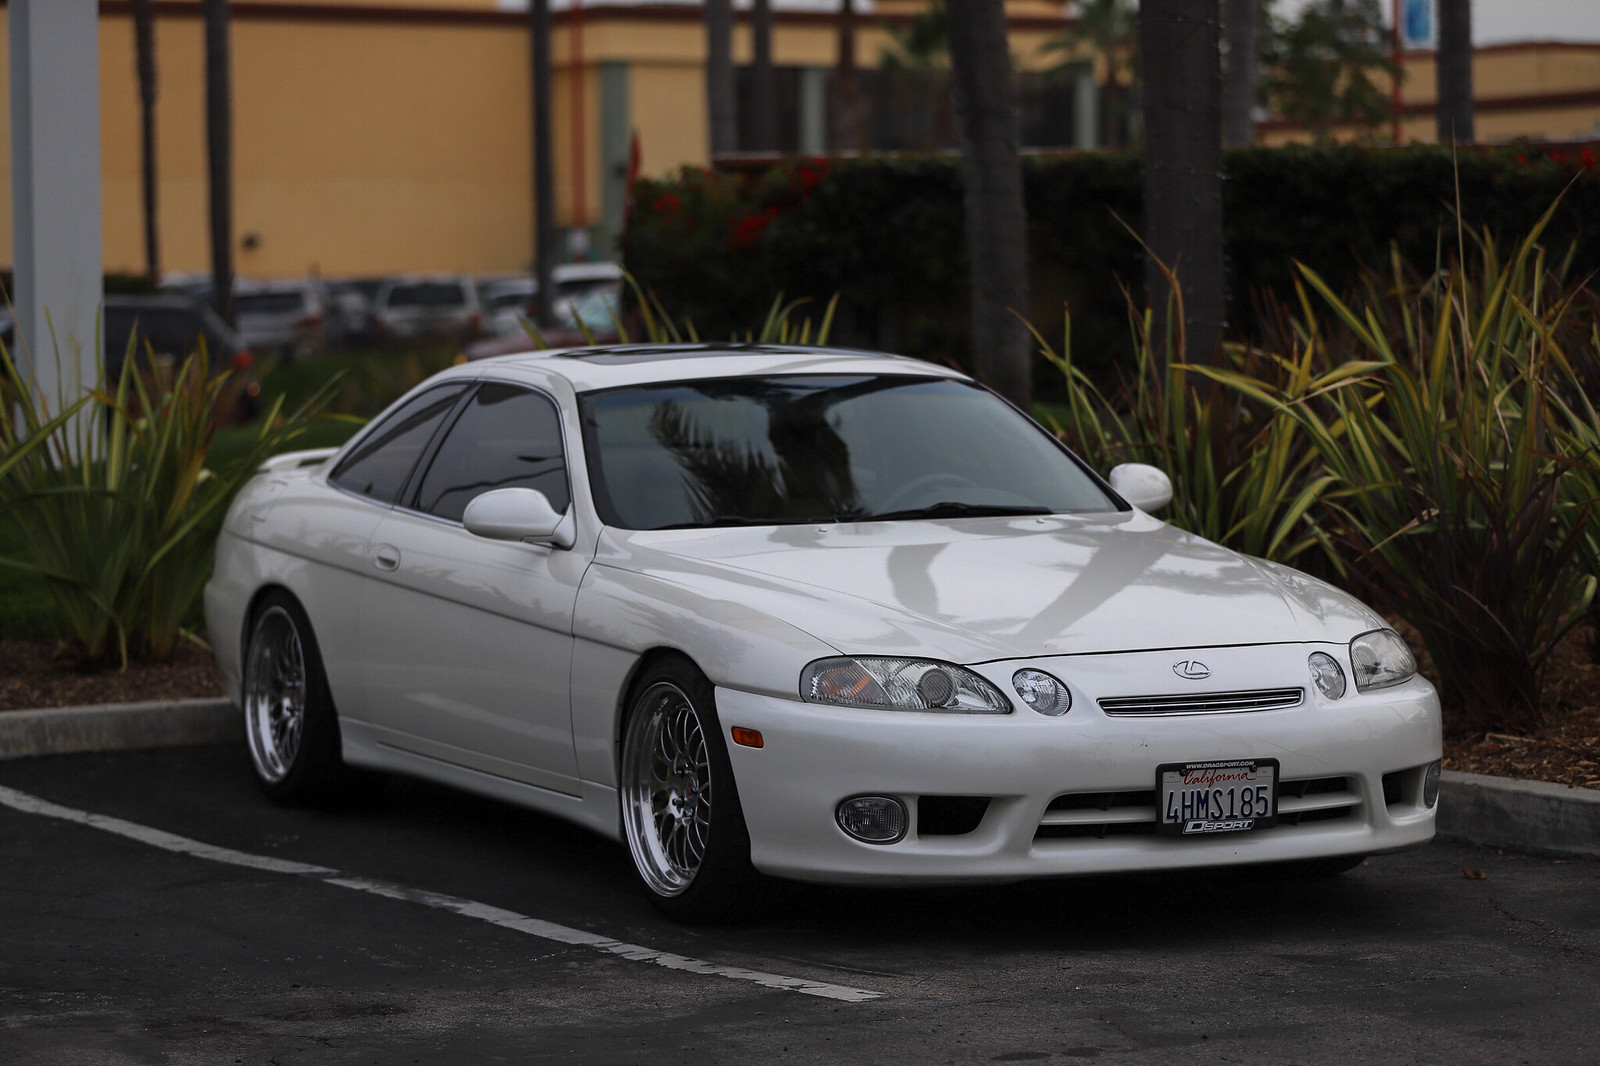
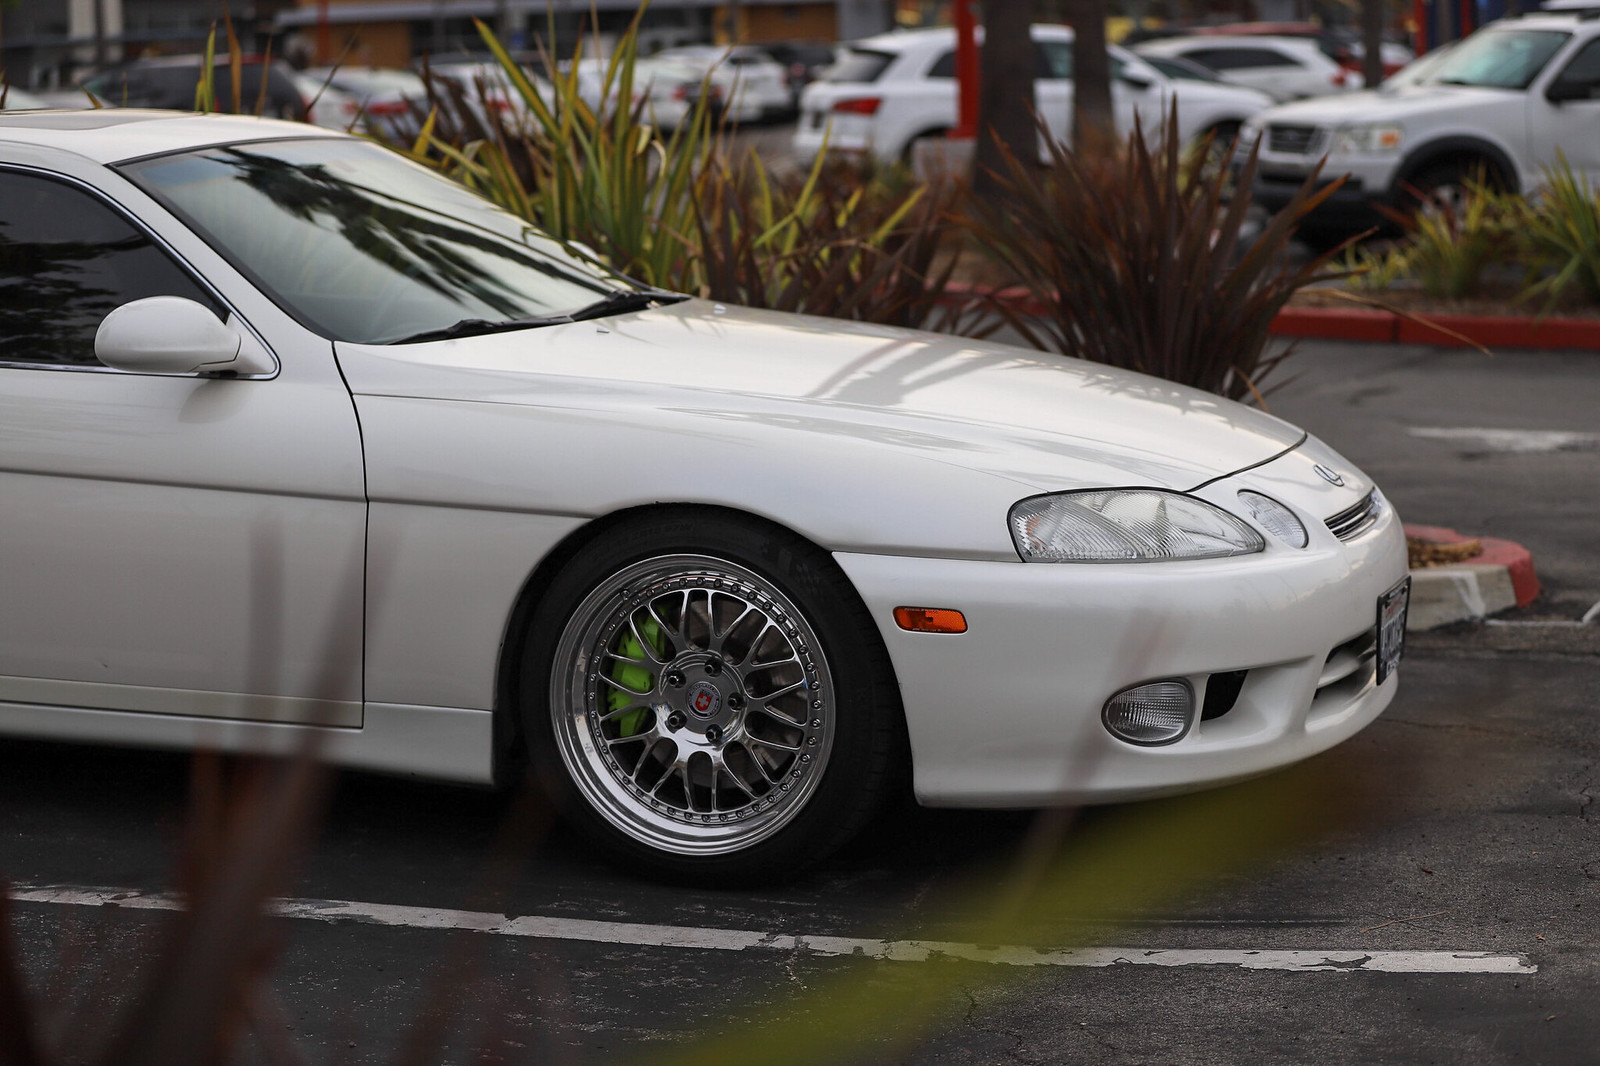
Some pics from my friends. They were testing out each other's camera gear.
I chopped up the stock seats and trashed the frame/motors. I kept the factory leather and cushions.
An FYI for anyone that needs to remove the cushions on a dead seat to access all 4 bolts, these C clips can be removed on both sides to manually move the seat up and down.
I registered the car for the Eibach Throwback/ 90's era meet. Going to be representing with at least 3 other SC's
Some pics from my friends. They were testing out each other's camera gear.
12-15-18, 10:36 AM
#338
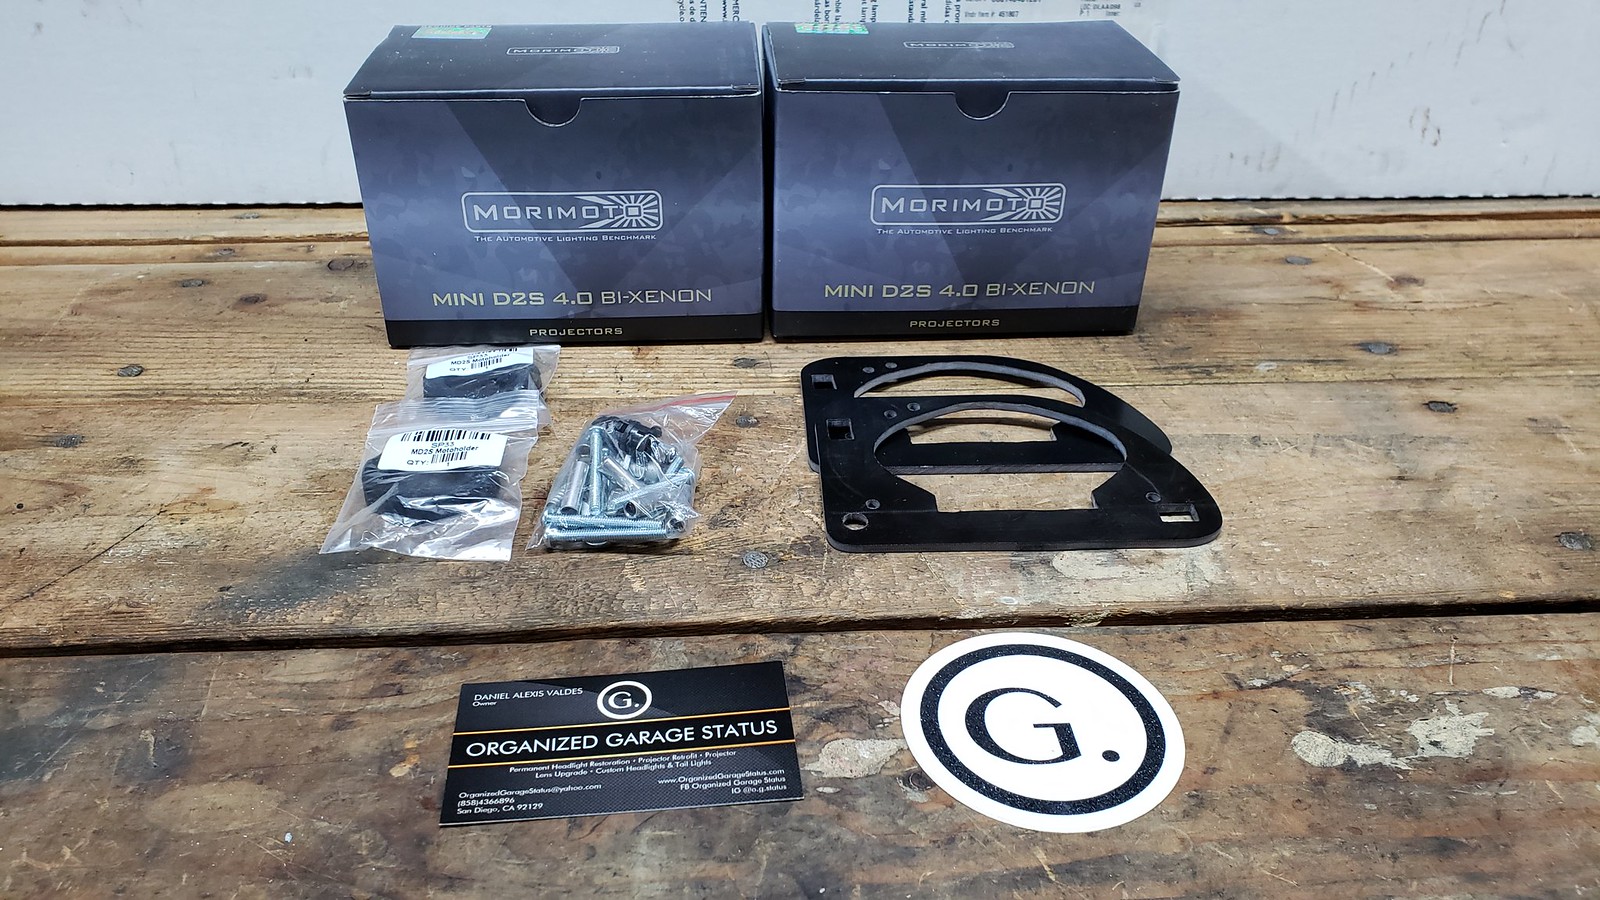
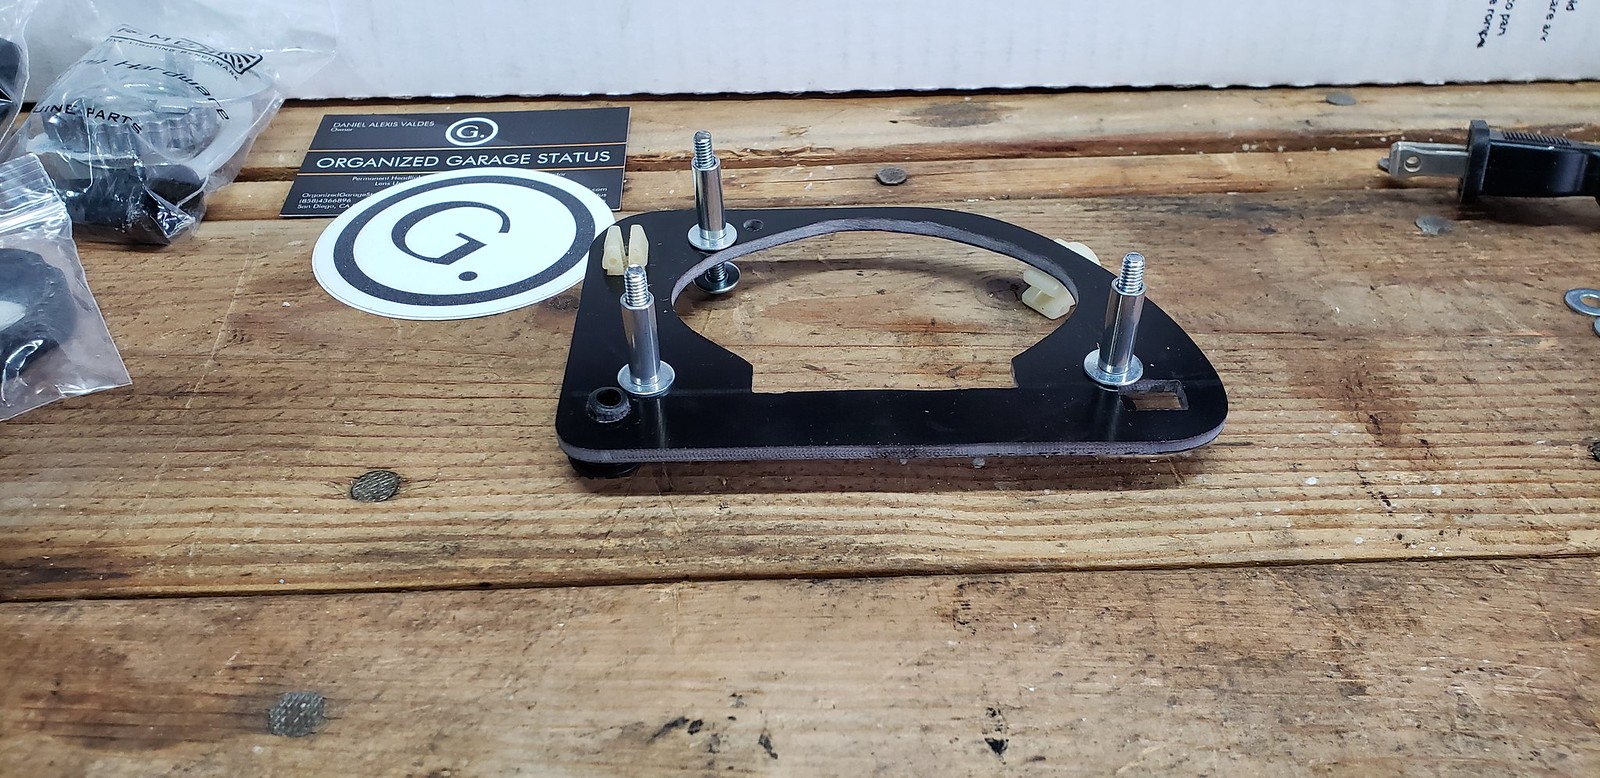
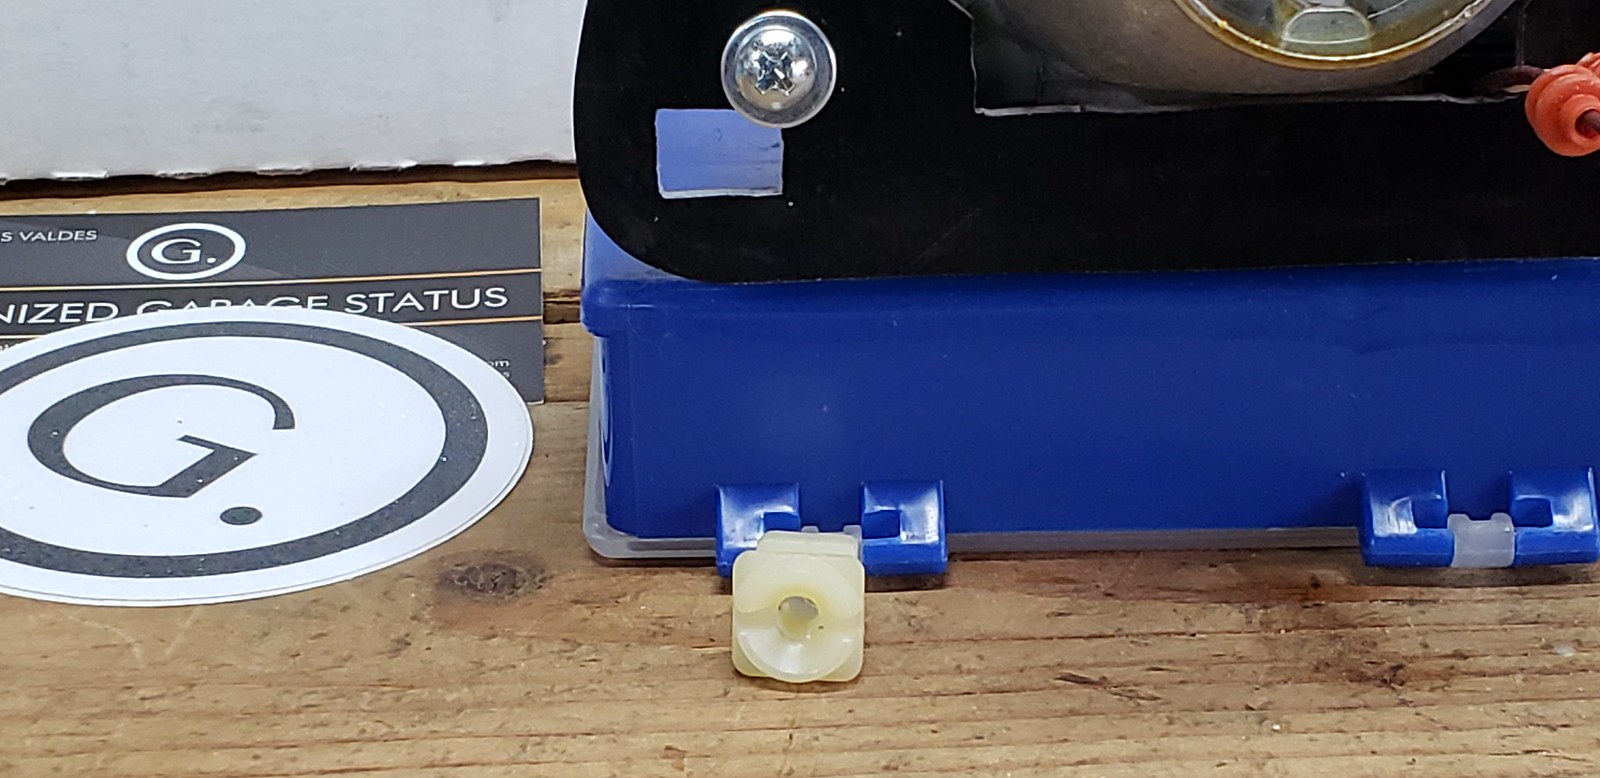
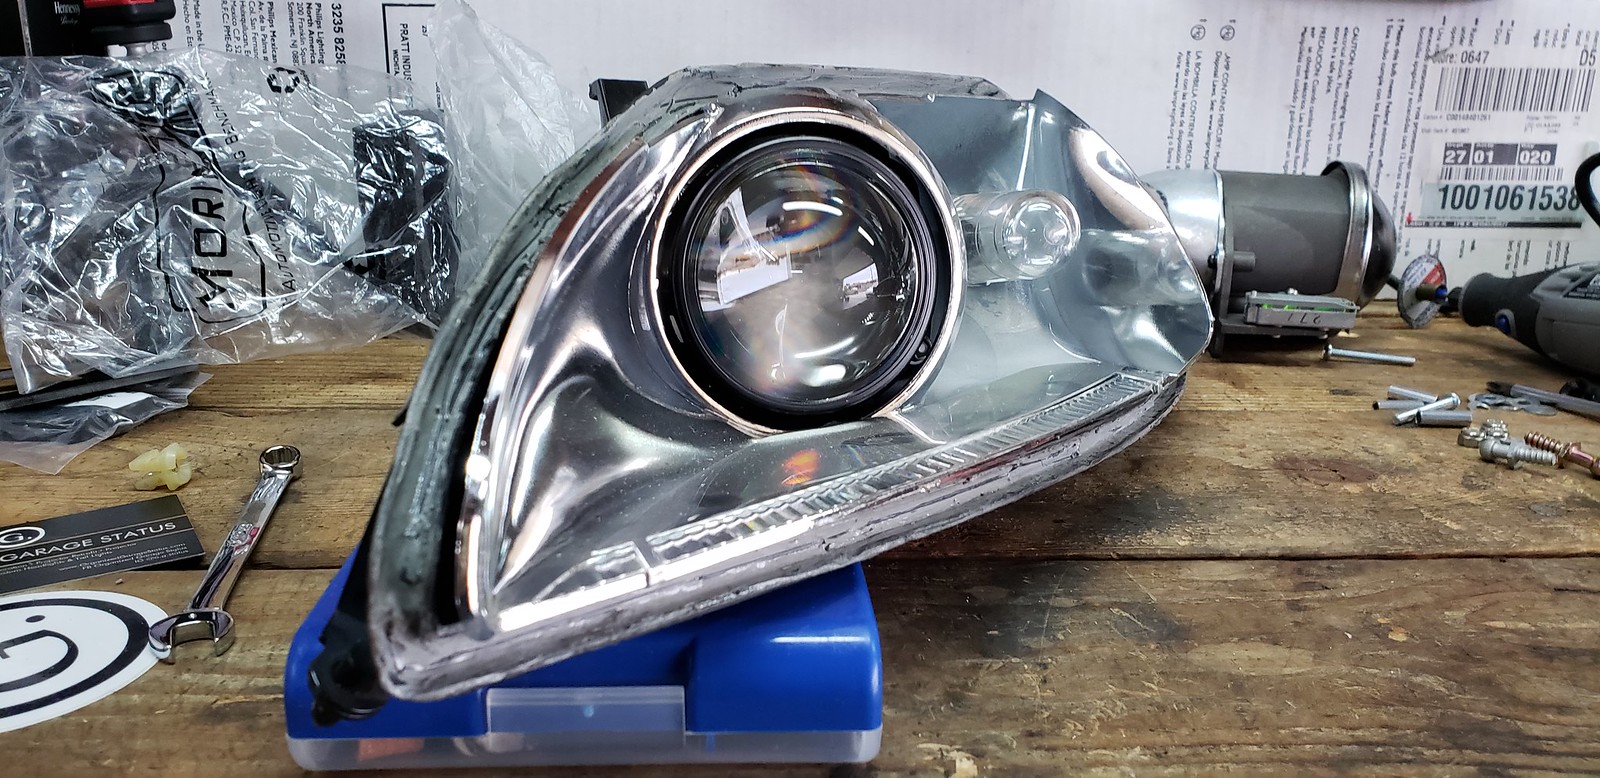
I've been bugging Daniel/ OG Status for these headlight retrofit kits for a couple months now. He was nice enough to hand deliver the first production set to me on Thursday night.
Kit includes:
- 2 Projectors
- 2 D2S Endcaps for the projectors
- 2 Mounting Brackets
- 2 Replacement Pivot *****
- 2 Replacement Pivot ball clips
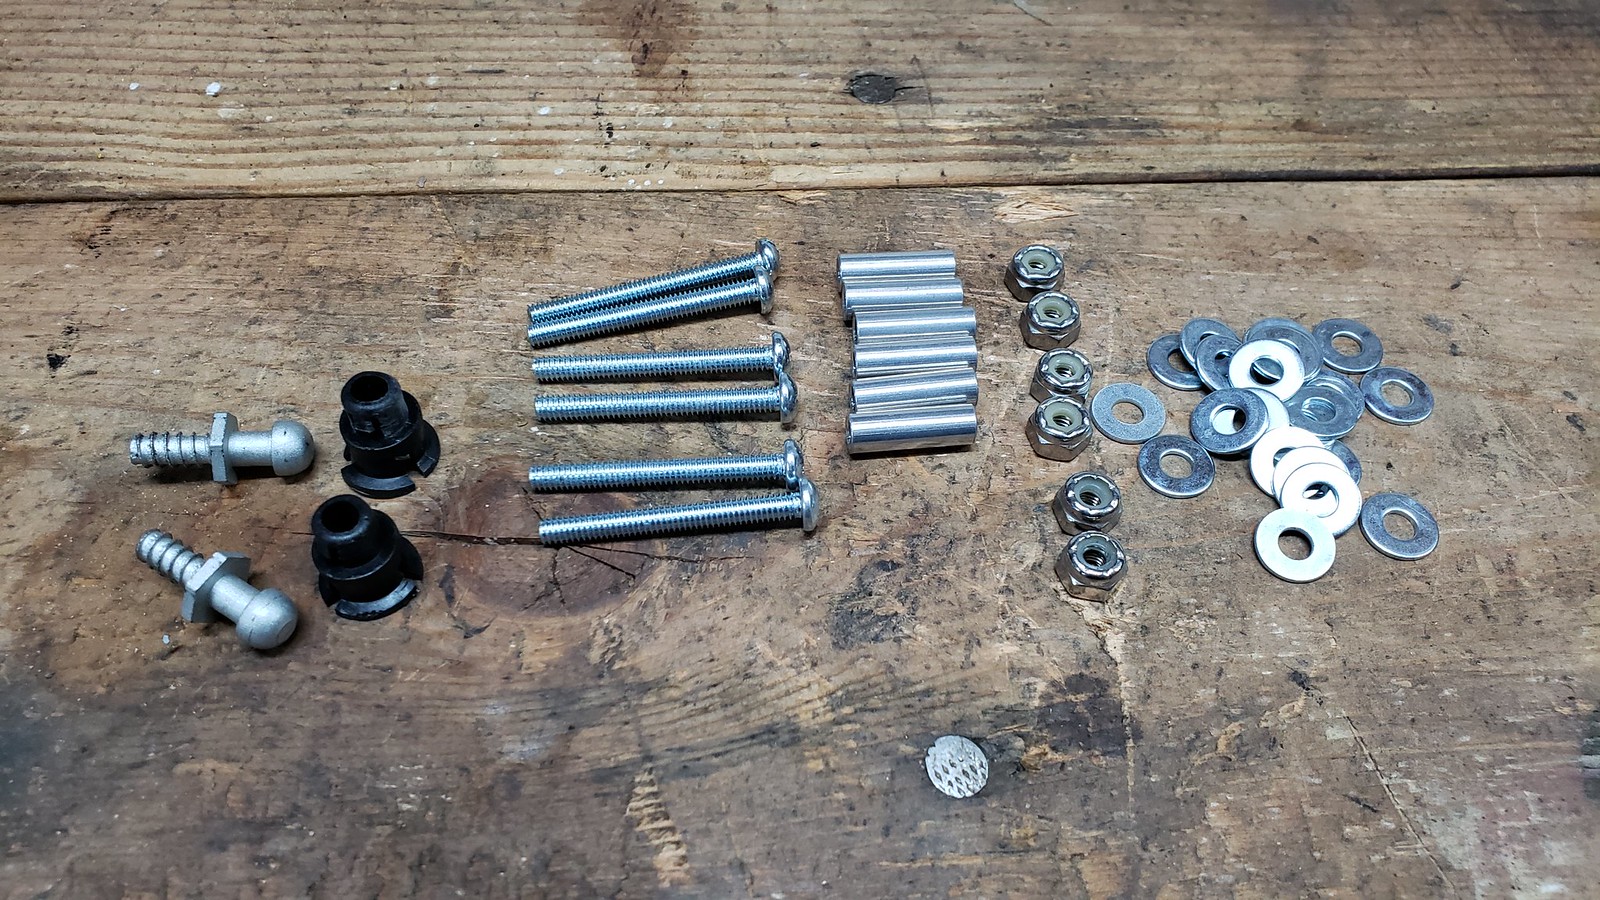
- 6 Bolts (3 per projector)
- 6 Aluminum spacers (3 per projector)
- 6 Nylon locking nuts (3 per projector)
- 24 washers (4 per bolt)
- 1 OG Sticker
- 1 OG Business card
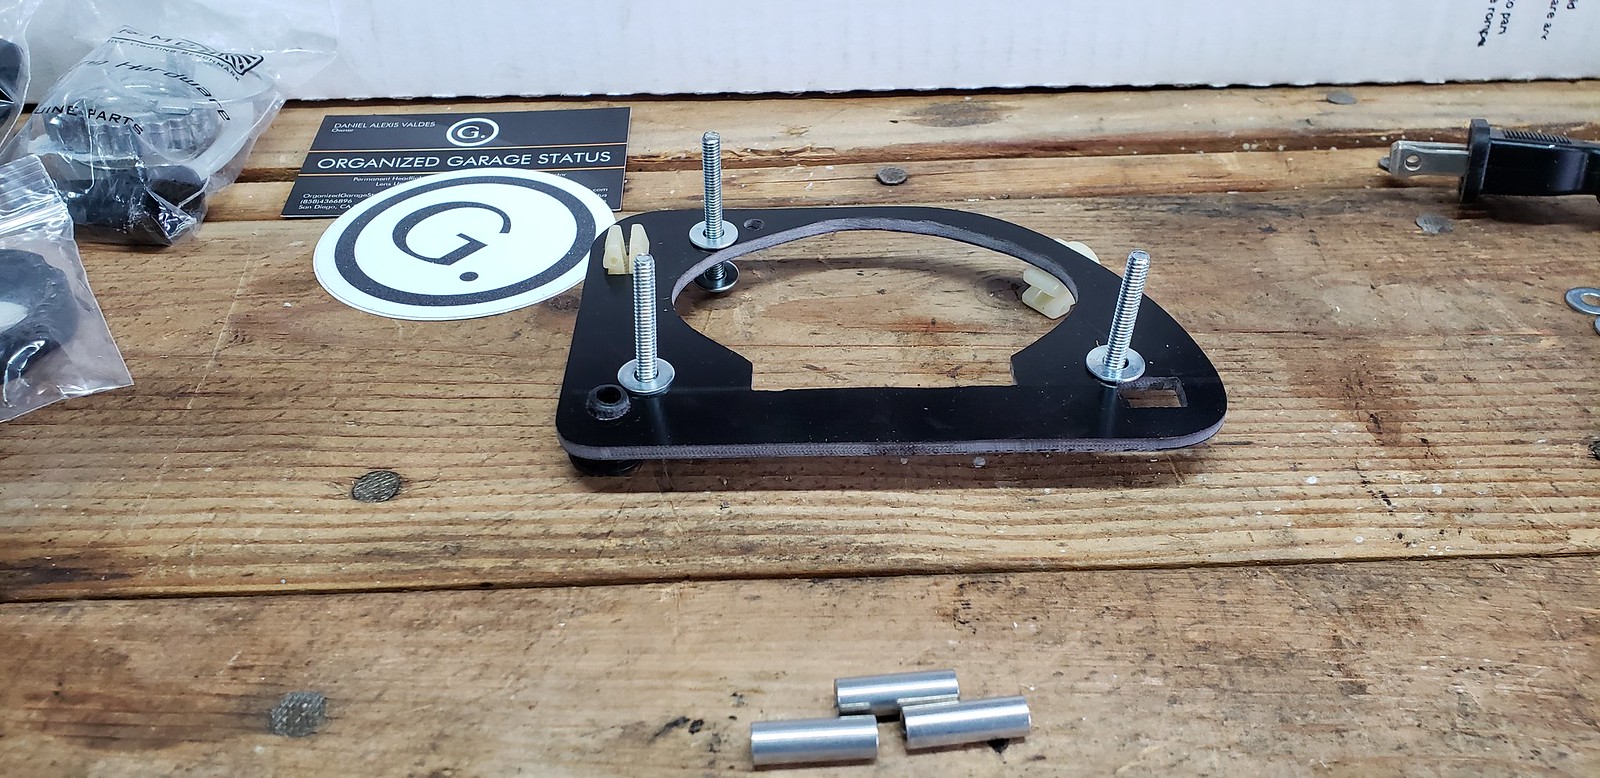
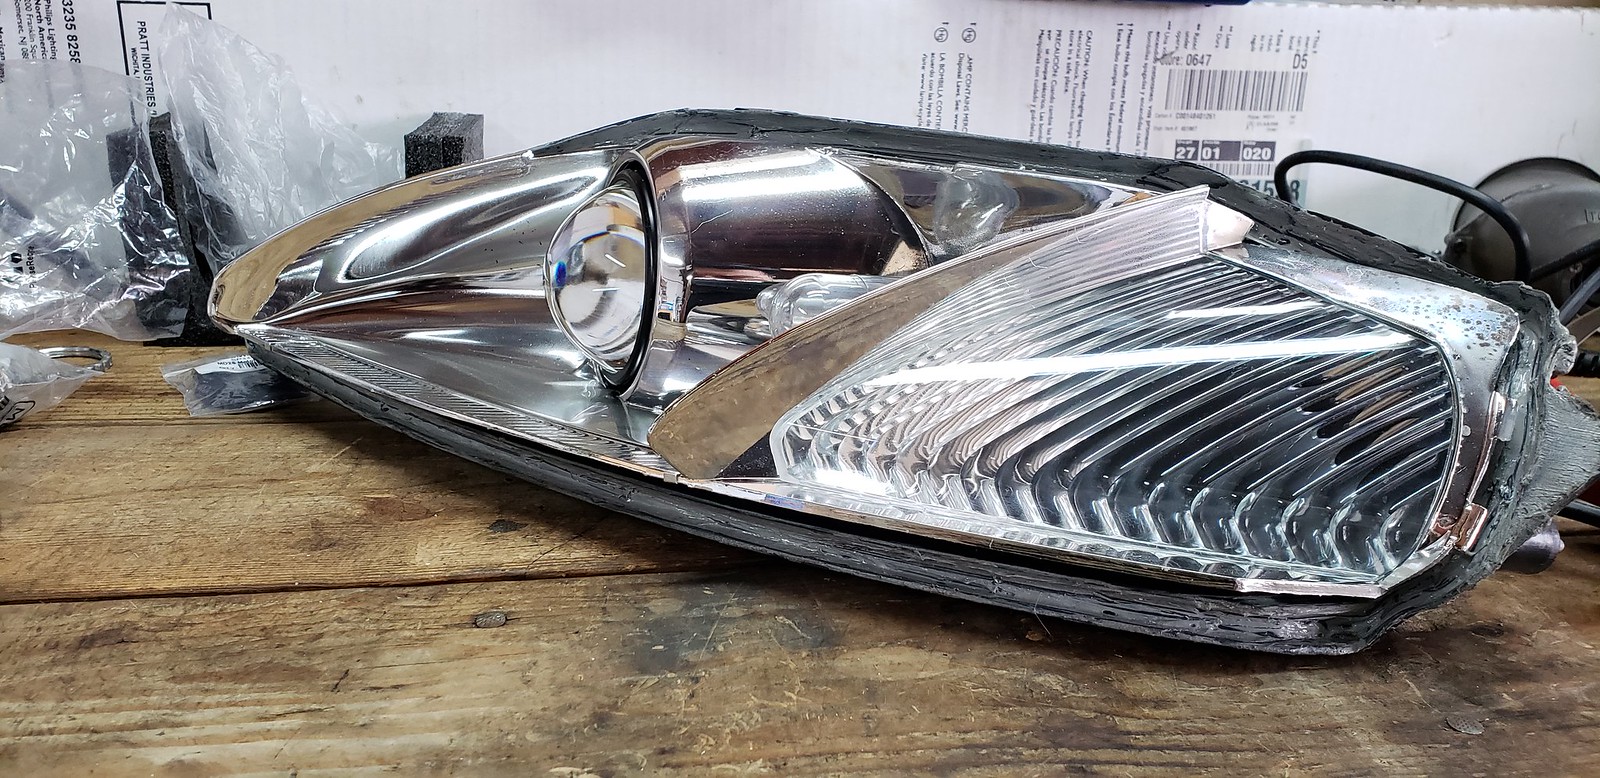
Step 1: Remove the plastic tabs from the stock projectors
Step 2: Transfer 1 of the tabs into the upper position of the mounting bracket, and insert 1 bolt (with washer) into the brackets to figure out which holes will line up with the projectors. I installed the bolts with the phillips end facing towards the rear of the car. I found this to be the easiest.
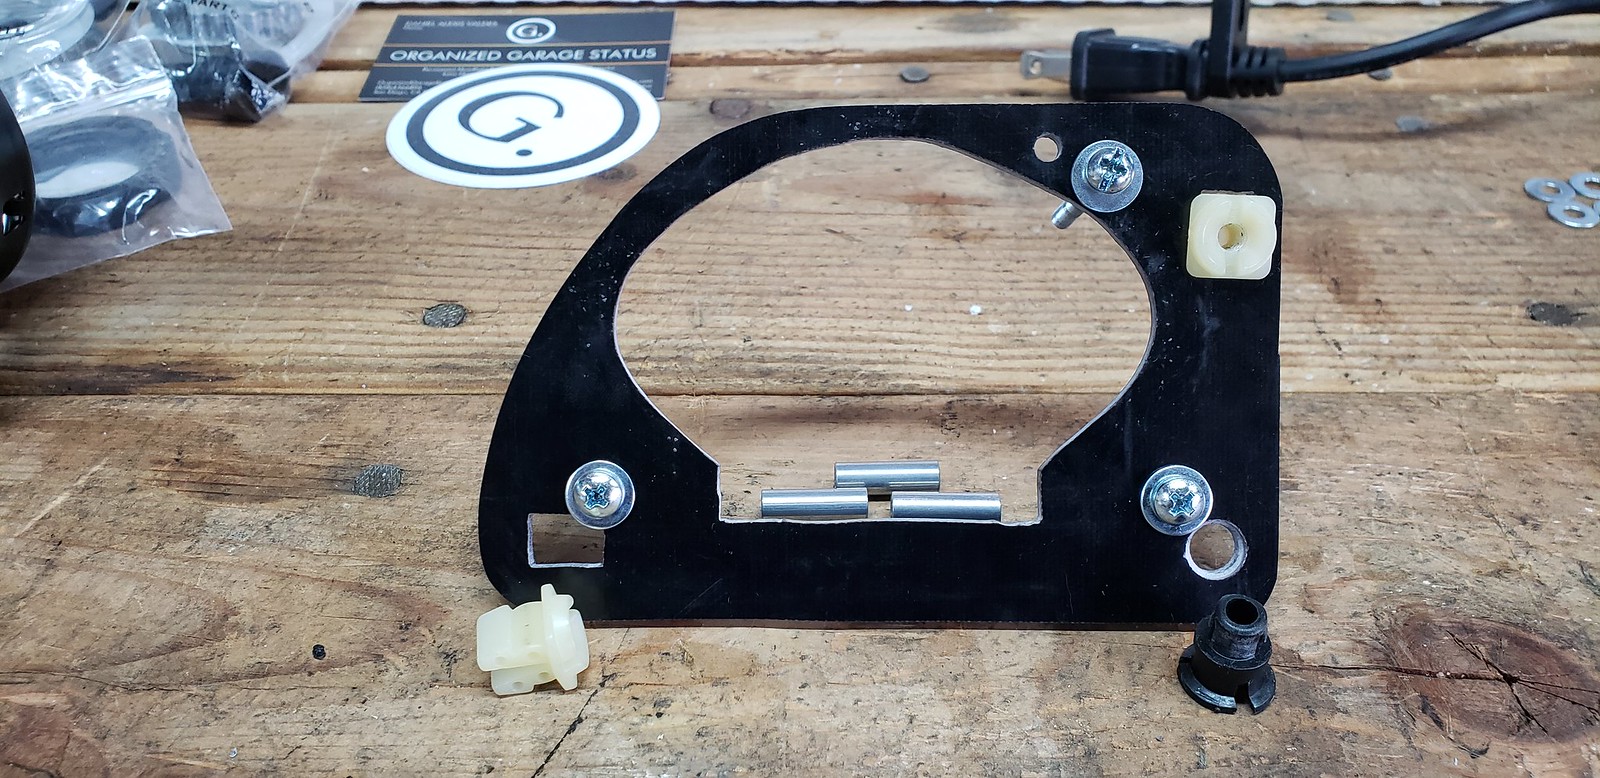
Step 3: Mark which holes line up and bring out the drill. I used a 4mm drill bit to widen the holes on the projectors. Some holes fit and some didn't. Every projector I had was different.
Step 4: Install the harness for the high beam actuator. I forgot to do this with both projectors and ended up needing to take the whole thing a part to clip it in.
Harness won't fit with the bracket installed:

Harness installed:
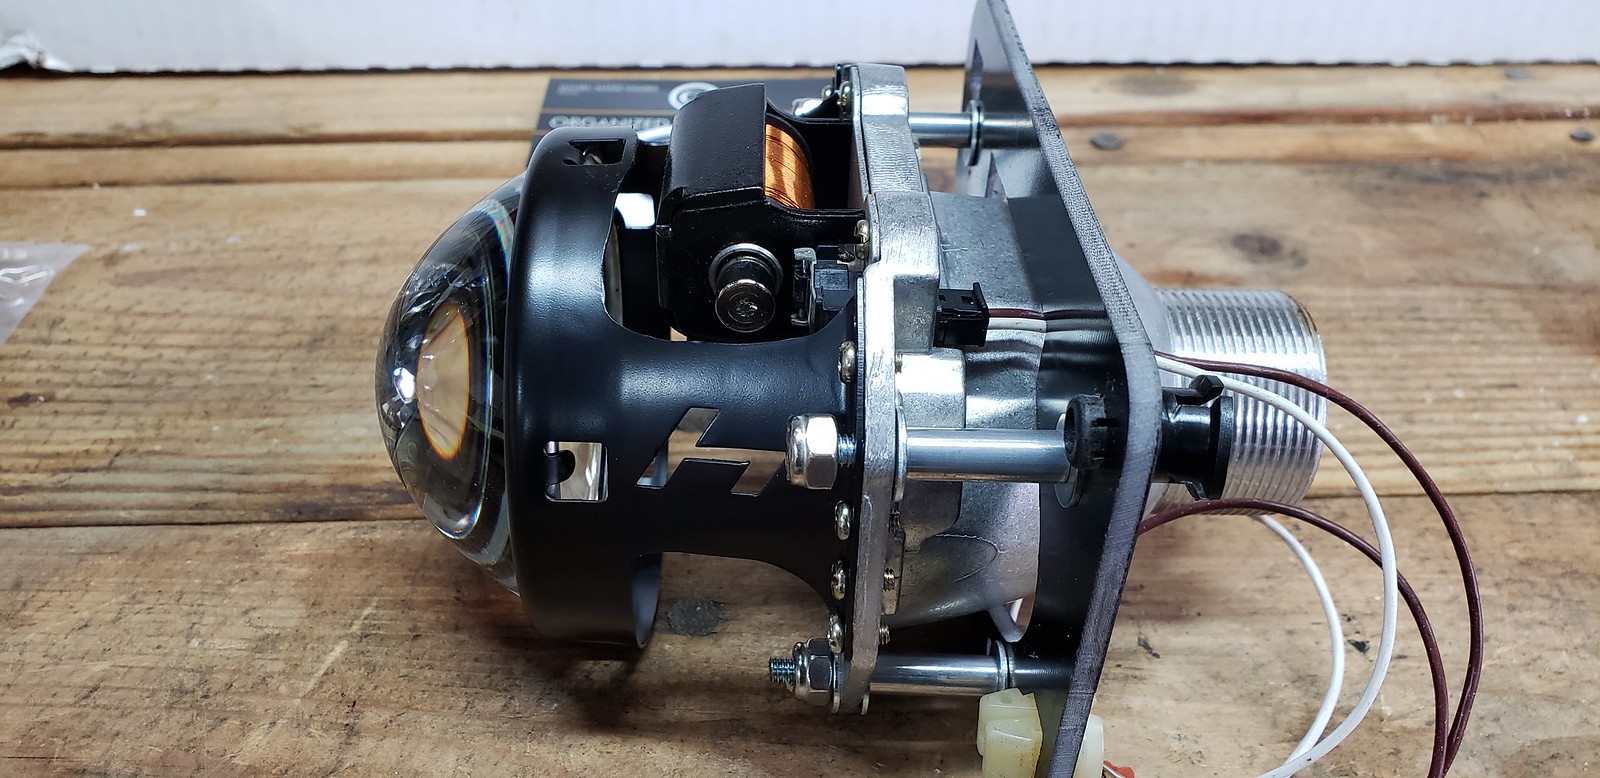
Step 5: Install the clip for the ball pivot
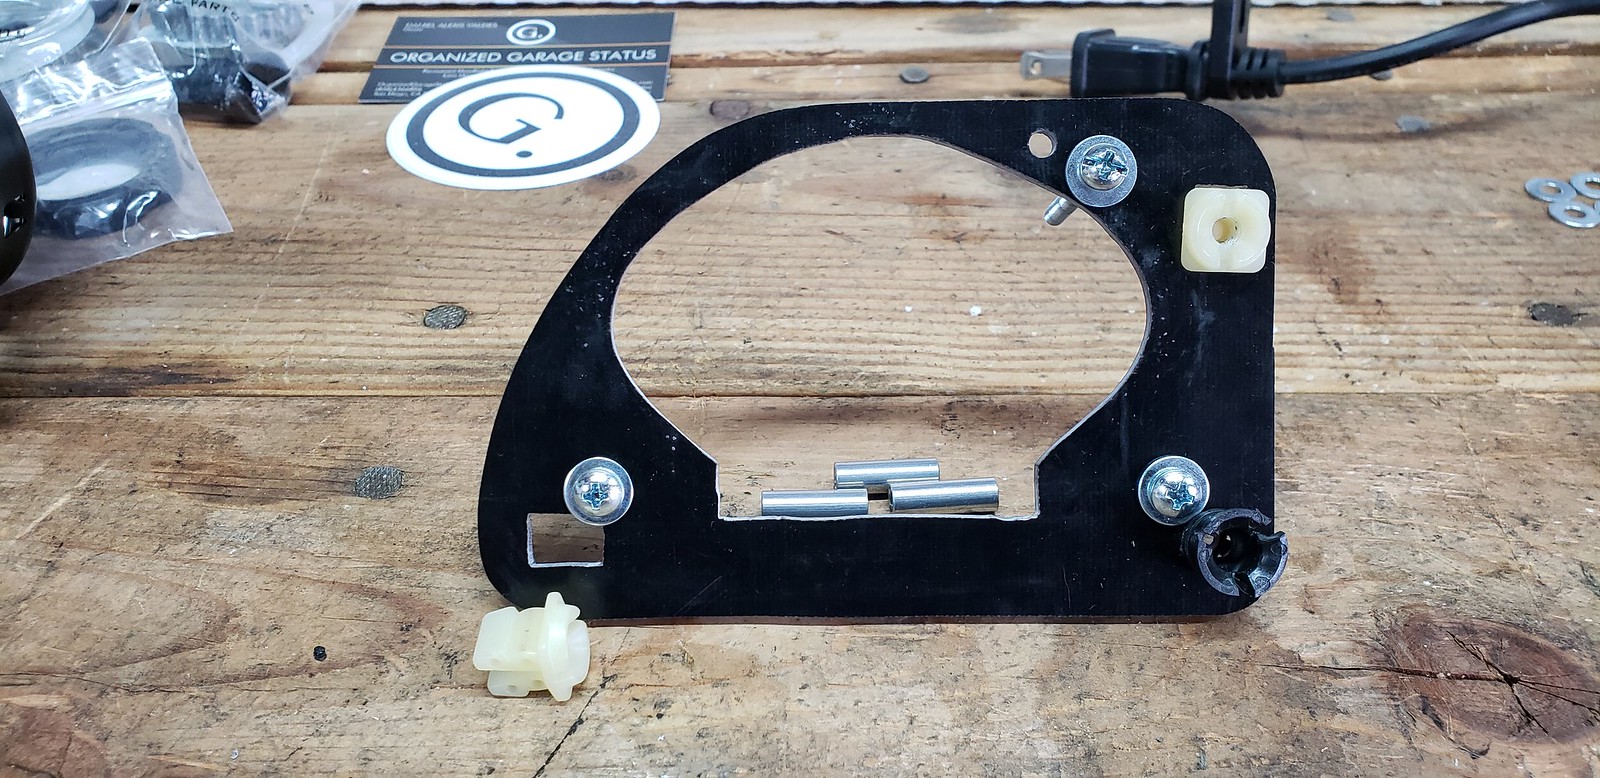
Step 6: Put the bracket backside (Part that faces the rear of the car) down and install another washer
Step 7: Install the aluminum spacer
Step 8: Install another washer
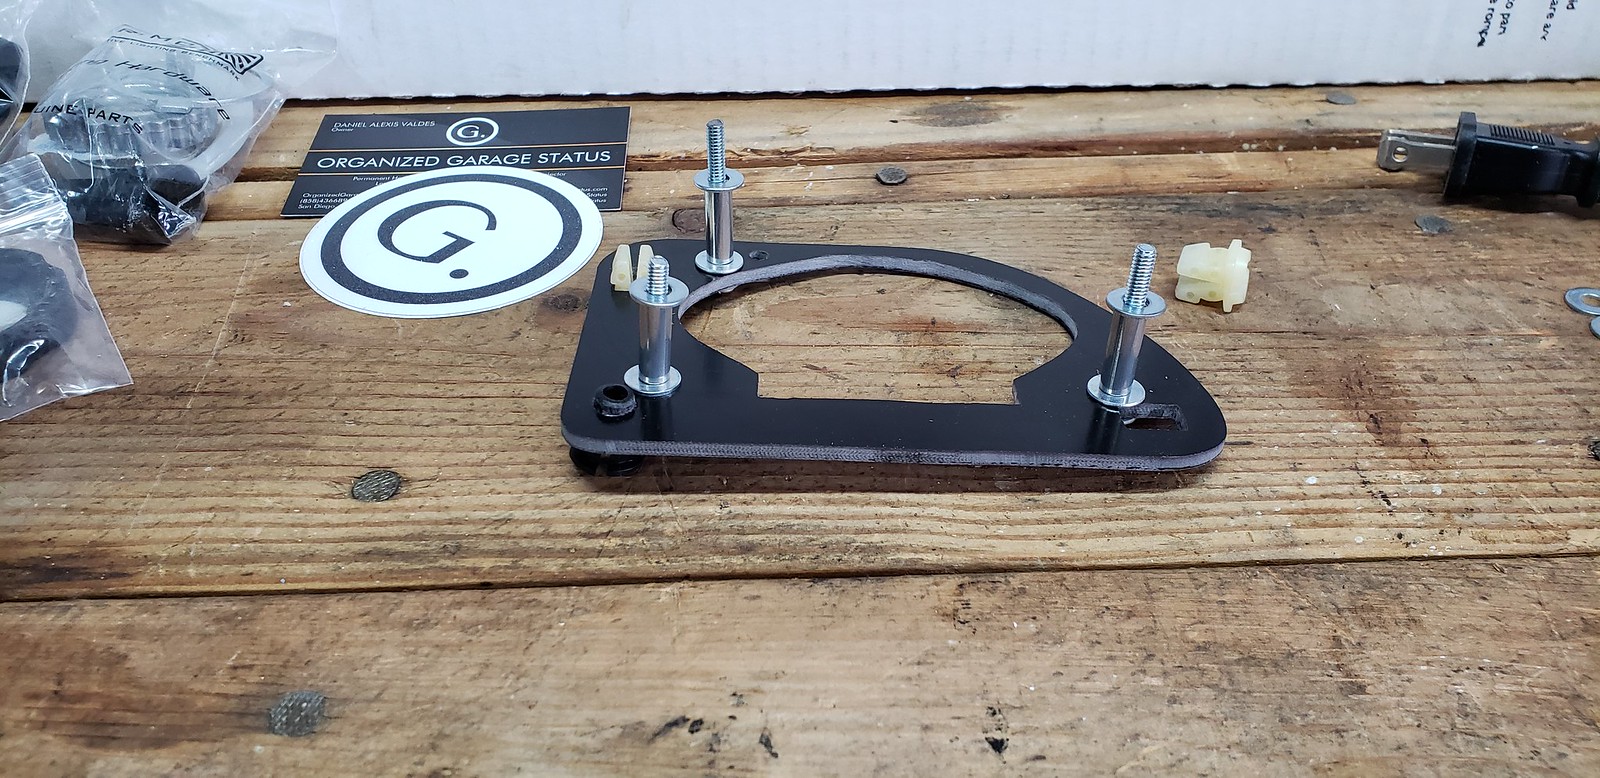
Step 9: Line up bolts with Projector and route the harness through the bracket (I forgot to do it in this pic)
Step 10: Install 1 more washer and the nylon nut on the projector side. I used a #2 Phillips screw driver + a 9mm wrench to hold the nut to tighten it down. I'm pretty sure it is SAE hardware, but I don't have wrenches that small.
Step 11: The last tab that wasn't installed yet needs to be dremeled down to clear the washers.
Before:
After:
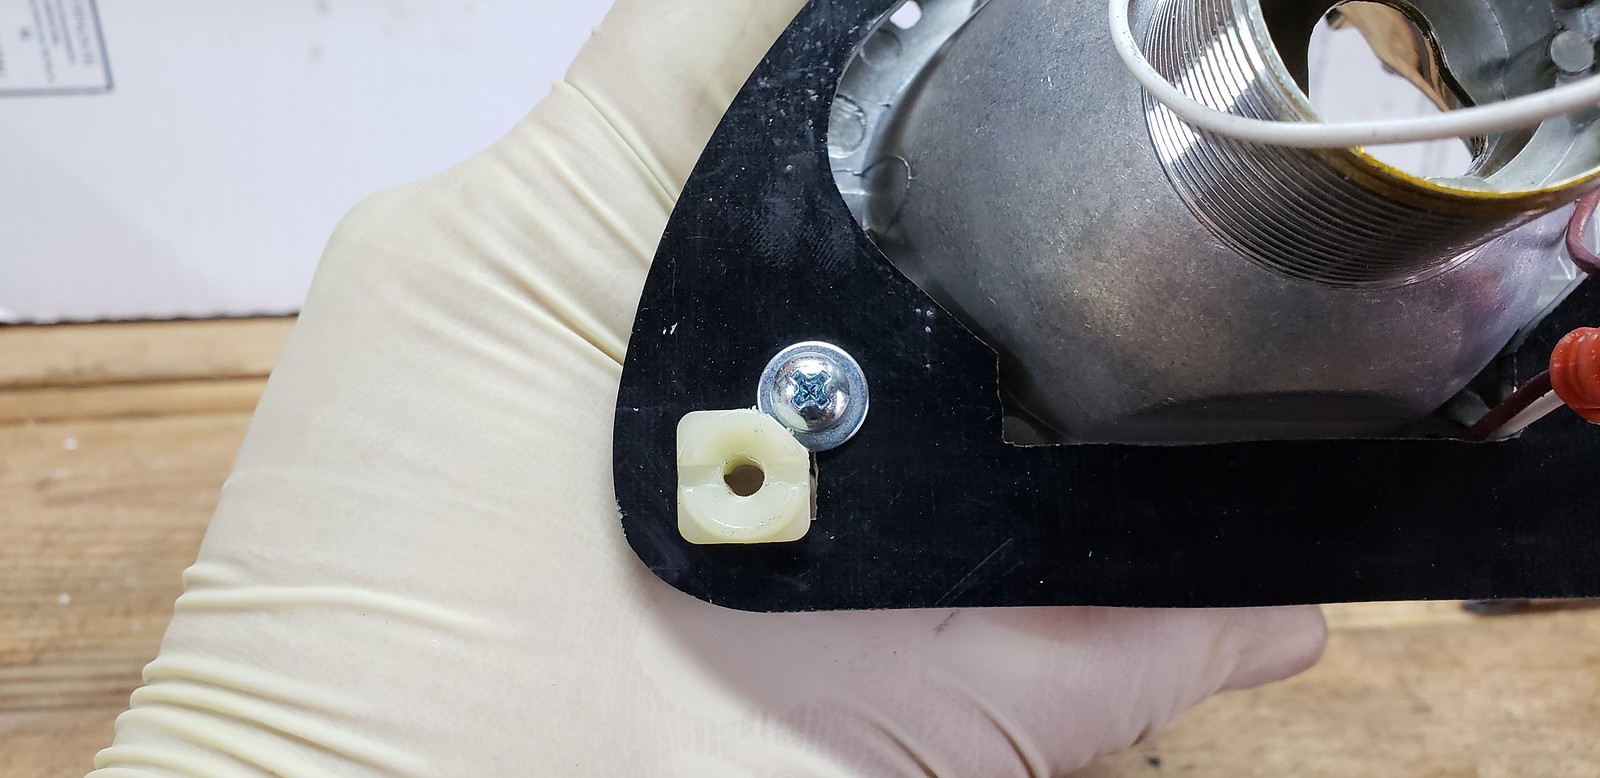
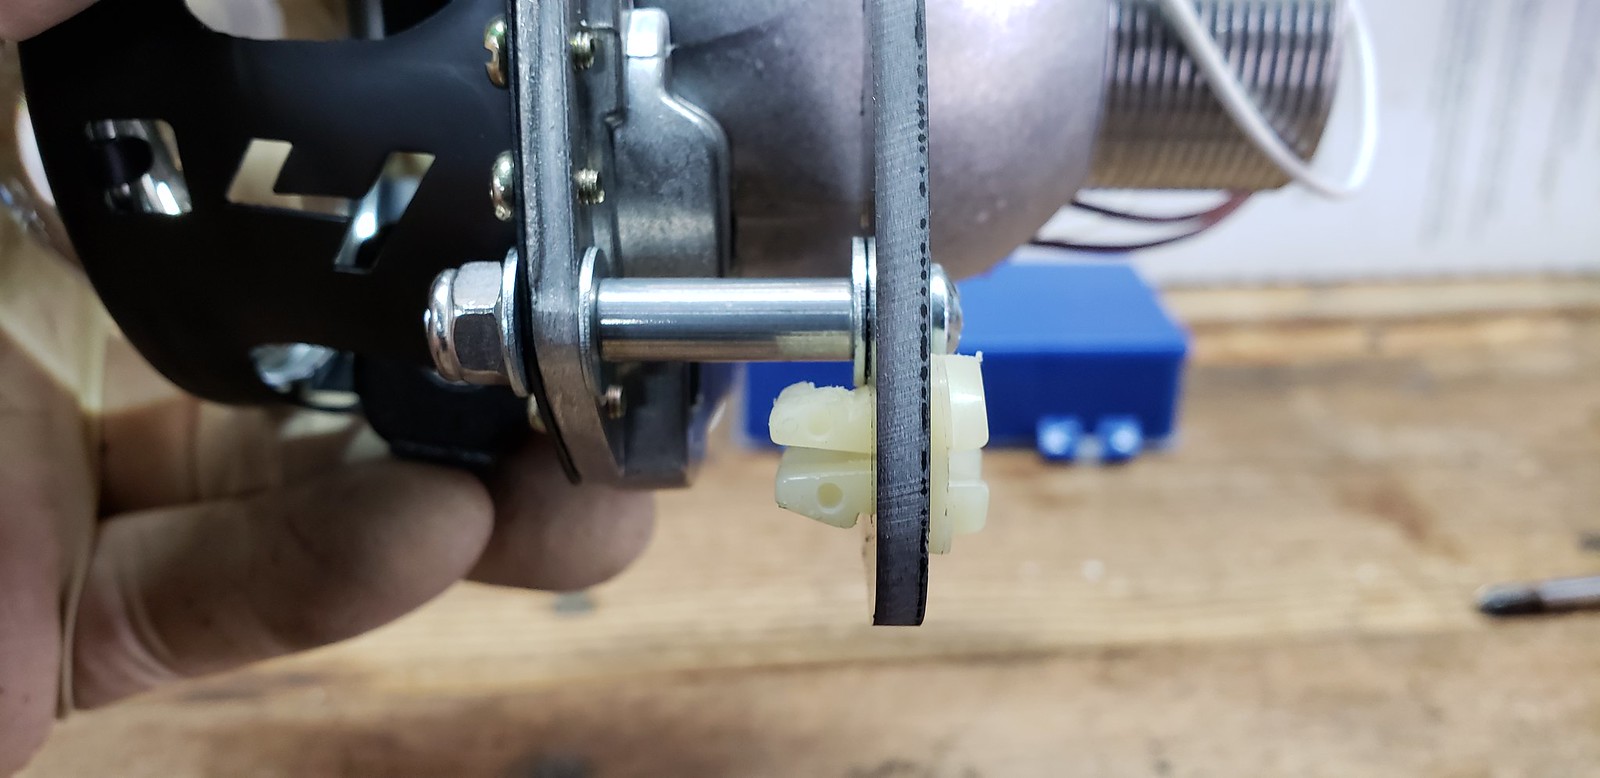
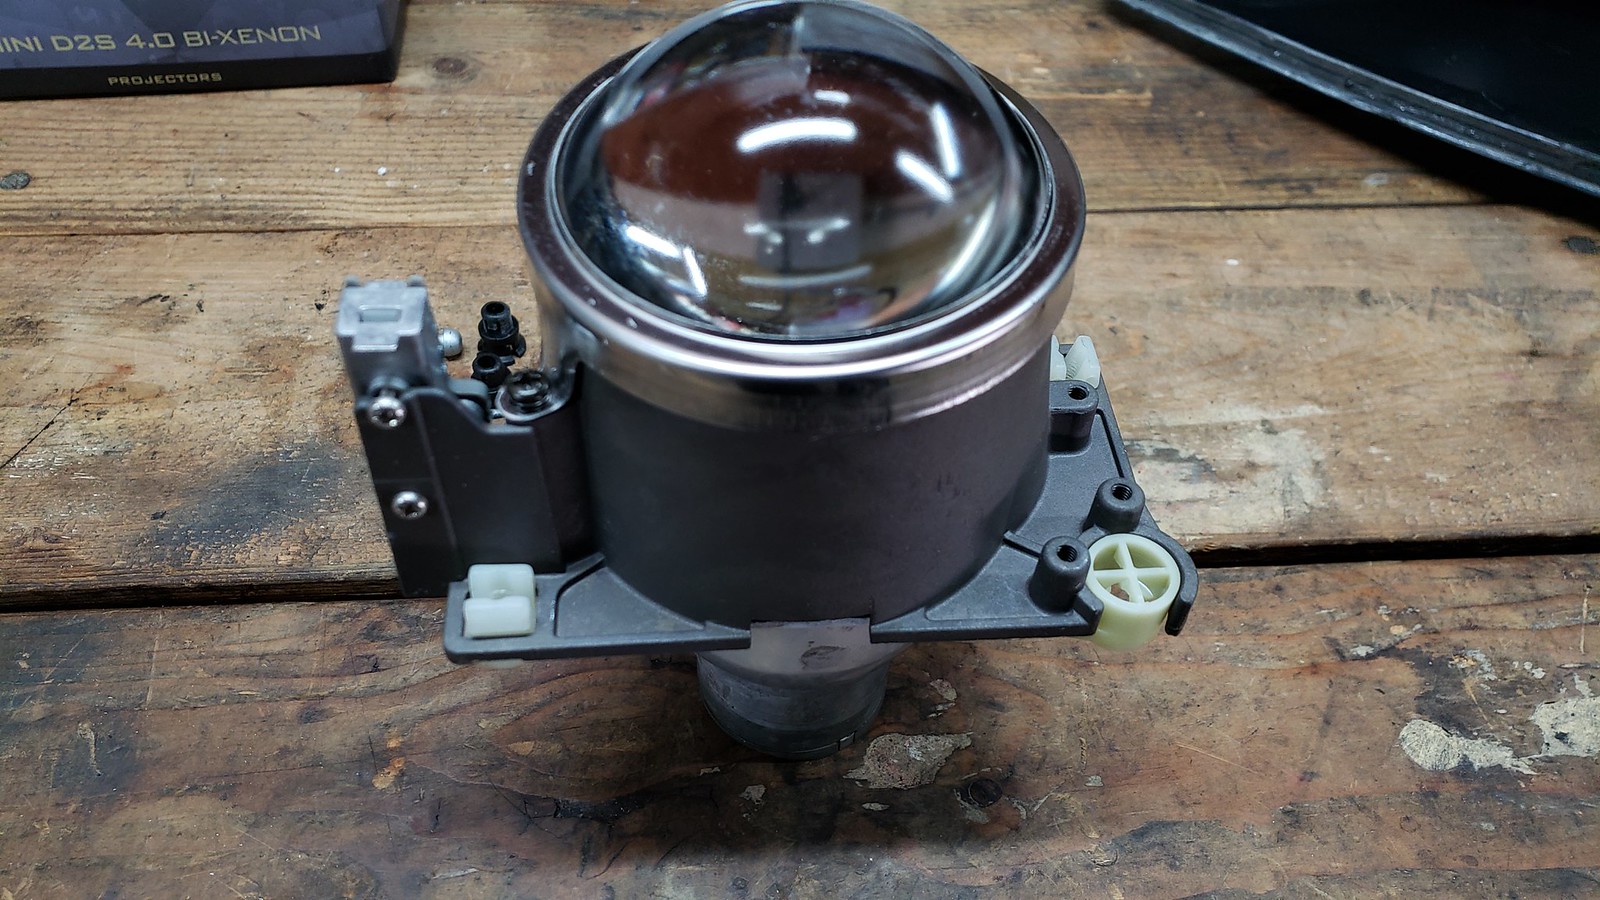
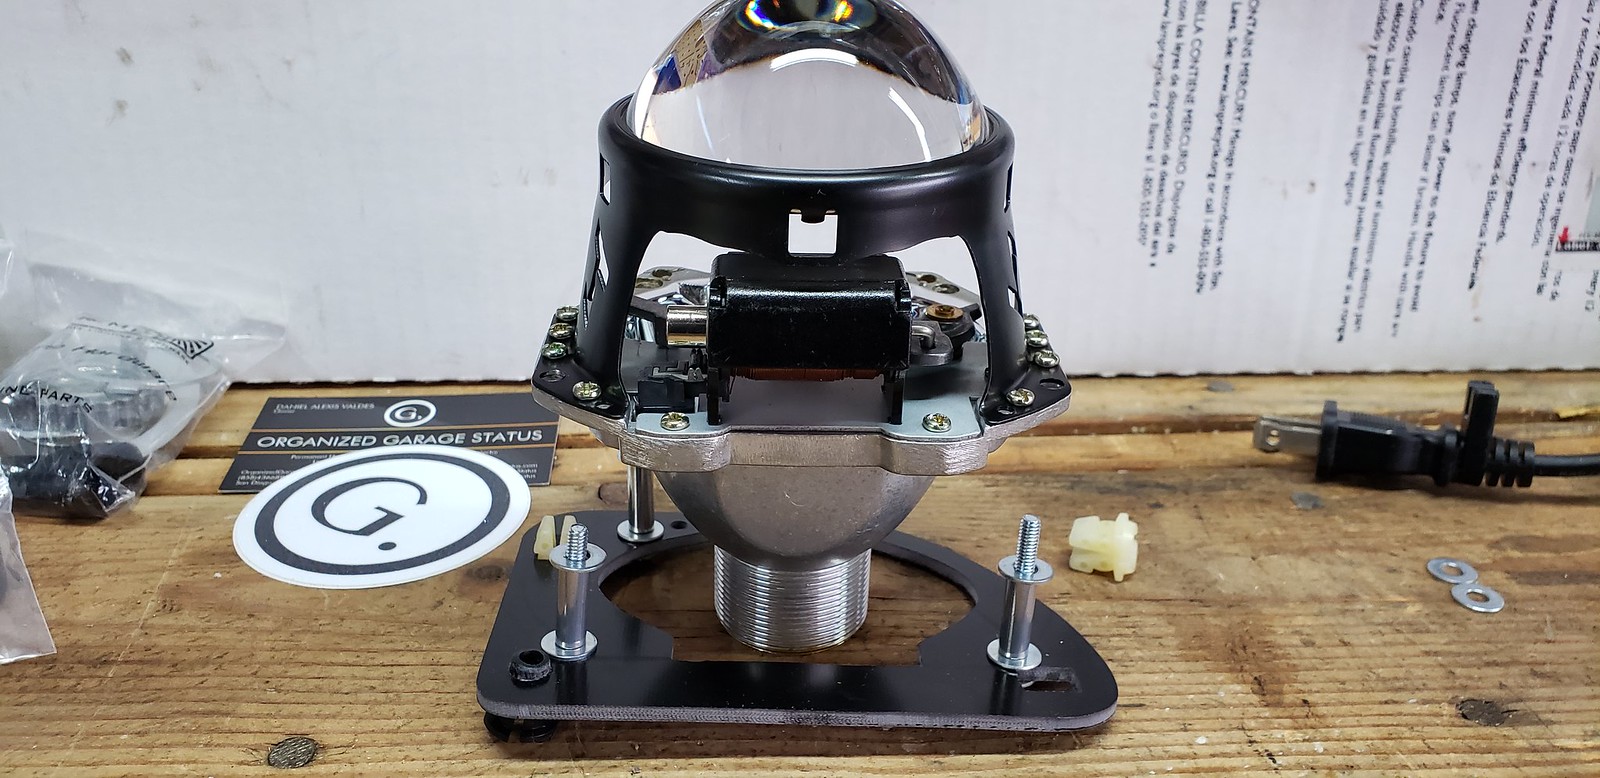
Step 12: Swap the pivot ball. I used a 10mm ratcheting wrench to remove the old pivot and install the new one. The new pivot is essential to keeping the projectors spaced perfectly.

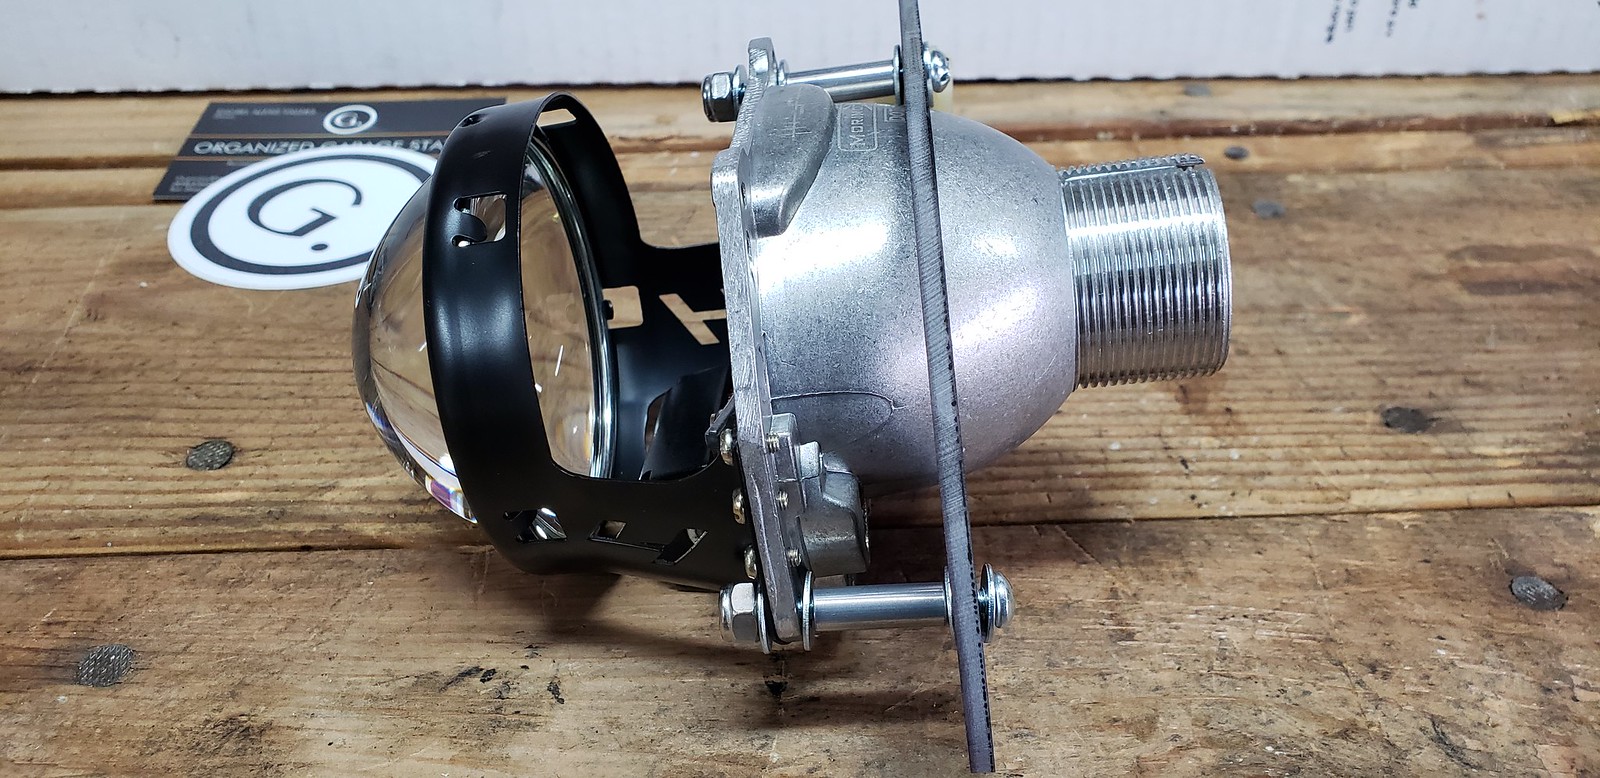
Step 13: Install the brackets back into the housing. The adjusters are use a 8mm wrench and are reversed. To pull the projectors back on you turn to the left. Remember to adjust each one a little bit at a time and alternate to keep it from binding. Once the projectors are close enough, the pivot ball will clip on.
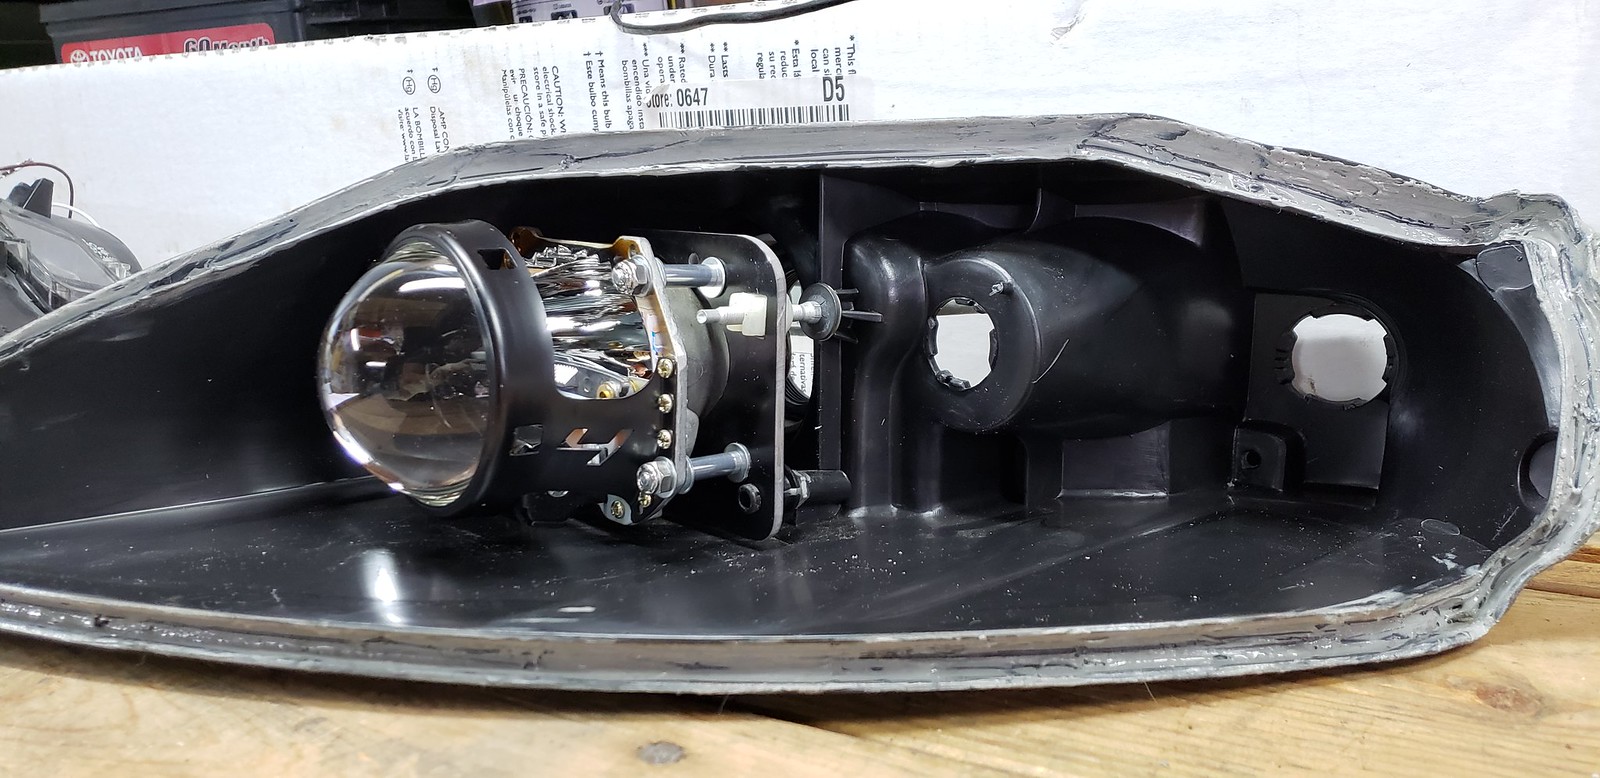

This projector is the perfect choice for our headlights because the fit is perfect compared to the TSX Projectors I have now.
Conclusion:
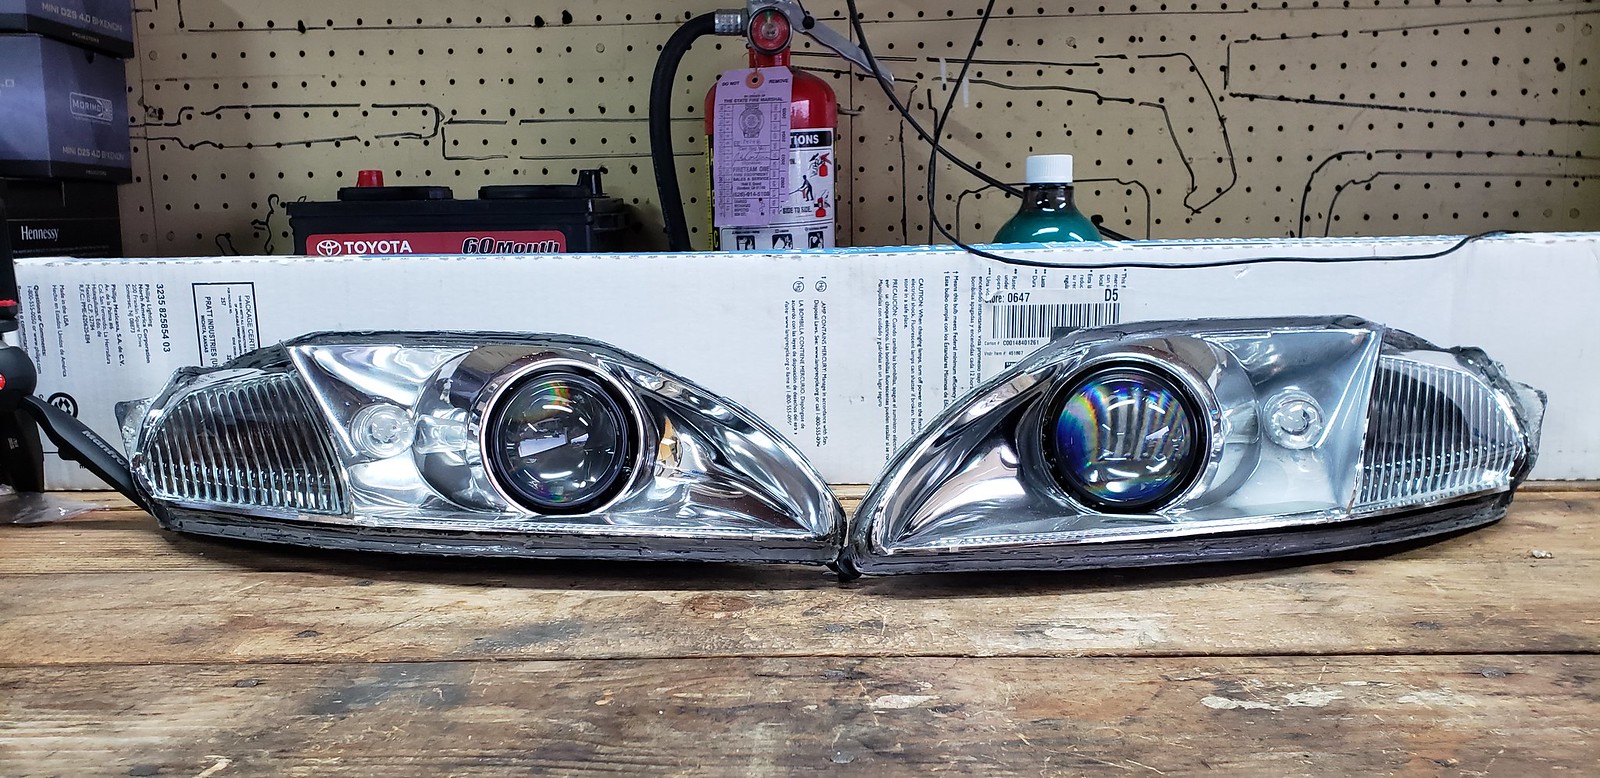
I'm super happy Daniel decided to produce this kit for people that like to DIY. The fitment is almost perfect and the projectors alignment only needs minor adjustment using the factory adjusters. This kit is much cheaper than the TSX retrofit I did when I first got the car, and it's also complete. I didn't need to source any parts and guess on spacing. Besides the minor shaving and widening holes on the projectors, it is almost an idiot proof package.
I still need to order a HID kit to power these and there is still lots of cleaning that needs to be done before these lights are ready to be sealed and installed on the car.
Kit includes:
- 2 Projectors
- 2 D2S Endcaps for the projectors
- 2 Mounting Brackets
- 2 Replacement Pivot *****
- 2 Replacement Pivot ball clips
- 6 Bolts (3 per projector)
- 6 Aluminum spacers (3 per projector)
- 6 Nylon locking nuts (3 per projector)
- 24 washers (4 per bolt)
- 1 OG Sticker
- 1 OG Business card
Step 1: Remove the plastic tabs from the stock projectors
Step 2: Transfer 1 of the tabs into the upper position of the mounting bracket, and insert 1 bolt (with washer) into the brackets to figure out which holes will line up with the projectors. I installed the bolts with the phillips end facing towards the rear of the car. I found this to be the easiest.
Step 3: Mark which holes line up and bring out the drill. I used a 4mm drill bit to widen the holes on the projectors. Some holes fit and some didn't. Every projector I had was different.
Step 4: Install the harness for the high beam actuator. I forgot to do this with both projectors and ended up needing to take the whole thing a part to clip it in.
Harness won't fit with the bracket installed:
Harness installed:
Step 5: Install the clip for the ball pivot
Step 6: Put the bracket backside (Part that faces the rear of the car) down and install another washer
Step 7: Install the aluminum spacer
Step 8: Install another washer
Step 9: Line up bolts with Projector and route the harness through the bracket (I forgot to do it in this pic)
Step 10: Install 1 more washer and the nylon nut on the projector side. I used a #2 Phillips screw driver + a 9mm wrench to hold the nut to tighten it down. I'm pretty sure it is SAE hardware, but I don't have wrenches that small.
Step 11: The last tab that wasn't installed yet needs to be dremeled down to clear the washers.
Before:
After:
Step 12: Swap the pivot ball. I used a 10mm ratcheting wrench to remove the old pivot and install the new one. The new pivot is essential to keeping the projectors spaced perfectly.
Step 13: Install the brackets back into the housing. The adjusters are use a 8mm wrench and are reversed. To pull the projectors back on you turn to the left. Remember to adjust each one a little bit at a time and alternate to keep it from binding. Once the projectors are close enough, the pivot ball will clip on.
This projector is the perfect choice for our headlights because the fit is perfect compared to the TSX Projectors I have now.
Conclusion:
I'm super happy Daniel decided to produce this kit for people that like to DIY. The fitment is almost perfect and the projectors alignment only needs minor adjustment using the factory adjusters. This kit is much cheaper than the TSX retrofit I did when I first got the car, and it's also complete. I didn't need to source any parts and guess on spacing. Besides the minor shaving and widening holes on the projectors, it is almost an idiot proof package.
I still need to order a HID kit to power these and there is still lots of cleaning that needs to be done before these lights are ready to be sealed and installed on the car.
The following users liked this post:
Billy305 (02-12-20)
12-15-18, 10:45 AM
#339
I located a pair of 19" HRE 540 rear wheels. I'm going to send these out to be refinished with the 19" HRE 540R (bbk fit) I got earlier this year. I've made up my mind on most of the details of the new wheel build. I just need to save up the money now.
While working on the retrofit in the above post, I popped my hood to discover my radiator cracked.
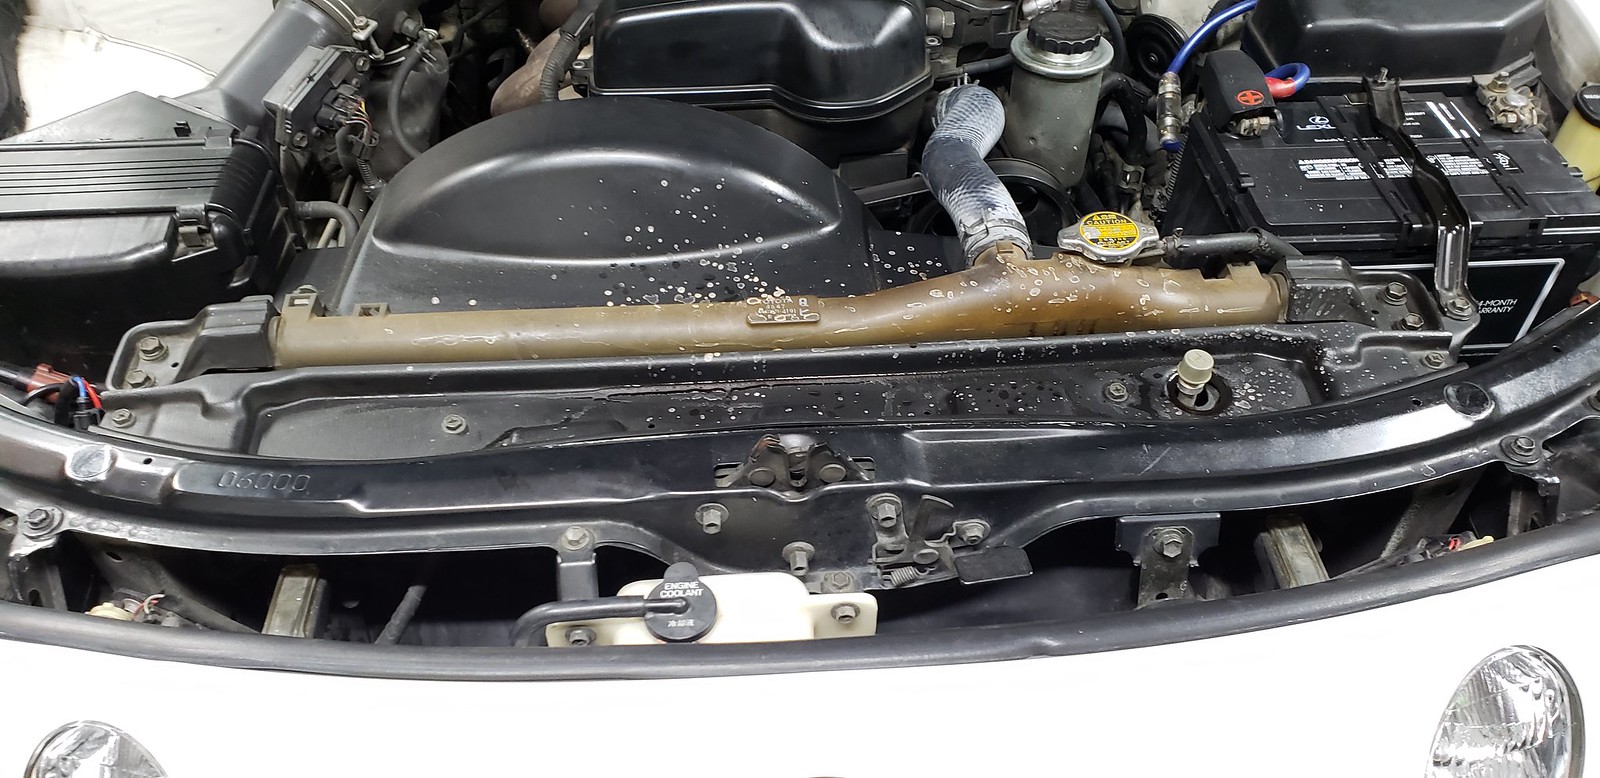
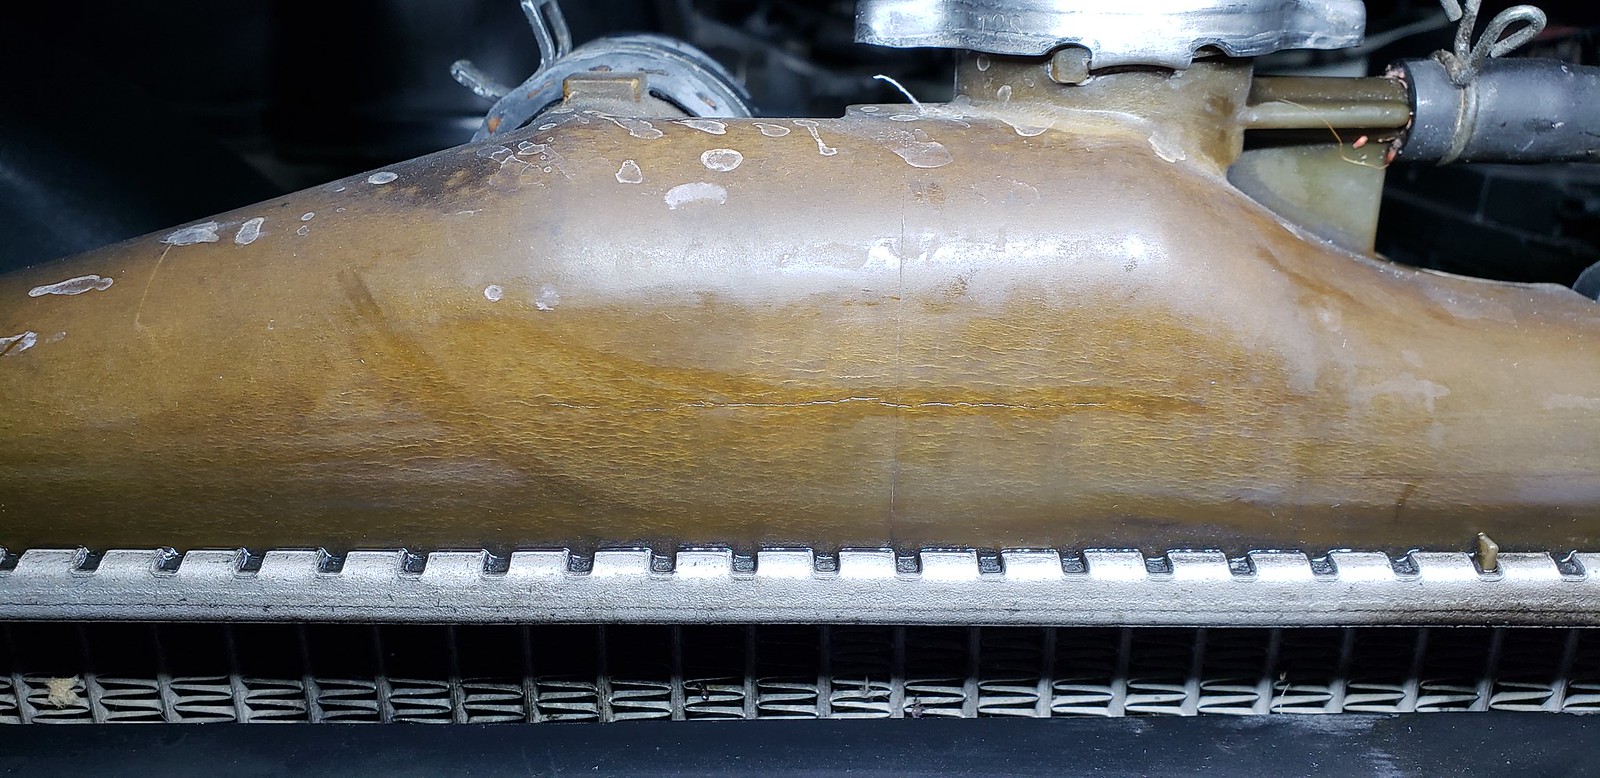
I've been waiting for it to crack since January 2008 with 125k miles. Everyone that saw my engine bay would always comment on it saying it would crack soon. It lasted a total of 20 years and10 months with 195,532 miles. lol
While working on the retrofit in the above post, I popped my hood to discover my radiator cracked.
I've been waiting for it to crack since January 2008 with 125k miles. Everyone that saw my engine bay would always comment on it saying it would crack soon. It lasted a total of 20 years and10 months with 195,532 miles. lol
12-15-18, 10:47 AM
#340
Thanks for the write up on the projectors! Those are going on the mod list for next year.
Oh man those 19" HREs are GOALS! So jealous I was looking for 19s for a minute, but never could find them in 5x114
Oh man those 19" HREs are GOALS! So jealous
I was looking for 19s for a minute, but never could find them in 5x114
12-19-18, 08:37 AM
#342
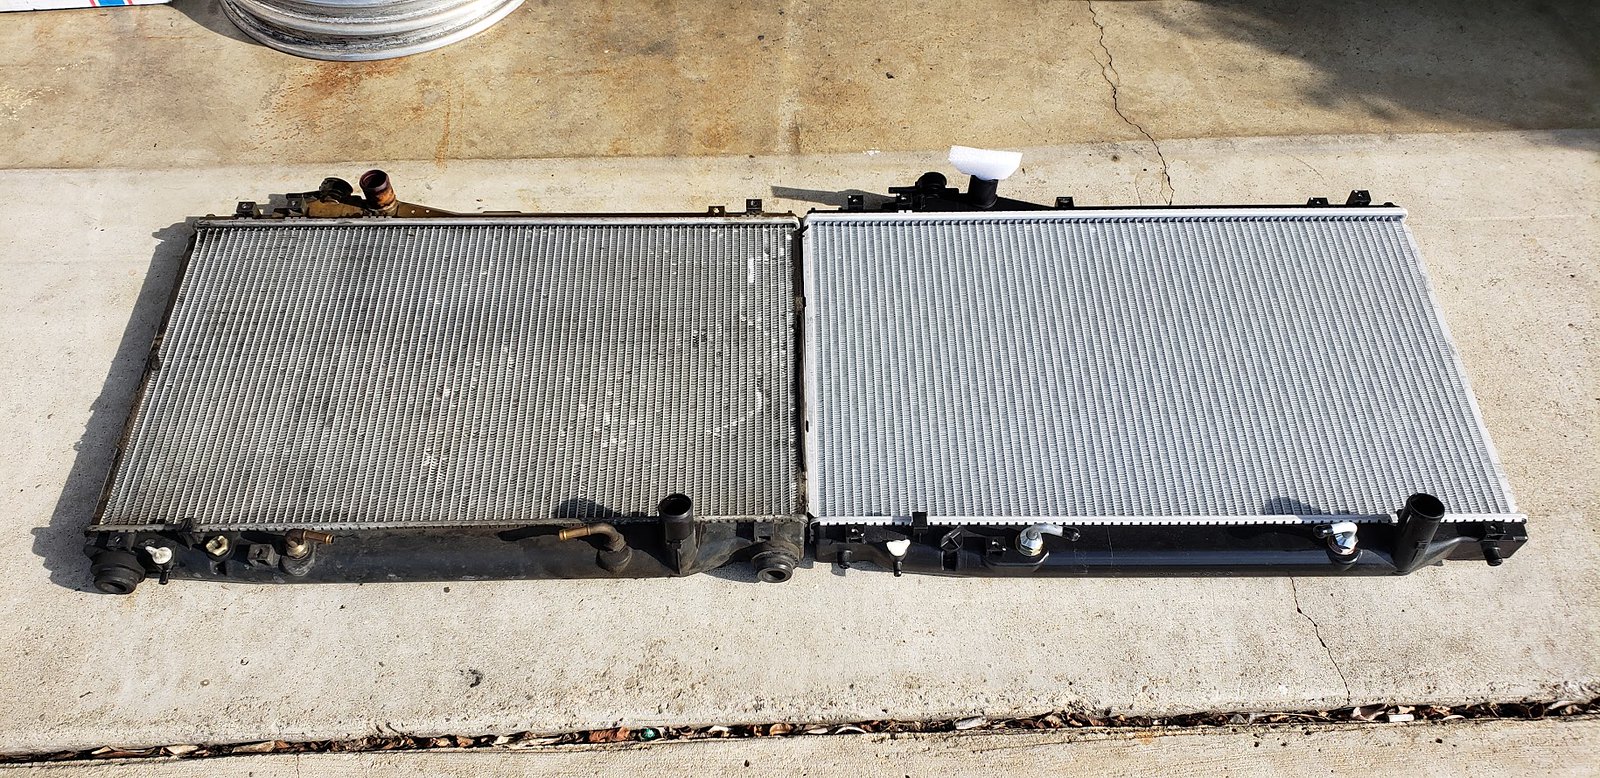
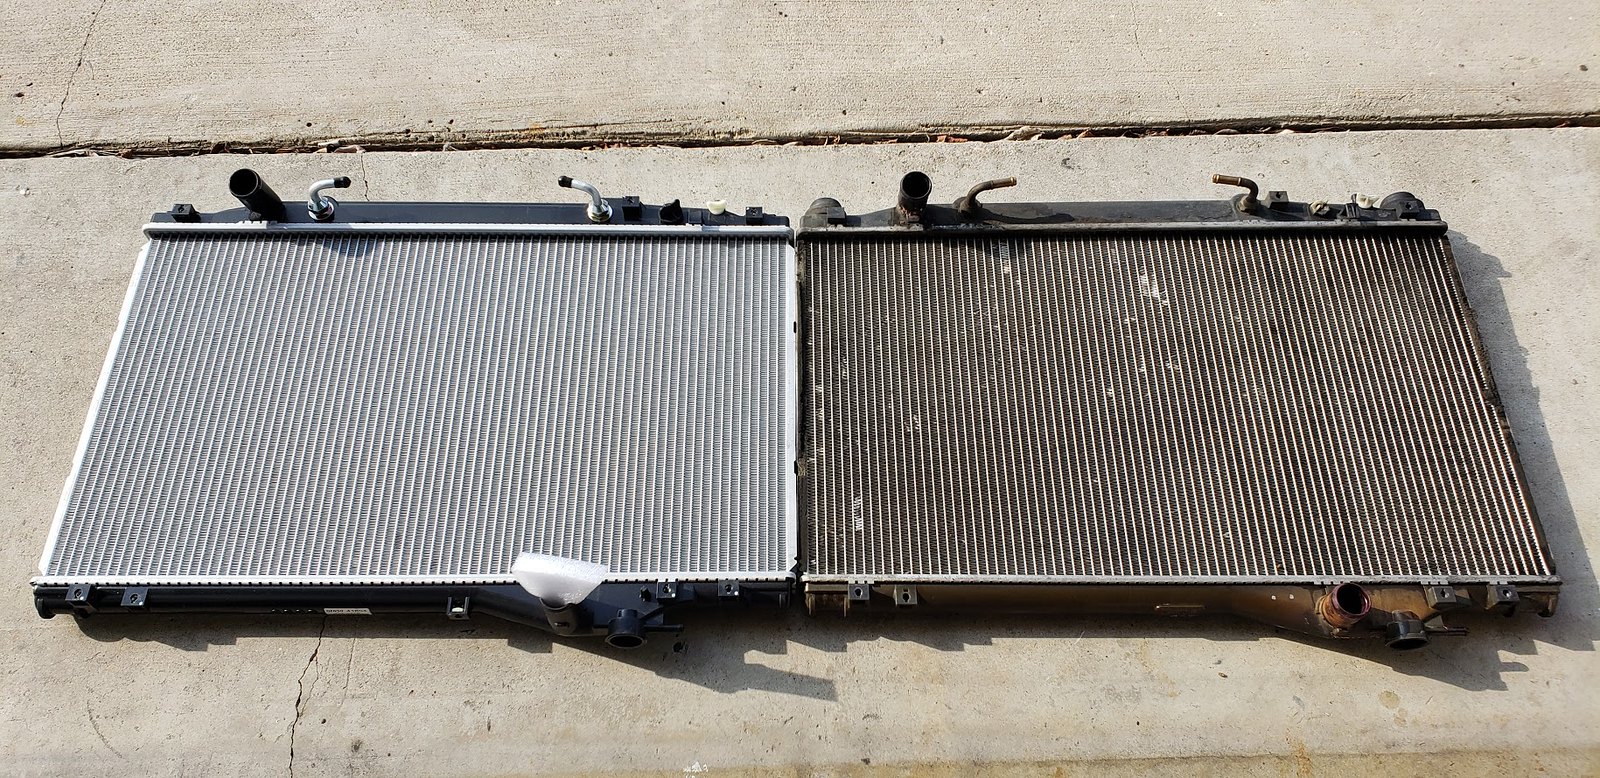
I ordered a Denso 221-3118 radiator for a 92-96 SC300. It says it doesn't fit the 97+ SC, but it seemed to work fine. Also, the radiator doesn't come with a new cap, so I have a new one on order from the dealer.
Comparison with my OEM.
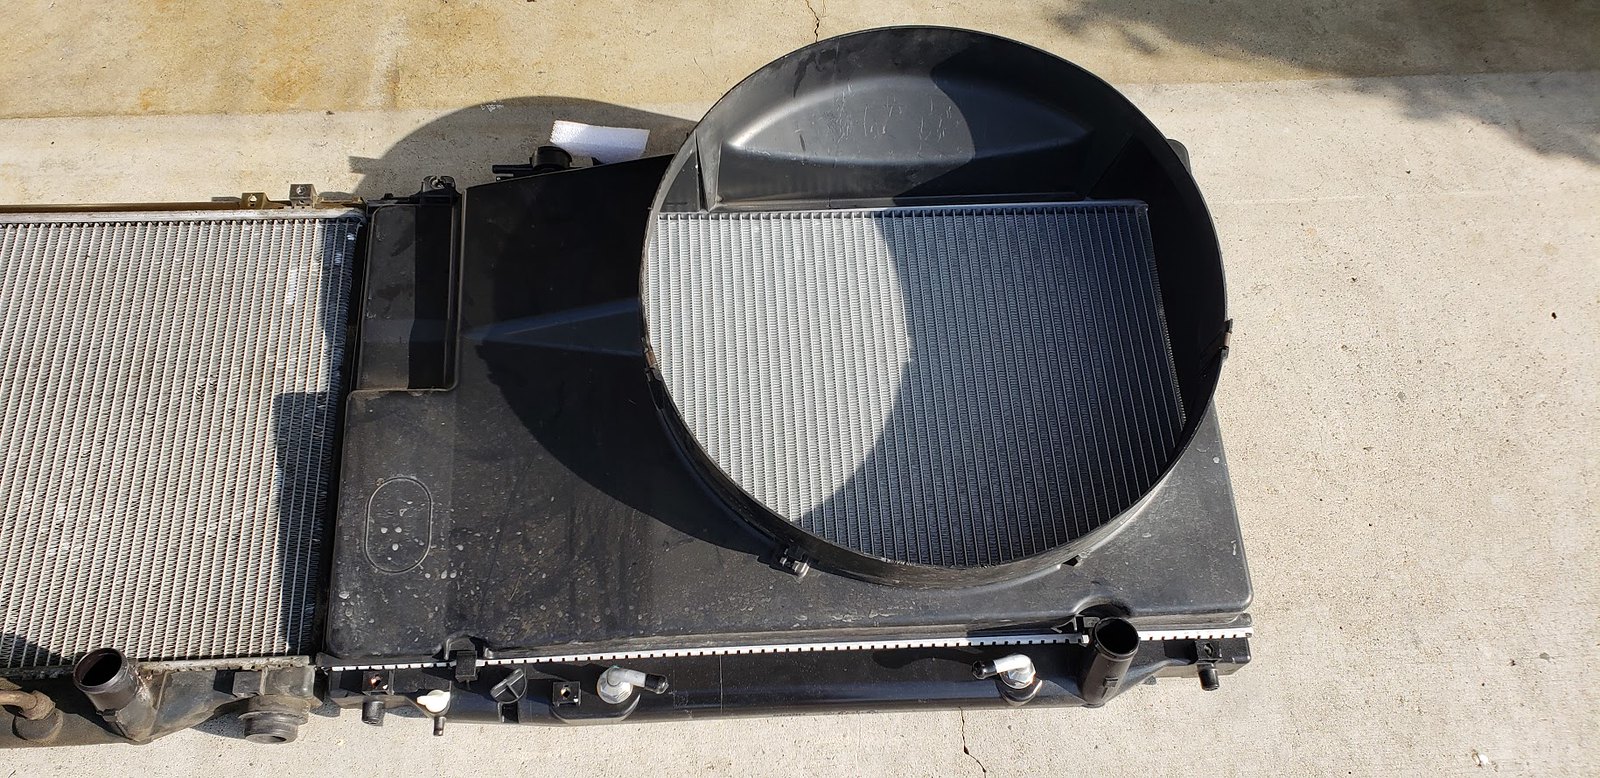
Fan Shroud mocked up, looks good to go
While the radiator was out, I threw in my new harmonic balancer. The old one still looked good, but I already had the part and it was right there. The new damper has these 4 dimples

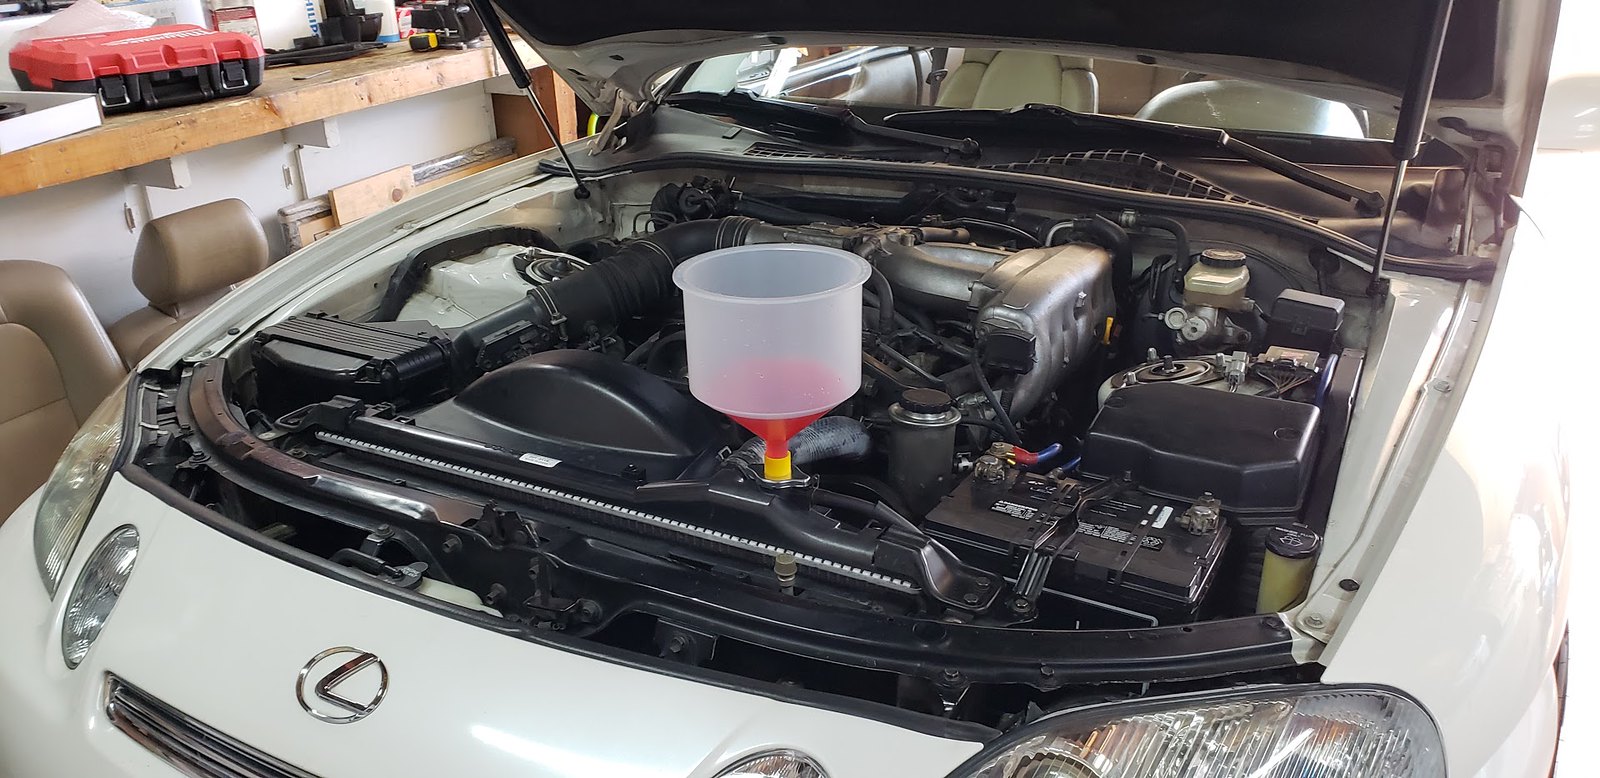
Everything installed and bleeding the radiator
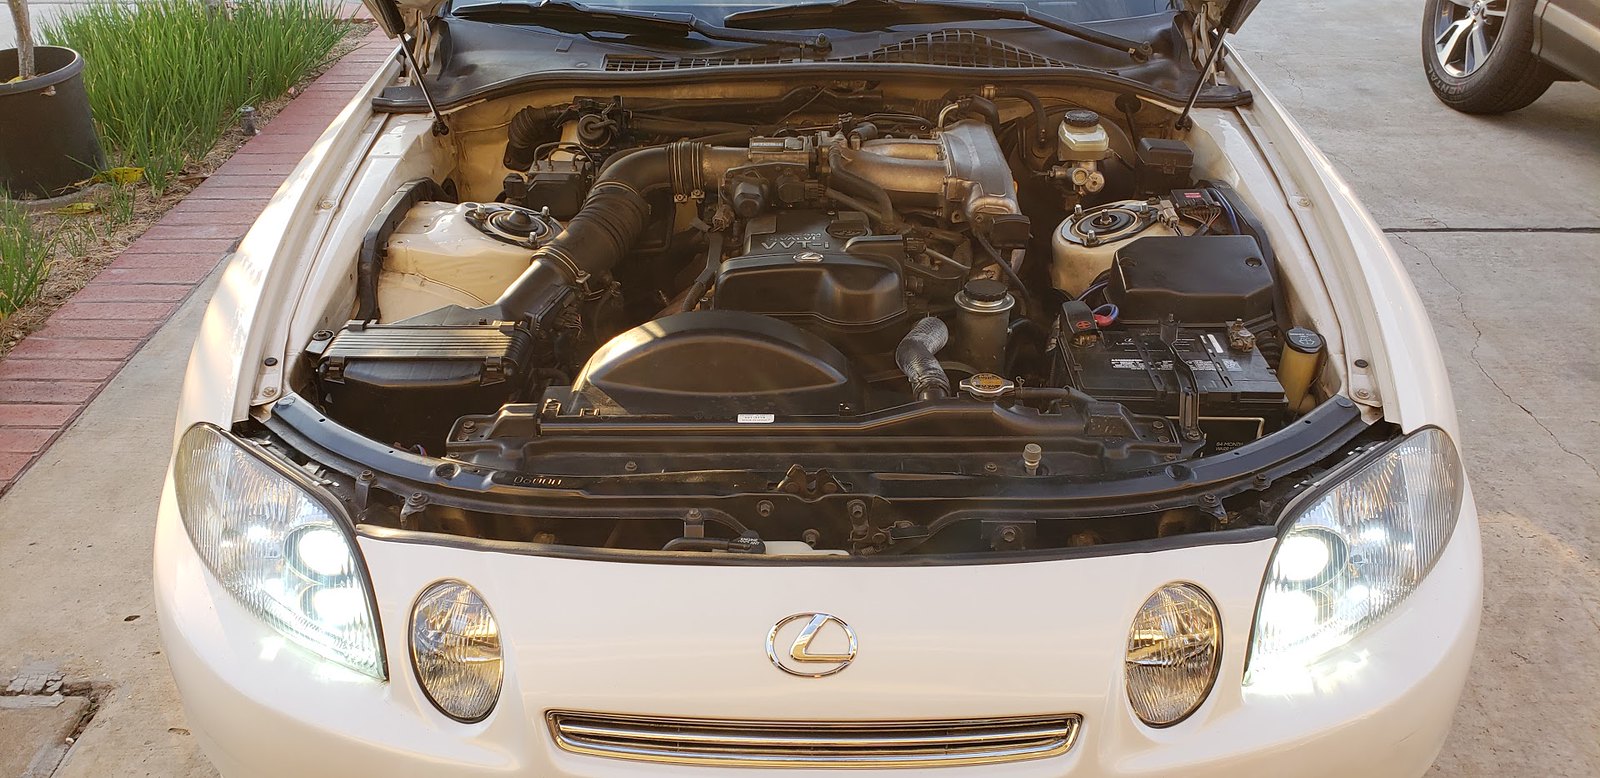
All bolted up waiting on a new radiator cap
While I had the new radiator, I compared it to my spare Supra TT Koyo
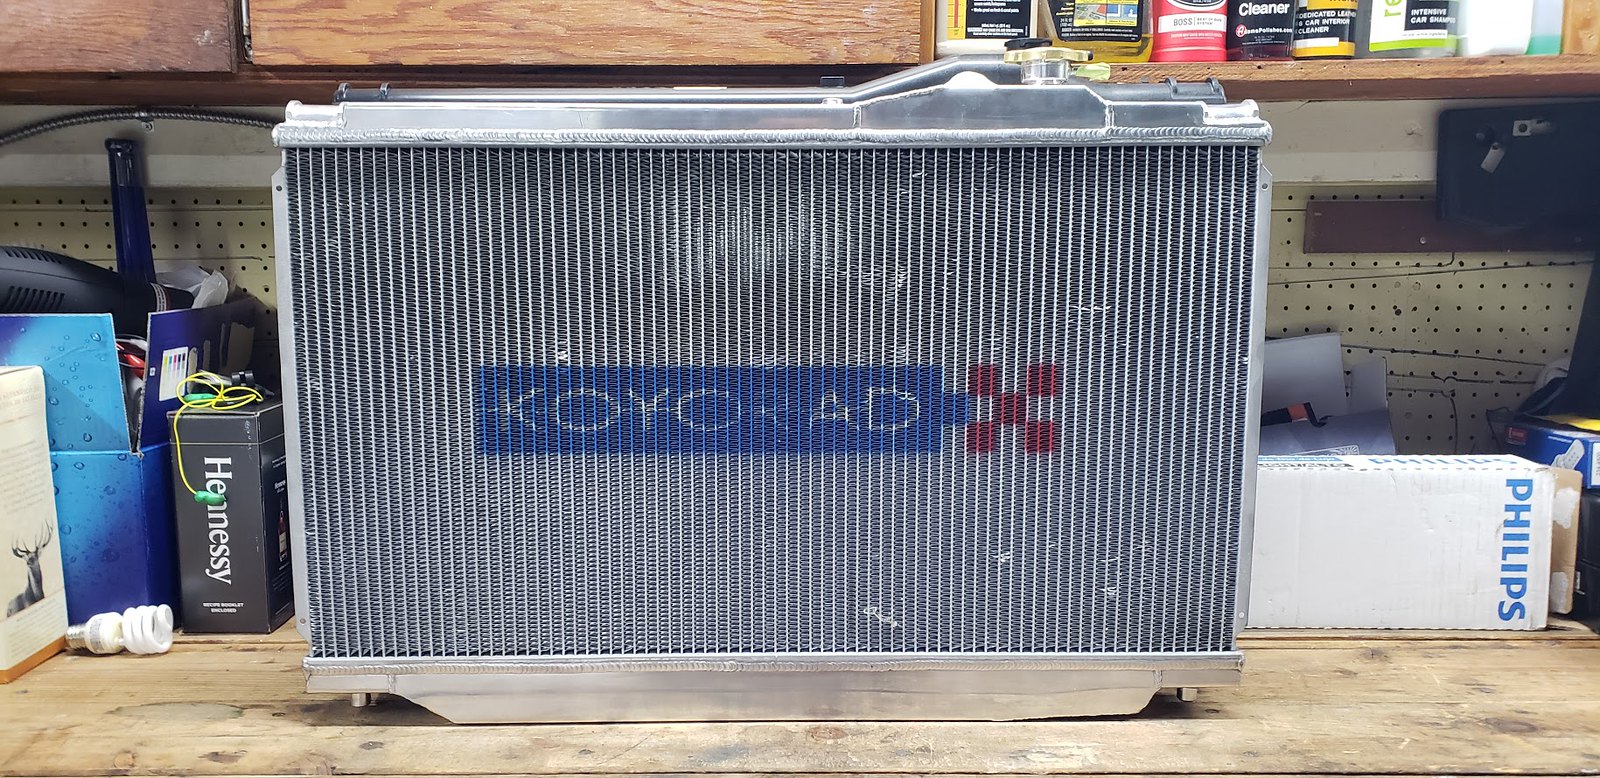
The koyo is a little shorter, but much thicker
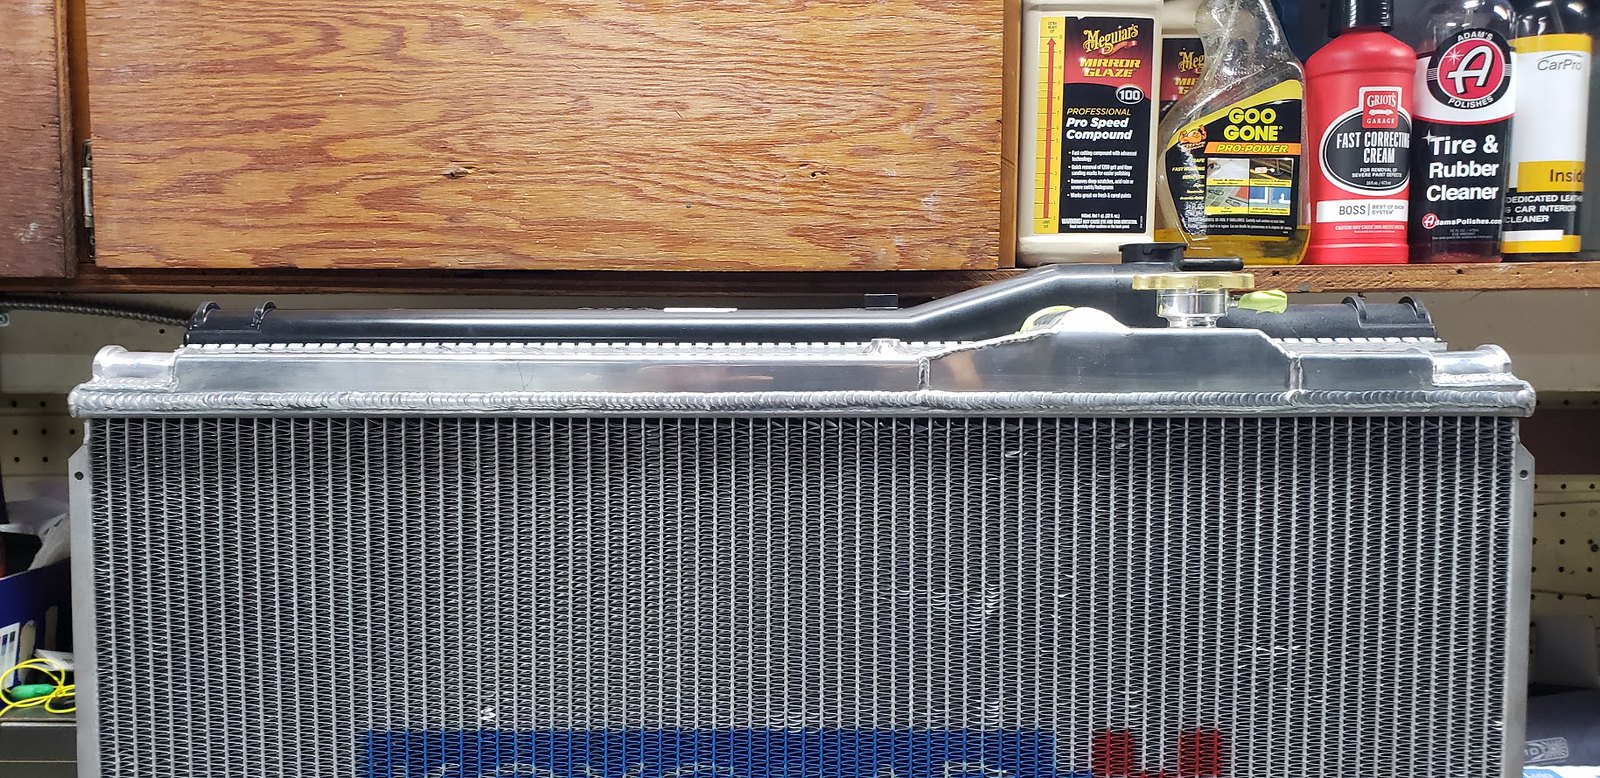
If you're wondering why I didn't put the koyo in, It's because I don't really need it on the car and it would have required too many additional parts (TT fan shroud, transmission cooler, and custom mounts).
Comparison with my OEM.
Fan Shroud mocked up, looks good to go
While the radiator was out, I threw in my new harmonic balancer. The old one still looked good, but I already had the part and it was right there. The new damper has these 4 dimples
Everything installed and bleeding the radiator
All bolted up waiting on a new radiator cap
While I had the new radiator, I compared it to my spare Supra TT Koyo
The koyo is a little shorter, but much thicker
If you're wondering why I didn't put the koyo in, It's because I don't really need it on the car and it would have required too many additional parts (TT fan shroud, transmission cooler, and custom mounts).
01-18-19, 12:36 AM
#343
Last week was the 11 year mark since I bought this car.
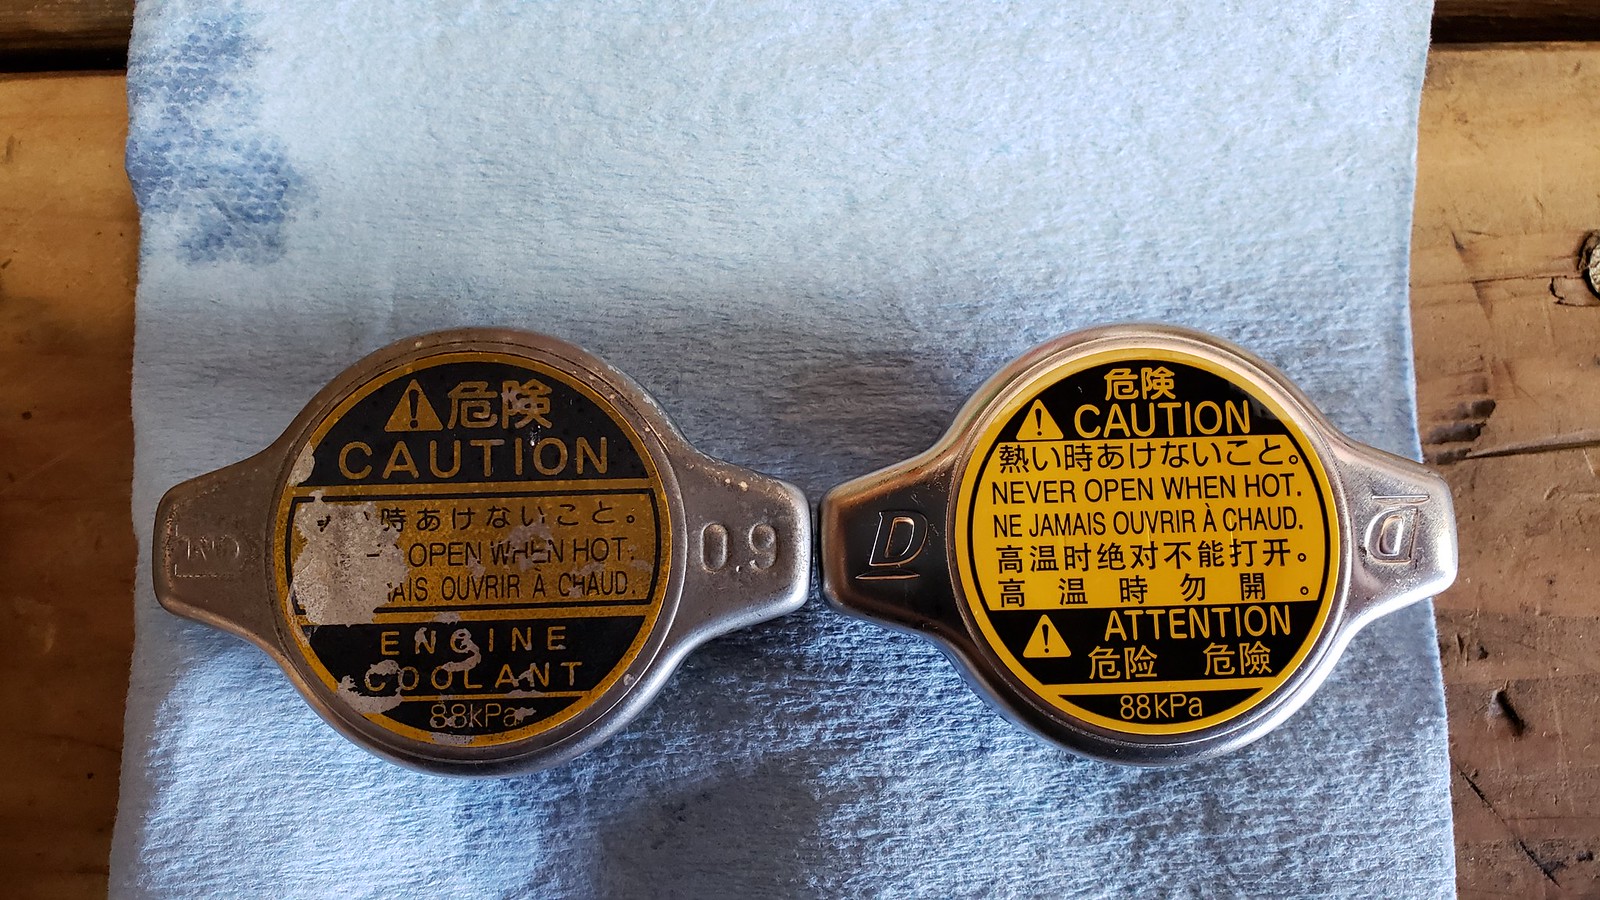
Ordered an oem radiator cap:
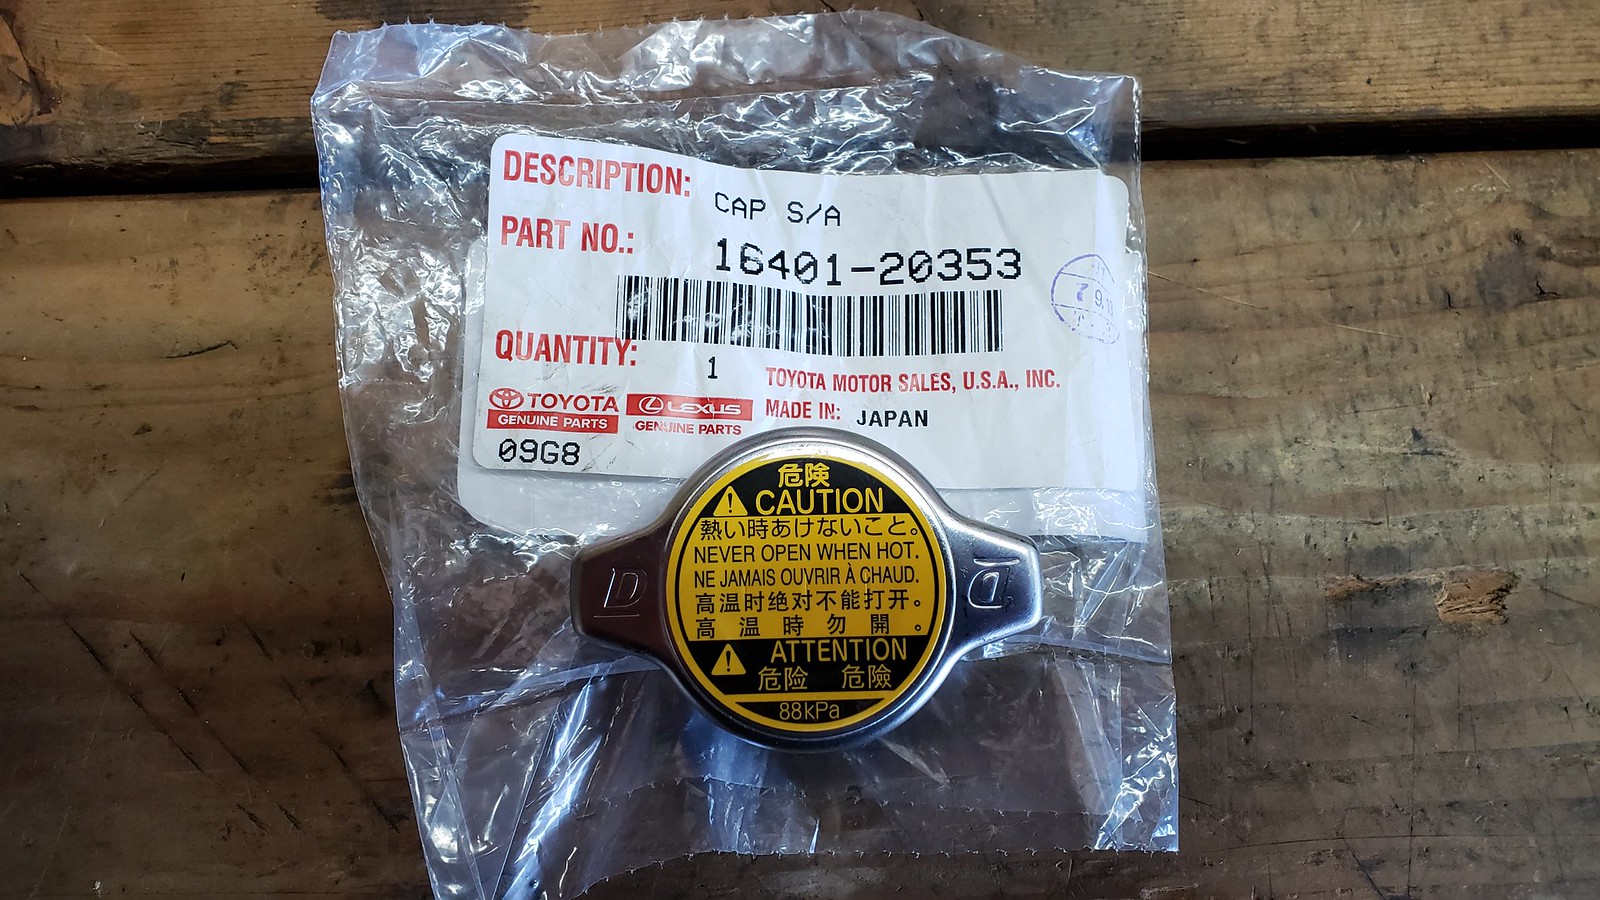
My old cap didn't have the proper instructions. Old vs new:
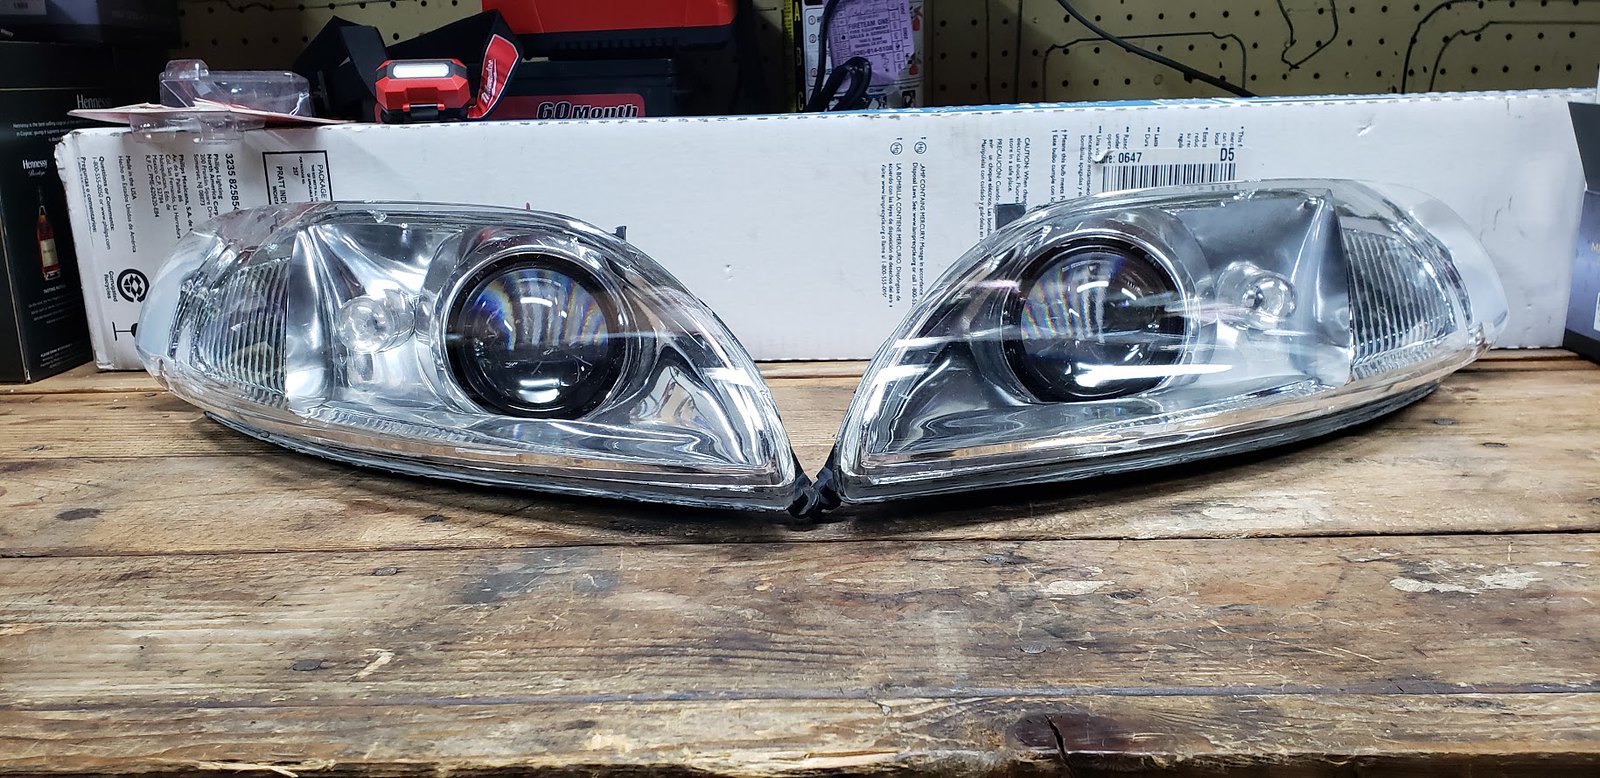
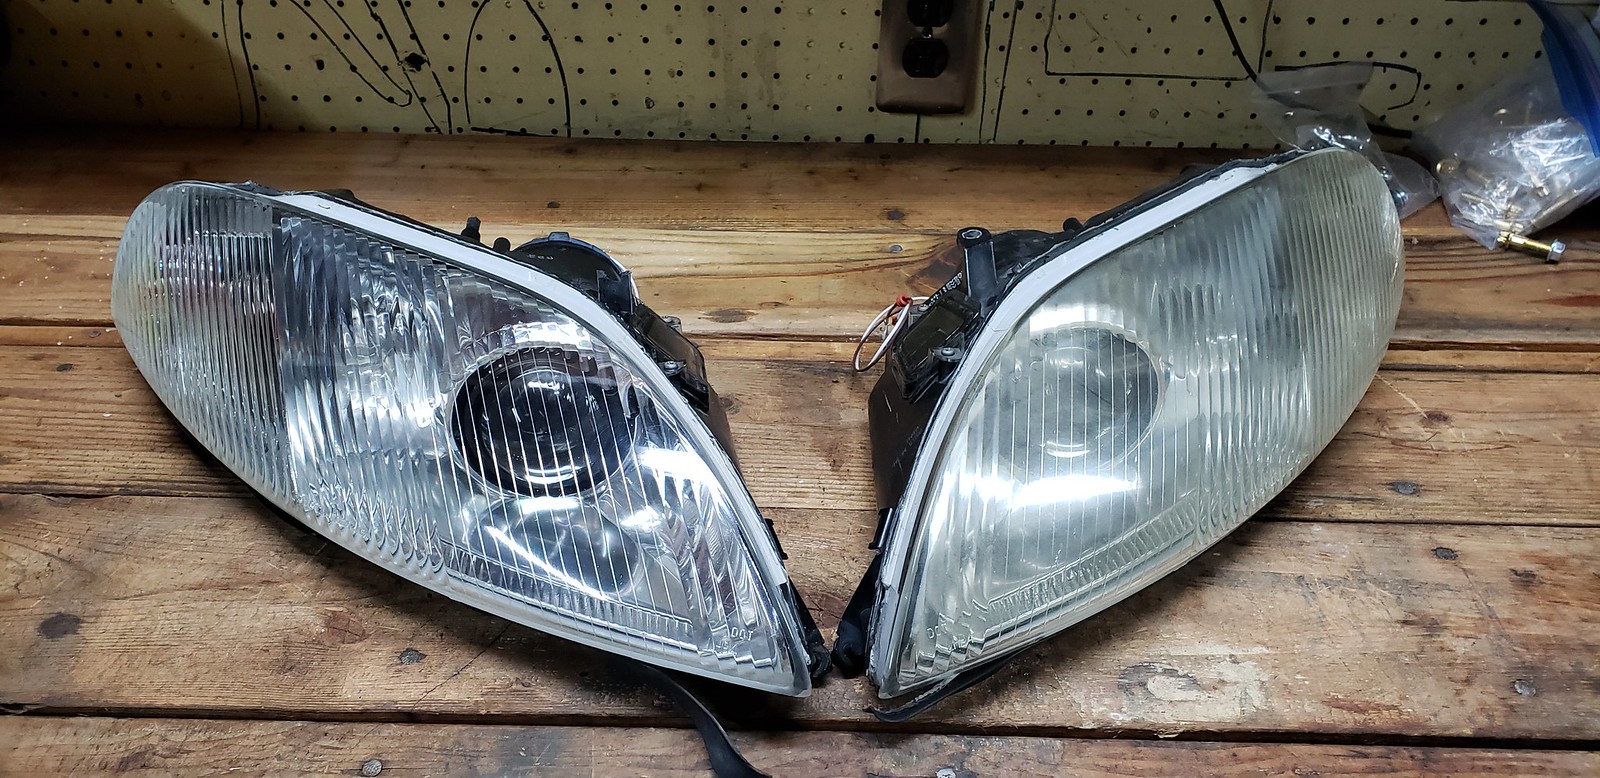
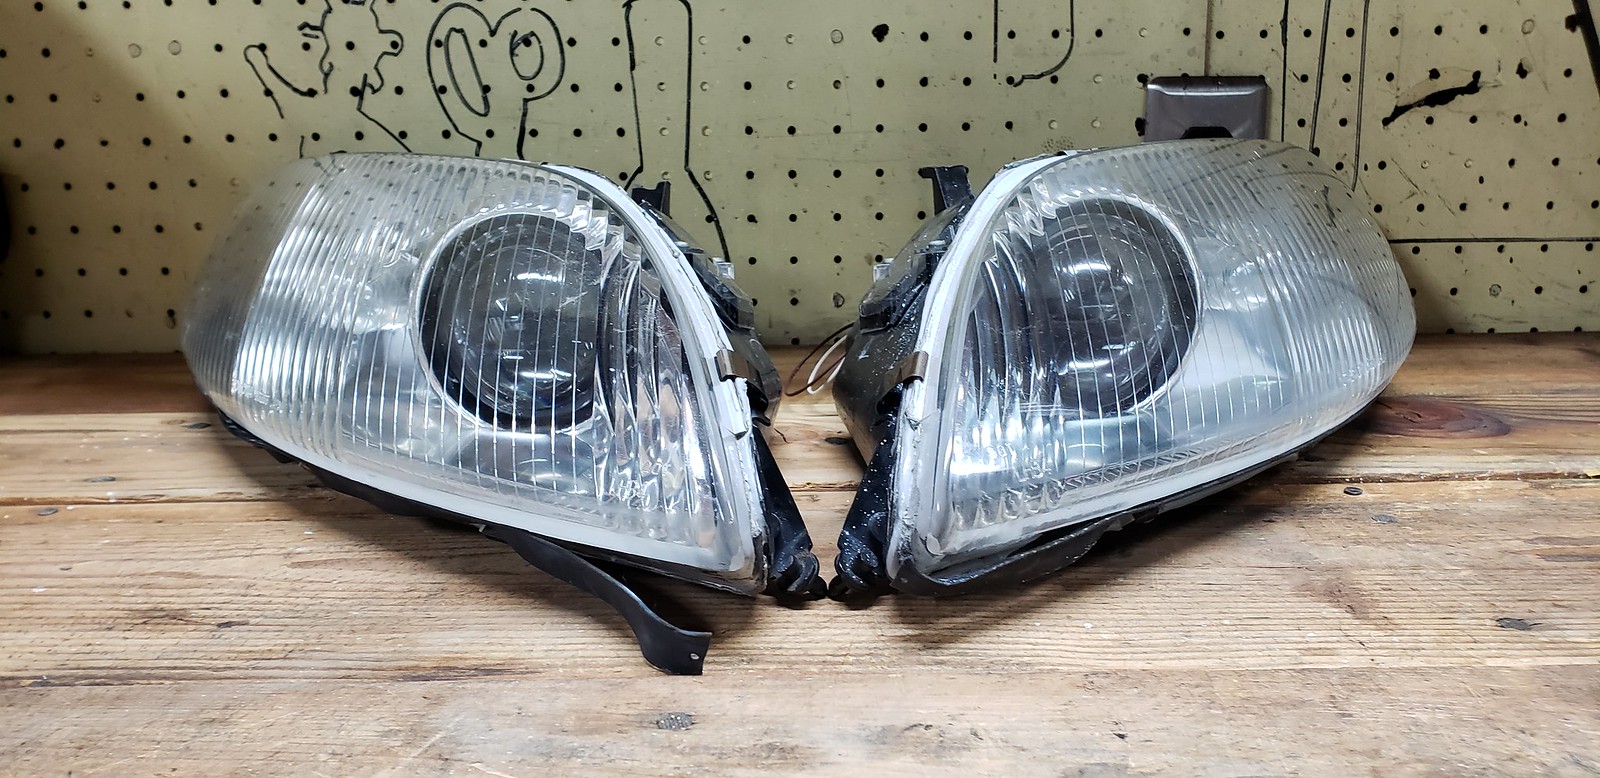
Also started to wrap up my O.G. Status retrofit kit.
Headlight restoration:
Installing new butyl - I went a bit overboard which made them harder to assemble.
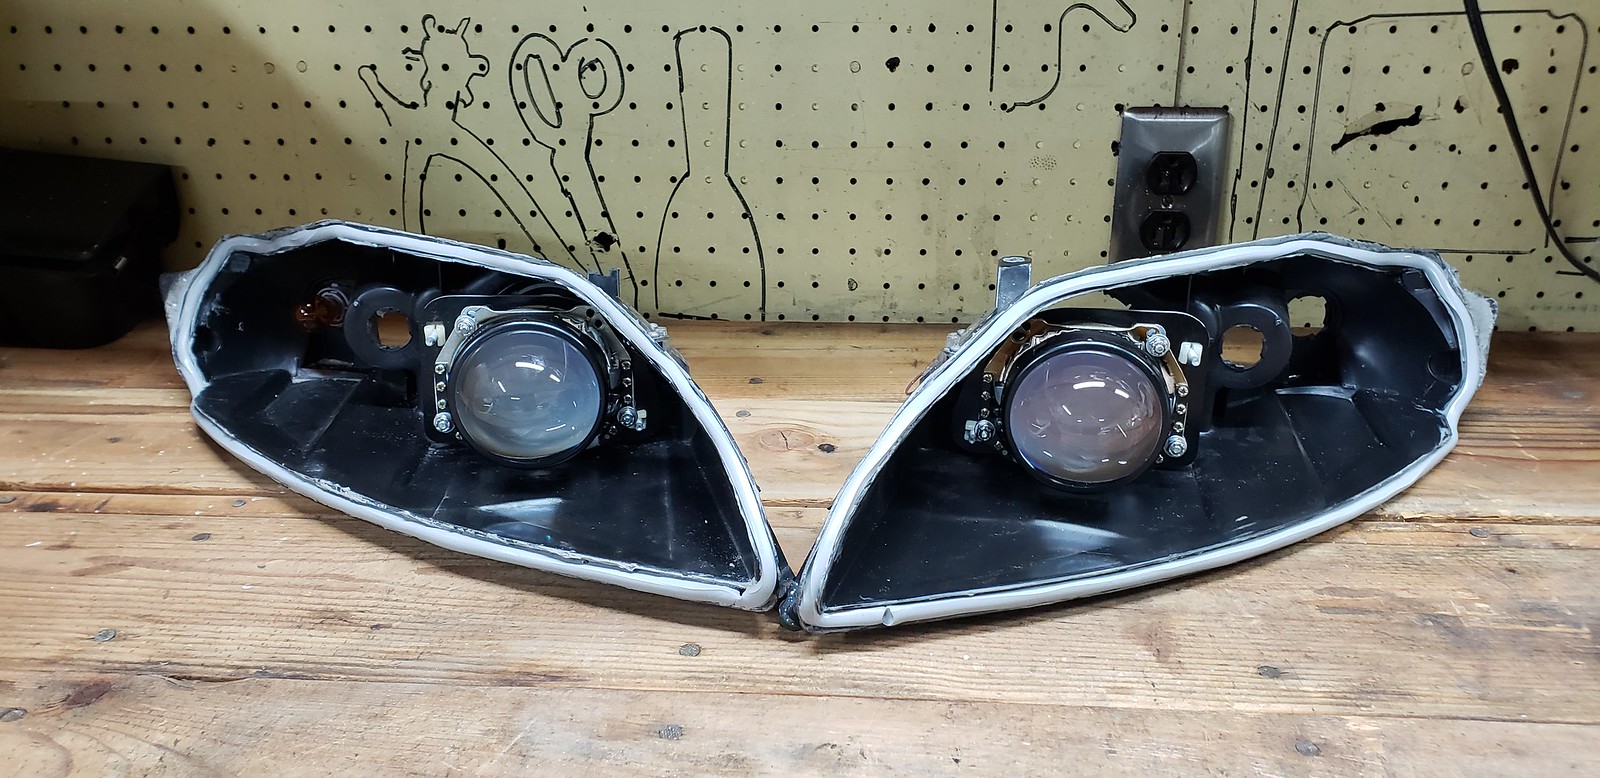
All assembled:
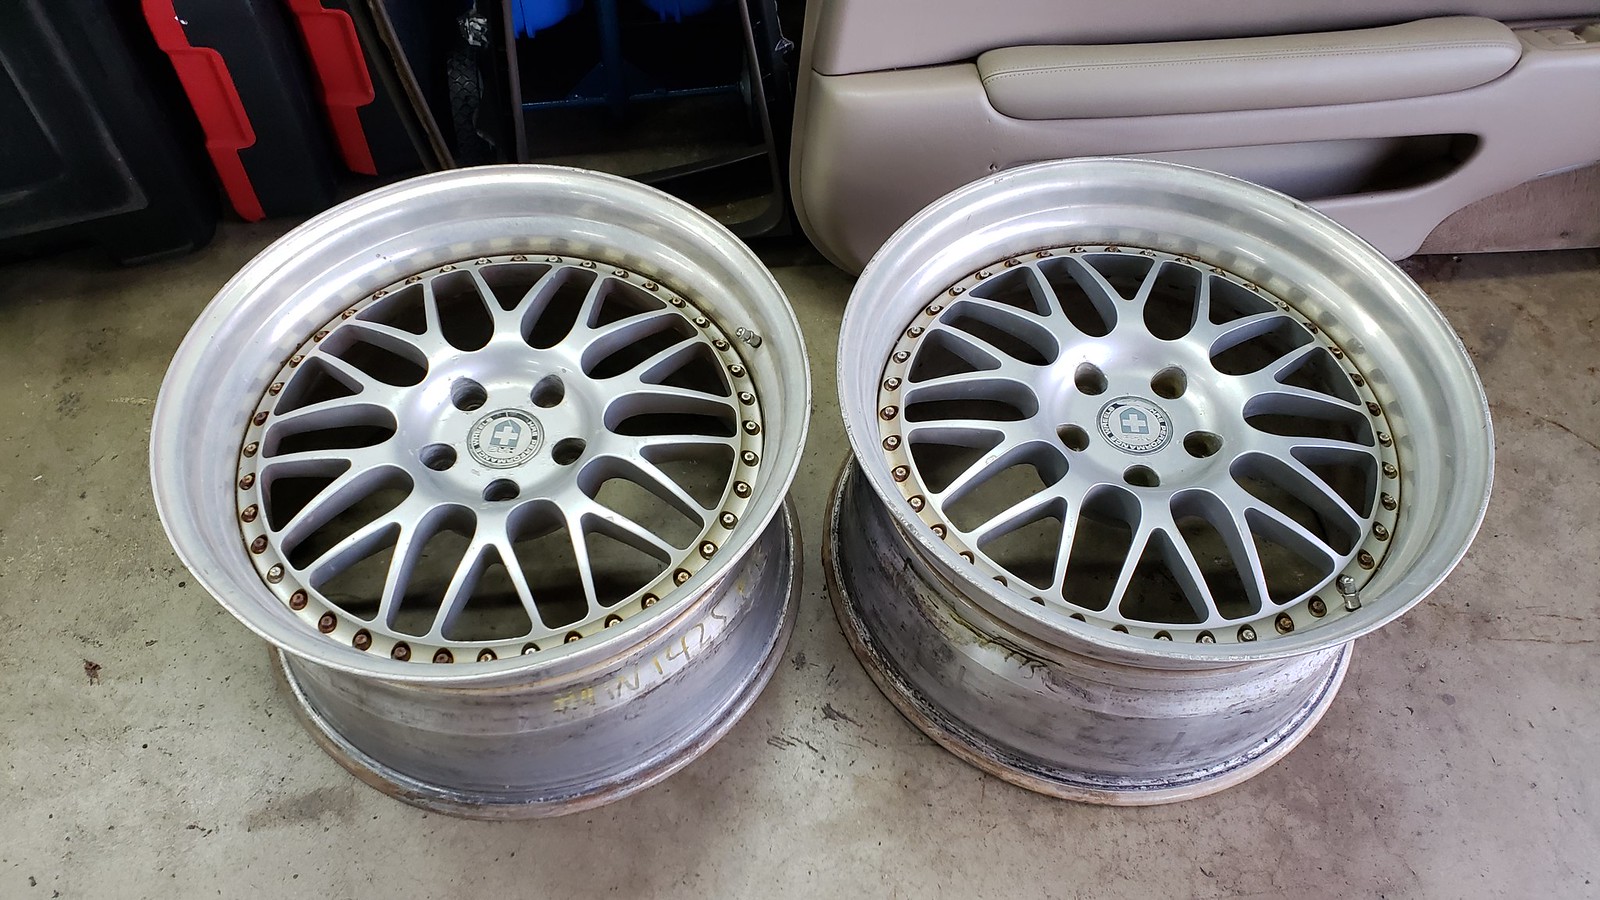
Wheels:
A comparison of the faces: The fronts (gunmetal) are bbk fitment, so they're taller on the bench. Also, since the rears (Silver) are step, the faces are smaller than the fronts.
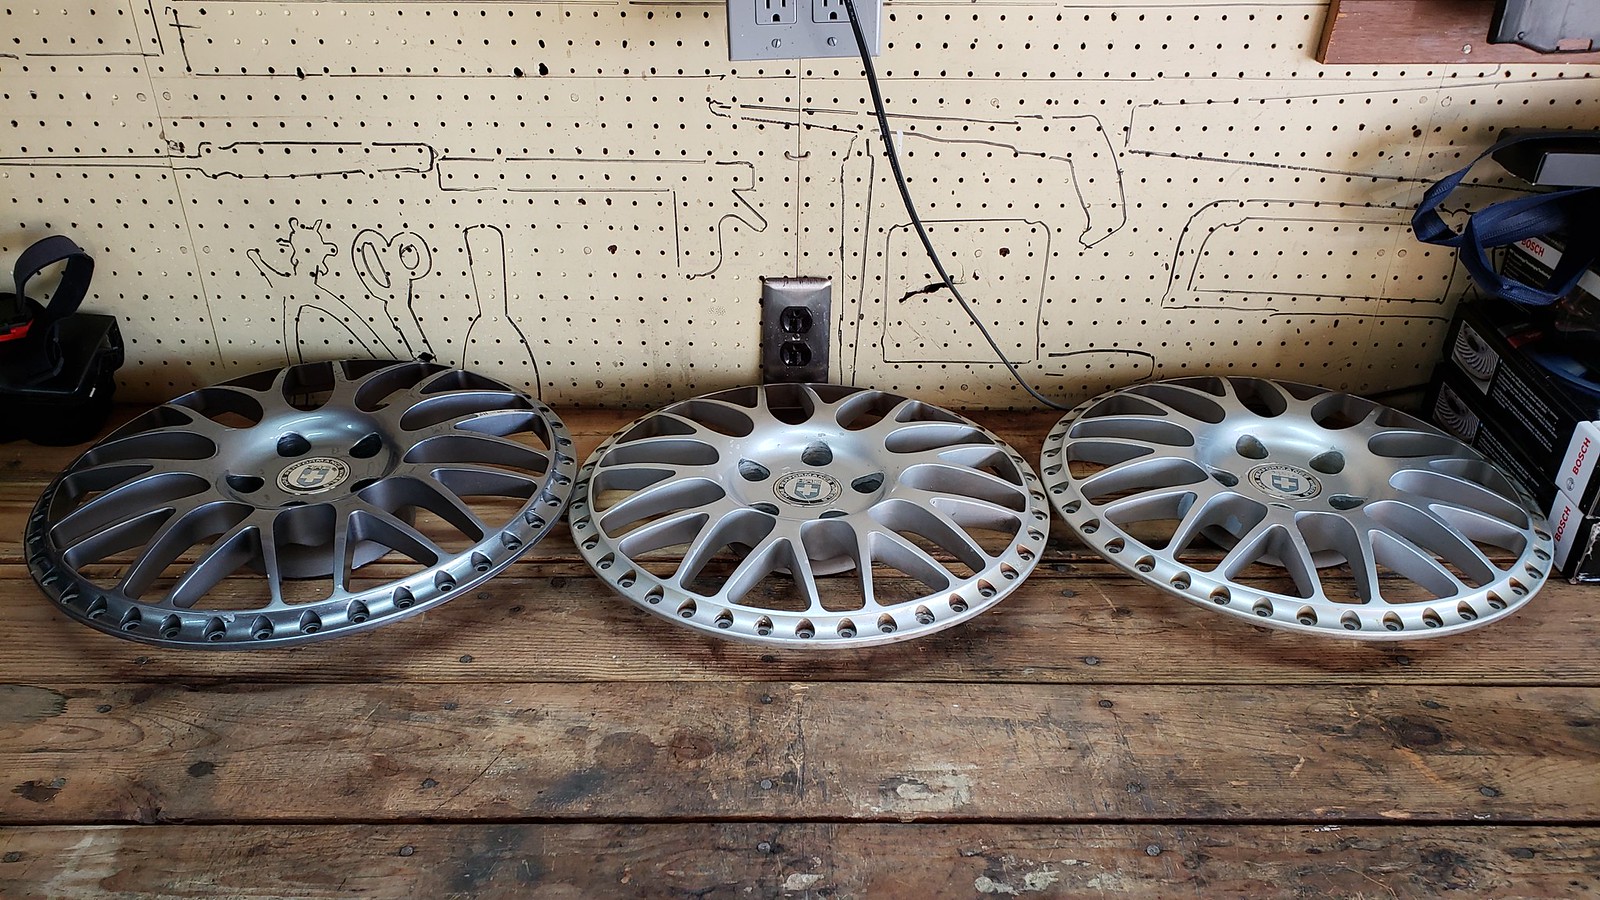
The rebuild on these wheels is getting underway. The faces were sent out a couple weeks ago because the shop quoted me a 10 week turn around time for refinishing. I thought I had misheard him, but he repeatedly confirmed it.
Ordered an oem radiator cap:
My old cap didn't have the proper instructions. Old vs new:
Also started to wrap up my O.G. Status retrofit kit.
Headlight restoration:
Installing new butyl - I went a bit overboard which made them harder to assemble.
All assembled:
Wheels:
A comparison of the faces: The fronts (gunmetal) are bbk fitment, so they're taller on the bench. Also, since the rears (Silver) are step, the faces are smaller than the fronts.
The rebuild on these wheels is getting underway. The faces were sent out a couple weeks ago because the shop quoted me a 10 week turn around time for refinishing. I thought I had misheard him, but he repeatedly confirmed it.
01-18-19, 06:21 AM
#344
Pole Position
Nice work sir, she's looking sharp! I had my radiator explode on me only a few weeks after buying the car lol.

 I need to do a new set for mine.