When you click on links to various merchants on this site and make a purchase, this can result in this site earning a commission. Affiliate programs and affiliations include, but are not limited to, the eBay Partner Network.
Some progress but no pictures to show. The engine block and parts are going to a new machine shop since the one I took it to is very backed up and still haven't gotten to it since January. I told them I wasn't in a hurry to begin with but based on our talks I did expect them to have it underway by now. I don't fault their workmanship by any means but I need to get this built so... onward. The queue time is not going to be very long with this new shop and they are also versed in 2JZ engine builds. It should only be a few weeks.
Driftmotion delivered a new OEM Toyota 2JZGTE head gasket and ARP head bolts today as well, so that makes getting the cylinder head with cams, the freshly painted valve covers and engine hooks bolted on a no-brainer. That should also make it easier to move with the engine crane.
After that I'll have the USDM turbos rebuilt and get my wiring harness done. And then... it will be full dressing assembly time.
It feels good to get the heart of this project moving again!
Edit/Update April 13th, 2017:
The short block is now at the new machine shop and in the queue for assembly. Looks like things will finally get started in a week or two.
Today I called the new machine shop and went over all of the work to be done to the GTE short block. I was just going to have the bores honed and the crank balanced but since it didn't add much more to the total it's now going to be a fully balanced and blueprinted short block. I never thought I would be able to say that about a vehicle engine that I owned!
It's looking like a completion and pickup date in mid-May. Just got my flight booked. Currently trying to determine what top end assembly I can get done while I'm in Florida.
I went ahead and bought a new OEM 2JZGTE head gasket and a set of ARP head studs and had those shipped out to Florida. I already have a set of OEM washers to use with those studs. Then I can get the newly rebuilt GTE cylinder head and cams bolted on, install the restored valve covers and bolt on the head hooks for easier moving with the engine crane. The new TT oil pump and full oil pan assembly (which I tapped for the oil drain previously) will be installed by the machine shop prior to moving it.
No pictures for now but there will be next month when I'm in possession of the engine block again.
...
The non-rebuilt 150k mile twin turbos and engine harness are still with me in California and both still need work done to them.
I picked up a few used parts recently, notably a 2nd variation of the wrap around coolant pipe with an integrated metal affixing plate (I was looking for an earlier version that had uses a separate insulating metal plate. Not sure when Toyota made this change but this is a JDM cooling pipe vs my USDM TT version that has no metal plate welded on).
Then, a set of six used TT coil packs that are in unknown condition-- they were impossible to refuse for the price but I'll have to check those.
Driftmotion is currently holding my used USDM 550cc injectors in queue for testing. Hopefully those will not need any cleaning/rebalancing.
I also finally got tired of looking at my spare winged trunk lid a couple of weeks ago and decided to educate myself on how to sand and strip off the poor quality flat black paint and grimy old insulation from the spoiler. I used 180 grit for the stripping, then 320, then 400. I need to give it another final pass with 600 grit before I move on to a primer and take it in to get sprayed with factory Onyx Black (202) paint and three clear coats.
The 92-96 SC400 wing below was originally a factory shade of white and painted over with flat black or possibly Plasti-Dip. Here it is after a few hours of sanding from 180 to 400.
My apologies for the less than great iPhone photos.
This project is so defined by fits and starts. I just keep chipping away at it as I can
I picked up the rebuilt short block a couple of days ago. All stock Toyota components from the rods and new pistons to the new OEM bearings matched to the engine block and rod numbers. The only exception is the ARP rod bolts and ARP crank bolts. The lower rotating assembly is also fully blueprinted. Clearances are all tight and nicely within Toyota's factory specs. The cylinder walls (since this was a used GTE block) were in great shape and very straight across the board. Only mild cylinder honing was needed.
If anyone is interested I can post a scan of the build sheet.
I couldn't be happier. It's just a bit of overkill for what will be a very under-stressed engine with very moderate boost. Considering how much mileage I plan to put on it though I think it will pay off down the road!
Interesting to me, my engine builder's break-in instructions were to use Comp Cams non-synthetic break in oil (high zinc content?) 10W-30 for the first 500 miles at no more than 2,000-3,500 RPM (avoiding boost as much as possible) and after that I am to go straight into my preferred Mobil1 Synthetic 10W-30. No other special break-in instructions from him. I thought there would be more of a procedure to it.
He also didn't seem to think that the break-in phase or oil would have much appreciable affect on the health of the turbos which is in contrast to what at least one turbo rebuild shop familiar with the old Toyota CT12B's has said to me. Gerry-- you have told me this as well or at least to just use my 150k mile twin turbos that have a little bit of shaft play as-is.
Here is the block waiting to get set up on the engine stand for assembly. I've given the exposed internal area a protective spray down of WD-40 every evening since it was picked up just to be safe. That plastic engine bag is closed up at the end and tied with some tight painter's tape.
More updates very soon as I get to work on it:
Addition/Edit:
I found this informative thread detailing the short block build process on SF. It may be helpful reference to anyone curious:
Nice can't wait to see it running. I hope the coolant pipe and coils work out for you! We all love seeing progress!
Thanks davvv! I'm patient but also very much looking forward to getting it running. Thank you for that coolant pipe! I may get to installing it by the end of this week. I just realized I forgot the O-rings for the oil pump so will have to get them first thing Monday before proceeding.
It was a bit of a challenge to figure out how to orient my 2,000lb engine crane (hoisting the short block) and the orientation of the 2,000lb Harbor Freight V-stand just to get the block aligned with the adapter. There was one way to do it with the mounting adapter facing outward and the "V" of each stand facing each other... but with one leg of the HF stand just outside one "V" leg of the engine crane. It took pulling the 200+ lb hoisted short block onto the stand at an angle before locking it in place with the locating pin (the mounting adapter was bolted on first). Then the crane piston could be lowered to let off tension from the straps, chains and load leveler. Few people talk about this if you try to Google examples or advice of how it's done. Not a head scratcher after the first time but I definitely wasn't sure how to get the crane and stand in the right place at first.
Also, in case anyone reading doesn't know, for the engine stand adapter you need four stainless M12 x 1.25 thread pitch bolts each at 3.5 inches in length. Not common to find just anywhere. I've also read that stock Toyota 7M head bolts are supposed to be a fit. I picked up four of these M12x1.25 3.5" bolts in Grade 10 strength from Ace Hardware for about $19. I used one washer on each and torqued them evenly to only 20 ft-lbs once they were already on tight and secure. Seems to hold fine for assembly on the stand.
I'm kicking myself that I didn't check the oil pump kit for the missing O-rings before visiting Toyota earlier yesterday when I ordered a few random bolts.
Next:
--Oil pump install
--Water pump install
--oil pan + pickup install
--cylinder head install
Craig , looks like you are on a fast track now with you project . Glad things are going on well .
Thanks Gerry!! It's fast tracking for the moment. I'm finding I still forgot a few small random gaskets and bolts that have held things up over the last couple of days. Have to use the time for the next two weeks to get as much assembly done as I can.
The goal within two weeks is to be down to just the turbos, wiring harness and a few remaining miscellaneous parts left to buy (A/C compressor, PS pump, crank pulley, oil level sender, stronger clutch, etc.).
Kahn those coil packs look pretty bad shape....I have a mint set with 50K miles in case those dont work out for you.....Let me know....
CatManD3W, thank for the offer! I need to inspect and test these coils firs but I may take you up on that offer. It's been on my list test the ones I have soon.
A lot has happened in the last week. A health emergency with a family member took all involved by surprise and put all our lives on hold. We barely slept all week but the good news is that everything is fine now and looking very good. Never take little symptomatic clues of a health issue for granted. If at all possible, get checked when in doubt. My family and I consider ourselves all very lucky.
Now, to the project at hand, I had a lot of waiting to do because I kept finding more bolts and little pieces that I was missing! Looking at various exploded diagrams for the last few years you still won't always know every little nut and bolt you need unless you've worked on these parts before. Noting that, I will be listing all the small parts numbers used for each stage whenever I can.
For those of you who have built one or more 2JZ engines my coverage may seem like overkill. Indeed many of these steps are covered in the TSRM for the SC300 and MKIV Supra Turbo. I have also referenced several video examples of each stage of the build for my own education. If these are online I will post them here also.
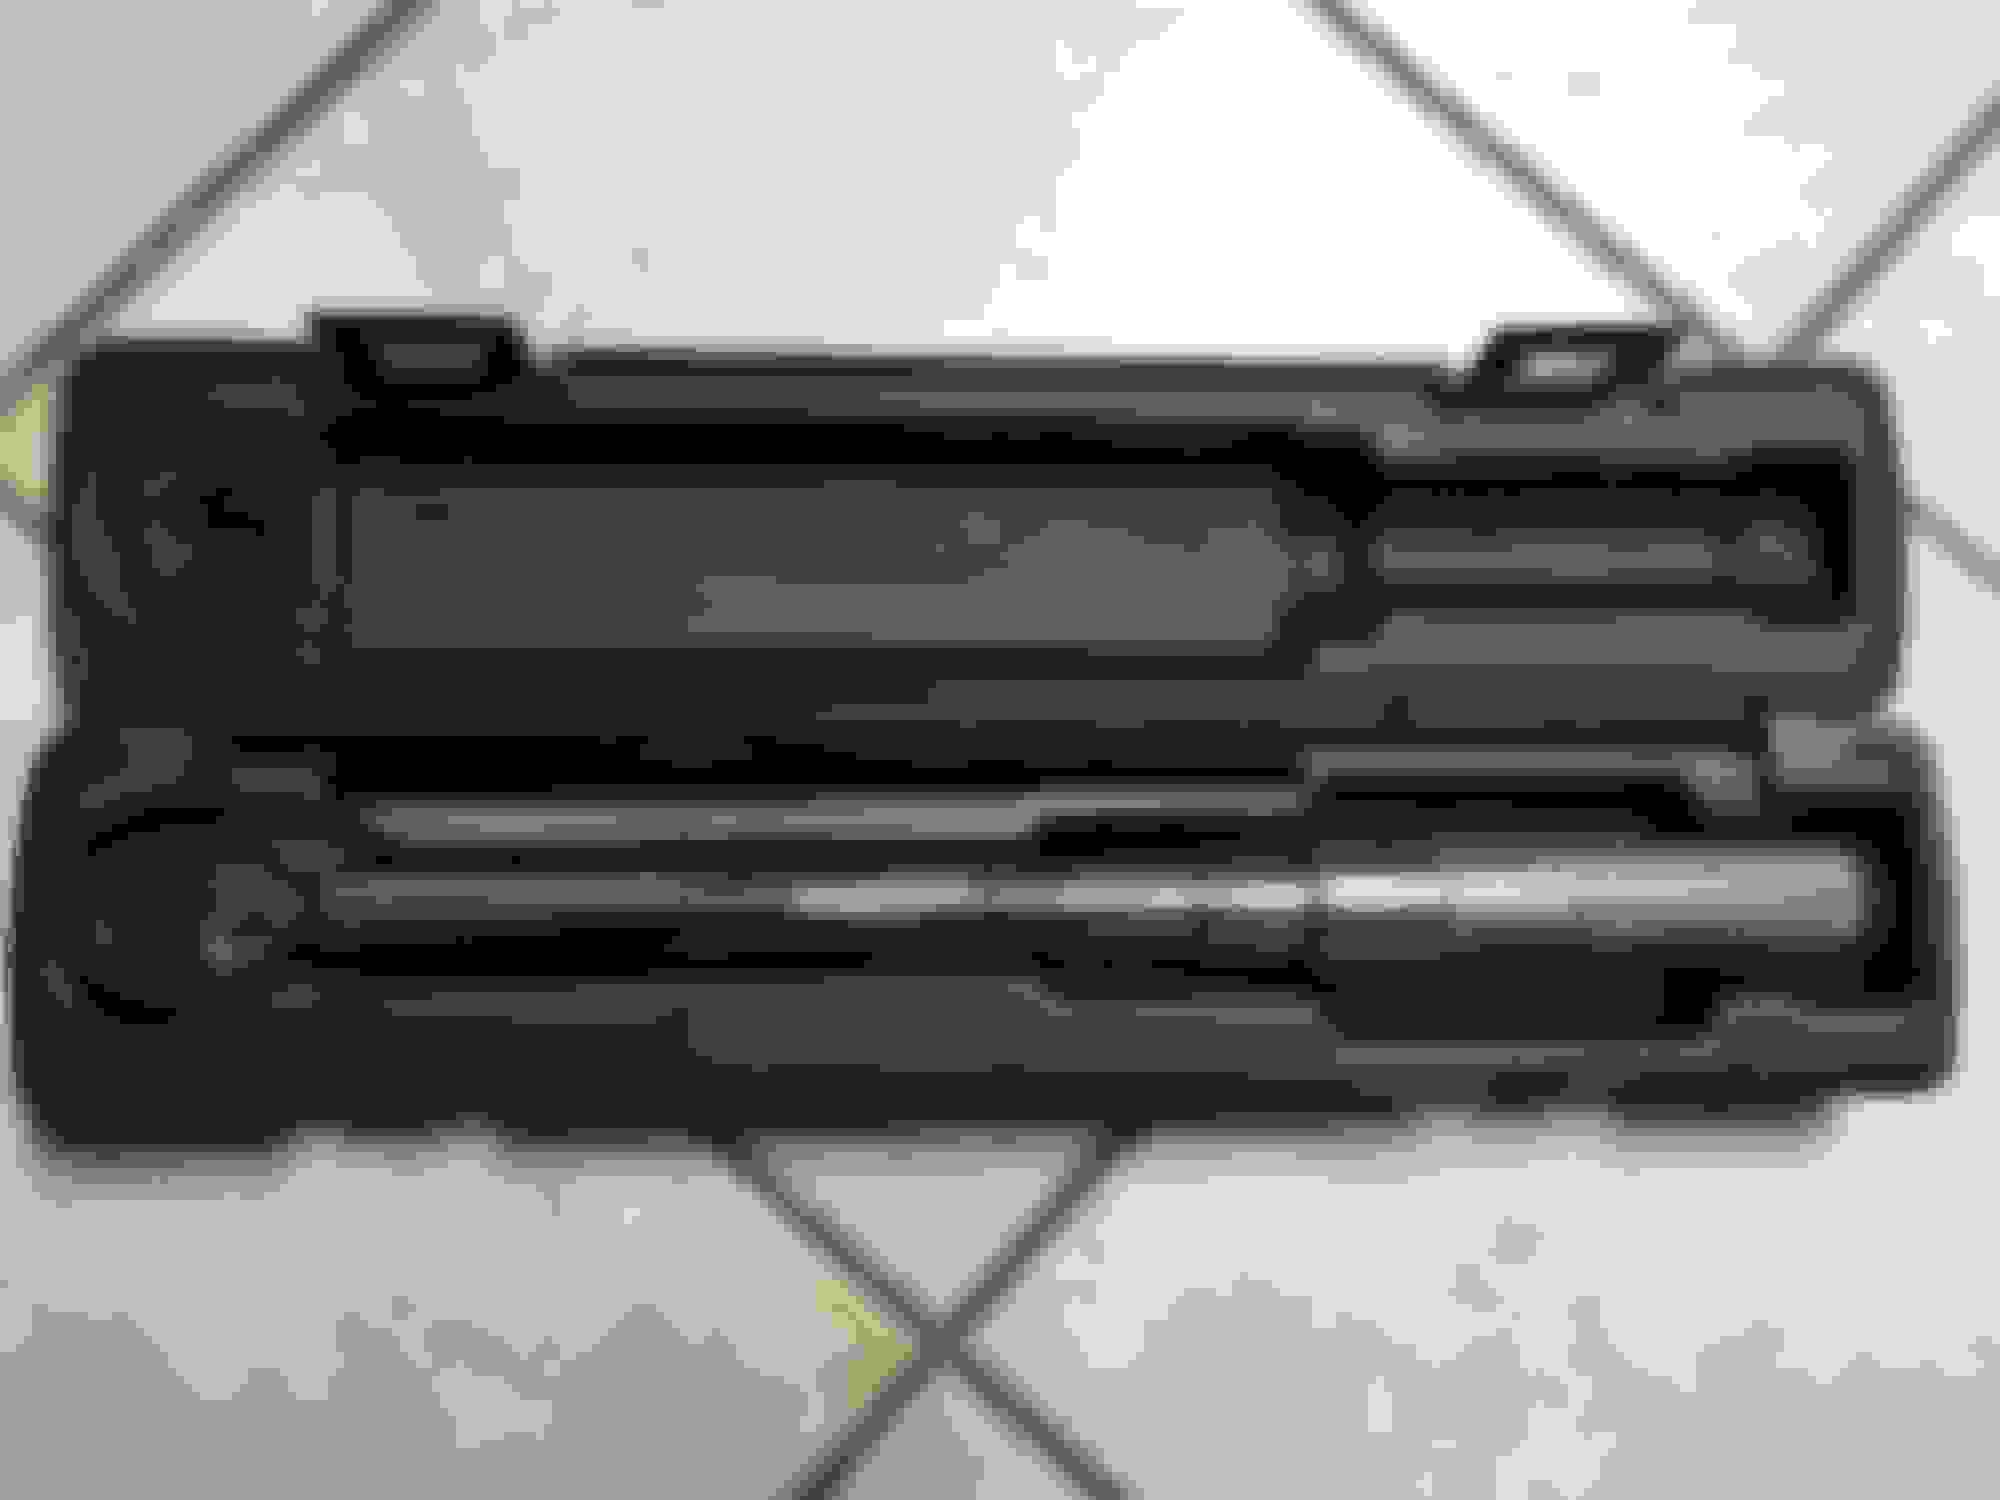
Torque Wrenches
This is a topic that has many differing opinions: What kind of torque wrench do you really need? How much do you really need to spend? Which wrenches or brands are the most accurate or accurate enough?
I primarily looked into this because I wanted to be absolutely sure that I was getting accurate torque to my ARP head bolts later, plus all the bolts that are specified with smaller torque loads. Getting a wrench that is calibrated well from the manufacturer, which produces consistent repeatable torque over a long period of use and which comes with a certificate of calibration are all key here. I heard two factors to maintaining a torque wrench mentioned a lot: 1) storing them at ZERO ft-lbs (or Newton-Meters). 2) Not dropping or banging them
I bought a CDI Torque Products (Snap-On owned since 1995) 20-100 ft-lb click-style torque wrench for the higher loads. It cost about $170 shipped to my door.
Model # 1002MFRMH
Next, I needed to cover the ranges from 5-20 (or 25) ft-lbs. I was wary of using my 10+ year old Kobalt torque wrench without at least checking its calibration first.
After a lot of deliberation and since I am trying not to spend too much if I do not have to I went with a $20 Harbor Freight Pittsburgh Pro 5-80 ft-lbs 3/8" Drive Click-type torque wrench.
Part #807
If it only stays in calibration through the engine build then it is still worth the $20.
Next, also from Harbor Freight I picked up a Pittsburgh Pro 1/2" Drive Digital Torque Adapter for $30. Model #68283. I read in a major hotrod car magazine article that these were tested to be fairly accurate and so I figured it couldn't hurt.
With the digital torque adapter (and a couple of 1/2" to 3/8" adapters) I tested the CDI at 20, 25, 40 ft lbs on a non-engine hex bolt on another metal contraption. It was nearly dead-on every time. Good.
Then I tested the Pittsburgh Pro wrench at the same loads. It was not quite as accurate but very close every time. Ok.
Next I tested the nice but very old and never re-calibrated Kobalt 5-100 ft-lbs torque wrench at the same values. VERY far off. Not anywhere near close. Every time. Especially at higher ranges. Yikes! I suspect I've only just gotten by so far with this wrench with my previous car repairs.
I also tested the Kobalt and HF/Pittsburgh at the lower ranges of 5, 10, 15 and 20 ft-lbs. The $20 HF/Pittsburgh was not perfect but very close-- good enough. The Kobalt, as before, was totally off the mark.
That Kobalt is now going to be set aside. I am not sure if it is worth it or not to have it calibrated. I probably don't have the receipt any longer. At the moment it is 100% useless, especially for an engine build.
Later I would like to get a better quality low range ft-lbs torque wrench and a quality inch-lbs torque wrench (another inexpensive one that I will pick up from Harbor Freight) but for now the very good/accurate CDI will do for the cylinder head and other critical areas while the smaller HF wrench with the digital torque adapter in-line to verify will do.
I am not an inexperienced engine builder at all and I am almost entirely doing this process by myself so I feel it is better to cover this base first rather than be very sorry later.
To think I was initially going to trust my old Kobalt wrench!
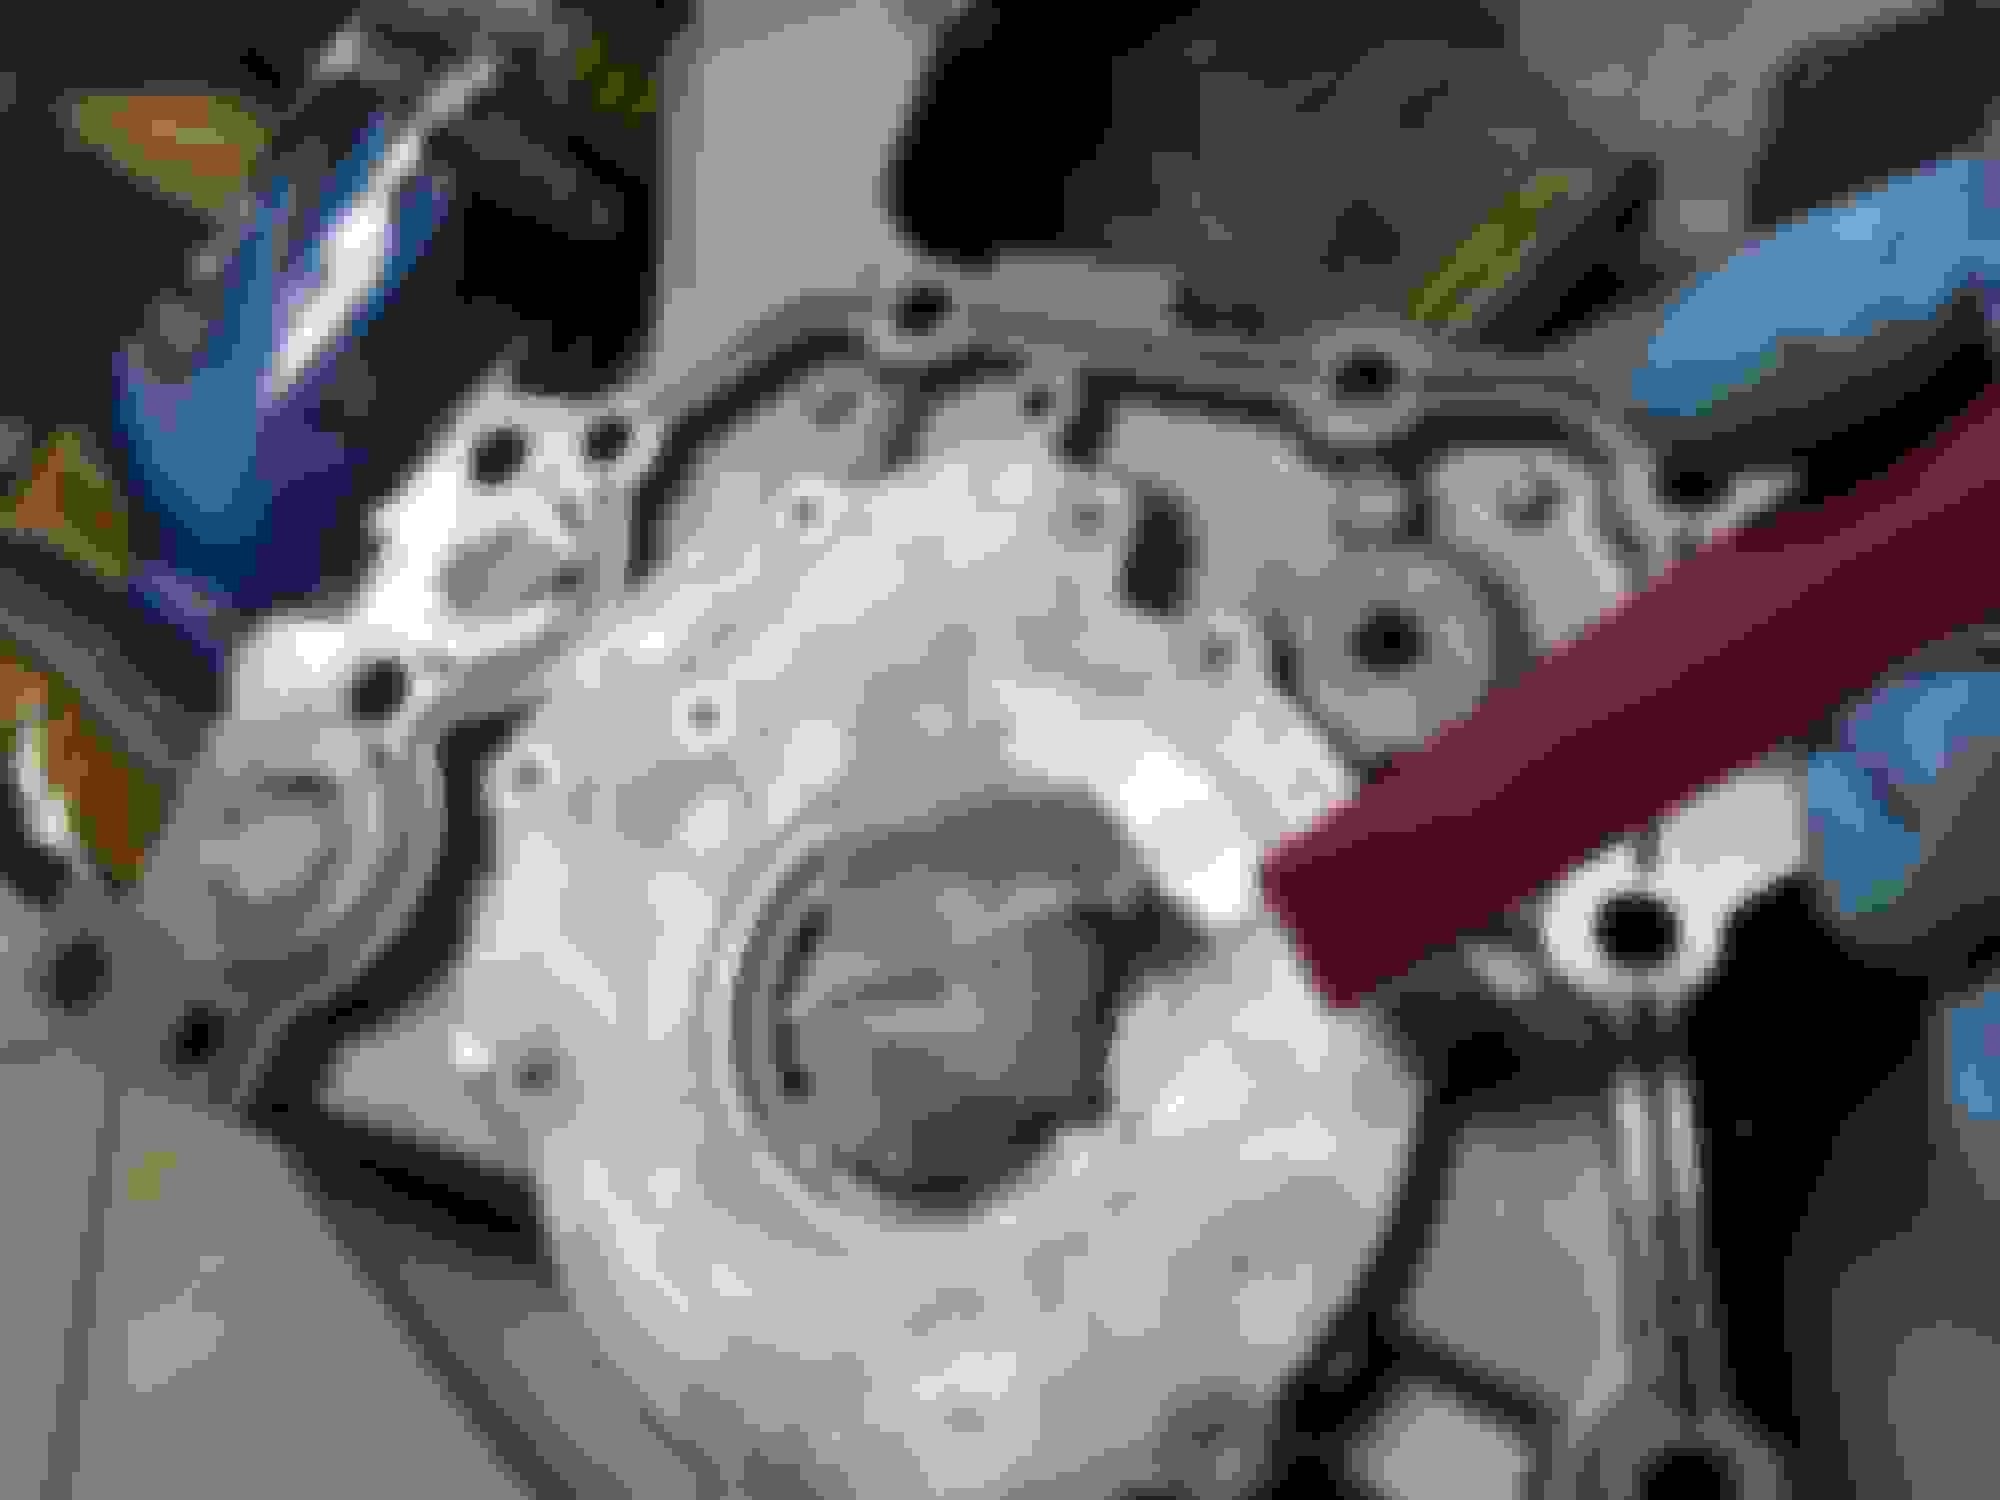
Oil Pump
Once I mounted the engine on the stand and waited on some parts it rested in a plastic bag with as tight a seal as I could manage for a week or so. I would check every couple of days and lightly spray a little WD-40 on the rotating assembly that the machine shop had already finished for me. Since this was in air conditioning I was not very concerned.
(pictured with the oil pump fitted before I removed it to reapply FIPG after my first try)
Please note that I am installing the oil pump, water pump, oil pan, pickup, baffle, lower pan and rear main seal and retainer plate with the engine upside down. The TSRM and most example videos demonstrate installation with the engine right side up.
The 2JZGTE oil pump (P/N 15100-46052) gets the front main seal installed first. I used a piece of cloth and a rubber hammer to lightly tap it into place evenly. I've seen one builder suggest using an old used identical seal but I didn't have one so the cloth and careful tapping had to to.
Before that I applied a little Lucas semi-synthetic assembly lube to the inside and outside of the main seal. I wanted this because it will closely match the Comp Cams 10W-30 break-in oil the engine will get for the first 500 miles of operation (both containing Zinc and Moly). Also, once the engine is built it will sit yet again for several weeks to a few months before it is installed in the SC depending on what my schedule is like. So I want to use a lubricant that will stay for that period of time when possible on all applicable O-rings and areas that need just a little lubrication during assembly.
The bolts required are seven (7) 90105-08153 and two (2) 91511B0850 long bolts (superseded to 90080-10200). I missed those two long bolts the other day and will be picking them up tomorrow. In the MKIV Supra TSRM Section EG-373 "Lubrication System" these bolts require 15 ft-lbs of torque. The gasket seal uses Toyota FIPG (Form In Place Gasket) P/N 00295-00103.
Before attempting this (I have never done it before) I watched a couple of videos to get an idea of how this is done outside just the TSRM instructions. One from a 2JZ build DVD that I bought a while back and also this video:
I did it mostly right but between missing the two long bolts and considering that I may have used too much FIPG I decided to remove the pump, clean the FIPG from the pump and block surfaces and do it a second time tomorrow once I had the last two bolts in hand. I figure that since this is the most critical part of the engine next to the bottom end rotating assembly and valves I would be wise to learn from my first try and do it again with a little bit of experience. I want to do it all right the first time and avoid any issues.
I blocked the oil passages on the block and pump while I cleaned off the day-old FIPG gasket. I think I did in fact use a bit too much as I'd suspected. Good lesson.
I cleaned off the oil pump o-rings (96721-24022 and 90301-A0032) to re-lube later. Only when needed I used a very small metal pick to dislodge FIPG gasket from holes. Otherwise I used a Harbor Freight plastic non-marring gasket scraper (red) on the aluminum pump and iron block mating surfaces. I followed with some 70% rubbing alcohol to wipe away any of the remaining residue.
Now it's ready to finish this stage properly tomorrow.
Water pump
This was simple. No gasket or FIPG required. Just an internal o-ring on the block side and six (6) bolts (P/N 90080-10249) to bolt the pump to the block. These also require 15 ft-lbs. MKIV TSRM section EG-337 "Cooling System" covers this. Simple enough. I also forgot to order the right amount of bolts for this ahead of time! Another pickup for tomorrow.
Once the engine is rotated 180 degrees on this stand and the cylinder head is installed I will complete more on the water pump.
...
In the interim I have been cleaning up the "U" shaped water pump bypass pipe and its bracket. I'm using some Coca Cola soak on the corroded little bracket overnight. Tomorrow I'll hand clean it and give it a coat of satin clear to make it look better.
Some testing of the oil pan, lower pan and bolts proved a good thing to do ahead of time as my lower pan had a slight deformation of part of the lip. I used a rubber dead-blow hammer on wood to carefully bend it back flat slightly. Fit and retest, hammer, repeat, repeat and it's perfect again.
But it is a bit scuffed, so I will score the lower surface and give it some paint.
(picture pending)
......
More tomorrow!
Here's the oil pump and oil pan test fitted to double check. This will all be bolted in for good in the next day.
I currently have a cheap 1/4" tekton wrench from amazon that I use to cover the low end ranges. I think it was $40. I plan on replacing it with a CDI wrench in the future, but the tekton hasn't let me down yet. I was told CDI is the company that designs most torque wrenches and provides the certification.
I currently have a cheap 1/4" tekton wrench from amazon that I use to cover the low end ranges. I think it was $40. I plan on replacing it with a CDI wrench in the future, but the tekton hasn't let me down yet. I was told CDI is the company that designs most torque wrenches and provides the certification.
I had also read good things about Tekton torque wrenches. I found several reviews comparing them favorably against Snap-On wrenches. Interesting that CDI does a lot of torque wrench design and calibration. I didn't know that.
I would have bought and tried a Tekton if any place local to me sold them.
Originally Posted by Brucelee28
In for awesome build!
Thanks Bruce! Another installment with pictures is pending when I can get some free time in the next day to finish and post it.
 04-08-17, 07:52 PM