2jzGTE SCs - The Siblings of my Supra MKIV Toys
 03-25-17, 09:33 AM
#3976

I always loved the 95-96 front bumper with the lip . It is actually my favorite stock SC bumper. You are able to remove the front grille to show off the inter-cooler.
Just finished wiring my rotary switches that has 6 levels to control the seat heaters. I have decided to use the Snow switch to have a master switch for the heaters that when it is off .. you are assured that both seat warmers are off.
Last edited by gerrb; 06-29-17 at 06:30 PM.

The following users liked this post:
myLEXsc400 (03-28-17)
03-25-17, 09:46 AM
#3978
We definitely do during winter. Our winters are cold but no snow so you need heaters. You should be a trooper if you don't run your car heater during winter in GA , lmaol . There maybe no snow but you can freeze to death on certain days  . For me, it is one of the states with the best weather IMHO. No nasty freezing / snowy weather of the NorthEast / Upper Midwest, Not really a tornado alley like the Lower Midwest , Not a storm alley like the states along the Gulf and Atlantic, no nasty rainy days of the West Coast and no very hot summers like TX, AZ , NM . Just the perfect weather which maybe debatable .
. For me, it is one of the states with the best weather IMHO. No nasty freezing / snowy weather of the NorthEast / Upper Midwest, Not really a tornado alley like the Lower Midwest , Not a storm alley like the states along the Gulf and Atlantic, no nasty rainy days of the West Coast and no very hot summers like TX, AZ , NM . Just the perfect weather which maybe debatable .
03-27-17, 05:54 AM
#3979
Snapped pictures of the interiors of the 4 SCs that needs painting and whose pictures I posted in a post / page prior to this . There are still small things that I still need to install since I am doing some stuff on them. But over all I am already happy with their interiors . Having a black interior on an SC was always the fad but in my opinion having a really nice clean tan interior is equally stunning depending on the condition of the tan interior and color of the car.
Am currently converting the 3rd 97 5 speed Green Pearl from Tan to Black which eventually the car itself needs to be painted and the 2nd 97 5 speed Black Mamba already has a good full Black Interior and that car doesn't need a paint job. Its black paint is still in very good condition.
Old Man Tan has tan interior .. One of my best tan interior since it came from a 38k miles SC I parted out. It looks and smells like new . In fact a guy who is restoring a GMC truck wanted to pay me $1200 for the two front seats and I refused to sell them due to the fact that I was afraid I won't be able to find original seats in such a great condition.
Red Mamba Two has a black interior :
Red Mamba One has a tan interior :
Black Pearl has the black interior with the Infinity Performance Line front seats .
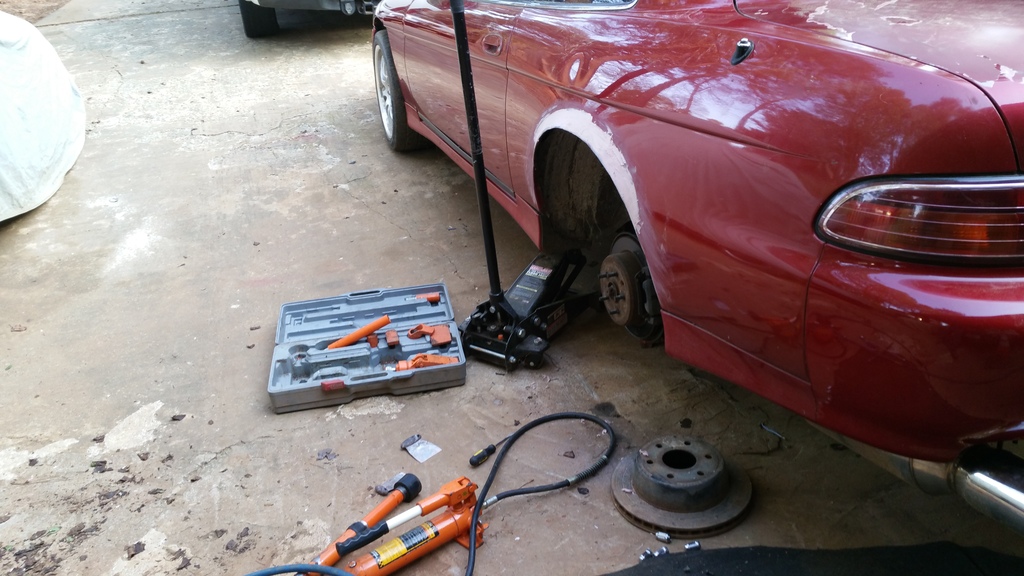
We just took out the VVTi / 6 speed drive train since I am ready to send the 2jzGTE VVTi engine to get a 3.4 liter stroker setup with billet mains plus all the other goodies on it and get the vvti head fully built with all ferrea valve train , shimless buckets and GSC VVTi 272 cams. Am ready to start my 1500rwhp quest for Black Pearl .To keep the car running and my wife doesn't brand it as a junk car , we installed the original 5 speed drive train back temporarily. My wife hates to see non running cars . They are junk cars according to her . Well at least I will continually be able to use it while waiting for my built drive train be done.
Am currently converting the 3rd 97 5 speed Green Pearl from Tan to Black which eventually the car itself needs to be painted and the 2nd 97 5 speed Black Mamba already has a good full Black Interior and that car doesn't need a paint job. Its black paint is still in very good condition.
Old Man Tan has tan interior .. One of my best tan interior since it came from a 38k miles SC I parted out. It looks and smells like new
. In fact a guy who is restoring a GMC truck wanted to pay me $1200 for the two front seats and I refused to sell them due to the fact that I was afraid I won't be able to find original seats in such a great condition.Red Mamba Two has a black interior :
Red Mamba One has a tan interior :
Black Pearl has the black interior with the Infinity Performance Line front seats .
We just took out the VVTi / 6 speed drive train since I am ready to send the 2jzGTE VVTi engine to get a 3.4 liter stroker setup with billet mains plus all the other goodies on it and get the vvti head fully built with all ferrea valve train , shimless buckets and GSC VVTi 272 cams. Am ready to start my 1500rwhp quest for Black Pearl
.To keep the car running and my wife doesn't brand it as a junk car , we installed the original 5 speed drive train back temporarily. My wife hates to see non running cars . They are junk cars according to her . Well at least I will continually be able to use it while waiting for my built drive train be done.
Last edited by gerrb; 06-29-17 at 06:50 PM.
The following users liked this post:
Ezroni (03-28-17)
03-28-17, 04:11 AM
#3980
The new seats look great in Black Pearl! Beautiful and clean and they don't really look like they couldn't have been a later factory option for the SC's. Other than the "IPL" logo. The other SC interiors are looking really good! Depending on how perfect you want to make them from here I'd call most of them good to go!
The seat switches look cleanly installed in the factory location but those switch bezel edges do stand out just a bit. Not enough to make me all that bothered though. It has, however, gotten me thinking...
I have felt for the longest time that the cupholder area -- at least in a manual SC -- is nearly useless and ripe for a CAD designed replacement that has a similar upper "lid" but which is actually fixed to the rest of the assembly. This would be a great area for recessed switches or a blank for cutting and mounting them. But the more I think about it... did you have to retain that entire control panel in order to make the seats work at all? Meaning... is the circuitry in there so intricate that it is just easier to leave it as it is and not attempt to replicate all the functions with a set of custom switches or relocating the ***** and center switch to different locations on a custom panel? My guess is that this was the case.
I had similar concerns when attempting to re-wire the factory SC seat heater switches for other functions. They just didn't function in a simple way because when I tested them with a multimeter the two switches seemed to be tied together in series or they shared the same circuit. I gave up on repurposing them. If I were to have tried to re-create them (hypothetically and applicable to your IPL seat switches) I'd have needed to go straight to a factory electrical schematic.
You know I like to think through all possibilities
Although... now that I'm seeing these IPL seats in your car it's making me think about possibly finding the appropriate connector for my seat heat switches (I have the Auto version but they snap into the 5-speed bezel just the same) and pre-wire that system. When I had my MKIV seats reupholstered I declined to have aftermarket heater pads pre-installed because... Florida and southern California. You're giving me ideas of my own now!
Last edited by KahnBB6; 03-28-17 at 04:20 AM.
03-28-17, 03:18 PM
#3981
^^^ One day I will see what I can do to make those seat heater rotary switches look better in that area. I know that cup holder is useless on a manual trans due to the shifting motion . You are right , could be used for a place holder of switches.
Right now I use the arm rest box of the Black Pearl to hide my power adder switches for my direct port nitrous & purge solenoids, inter-cooler spray solenoid and weldon pump kill mode switches / push buttons. This Black Pearl will be lethal in every way ! I hope to transform it to be the cream of the crop .
If you haven't noticed , there are no gauge pods with gauges on the pillars of the Black Pearl just like my other cars. It is because there will be none. I want it more sleeper than my other cars. I will just use a Motec Dash Display on the stock gauge cluster area since this car will have a Motec ECU to control the 3.4l stroker motor and all the power adder systems.
Btw, the stock / oem heater switches work separately in two different circuits. They just share a common relay and fuse. So from the fuse to the two switches then they part ways... one goes to the driver side junction to the driver seat and the other goes to the passenger foot well junction to the passenger seat. I think it is somewhere on page 13 of the wiring diagrams I sent you in which you will see the seat heater diagrams. Did your car originally came with seat warmers ? If not you will need to install the Ignition / Seat Heater Relay since it will be empty and add a wire on pin 10 of one of the orange connectors and then go to the shifter area. Easy to re use those circuits .
Right now I use the arm rest box of the Black Pearl to hide my power adder switches for my direct port nitrous & purge solenoids, inter-cooler spray solenoid and weldon pump kill mode switches / push buttons. This Black Pearl will be lethal in every way
! I hope to transform it to be the cream of the crop .If you haven't noticed , there are no gauge pods with gauges on the pillars of the Black Pearl just like my other cars. It is because there will be none. I want it more sleeper than my other cars. I will just use a Motec Dash Display on the stock gauge cluster area since this car will have a Motec ECU to control the 3.4l stroker motor and all the power adder systems.
Btw, the stock / oem heater switches work separately in two different circuits. They just share a common relay and fuse. So from the fuse to the two switches then they part ways... one goes to the driver side junction to the driver seat and the other goes to the passenger foot well junction to the passenger seat. I think it is somewhere on page 13 of the wiring diagrams I sent you in which you will see the seat heater diagrams. Did your car originally came with seat warmers ? If not you will need to install the Ignition / Seat Heater Relay since it will be empty and add a wire on pin 10 of one of the orange connectors and then go to the shifter area. Easy to re use those circuits .
Last edited by gerrb; 06-29-17 at 06:52 PM.
04-04-17, 12:39 PM
#3982
Cosmetic Work for my cars had started . The fun part began . Learning by doing ....I started working on the Red Mamba Two.
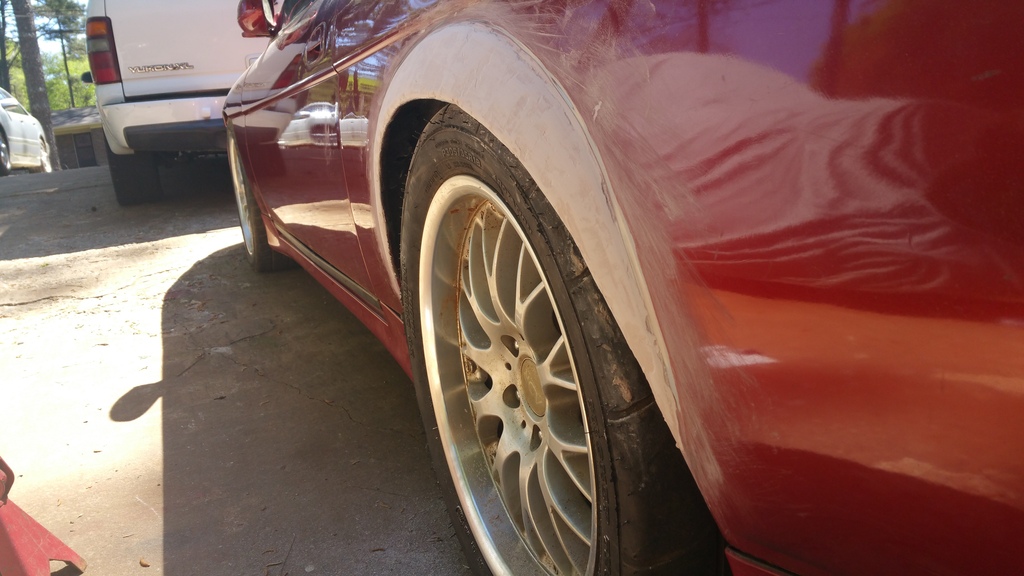
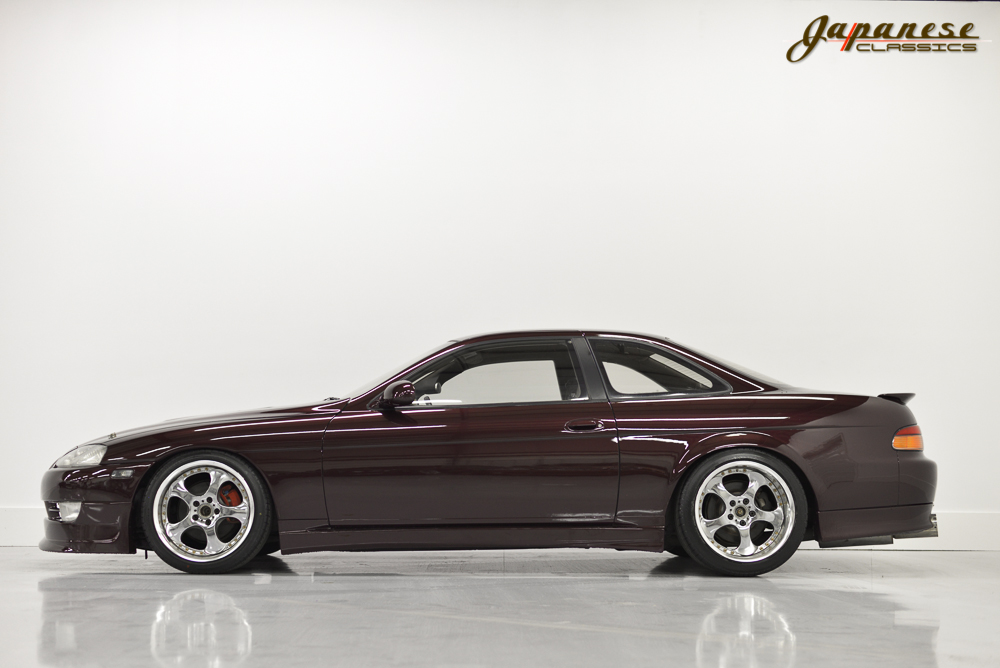
I didn't like the way the quarter panel was pulled. From a far , just like the many SCs you see , you notice a one inch lip pushed out to accommodate wider wheels and bigger tires.
just like you see on this picture... ..
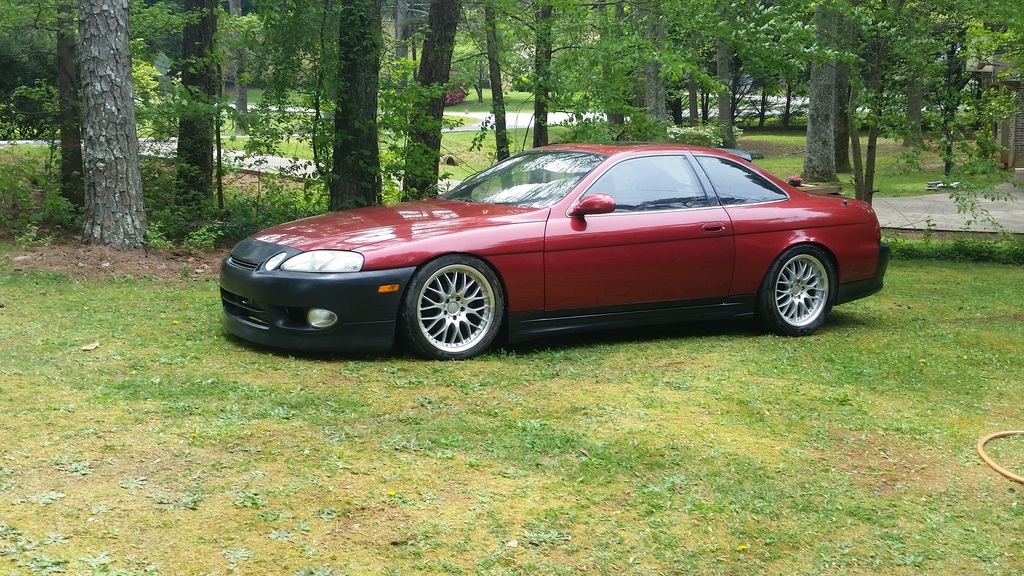
BTW , I am going to install a set of coil overs for this car so whoever is interested in lowering their cars using lowering springs and shocks (Tokico Shocks and RS-R Springs) from this car , let me know. The picture above shows the stance of the car with those lowering springs and shocks installed. They just ride a lot better than coil-overs which usually are more stiff. I need adjustable ride height due to the size / width of my tires and application that is why they have to go and some coil-overs be installed..
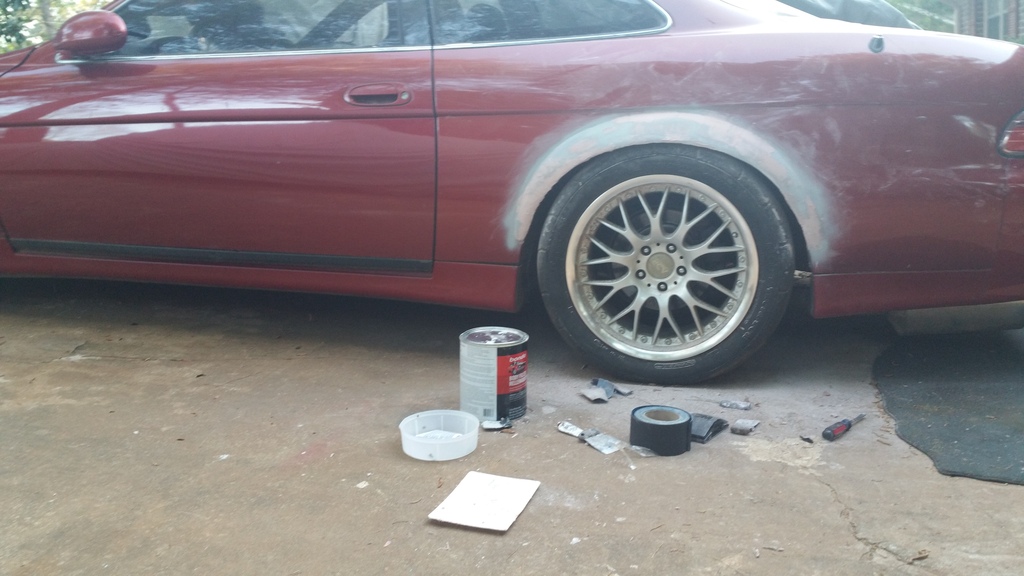
So I started pulling / pushing the sh?t out of the quarter panel using my portable pneumatic puller. You will have to push that wheel well liner (ceiling) for you to be able to flare the quarter panel beyond a width / height of one inch which we usually see in many cars.
I have a 305/35R18 tire right now ...
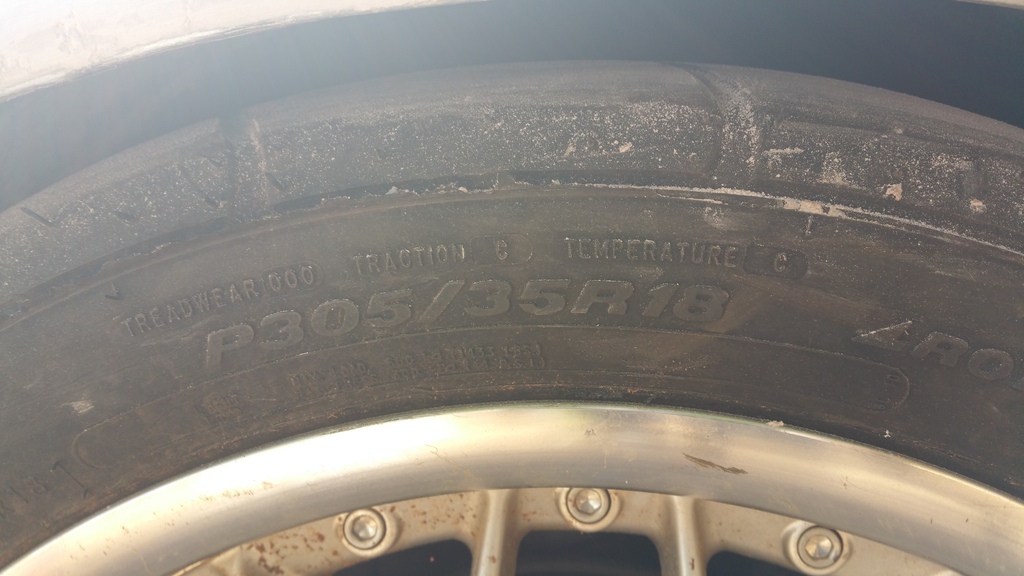
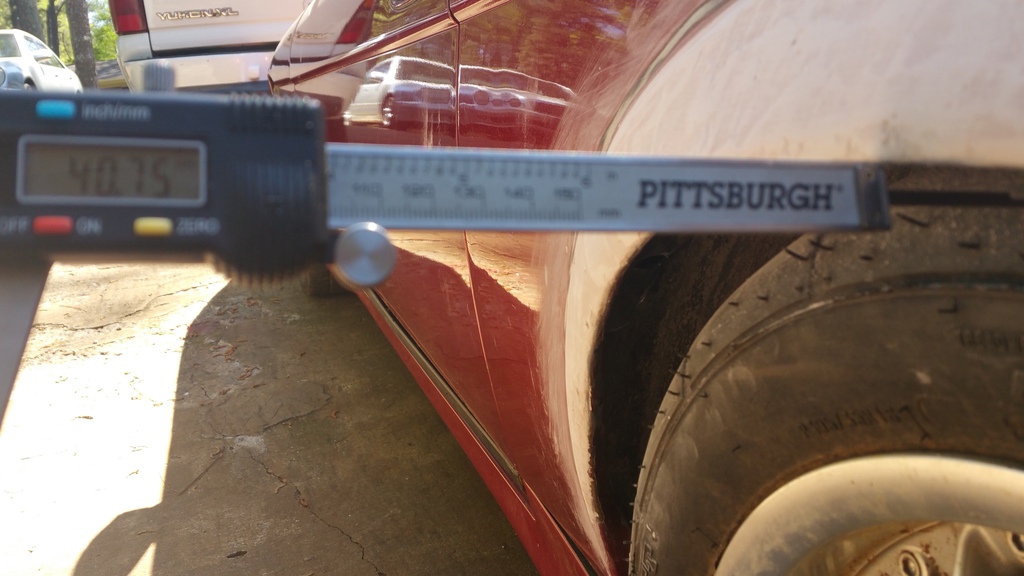
With all the pulling / pushing , I was able to clear another 40mm which means I would now be able to install an 18x12 +25 with a 345/35R18 MT ET Street II Drag Radials or BFGoodrich Street Tires .
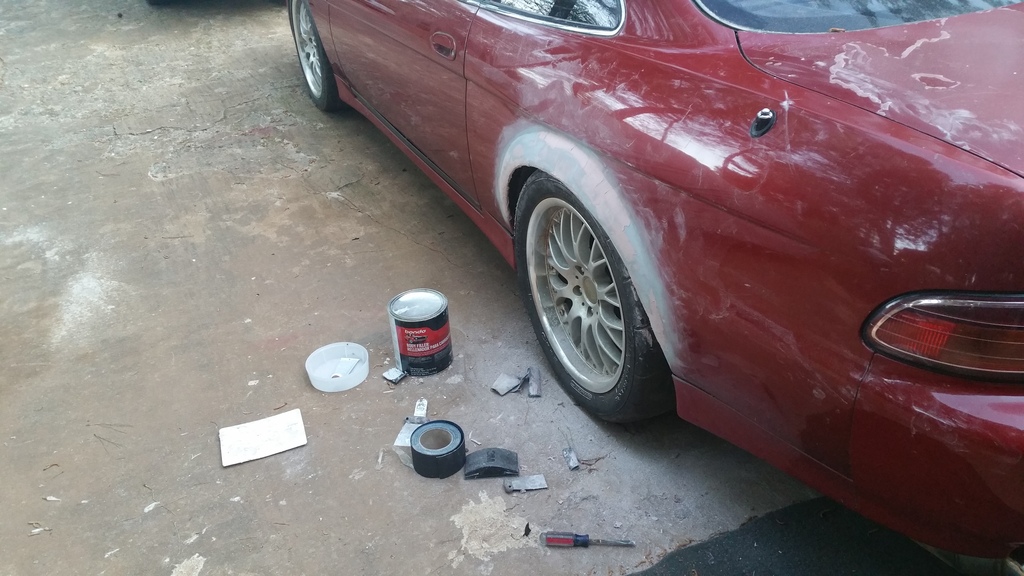
I also am trying to make the pulled quarter panel look like an over fender and look like a stock / oem bulge
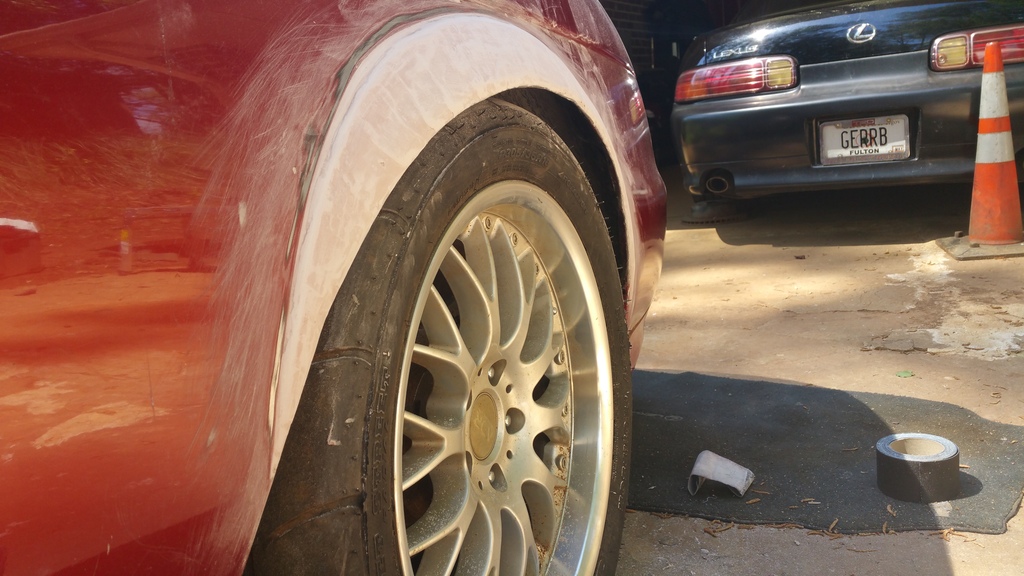
It will still need a lot of work..... .... hammering , body filler and sanding to make it look symmetrical but you get what I am trying to get into
  .....
.....
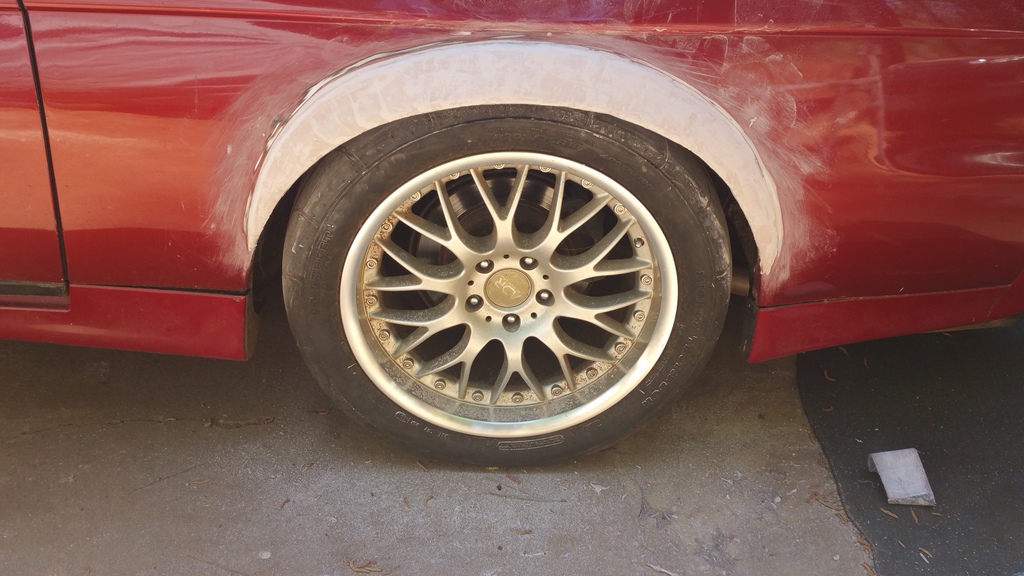
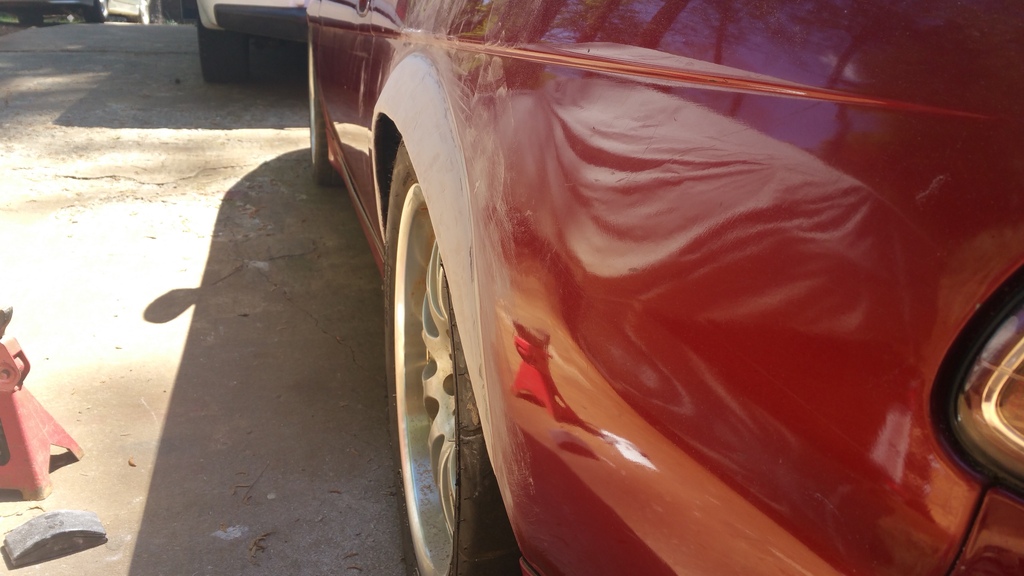
Got the idea from some pictures posted by one of our mods (Jadu) ... Thanks Buddy ! That gave me an idea on what to do on this car .

I really don't see any reason now why I couldn't install deep dish wheels size 18x12" +25 offset & 345/35R18 tires . . This is basically the 50mm width you get out of the wide body kit.
I didn't like the way the quarter panel was pulled. From a far , just like the many SCs you see , you notice a one inch lip pushed out to accommodate wider wheels and bigger tires.
just like you see on this picture... ..

BTW , I am going to install a set of coil overs for this car so whoever is interested in lowering their cars using lowering springs and shocks (Tokico Shocks and RS-R Springs) from this car , let me know. The picture above shows the stance of the car with those lowering springs and shocks installed. They just ride a lot better than coil-overs which usually are more stiff. I need adjustable ride height due to the size / width of my tires and application that is why they have to go and some coil-overs be installed..
So I started pulling / pushing the sh?t out of the quarter panel using my portable pneumatic puller. You will have to push that wheel well liner (ceiling) for you to be able to flare the quarter panel beyond a width / height of one inch which we usually see in many cars.

I have a 305/35R18 tire right now ...

With all the pulling / pushing , I was able to clear another 40mm which means I would now be able to install an 18x12 +25 with a 345/35R18 MT ET Street II Drag Radials or BFGoodrich Street Tires .

I also am trying to make the pulled quarter panel look like an over fender and look like a stock / oem bulge


It will still need a lot of work.....
.... hammering , body filler and sanding to make it look symmetrical but you get what I am trying to get into .....

Got the idea from some pictures posted by one of our mods (Jadu) ... Thanks Buddy ! That gave me an idea on what to do on this car .


I really don't see any reason now why I couldn't install deep dish wheels size 18x12" +25 offset & 345/35R18 tires .
. This is basically the 50mm width you get out of the wide body kit.
Last edited by gerrb; 04-04-17 at 07:14 PM.
04-04-17, 05:06 PM
#3983
When it comes to cosmetics work ... like body work and painting , you become your worst critic . You will be looking for the slightest imperferction. I can't seem to get satisfied even if I have spent almost the whole day on these quarter panels. I have pushed / pulled the passenger side but I haven't even started smoothening it up with body filler cause the driver side still needs a lot of sanding . I prefer to use block sander on this one rather than the DA sander since I am trying to get the right symmetrical shape for the over fender.
. I prefer to use block sander on this one rather than the DA sander since I am trying to get the right symmetrical shape for the over fender.

Last edited by gerrb; 04-04-17 at 06:22 PM.
04-04-17, 07:42 PM
#3984
Nice job gerrb. Some more work, more sanding and finishing and it should look really good. I agree, I do not see a point to those widebodies at all if you can just do this.
I do love the look of the Vertex Ridge but all the other stuff out on the market just doesn't do the car justice, makes it look like a bloated cow.
I do love the look of the Vertex Ridge but all the other stuff out on the market just doesn't do the car justice, makes it look like a bloated cow.
04-04-17, 08:04 PM
#3985
gerrb, thought I'd post this for you:
http://www.hotrod.com/articles/1107p...fender-flares/
Look through all the pics of how they are doing the all metal widebody. I've seen my dad do it this way at his work over the years. If you don't have the equipment to do an all metal work, you can still use the basics to get the shape of the flares just perfect. That way you're not dicking around with layering bondo many times and sanding over and over to try and get the perfect arc. If you have a metal base as an arc, it's going to be perfect, just fill the rest of it with whatever medium you have (expanding foam base, sanded, than fiberglass even if you don't have sheet metal).
On the brown car, it looks like very clean work overall, but on the close up shot you can see the edge of the flares has some wave to it, which tells me it was done probably the way you are going about it.
04-04-17, 09:19 PM
#3986
When it comes to cosmetics work ... like body work and painting , you become your worst critic . You will be looking for the slightest imperferction. I can't seem to get satisfied even if I have spent almost the whole day on these quarter panels. I have pushed / pulled the passenger side but I haven't even started smoothening it up with body filler cause the driver side still needs a lot of sanding . I prefer to use block sander on this one rather than the DA sander since I am trying to get the right symmetrical shape for the over fender.
. I prefer to use block sander on this one rather than the DA sander since I am trying to get the right symmetrical shape for the over fender.This is a really nice example of a pull

More pics:
http://ladyonwheels.com/tag/toyota-soarer/
04-05-17, 09:59 AM
#3987

I like the shape, it should come out nice just keep forming it and sanding it, it's still alot less filler than your average 240sx has
Maybe use something rounded to sand with instead of the flat block, like flip it upside down and use it backwards
Maybe use something rounded to sand with instead of the flat block, like flip it upside down and use it backwards
 04-06-17, 03:22 AM
#3989
^^^ One day I will see what I can do to make those seat heater rotary switches look better in that area. I know that cup holder is useless on a manual trans due to the shifting motion . You are right , could be used for a place holder of switches.
Right now I use the arm rest box of the Black Pearl to hide my power adder switches for my direct port nitrous & purge solenoids, inter-cooler spray solenoid and weldon pump kill mode switches / push buttons. This Black Pearl will be lethal in every way ! I hope to transform it to be the cream of the crop .
Right now I use the arm rest box of the Black Pearl to hide my power adder switches for my direct port nitrous & purge solenoids, inter-cooler spray solenoid and weldon pump kill mode switches / push buttons. This Black Pearl will be lethal in every way
! I hope to transform it to be the cream of the crop .Hiding everything underneath the armrest is cool. Very stealth
If you haven't noticed , there are no gauge pods with gauges on the pillars of the Black Pearl just like my other cars. It is because there will be none. I want it more sleeper than my other cars. I will just use a Motec Dash Display on the stock gauge cluster area since this car will have a Motec ECU to control the 3.4l stroker motor and all the power adder systems.
I'm planning something similar with my LXCC climate controller panel for with its digital gauge hookups. Looks like a late model factory part in the center console.
Btw, the stock / oem heater switches work separately in two different circuits. They just share a common relay and fuse. So from the fuse to the two switches then they part ways... one goes to the driver side junction to the driver seat and the other goes to the passenger foot well junction to the passenger seat. I think it is somewhere on page 13 of the wiring diagrams I sent you in which you will see the seat heater diagrams. Did your car originally came with seat warmers ? If not you will need to install the Ignition / Seat Heater Relay since it will be empty and add a wire on pin 10 of one of the orange connectors and then go to the shifter area. Easy to re use those circuits .
04-06-17, 07:40 AM
#3990
Nice job gerrb. Some more work, more sanding and finishing and it should look really good. I agree, I do not see a point to those widebodies at all if you can just do this.
I do love the look of the Vertex Ridge but all the other stuff out on the market just doesn't do the car justice, makes it look like a bloated cow.
I do love the look of the Vertex Ridge but all the other stuff out on the market just doesn't do the car justice, makes it look like a bloated cow.
.gerrb, thought I'd post this for you:
Look through all the pics of how they are doing the all metal widebody. I've seen my dad do it this way at his work over the years. If you don't have the equipment to do an all metal work, you can still use the basics to get the shape of the flares just perfect. That way you're not dicking around with layering bondo many times and sanding over and over to try and get the perfect arc. If you have a metal base as an arc, it's going to be perfect, just fill the rest of it with whatever medium you have (expanding foam base, sanded, than fiberglass even if you don't have sheet metal).
On the brown car, it looks like very clean work overall, but on the close up shot you can see the edge of the flares has some wave to it, which tells me it was done probably the way you are going about it.
With the way I am doing it , you will have to do a lot of work. Though it is the cheapest way
. I can't weld really well yet so it wasn't a feasible option for me. I didn't want to spend more by letting someone else do it. I just do hope I will end up with a good product which I am confident I will.Getting better sanding blocks will help. A kit like this will be very useful. https://www.amazon.com/Dura-Block-AF...dp/B003978QGQ/
This is a really nice example of a pull
More pics:
That work is amazing.
This is a really nice example of a pull
More pics:
That work is amazing.
.But I do believe based on all my measurements so far , the 345 tires on a 18x12" wheels would easily get in with the right offset . I was already able to pull 40mm on the outside and all I need is 30mm since the 10mm will go towards the inside .
Am glad you mentioned those DuraBlock set of sanding blocks from Amazon. I was about to grab them from Eastwood which were $20 more expensive . Thanks !
Thanks brother.
You know, it really is a minor thing. The more I see the seat heater control panel placement the more it grows on me
Hiding everything underneath the armrest is cool. Very stealth
I didn't notice that before in the pictures and I guess I assumed gauges would come later when I saw that SC in person. Now that you mention it I like this approach. For a normally used street car (albeit one with 1500whp) I like the stealth interior approach.
I'm planning something similar with my LXCC climate controller panel for with its digital gauge hookups. Looks like a late model factory part in the center console.
Thank you! I will look into this again later. Maybe... possibly... there will be a way to repurpose those seat heater switches. I wanted them to be simple IC water spray on/off and ETTC on/off but if that's not possible I may find some kind of momentary switch for the IC spray.
Last edited by gerrb; 04-06-17 at 10:20 AM.