Scrape bumpers. Anybody have a step-by-step?
 08-29-10, 02:20 AM
#1
Driver
Thread Starter

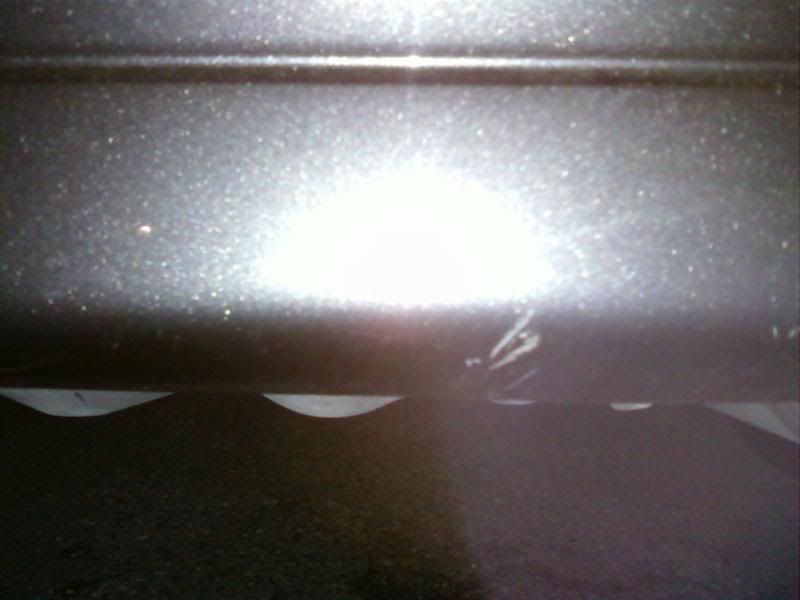
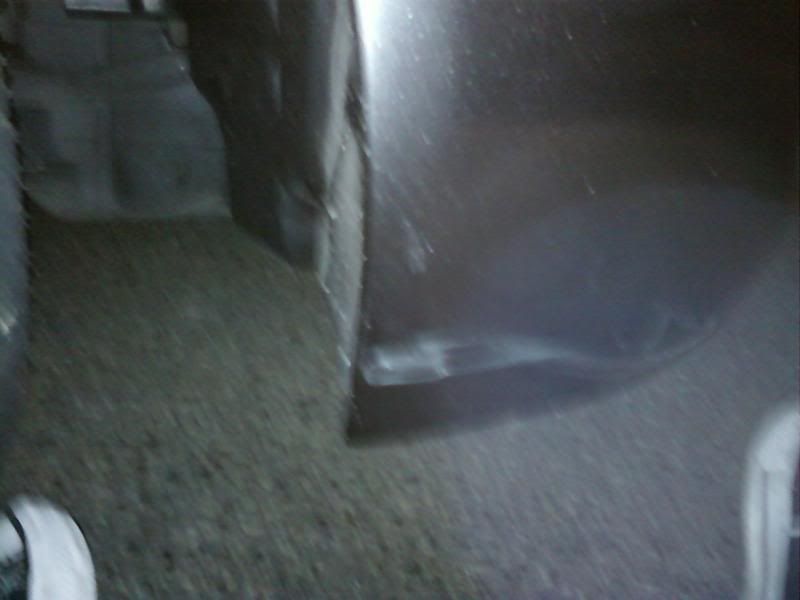
I apologize for the bad pics, but these were taken by my phone. The first picture was most likely from scraping against cement/concrete and I have no idea how the second one even happened. Both scrapes went through the paint and I think sanding is required. Problem is, I don't know how to do so. Also, should I get the regular touch-up paint or spray? Should I prime it?
Thanks in advance.

Last edited by GenEric587; 08-29-10 at 02:25 AM.
 09-01-10, 05:48 PM
#3
Lexus Test Driver
iTrader: (8)
Join Date: Oct 2008
Location: California
Posts: 817
Likes: 0
Received 0 Likes
on
0 Posts
Wetsand, wetsand, wetsand, wetsand, wetsand, primer, dry, paint, dry, paint, dry, paint, dry, clearcoat, dry, dry, dry, clearcoat, dry dry dry, clearcoat, dry, dry, dry, wait one week, buff.
09-02-10, 11:22 AM
#5

i dont think wet sanding is necessary if you're going to primer/paint/clear anyways... wet sand after? Yes but before? not really needed. just make sure the primer can stick to the bumper correctly.. remove any wax/sealant that is on the bumper/the area to reduce fisheyes or watever.
also going that route means youll need to know how to blend the paint correctly. Removing the bumper would be best to avoid any over spray even after masking the surrounding areas.
Did it go through and scrape the actual bumper??
also cheaper alternative is to just buff as much of the scruffs as u can ie
2000 wetsand / buff / polish / seal / wax.... youll still have the deep scratches but the smaller ones will be gone.
09-02-10, 12:06 PM
#6
Driver
Thread Starter
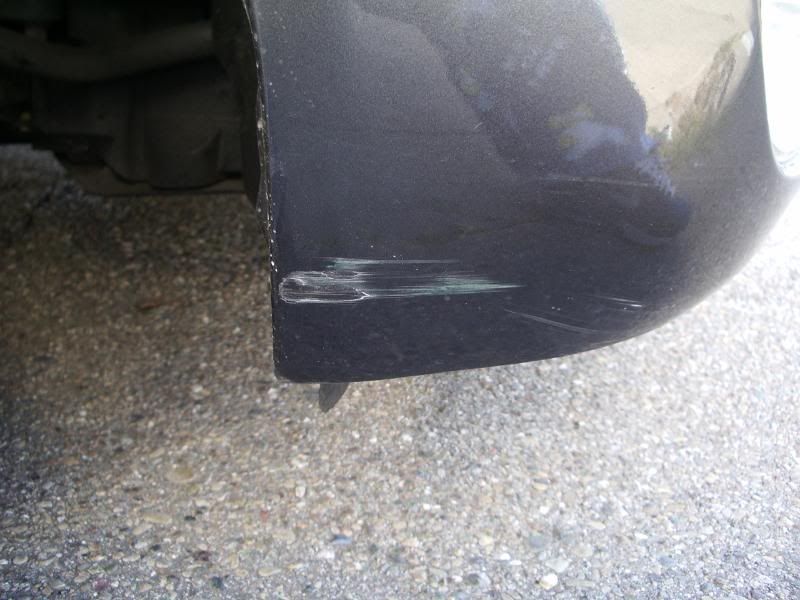
Yes, I think I scraped the actual bumper. Especially in the 2nd picture where I couldn't really buff that out.
If I did the sand/buff thing, wouldn't the finish be gone if the polish/wax wear off?
If I did the sand/buff thing, wouldn't the finish be gone if the polish/wax wear off?
09-02-10, 10:12 PM
#7
all you are doing is wetsanding the clear to a nice flat surface since the scruff messed it up and polishing out the haze wetsanding will leave behind (2000/3000 grit) leave behind. it wont be a complete "fix" but its the cheapest alternative to fixing the scruffed areas around the deeper marks.
is it possible to get better pics?? kinda hard to see how bad it is.
btw if you do decide to respray the bumper are you going to DIY? or send to a shop?
is it possible to get better pics?? kinda hard to see how bad it is.
btw if you do decide to respray the bumper are you going to DIY? or send to a shop?
Trending Topics
09-17-10, 07:44 PM
#9
Driver
Thread Starter
all you are doing is wetsanding the clear to a nice flat surface since the scruff messed it up and polishing out the haze wetsanding will leave behind (2000/3000 grit) leave behind. it wont be a complete "fix" but its the cheapest alternative to fixing the scruffed areas around the deeper marks.
is it possible to get better pics?? kinda hard to see how bad it is.
btw if you do decide to respray the bumper are you going to DIY? or send to a shop?
is it possible to get better pics?? kinda hard to see how bad it is.
btw if you do decide to respray the bumper are you going to DIY? or send to a shop?
 09-17-10, 09:38 PM
#10
Lexus Champion
If that was my car, the first thing I would do is take a rubbing compound (I use 3M) and see how much crap you can get off. Once that's done, see if the colour layer is damaged. If so, then hit it with base, wet sand, clear coat, wet sand, polish.
Providing the colour matches, you will be able to blend the repair perfectly.
Providing the colour matches, you will be able to blend the repair perfectly.
09-17-10, 09:49 PM
#11
Driver
Thread Starter
Talking about this?
http://www.amazon.com/3M-Rubbing-Com.../dp/B001AJ3660
And what grit should I use for that? And what is base? Sorry, I'm new to this whole restoration deal.
http://www.amazon.com/3M-Rubbing-Com.../dp/B001AJ3660
And what grit should I use for that? And what is base? Sorry, I'm new to this whole restoration deal.
09-17-10, 10:05 PM
#12
Lexus Champion
That's the stuff. I especially like it because it removes sanding marks perfectly.
Your steps are:
BTW, they sell the 3M rubbing compound at many Walmart stores.
One important tip, overlap the clearcoat more than the base coat, you want to make sure the clearcoat covers the colour coat completely. Also, clean the area with lacquer thinner before you paint, but not between coats, just use plain water and a lint free rag to dry.
Your steps are:
- 3M rubbing compound, remove as much of the scuff as you can
- Wet sand with 2000 grit, not too much just enough to make a good surface for the paint to adhere (clean the area after you sand, you'll see the paint has dulled).
- Base coat (this is the colour coat) hit the spot directly and a bit of the surrounding area. You don't have to be too precise, you can always sand and polish the overspray off. But do mask off the bumper etc. otherwise you will have more work getting rid of the overspray.
- Wet sand. Again just enough to make the surface ready for the clearcoat. Then hit it with clear, don't go crazy with the amount, a couple of normal coats are fine.
After it's all dry (wait a day after the final coat) you then wet sand again, including the surrounding area, this will blend the paint into the original. Then go over the entire area with your 3M, then use a normal polish.
BTW, they sell the 3M rubbing compound at many Walmart stores.
One important tip, overlap the clearcoat more than the base coat, you want to make sure the clearcoat covers the colour coat completely. Also, clean the area with lacquer thinner before you paint, but not between coats, just use plain water and a lint free rag to dry.
Last edited by LeX2K; 09-17-10 at 10:09 PM.
09-18-10, 04:53 AM
#13
Driver
Thread Starter
So remove the scuff as much as I can with the compound, wet sand, paint, sand again (how long should I wait for the paint to dry before sanding a second time?? Should I give it a good 24 hours or would something like 2 hours be fine?), rubbing compound again, and then polish?
09-18-10, 05:02 AM
#14
Lexus Champion
Two coats of the base colour, follow instructions on can. Wait 24 hours, then two coats of clear.
Wait 24 hours after you put on the clear coat, then wet sand, rubbing compound, polish. Don't wax right away, wait a few days at least to let the paint cure.
Wait 24 hours after you put on the clear coat, then wet sand, rubbing compound, polish. Don't wax right away, wait a few days at least to let the paint cure.