Dr. Colorchip DIY/Review (PICS)
 07-01-09, 06:10 AM
#31
Intermediate
Thread Starter
iTrader: (2)

Join Date: Jul 2008
Location: NJ
Posts: 309
Likes: 0
Received 0 Likes
on
0 Posts
hmm just talkin to some of the IS guys that used it...apparently the color match isnt so great with the dark pearl paints...especially the graphite gray pearl. can anyone else chime in on this?
 07-06-09, 01:03 PM
#32
Lexus Champion
I sent an e-mail to them and they did call me this morning. He suggested that I pour some of the paint into a paper cup and stir it until it thickened and apply it. He said I could remove the paint on the surrounding area (I was afraid to leave it too long) and let the chip area dry for up to 3-4 hours.
He said they mix the paint and test it for color against my paint before sending it. He also said it would look better in the sunlight but also said not to expect a perfect repair that would not show at all. But he said the color should match. I took before photos but no after photos yet because they would look terrible.
He said they would lighten the paint if I find the paint is too dark. He said to look at the paint color after the smear and it should be the same color as the car.
I'll try all this and see how it turns out.
07-07-09, 01:13 PM
#33
... The glove tends to stick to the car and you can't smoothy drag to or over the chip area. Consequently it tended to always drag some of the paint out of the chip area. I tried various techniques, even using a cloth on tiny areas (Road Rash) and that didn't work either. What paint that was left in the chip came out way to dark and you could see the chips from 4 feet away. Tried leaving the paint on for different times before removing. Nothing really worked.
What youc an try also, I had wood modelling sticks, basically wooden stips with flat tips, and you can apply the paint with that, so that you're basically applying and putting pressure at same time, sort of like spackling the paint on. This way, you can skip the pressing with glove part. I'm done, pretty satisfied with the "far away" look of it, but if you look really up close, then of course you can see the imperfections still. Hey, atleast it's black imperfections and not white on black imperfections.
Good luck trying again. Also, for anyone interested in the product, get the smaller package. It says what, dozen chips for the small, while over 2 dozen for the mid-range one... the touch up paint you can cover easily 100 small chips, while the pink solution, if you use it right, can clean up those 100 easily. Save your money if you've only got a few chips.
07-08-09, 06:42 AM
#34
Intermediate
Thread Starter
iTrader: (2)
Join Date: Jul 2008
Location: NJ
Posts: 309
Likes: 0
Received 0 Likes
on
0 Posts
I just tried the Dr. ColorChip kit yesterday on my 04 LS430 which is Mercury Metallic (silver). I started on some (5 or6) small chipped areas on the front of the car. None were bigger than 1/8 ". I really couldn't get the smear to work like they showed. The glove tends to stick to the car and you can't smoothy drag to or over the chip area. Consequently it tended to always drag some of the paint out of the chip area. I tried various techniques, even using a cloth on tiny areas (Road Rash) and that didn't work either. What paint that was left in the chip came out way to dark and you could see the chips from 4 feet away. Tried leaving the paint on for different times before removing. Nothing really worked.
I sent an e-mail to them and they did call me this morning. He suggested that I pour some of the paint into a paper cup and stir it until it thickened and apply it. He said I could remove the paint on the surrounding area (I was afraid to leave it too long) and let the chip area dry for up to 3-4 hours.
He said they mix the paint and test it for color against my paint before sending it. He also said it would look better in the sunlight but also said not to expect a perfect repair that would not show at all. But he said the color should match. I took before photos but no after photos yet because they would look terrible.
He said they would lighten the paint if I find the paint is too dark. He said to look at the paint color after the smear and it should be the same color as the car.
I'll try all this and see how it turns out.
07-09-09, 03:04 PM
#35
Lexus Champion
I thickened the paint by working on a piece of tinfoil and then applied. Still couldn't get the smearing to work so I used the brush to fill the hole and let dry for an hour.
Still was very visable in the shade, a somewhat darker color. But in the bright sunlight the color matched up and the chip nearly disappeared. I think I'll apply one more time to see if I can fully fill the chip, as I can still feel it with my finger.
Photos in the sun off the metallic silver didn't come out very good from the glare. Just that the chips weren't visible.
This stuff is definitely much better than bare chips or trying to use the factory repair paint.
07-30-09, 08:48 AM
#36
Lead Lap
iTrader: (1)
Join Date: Nov 2006
Location: JP (oki to be precise :D)
Posts: 4,918
Likes: 0
Received 2 Likes
on
2 Posts
i'm thinking about doing this dr. chip stuff on my flint mica 05 ls and have a quick question for you guys. i have already applied a slight gloopy amount of touch up paint (factory) on a few little chips here and there, how can i re-engineer these?? i guess the dr. chip stuff will only work on new chips that haven't already been attempted by factory touch up paint?? thanks,
 07-31-09, 05:54 AM
#38
Intermediate
Thread Starter
iTrader: (2)
Join Date: Jul 2008
Location: NJ
Posts: 309
Likes: 0
Received 0 Likes
on
0 Posts
i'm thinking about doing this dr. chip stuff on my flint mica 05 ls and have a quick question for you guys. i have already applied a slight gloopy amount of touch up paint (factory) on a few little chips here and there, how can i re-engineer these?? i guess the dr. chip stuff will only work on new chips that haven't already been attempted by factory touch up paint?? thanks,
12-20-09, 12:54 PM
#40
Driver School Candidate
Join Date: Dec 2009
Location: NY
Posts: 6
Likes: 0
Received 0 Likes
on
0 Posts
I'm giving some new life to these old threads, but figured others would benefit from seeing my results. What I took pictures of was the worst section of my 2003 GX 470 - Ash Blue Mica (1E8). Other, smaller chips virtually disappeared.
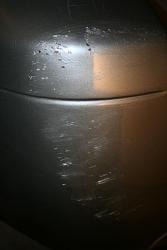
This is what the damage looked like. I bought the truck with this damage, so I don't know how it happened, but looks like they backed into a rough textured surface:
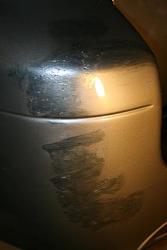
This is what it looks like with the paint "smeared" into the chips.
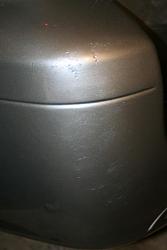
This is after two applications of the paint and buffed out (but no wax). Let me point out a few things. Notice that the "spiderweb" cracking on the top of the bumper disappeared. Also, all of the black (deep digs) and white (scratches) are gone and everything it color blended. I did not bother to sand anything, but may go back and do it again after I saw how good the results were with no sanding. From a distance, you can't even see where the damage was.

Last edited by Lance99; 12-20-09 at 01:06 PM.
12-21-09, 07:36 AM
#42
Intermediate
Thread Starter
iTrader: (2)
Join Date: Jul 2008
Location: NJ
Posts: 309
Likes: 0
Received 0 Likes
on
0 Posts
http://www.drcolorchip.com/
3 different kits...i used the basic kit. more than enough for a few applications.
3 different kits...i used the basic kit. more than enough for a few applications.
12-21-09, 05:34 PM
#44
Driver School Candidate

I bought the kit right after I picked up my CPOed 07 LS460L. It's Black Sapphire Pearl and once I put it on, there was literally no telling where the chips or scratches were. The only problem is if the scratch isn't deep enough to hold the paint, it won't cover. If they can match the dark blue pearl, they ought to be able to match anything. Can't speak for the other colors obviously, but it sure worked for me.
